2010 JAGUAR XFR diagram
[x] Cancel search: diagramPage 1448 of 3039

DTC Description Possible Cause Action U0416-68
Invalid Data Received From
Vehicle Dynamics Control
Module - event information
Event information brake
information Check Engine control module for stored DTCs. Check
CAN Bus Circuit for fault U0422-68
Invalid Data Received From
Body Control Module - event
information
Event information invalid
Power mode information Check Central junction box for stored DTCs. Check CAN
Bus Circuit for fault U101B-87
Lost Communication With
GSM - Multiple Bus-missing
message
Missing message lost
communication with
Transmission Shift
Module (multiple Bus) Check Transmission Shift Module for stored DTCs.
Refer to Circuit diagrams and check CAN and LIN Bus
for Circuit fault U3000-49
Control Module - internal
electronic failure
Internal electronic failure Suspect the Transmission control module. Install a
new Transmission control module as required, refer to
the new module/component installation note at the top of the DTC Index U3000-4B
Control Module - Circuit
resistance above threshold
Internal electronic failure Check and correct oil level. Check hydraulic flow
through oil cooler and pipe circuit for restriction or
blockage. If no restrictions found, suspect the
Transmission control module. Install a new
Transmission control module as required, refer to the
new module/component installation note at the top of
the DTC Index U3000-81
Control Module - invalid
serial data received
Vehicle or Engine type
signal incorrect from BCM
or incorrect Transmission
control module software
installed Reflash the Transmission control module using the
manufacturer approved process U3001-94
Control Module Improper
Shutdown - unexpected
operation
Control Module Improper
Shutdown (voltage
related) Check Engine control module For Power (generator)
faults. Check Power and Ground Circuit and Battery for
fault. Clear DTCs. Road Test. If DTC reoccurs suspect
the Transmission control module. Install a new
Transmission control module as required, refer to the
new module/component installation note at the top of
the DTC Index
Page 1529 of 3039

Published: 11-May-2011
Automatic Transmission/Transaxle External Controls - TDV6 3.0L Diesel /V8 5.0L Petrol/V8 S/C 5.0L Petrol - External Controls - System Operation and
Component Description
Description and Operation
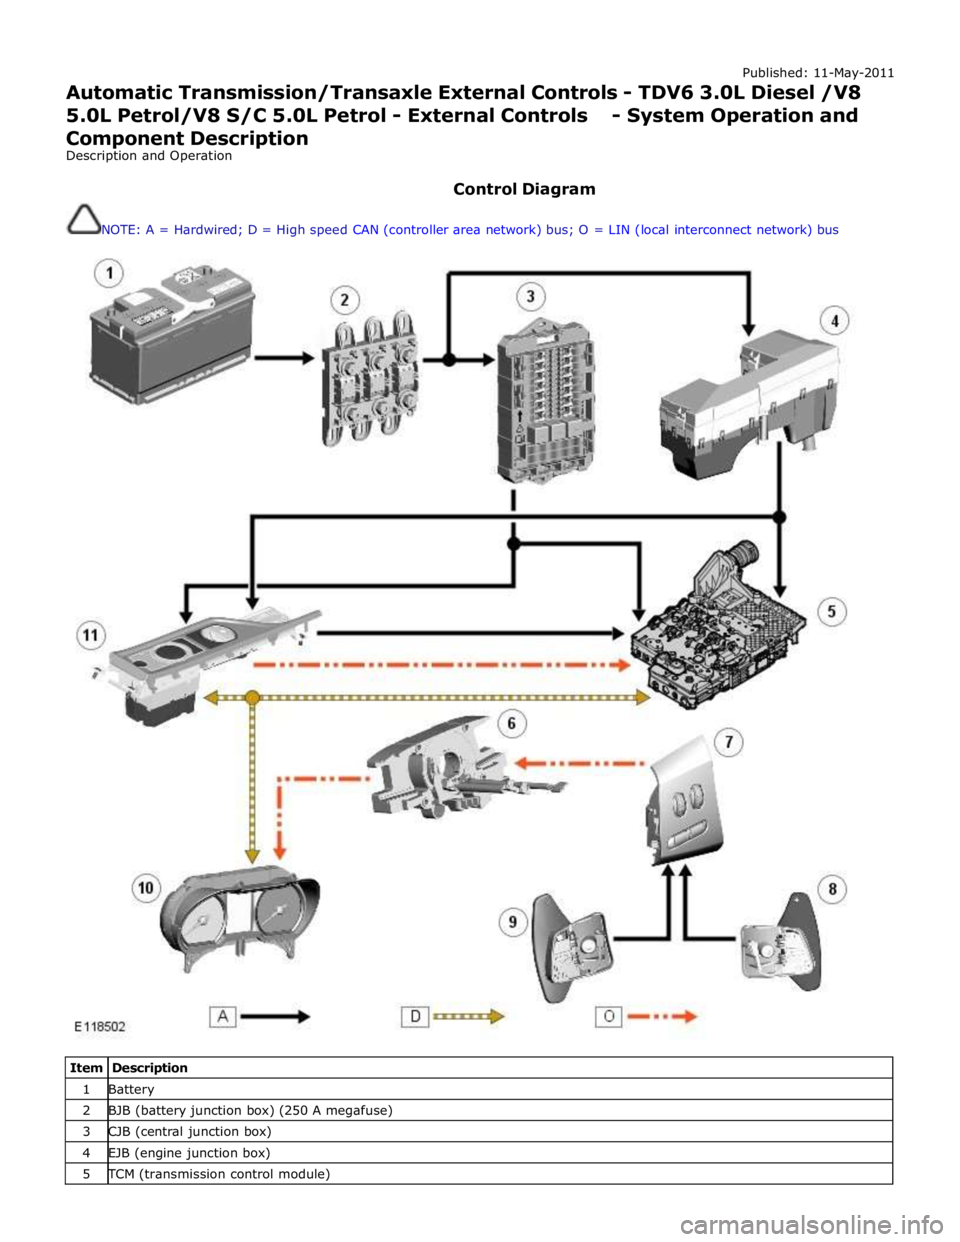
Control Diagram
NOTE: A = Hardwired; D = High speed CAN (controller area network) bus; O = LIN (local interconnect network) bus
Item Description 1 Battery 2 BJB (battery junction box) (250 A megafuse) 3 CJB (central junction box) 4 EJB (engine junction box) 5 TCM (transmission control module)
Page 1585 of 3039

Published: 11-May-2011
Fuel Tank and Lines - V8 5.0L Petrol/V8 S/C 5.0L Petrol - Fuel Tank and Lines - System Operation and Component Description
Description and Operation
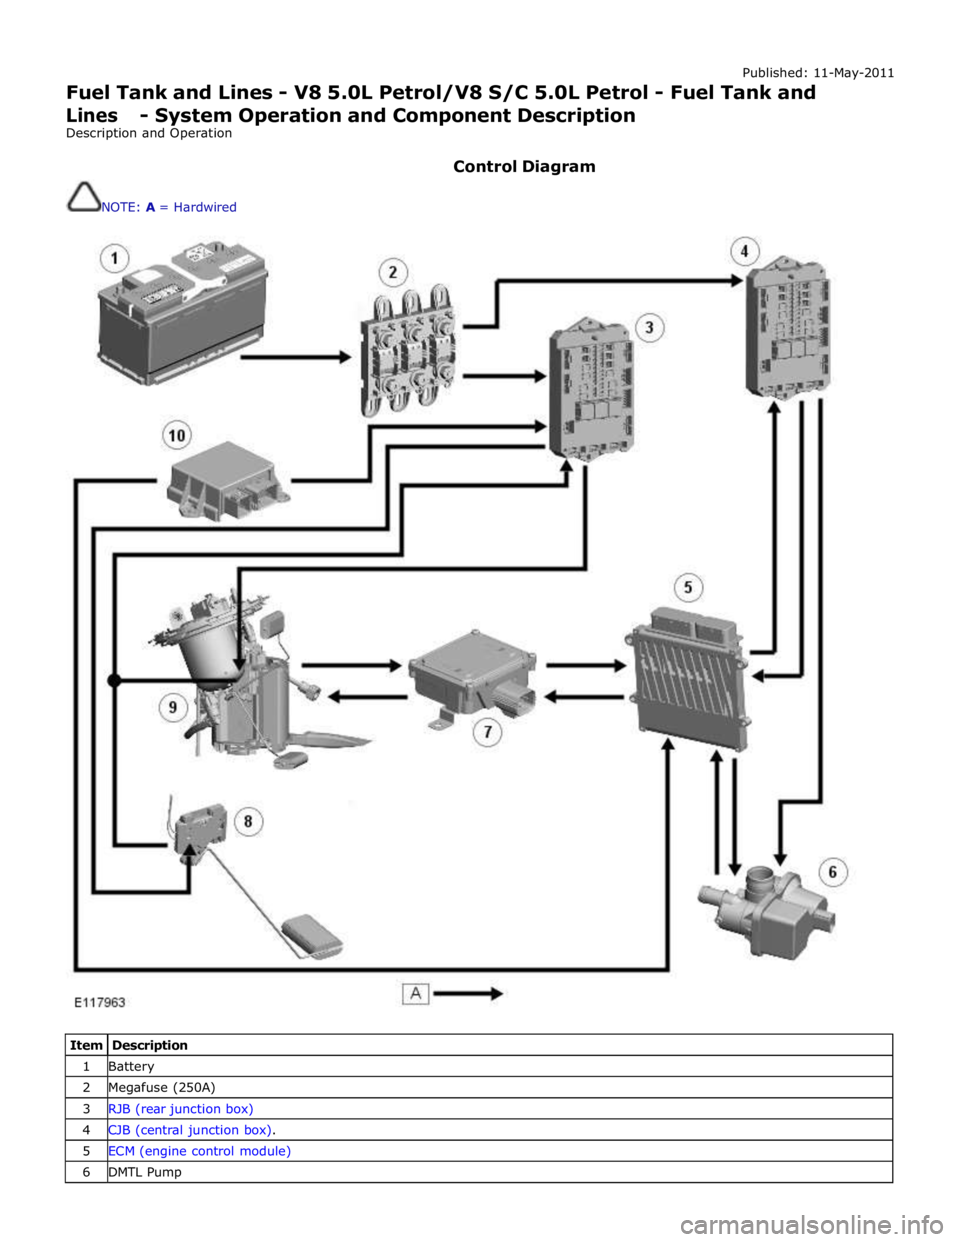
Control Diagram
NOTE: A = Hardwired
Item Description 1 Battery 2 Megafuse (250A) 3 RJB (rear junction box) 4 CJB (central junction box). 5 ECM (engine control module) 6 DMTL Pump
Page 1586 of 3039

8 LH (left-hand) fuel level sensor 9 RH (right-hand) fuel level sensor and fuel pump module 10 RCM (restraints control module)
OPERATION System Operation
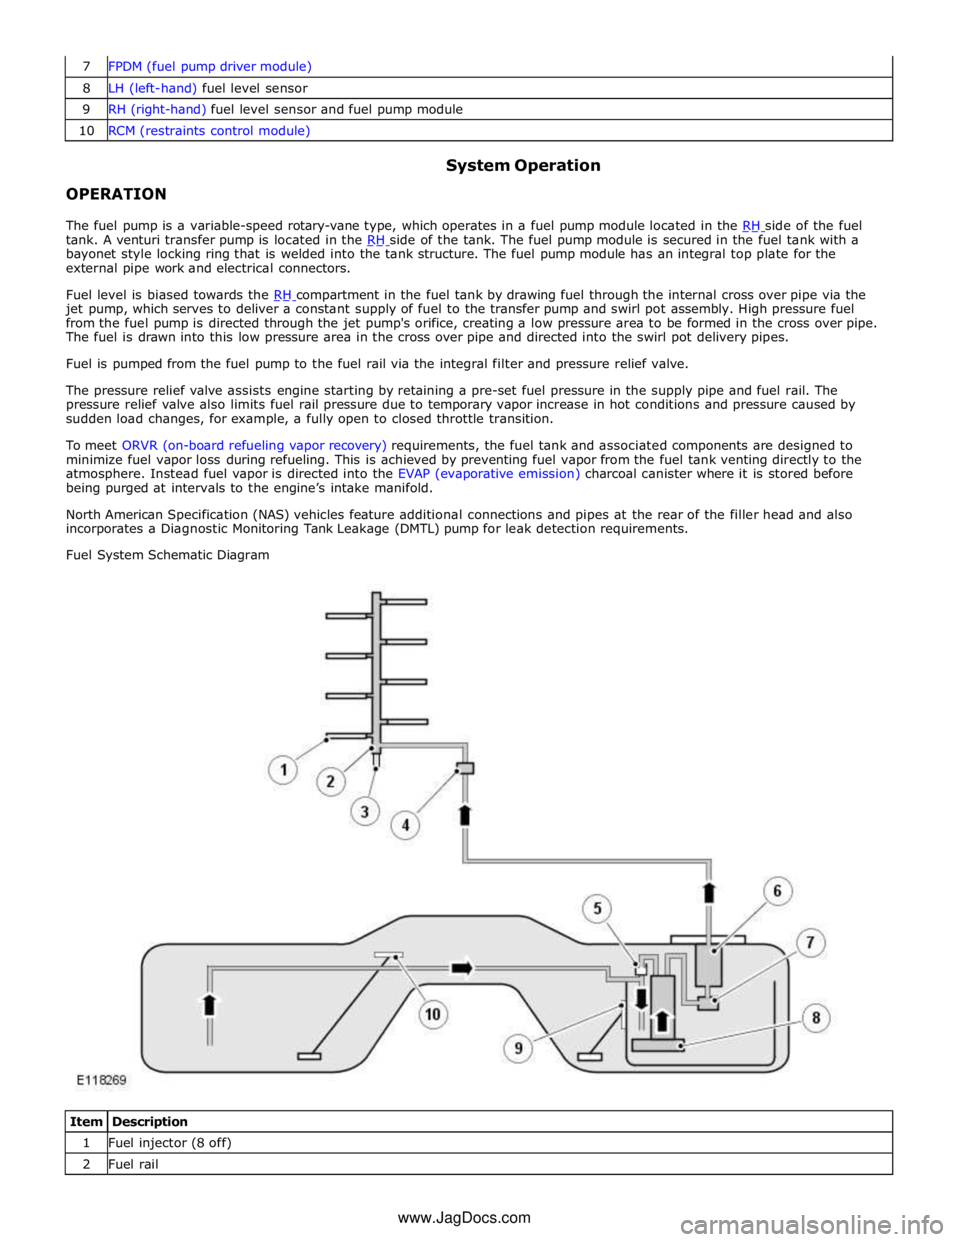
The fuel pump is a variable-speed rotary-vane type, which operates in a fuel pump module located in the RH side of the fuel tank. A venturi transfer pump is located in the RH side of the tank. The fuel pump module is secured in the fuel tank with a bayonet style locking ring that is welded into the tank structure. The fuel pump module has an integral top plate for the
external pipe work and electrical connectors.
Fuel level is biased towards the RH compartment in the fuel tank by drawing fuel through the internal cross over pipe via the jet pump, which serves to deliver a constant supply of fuel to the transfer pump and swirl pot assembly. High pressure fuel
from the fuel pump is directed through the jet pump's orifice, creating a low pressure area to be formed in the cross over pipe.
The fuel is drawn into this low pressure area in the cross over pipe and directed into the swirl pot delivery pipes.
Fuel is pumped from the fuel pump to the fuel rail via the integral filter and pressure relief valve.
The pressure relief valve assists engine starting by retaining a pre-set fuel pressure in the supply pipe and fuel rail. The
pressure relief valve also limits fuel rail pressure due to temporary vapor increase in hot conditions and pressure caused by
sudden load changes, for example, a fully open to closed throttle transition.
To meet ORVR (on-board refueling vapor recovery) requirements, the fuel tank and associated components are designed to
minimize fuel vapor loss during refueling. This is achieved by preventing fuel vapor from the fuel tank venting directly to the
atmosphere. Instead fuel vapor is directed into the EVAP (evaporative emission) charcoal canister where it is stored before
being purged at intervals to the engine’s intake manifold.
North American Specification (NAS) vehicles feature additional connections and pipes at the rear of the filler head and also
incorporates a Diagnostic Monitoring Tank Leakage (DMTL) pump for leak detection requirements.
Fuel System Schematic Diagram
Item Description 1 Fuel injector (8 off) 2 Fuel rail www.JagDocs.com
Page 1631 of 3039

Acceleration Control - Acceleration Control
Diagnosis and Testing
Principles of Operation Published: 11-May-2011
For a detailed description of the acceleration controls, refer to the relevant Description and Operation sections in the workshop
manual. REFER to: Acceleration Control (310-02, Description and Operation).
Inspection and Verification
CAUTION: Diagnosis by substitution from a donor vehicle is NOT acceptable. Substitution of control modules does not
guarantee confirmation of a fault, and may also cause additional faults in the vehicle being tested and/or the donor vehicle.
1. Verify the customer concern.
2. Visually inspect for obvious signs of damage and system integrity.
Visual Inspection
Mechanical Electrical
Accelerator pedal
Throttle body
Fuses
Wiring harness
Electrical connector(s)
Sensor(s)
Engine control module (ECM)
3. If an obvious cause for an observed or reported concern is found, correct the cause (if possible) before proceeding to
the next step.
4. If the cause is not visually evident check for Diagnostic Trouble Codes (DTCs) and refer to the DTC Index.
DTC Index
CAUTION: When probing connectors to take measurements in the course of the pinpoint tests, use the adaptor kit, part
number 3548-1358-00.
NOTES:
If the module or a component is suspect and the vehicle remains under the Manufacturers warranty, refer to the Warranty
Policy and Procedure manual (section B1.2), or determine if any prior approval programme is in operation, prior to the
installation of a new module/component.
Generic scan tools may not read the codes listed, or may read only five digit codes. Match the five digits from the scan
tool to the first five digits of the seven digit code listed to identify the fault (the last two digits give additional information
read by the manufacturer-approved diagnostic system).
When performing electrical voltage or resistance tests, always use a digital multimeter (DMM) accurate to three decimal
places, and with an up-to-date calibration certificate. When testing resistance, always take the resistance of the DMM leads
into account.
Check and rectify basic faults before beginning diagnostic routines involving pinpoint tests.
If DTCs are recorded and, after performing the pinpoint tests, a fault is not present, an intermittent concern may be the
cause. Always check for loose connections and corroded terminals.
DTC Description Possible Cause Action P012100 Throttle/Pedal
Position Sensor A
Circuit
Range/Performance
TP sensor sensing
circuits TP 1 and TP
2 - short to power,
high resistance
TP sensor failure Carry out any pinpoint tests associated with this DTC using the
manufacturer approved diagnostic system. Refer to the electrical
circuit diagrams and check TP sensor sensing circuits TP 1 and TP 2
for short to power, high resistance. Check and install a new throttle
body as required www.JagDocs.com
Page 1632 of 3039

DTC Description Possible Cause Action P012200 Throttle/Pedal
Position Sensor A
Circuit Low
TP sensor sensing
circuit TP 1 - short
to ground, high
resistance
TP sensor failure Carry out any pinpoint tests associated with this DTC using the
manufacturer approved diagnostic system. Refer to the electrical
circuit diagrams and check TP sensor sensing circuit TP 1 for short
to ground, high resistance. Check and install a new throttle body as
required P012300 Throttle/Pedal
Position Sensor A
Circuit High
TP sensor sensing
circuit TP1 - short
to power
TP sensor failure Carry out any pinpoint tests associated with this DTC using the
manufacturer approved diagnostic system. Refer to the electrical
circuit diagrams and check TP sensor sensing circuit TP 1 for short
to power. Check and install a new throttle body as required P022200 Throttle/Pedal
Position Sensor/Switch
B Circuit Low
TP sensor sensing
circuit TP 2 - short
to ground, high
resistance
TP sensor failure Carry out any pinpoint tests associated with this DTC using the
manufacturer approved diagnostic system. Refer to the electrical
circuit diagrams and check TP sensor sensing circuit TP 2 for short
to ground, high resistance. Check and install a new throttle body as
required P022300 Throttle/Pedal
Position Sensor/Switch
B Circuit High
TP sensor sensing
circuit TP 2- short
to power
TP sensor failure Carry out any pinpoint tests associated with this DTC using the
manufacturer approved diagnostic system. Refer to the electrical
circuit diagrams and check TP sensor sensing circuit TP 2 for short
to power. Check and install a new throttle body as required P022700 Throttle/Pedal
Position Sensor/Switch
C Circuit Low
APP sensor circuit
APP 1 - short to
ground, high
resistance Carry out any pinpoint tests associated with this DTC using the
manufacturer approved diagnostic system. Refer to the electrical
circuit diagrams and check APP sensor circuit APP 1 for short to
ground, high resistance P022800 Throttle/Pedal
Position Sensor/Switch
C Circuit High
APP sensor circuit
APP 1 - short to
power Carry out any pinpoint tests associated with this DTC using the
manufacturer approved diagnostic system. Refer to the electrical
circuit diagrams and check APP sensor circuit APP 1 for short to
power P210129 Throttle Actuator
Control Motor Circuit
Range/Performance
Signal invalid
Jammed throttle
blade, gearing or
motor Carry out any pinpoint tests associated with this DTC using the
manufacturer approved diagnostic system. Refer to the electrical
circuit diagrams and test throttle actuator control motor circuit for
short to ground, power, high resistance. Suspect the throttle body,
check and install a new throttle body as required, refer to the new module/component installation note at the top of the DTC Index P210162 Throttle Actuator
Control Motor Circuit
Range/Performance
Signal compare
failure
Jammed throttle
blade, gearing or
motor Carry out any pinpoint tests associated with this DTC using the
manufacturer approved diagnostic system. Refer to the electrical
circuit diagrams and test throttle actuator control motor circuit for
short to ground, power, high resistance. Suspect the throttle body,
check and install a new throttle body as required, refer to the new
module/component installation note at the top of the DTC Index P210164 Throttle Actuator
Control Motor Circuit
Range/Performance
Signal plausibility
failure
Jammed throttle
blade, gearing or
motor Carry out any pinpoint tests associated with this DTC using the
manufacturer approved diagnostic system. Refer to the electrical
circuit diagrams and test throttle actuator control motor circuit for
short to ground, power, high resistance. Suspect the throttle body,
check and install a new throttle body as required, refer to the new
module/component installation note at the top of the DTC Index P210177 Throttle Actuator
Control Motor Circuit
Range/Performance
Commanded
position not
achievable
Throttle blade
stuck open
Intake air system
leak Carry out any pinpoint tests associated with this DTC using the
manufacturer approved diagnostic system. Refer to the electrical
circuit diagrams and test throttle actuator control motor circuit for
short to ground, power, high resistance. Suspect the throttle body,
check and install a new throttle body as required, refer to the new
module/component installation note at the top of the DTC Index P210329 Throttle Actuator
Control Motor Circuit
High
Signal invalid
Throttle motor
control circuit -
short to power
ECM fault Carry out any pinpoint tests associated with this DTC using the
manufacturer approved diagnostic system. Refer to the electrical
circuit diagrams and check throttle motor control circuit for short to
power. If ECM is suspect, check and install a new module as
required, refer to new module/component installation note at top of
DTC Index P210364 Throttle Actuator
Control Motor Circuit
High
Signal plausibility
failure
Throttle motor
control circuit -
short to power Carry out any pinpoint tests associated with this DTC using the
manufacturer approved diagnostic system. Refer to the electrical
circuit diagrams and check throttle motor control circuit for short to
power. If ECM is suspect, check and install a new module as
required, refer to new module/component installation note at top of
DTC Index
Page 1633 of 3039

DTC Description Possible Cause Action ECM fault
P210500 Throttle Actuator
Control System -
Forced Engine
Shutdown
Throttle MIL
request due to fuel
cut Carry out any pinpoint tests associated with this DTC using the
manufacturer approved diagnostic system P211800 Throttle Actuator
Control Motor Current
Range/Performance
Throttle motor
control circuit -
short to ground,
power, high
resistance Carry out any pinpoint tests associated with this DTC using the
manufacturer approved diagnostic system. Refer to the electrical
circuit diagrams and check throttle motor control circuit for short to
ground, power, high resistance P211900 Throttle Actuator
Control Throttle Body
Range/Performance
Throttle spring
faulty Carry out any pinpoint tests associated with this DTC using the
manufacturer approved diagnostic system. Suspect throttle body
faulty. Check and install a new throttle body as required, refer to
the new module/component installation note at top of DTC Index P212200 Throttle/Pedal
Position Sensor/Switch
D Circuit Low
APP sensor circuit 2
- low input Carry out any pinpoint tests associated with this DTC using the
manufacturer approved diagnostic system. Refer to the electrical
circuit diagrams and check APP sensor circuit 2 for short to ground, open circuit P212216 Throttle/Pedal
Position Sensor/Switch
D Circuit Low Input
Accelerator pedal
position (APP)
sensor circuit 1 -
short to ground,
power
Accelerator pedal
position (APP)
sensor failure Carry out any pinpoint tests associated with this DTC using the
manufacturer approved diagnostic system. Refer to electrical circuit
diagrams and check accelerator pedal position (APP) sensor circuit 1
for short to ground, power. Set ignition status to 'ON' engine 'OFF'
check and record 'Pedal value sensor 1' datalogger signal. With
pedal in idle position, value of signal should be approximately 0%,
if not suspect the pedal position sensor, check and install a new
sensor as required P212300 Throttle/Pedal
Position Sensor/Switch
D Circuit High
APP sensor circuit 2
- high input Carry out any pinpoint tests associated with this DTC using the
manufacturer approved diagnostic system. Refer to the electrical
circuit diagrams and check APP sensor circuit 2 for short to power P212317 Throttle/Pedal
Position Sensor/Switch
D Circuit High Input
Accelerator pedal
position (APP)
sensor circuit 1 -
short to power
Accelerator pedal
position (APP)
sensor failure Carry out any pinpoint tests associated with this DTC using the
manufacturer approved diagnostic system. Refer to electrical circuit
diagrams and check accelerator pedal position (APP) sensor circuit 1
for short to ground, power. Set ignition status to 'ON' engine 'OFF'
check and record 'Pedal value sensor 1' datalogger signal. With
pedal in fully depressed position, value of signal should be
approximately 99%, if not suspect the pedal position sensor, check
and install a new sensor as required P212716 Throttle/Pedal
Position Sensor/Switch
E Circuit Low Input
Accelerator pedal
position (APP)
sensor circuit 2 -
short to ground,
high resistance
Accelerator pedal
position (APP)
sensor failure Carry out any pinpoint tests associated with this DTC using the
manufacturer approved diagnostic system. Refer to electrical circuit
diagrams and check accelerator pedal position (APP) sensor circuit 2
for short to ground, power. Set ignition status to 'ON' engine 'OFF'
check and record 'Pedal value sensor 2' datalogger signal. With
pedal in idle position, value of signal should be approximately 0%,
if not suspect the pedal position sensor, check and install a new
sensor as required P212817 Throttle/Pedal
Position Sensor/Switch
E Circuit High Input
Accelerator pedal
position (APP)
sensor circuit 2 -
short to power
Accelerator pedal
position (APP)
sensor failure Carry out any pinpoint tests associated with this DTC using the
manufacturer approved diagnostic system. Refer to electrical circuit
diagrams and check accelerator pedal position (APP) sensor circuit 2
for short to ground, power. Set ignition status to 'ON' engine 'OFF'
check and record 'Pedal value sensor 2' datalogger signal. With
pedal in fully depressed position, value of signal should be
approximately 99%, if not suspect the pedal position sensor, check
and install a new sensor as required P213528 Throttle/Pedal
Position Sensor/Switch
A/B Voltage
Correlation
APP sensor circuit 1
and 2 range
performance -
sub-processor Carry out any pinpoint tests associated with this DTC using the
manufacturer approved diagnostic system. Refer to the electrical
circuit diagrams and check APP sensor circuits 1 and 2 for short to
ground, power and high resistance. Clear the DTCs and retest. If
the code remains, replace the APP sensor P213529 Throttle/Pedal
Position Sensor/Switch
A/B Voltage
Correlation
APP sensor -
excessive difference
between
raw values of circuit
1 and 2 -
sub-processor Carry out any pinpoint tests associated with this DTC using the
manufacturer approved diagnostic system. Refer to the electrical
circuit diagrams and check APP sensor circuits 1 and 2 for short,
open circuit
Page 1634 of 3039

DTC Description Possible Cause Action P213562 Throttle/Pedal
Position Sensor/Switch
A/B Voltage
Correlation
APP sensor circuit 1
and 2 range
performance -
sub-processor Carry out any pinpoint tests associated with this DTC using the
manufacturer approved diagnostic system. Refer to the electrical
circuit diagrams and check APP sensor circuits 1 and 2 for short to
ground, power and high resistance. Clear the DTCs and retest. If
the code remains, replace the APP sensor P213564 Throttle/Pedal
Position Sensor/Switch
A/B Voltage
Correlation
APP sensor circuit 1
and 2 range
performance Carry out any pinpoint tests associated with this DTC using the
manufacturer approved diagnostic system. Refer to the electrical
circuit diagrams and check APP sensor circuits 1 and 2 for short,
open circuit P213862 Throttle/Pedal
Position Sensor/Switch
D/E Voltage
Correlation
Pedal value
difference between
channel 1 and
channel 2 greater
than a threshold Carry out any pinpoint tests associated with this DTC using the
manufacturer approved diagnostic system. Refer to electrical circuit
diagrams and check accelerator pedal position (APP) sensor circuit 1
and 2 for short to ground, power. Set ignition status to 'ON' engine
'OFF' check and record 'Pedal value sensor 1' and 'Pedal value
sensor 2' datalogger signal. With pedal in fully depressed position,
value of signals should be approximately 99%, with pedal in idle
position, value of signals should be approximately 0%, if not
suspect the pedal position sensor, check and install a new sensor
as required P213864 Throttle/Pedal
Position Sensor/Switch
D/E Voltage
Correlation
Gradient on one
channel without
gradient on the
other Carry out any pinpoint tests associated with this DTC using the
manufacturer approved diagnostic system. Refer to electrical circuit
diagrams and check accelerator pedal position (APP) sensor circuit 1
and 2 for short to ground, power. Set ignition status to 'ON' engine
'OFF' check and record 'Pedal value sensor 1' and 'Pedal value
sensor 2' datalogger signal. With pedal in fully depressed position,
value of signals should be approximately 99%, with pedal in idle
position, value of signals should be approximately 0%, if not
suspect the pedal position sensor, check and install a new sensor
as required