2010 INFINITI QX56 battery location
[x] Cancel search: battery locationPage 2017 of 4210
PARKING LAMP CIRCUITEXL-41
< COMPONENT DIAGNOSIS >
C
DE
F
G H
I
J
K
M A
B
EXL
N
O P
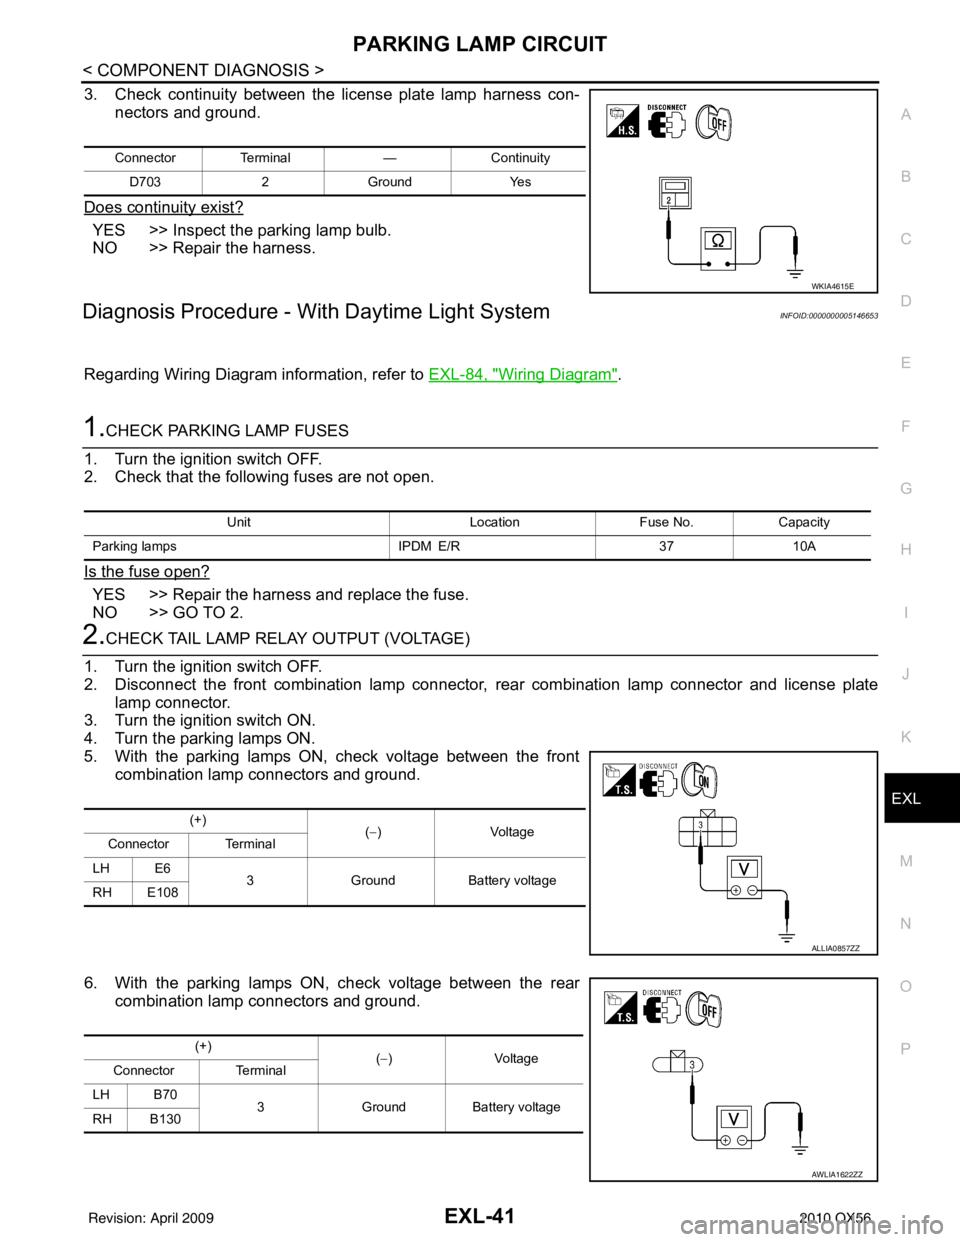
3. Check continuity between the license plate lamp harness con- nectors and ground.
Does continuity exist?
YES >> Inspect the parking lamp bulb.
NO >> Repair the harness.
Diagnosis Procedure - With Daytime Light SystemINFOID:0000000005146653
Regarding Wiring Diagram information, refer to EXL-84, "Wiring Diagram".
1.CHECK PARKING LAMP FUSES
1. Turn the ignition switch OFF.
2. Check that the following fuses are not open.
Is the fuse open?
YES >> Repair the harness and replace the fuse.
NO >> GO TO 2.
2.CHECK TAIL LAMP RELAY OUTPUT (VOLTAGE)
1. Turn the ignition switch OFF.
2. Disconnect the front combination lamp connector, rear combination lamp connector and license plate
lamp connector.
3. Turn the ignition switch ON.
4. Turn the parking lamps ON.
5. With the parking lamps ON, check voltage between the front combination lamp connectors and ground.
6. With the parking lamps ON, check voltage between the rear combination lamp connectors and ground.
Connector Terminal —Continuity
D703 2Ground Yes
WKIA4615E
Unit LocationFuse No.Capacity
Parking lamps IPDM E/R3710A
(+)
(−)V olt a g e
Connector Terminal
LH E6 3Ground Battery voltage
RH E108
ALLIA0857ZZ
(+) (−)V olt a g e
Connector Terminal
LH B70 3Ground Battery voltage
RH B130
AWLIA1622ZZ
Revision: April 20092010 QX56
Page 2169 of 4210
PRECAUTIONSFAX-3
< PRECAUTION >
CEF
G H
I
J
K L
M A
B
FA X
N
O P
5. When the repair work is completed, return the ignition switch to the ″LOCK ″ position before connecting
the battery cables. (At this time, the steering lock mechanism will engage.)
6. Perform a self-diagnosis check of al l control units using CONSULT-III.
PrecautionINFOID:0000000005148939
Observe the following precautions when disassembling and servicing the wheel hub and drive shafts.
• Perform work in a location which is as dust-free as possible.
• Before disassembling and servicing, clean the outside of parts.
• Prevention of the entry of foreign objects must be taken into account during disassembly of the component
parts.
• Disassembled parts must be carefully reassembled in the correct order. If work is interrupted, a clean cover
must be placed over parts.
• Paper shop cloths must be used. Fabric shop cloths must not be used because of the danger of lint adhering to parts.
• Disassembled parts (except for rubber parts) should be cleaned with a suitable solvent which shall be removed by blowing with air or wiping with paper shop cloths.
Revision: April 20092010 QX56
Page 2229 of 4210
GI-6
< HOW TO USE THIS MANUAL >
HOW TO FOLLOW TROUBLE DIAGNOSES
HOW TO FOLLOW TROUBLE DIAGNOSES
DescriptionINFOID:0000000005149573
NOTICE:
Trouble diagnoses indicate work procedures required to diagnose problems effectively. Observe the following
instructions before diagnosing.
• Before performing trouble diagnoses, read the “Work Flow” in each section.
• After repairs, re-check that the problem has been completely eliminated.
• Refer to Component Parts and Harness Connector Location for the Systems described in each section for
identification/location of components and harness connectors.
• When checking circuit continuity, ignition switch should be OFF.
• Refer to the Circuit Diagram for quick pinpoint check. If you need to check circuit continui ty between harness connectors in more detail, such as when a sub-har-
ness is used, refer to Wiring Diagram in each individual section and Harness Layout in PG section for identi-
fication of harness connectors.
• Before checking voltage at connectors, check battery voltage.
• After accomplishing the Diagnosis Procedures and Elec trical Components Inspection, make sure that all
harness connectors are reconnected as they were.
How to Follow Test Grou ps in Trouble DiagnosisINFOID:0000000005149574
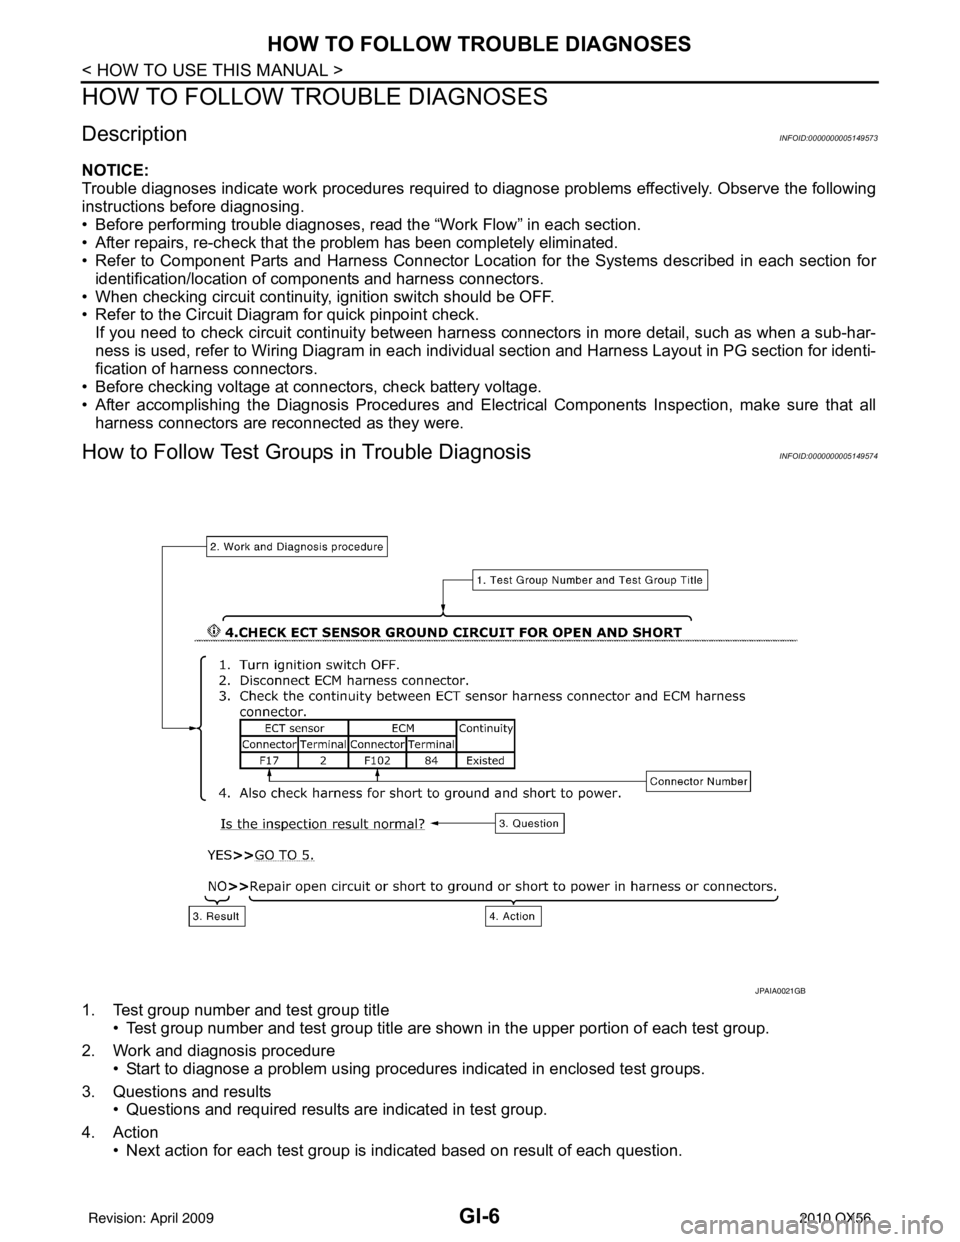
1. Test group number and test group title
• Test group number and test group title are s hown in the upper portion of each test group.
2. Work and diagnosis procedure • Start to diagnose a problem using procedures indicated in enclosed test groups.
3. Questions and results • Questions and required results are indicated in test group.
4. Action • Next action for each test group is indicated based on result of each question.
JPAIA0021GB
Revision: April 20092010 QX56
Page 2249 of 4210
GI-26
< PRECAUTION >
PRECAUTIONS
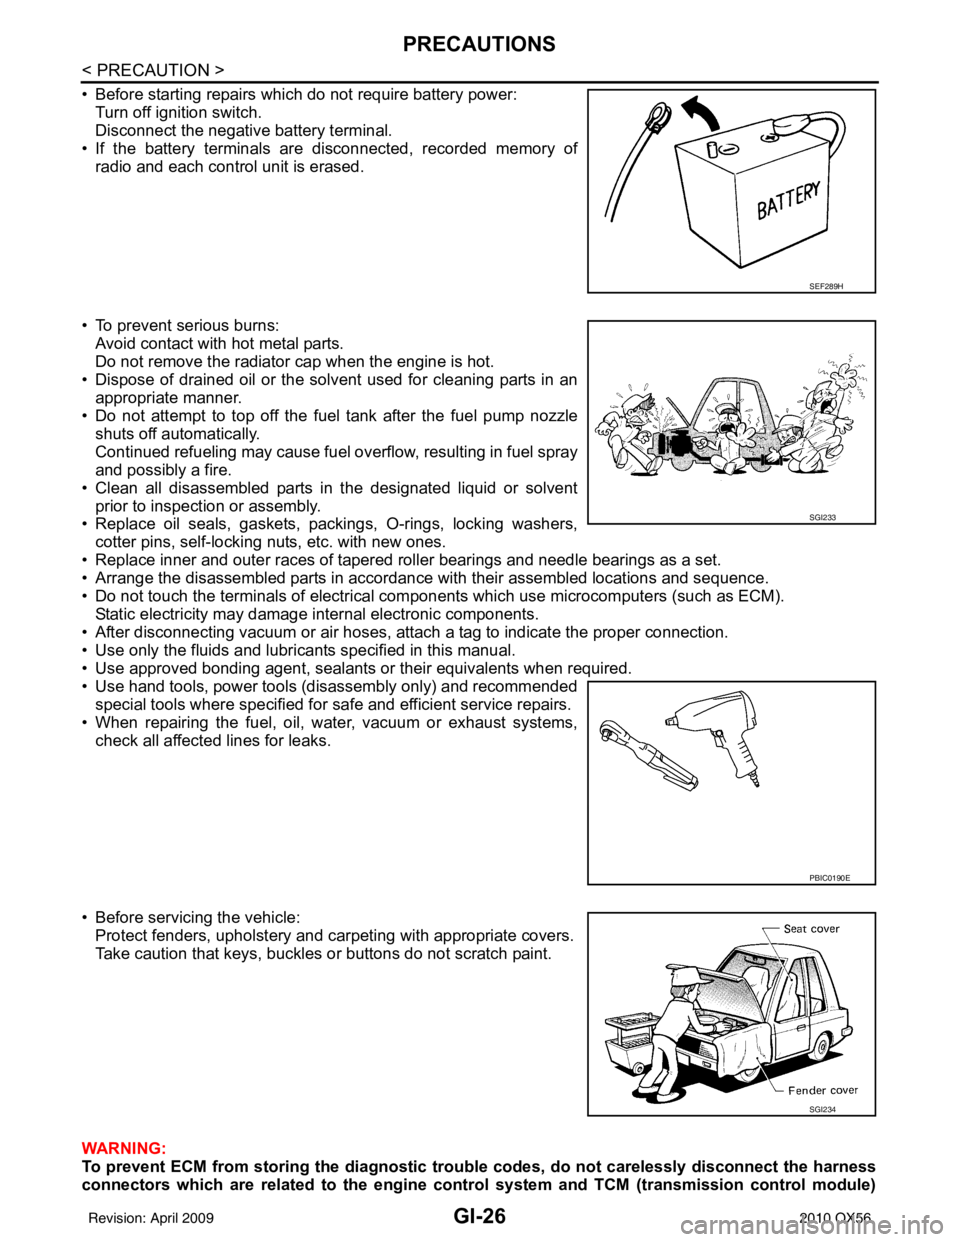
• Before starting repairs which do not require battery power:Turn off ignition switch.
Disconnect the negative battery terminal.
• If the battery terminals are disconnected, recorded memory of radio and each control unit is erased.
• To prevent serious burns: Avoid contact with hot metal parts.
Do not remove the radiator cap when the engine is hot.
• Dispose of drained oil or the solvent used for cleaning parts in an appropriate manner.
• Do not attempt to top off the fuel tank after the fuel pump nozzle
shuts off automatically.
Continued refueling may cause fuel overflow, resulting in fuel spray
and possibly a fire.
• Clean all disassembled parts in the designated liquid or solvent prior to inspection or assembly.
• Replace oil seals, gaskets, packings, O-rings, locking washers,
cotter pins, self-locking nuts, etc. with new ones.
• Replace inner and outer races of tapered roller bearings and needle bearings as a set.
• Arrange the disassembled parts in accordance with their assembled locations and sequence.
• Do not touch the terminals of electrical com ponents which use microcomputers (such as ECM).
Static electricity may damage internal electronic components.
• After disconnecting vacuum or air hoses, atta ch a tag to indicate the proper connection.
• Use only the fluids and lubricants specified in this manual.
• Use approved bonding agent, sealants or their equivalents when required.
• Use hand tools, power tools (disassembly only) and recommended special tools where specified for safe and efficient service repairs.
• When repairing the fuel, oil, water, vacuum or exhaust systems, check all affected lines for leaks.
• Before servicing the vehicle: Protect fenders, upholstery and carpeting with appropriate covers.
Take caution that keys, buckles or buttons do not scratch paint.
WARNING:
To prevent ECM from storing the diagnostic tro uble codes, do not carelessly disconnect the harness
connectors which are related to the engine control system and TCM (transmission control module)
SEF289H
SGI233
PBIC0190E
SGI234
Revision: April 20092010 QX56
Page 2296 of 4210
HA-4
< PRECAUTION >
PRECAUTIONS
5. When the repair work is completed, return the ignition switch to the ″LOCK ″ position before connecting
the battery cables. (At this time, the steering lock mechanism will engage.)
6. Perform a self-diagnosis check of a ll control units using CONSULT-III.
Precaution for Working with HFC-134a (R-134a)INFOID:0000000005147630
WARNING:
• CFC-12 (R-12) refrigerant and HFC-134a (R-134a) refr igerant are not compatible. If the refrigerants
are mixed compressor failure is likely to occur. Refer to HA-4, "
Contaminated Refrigerant". To deter-
mine the purity of HFC-134a (R-134a) in the vehicle and recovery tank, use recovery/recycling equip-
ment and refrigerant identifier.
• Use only specified oil for the HFC-134a (R-134a) A/C system and HFC-134a (R-134a) components. If
oil other than that specified is used, compressor failure is likely to occur.
• The specified HFC-134a (R-134a) oi l rapidly absorbs moisture from the atmosphere. The following
handling precautions must be observed:
- When removing refrigerant components from a vehicle, immediately cap (seal) the component to
minimize the entry of moisture from the atmosphere.
- When installing refrigerant co mponents to a vehicle, do not remove the caps (unseal) until just
before connecting the components. Connect all refrigerant loop components as quickly as possible
to minimize the entry of moisture into system.
- Only use the specified oil from a sealed container. Immediately reseal containers of oil. Without
proper sealing, oil will become moisture saturat ed and should not be used.
- Avoid breathing A/C refrigerant and oil vapor or mist. Exposure may irrita te eyes, nose and throat.
Remove HFC-134a (R-134a) from the A/C system usin g certified service equipment meeting require-
ments of SAE J2210 [HFC-134a (R-134a) recycling equipment], or J2209 [HFC-134a (R-134a) recovery
equipment]. If accidental system discharge occurs, ventilate work area before resuming service.
Additional health and safety in formation may be obtained from refrigerant and oil manufacturers.
- Do not allow A/C oil to come in contact with styrofoam parts. Damage may result.
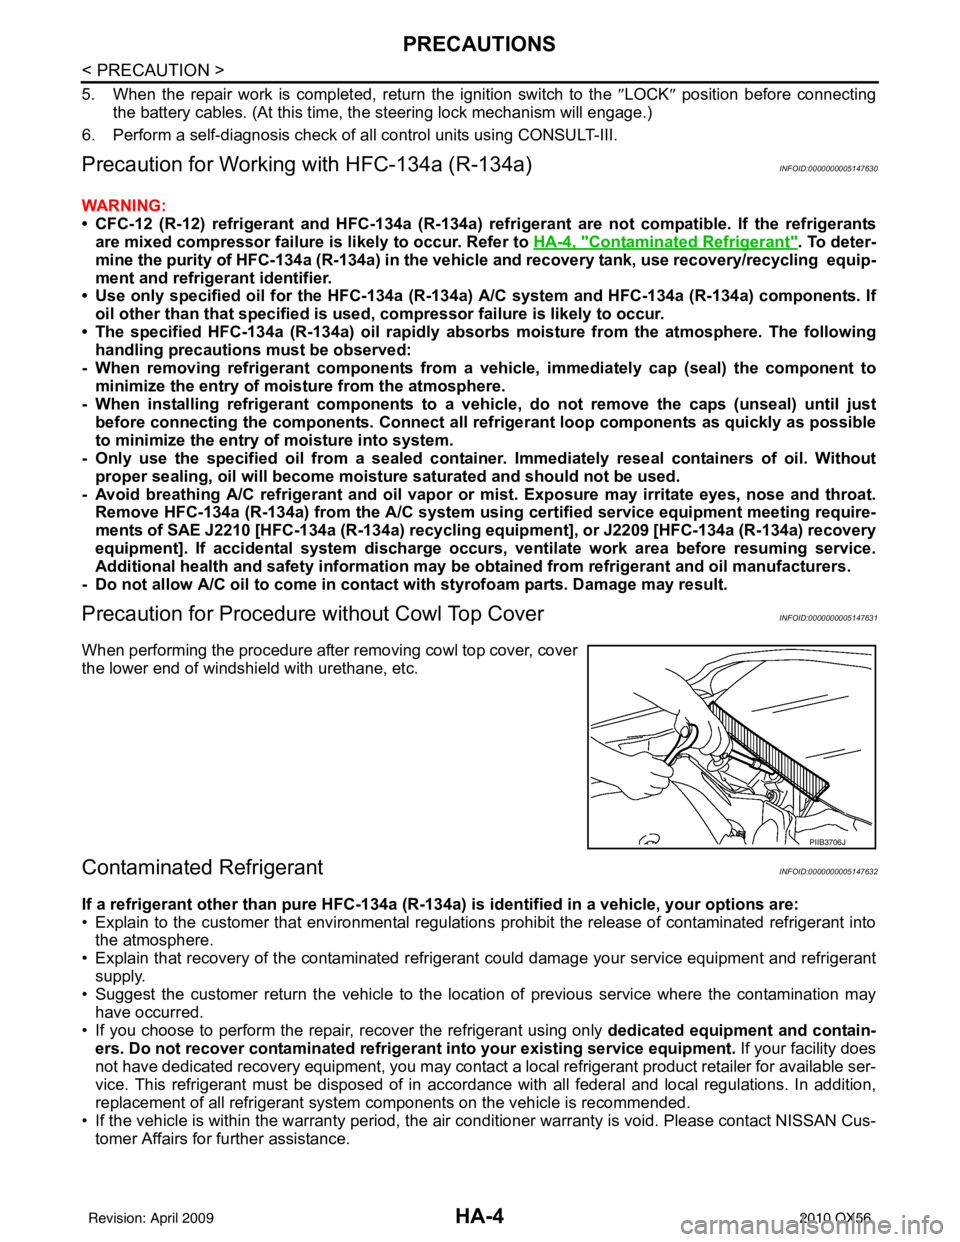
Precaution for Procedure without Cowl Top CoverINFOID:0000000005147631
When performing the procedure after removing cowl top cover, cover
the lower end of windshield with urethane, etc.
Contaminated RefrigerantINFOID:0000000005147632
If a refrigerant other than pure HFC-134a (R-134a) is identified in a vehicle, your options are:
• Explain to the customer that environmental regulations prohibit the release of contaminated refrigerant into
the atmosphere.
• Explain that recovery of the contaminated refri gerant could damage your service equipment and refrigerant
supply.
• Suggest the customer return the vehicle to the location of previous service where the contamination may have occurred.
• If you choose to perform the repair, recover the refrigerant using only dedicated equipment and contain- ers. Do not recover contamin ated refrigerant into your existing service equipment. If your facility does
not have dedicated recovery equipment, you may contact a local refrigerant product retailer for available ser-
vice. This refrigerant must be disposed of in acco rdance with all federal and local regulations. In addition,
replacement of all refrigerant system components on the vehicle is recommended.
• If the vehicle is within the warranty period, the air conditioner warranty is void. Please contact NISSAN Cus- tomer Affairs for further assistance.
PIIB3706J
Revision: April 20092010 QX56
Page 2399 of 4210
![INFINITI QX56 2010 Factory Service Manual REAR AIR CONTROL SYSTEMHAC-59
< COMPONENT DIAGNOSIS > [AUTOMATIC AIR CONDITIONER]
C
D
E
F
G H
J
K L
M A
B
HAC
N
O P
1. Start and run engine to operating temperature.
2. Turn the rear blower motor to m INFINITI QX56 2010 Factory Service Manual REAR AIR CONTROL SYSTEMHAC-59
< COMPONENT DIAGNOSIS > [AUTOMATIC AIR CONDITIONER]
C
D
E
F
G H
J
K L
M A
B
HAC
N
O P
1. Start and run engine to operating temperature.
2. Turn the rear blower motor to m](/manual-img/42/57032/w960_57032-2398.png)
REAR AIR CONTROL SYSTEMHAC-59
< COMPONENT DIAGNOSIS > [AUTOMATIC AIR CONDITIONER]
C
D
E
F
G H
J
K L
M A
B
HAC
N
O P
1. Start and run engine to operating temperature.
2. Turn the rear blower motor to maximum speed from the rear air control (front).
3. Turn rear air control (front) temperature contro l dial clockwise and then counterclockwise (REAR CTRL
indicator off).
4. Check for hot air at rear discharge air outlets in the maximum heat position and cold air at discharge air outlets in the maximum cold position.
Does the rear air control (front) operate properly?
YES >> GO TO 3.
NO >> Check rear air control (front). Refer to HAC-59, "
Air Mix Door Motor (Rear) Diagnosis Procedure".
3.CONFIRM SYMPTOM BY PERFORMING REAR AIR CONTROL (REAR) AIR MIX DOOR MOTOR OPER-
ATIONAL CHECK
1. Press the REAR CTRL switch on rear air control (front) to send control to t he rear air control (rear).
2. Turn rear air control (rear) temperature control dial slowly clockwise and then counterclockwise (REAR
CTRL indicator on).
3. Check for hot air at rear discharge air outlets in the maximum heat position and cold air at rear discharge
air outlets in the maximum cold position.
Does the rear air control (rear) operate properly?
YES >> GO TO 4.
NO >> Check rear air control (rear). Refer to HAC-56, "
Rear Air Control (Rear) Diagnosis Procedure #2".
4.CONFIRM SYMPTOM BY PERFORMING REAR AIR CONTROL (FRONT) MODE OPERATIONAL CHECK
1. Press the REAR CTRL switch on rear air control (front) (REAR CTRL indicator off).
2. Press each mode switch and check for proper air discharge at the appropriate locations.
Does the rear air control (front) operate properly?
YES >> GO TO 5.
NO >> Check mode door motor (rear). Refer to HAC-63, "
Mode Door Motor (Rear) Diagnosis Proce-
dure".
5.CONFIRM SYMPTOM BY PERFORMING REAR AIR CONTROL (REAR) MODE OPERATIONAL CHECK
1. Press the REAR CTRL switch on rear air control (front) to send control to t he rear air control (rear).
2. Press each mode switch and check for proper air discharge at the appropriate locations.
Does the rear air control (rear) operate properly?
YES >> System OK.
NO >> Replace rear air control (rear). Refer to VTL-7, "
Removal and Installation".
Air Mix Door Motor (Rear) Diagnosis ProcedureINFOID:0000000005147711
Regarding Wiring Diagram information, refer to HAC-91, "Wiring Diagram".
SYMPTOM:
• Temperature control (rear) operation is malfunctioning.
DIAGNOSTIC PROCEDURE FOR INOPERATIVE AIR MIX DOOR MOTOR (REAR)
1.CHECK REAR AIR CONTROL (FRONT) POWER SUPPLY
1. Disconnect rear air control (front) harness connector.
2. Turn ignition switch ON.
3. Check voltage between rear air control (front) harness connec- tor R108 terminal 1 and ground.
Is the inspection result normal?
YES >> GO TO 2.
NO >> Repair harness or connector. Battery voltage should exist.
AWIIA0182ZZ
Revision: April 20092010 QX56
Page 2470 of 4210
INL-1
DRIVER CONTROLS
C
DE
F
G H
I
J
K
M
SECTION INL
A
B
INL
N
O P
CONTENTS
INTERIOR LIGHTING SYSTEM
BASIC INSPECTION ....... .............................3
DIAGNOSIS AND REPAIR WORKFLOW ..... .....3
Work Flow ........................................................... ......3
FUNCTION DIAGNOSIS ...............................6
INTERIOR ROOM LAMP CONTROL SYSTEM
.....
6
System Diagram .................................................. ......6
System Description ...................................................6
Component Parts Location ........................................7
Component Description .............................................8
ILLUMINATION CONTROL SYSTEM .................9
System Diagram .................................................. ......9
System Description ...................................................9
Component Parts Location ........................................9
Component Description ...........................................10
DIAGNOSIS SYSTEM (BCM) ............................11
COMMON ITEM ..................................................... ....11
COMMON ITEM : CONSULT-III Function (BCM -
COMMON ITEM) .....................................................
11
INT LAMP .............................................................. ....11
INT LAMP : CONSULT-III Function (BCM - INT
LAMP) .....................................................................
12
BATTERY SAVER ................................................. ....13
BATTERY SAVER : CONSULT-III Function (BCM
- BATTERY SAVER) ...............................................
13
COMPONENT DIAGNOSIS .........................15
POWER SUPPLY AND GROUND CIRCUIT .. ....15
BCM ....................................................................... ....15
BCM : Diagnosis Procedure ....................................15
BATTERY SAVER OUTPUT/POWER SUP-
PLY CIRCUIT ................................................. ....
17
Description ........................................................... ....17
Component Function Check ....................................17
Diagnosis Procedure ...............................................17
INTERIOR ROOM LAMP CONTROL CIRCUIT
...
19
Description ........................................................... ....19
Component Function Check ....................................19
Diagnosis Procedure ...............................................19
STEP LAMP CIRCUIT .......................................22
Description ........................................................... ....22
Component Function Check ....................................22
Diagnosis Procedure ...............................................22
CARGO LAMP CONTROL CIRCUIT ................24
Description ...............................................................24
Component Function Check ....................................24
Diagnosis Procedure ...............................................24
IGNITION KEYHOLE ILLUMINATION CON-
TROL CIRCUIT .................................................
26
Description ...............................................................26
Component Function Check ....................................26
Diagnosis Procedure ...............................................26
INTERIOR ROOM LAMP CONTROL SYSTEM
...
28
Wiring Diagram .................................................... ....28
ILLUMINATION .................................................44
Wiring Diagram ........................................................44
ECU DIAGNOSIS .........................................58
BCM (BODY CONTROL MODULE) .................58
Reference Value .................................................. ....58
Terminal Layout .......................................................61
Physical Values ................................................... ....61
Wiring Diagram ........................................................67
Fail Safe ..................................................................71
DTC Inspection Priority Chart ...............................72
Revision: April 20092010 QX56
Page 2476 of 4210

INTERIOR ROOM LAMP CONTROL SYSTEMINL-7
< FUNCTION DIAGNOSIS >
C
DE
F
G H
I
J
K
M A
B
INL
N
O P
INTERIOR LAMP BATTERY SAVER CONTROL
If an interior lamp is left ON and does not turn OFF even when the doors are closed, the BCM turns off power
to the interior lamps automatically to save the batte ry 30 minutes after the ignition switch is turned OFF.
The BCM controls power and ground to all interior lamps.
After the battery saver system turns the la mps OFF, the lamps will illuminate again when
• a signal is received from an Intelligent Key or main power window and door lock/unlock switch, or when the
front door lock assembly LH (key cylinder switch) is locked or unlocked
• a door is opened or closed
• the Intelligent Key is removed from or inserted into the ignition switch.
The Interior lamp battery saver control time peri od can be changed with the function setting of CONSULT-III.
Component Parts LocationINFOID:0000000005146717
1. BCM M18, M19, M20 (view with instru-
ment lower panel LH removed) 2. Key switch and ignition knob switch
M12 3. Front door switch LH B8
Front door switch RH B108
4. Rear door switch LH B18 Rear door switch RH B116 5. Glass hatch ajar switch D707 6. Back door latch (door ajar switch)
D503
7. Front room/map lamp assembly R102 8. Vanity lamp LH R3 Vanity lamp RH R89. Door mirror (puddle lamp) LH D4
Door mirror (puddle lamp) RH D107
10. Ignition keyhole illumination M150 11. Foot lamp LH M99 Foot lamp RH M10012. Front step lamp LH D11
Front step lamp RH D109
AWLIA1062ZZ
Revision: April 20092010 QX56