2010 CHEVROLET CORVETTE display
[x] Cancel search: displayPage 215 of 472
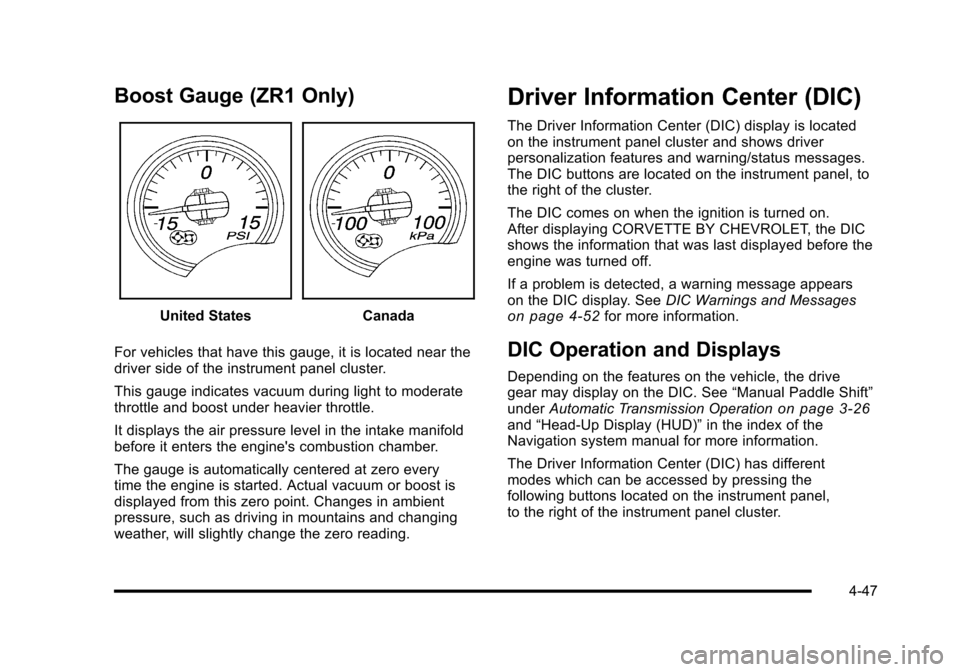
Boost Gauge (ZR1 Only)
United StatesCanada
For vehicles that have this gauge, it is located near the
driver side of the instrument panel cluster.
This gauge indicates vacuum during light to moderate
throttle and boost under heavier throttle.
It displays the air pressure level in the intake manifold
before it enters the engine's combustion chamber.
The gauge is automatically centered at zero every
time the engine is started. Actual vacuum or boost is
displayed from this zero point. Changes in ambient
pressure, such as driving in mountains and changing
weather, will slightly change the zero reading.
Driver Information Center (DIC)
The Driver Information Center (DIC) display is located
on the instrument panel cluster and shows driver
personalization features and warning/status messages.
The DIC buttons are located on the instrument panel, to
the right of the cluster.
The DIC comes on when the ignition is turned on.
After displaying CORVETTE BY CHEVROLET, the DIC
shows the information that was last displayed before the
engine was turned off.
If a problem is detected, a warning message appears
on the DIC display. See DIC Warnings and Messages
on page 4‑52for more information.
DIC Operation and Displays
Depending on the features on the vehicle, the drive
gear may display on the DIC. See “Manual Paddle Shift”
under Automatic Transmission Operation
on page 3‑26and“Head-Up Display (HUD)” in the index of the
Navigation system manual for more information.
The Driver Information Center (DIC) has different
modes which can be accessed by pressing the
following buttons located on the instrument panel,
to the right of the instrument panel cluster.
4-47
Page 216 of 472
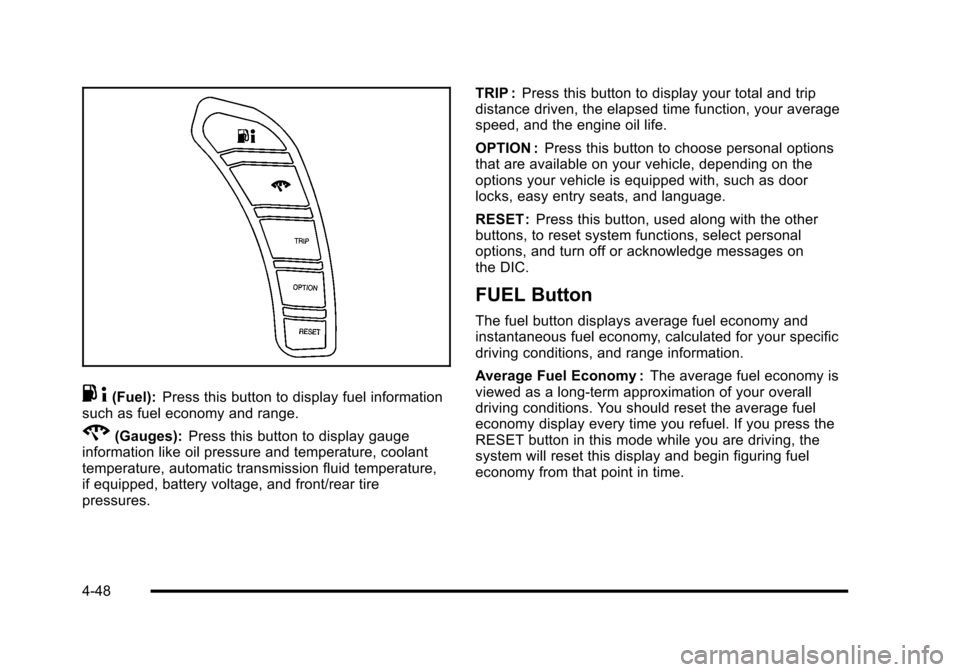
.4(Fuel): Press this button to display fuel information
such as fuel economy and range.
2(Gauges): Press this button to display gauge
information like oil pressure and temperature, coolant
temperature, automatic transmission fluid temperature,
if equipped, battery voltage, and front/rear tire
pressures. TRIP :
Press this button to display your total and trip
distance driven, the elapsed time function, your average
speed, and the engine oil life.
OPTION : Press this button to choose personal options
that are available on your vehicle, depending on the
options your vehicle is equipped with, such as door
locks, easy entry seats, and language.
RESET : Press this button, used along with the other
buttons, to reset system functions, select personal
options, and turn off or acknowledge messages on
the DIC.
FUEL Button
The fuel button displays average fuel economy and
instantaneous fuel economy, calculated for your specific
driving conditions, and range information.
Average Fuel Economy : The average fuel economy is
viewed as a long-term approximation of your overall
driving conditions. You should reset the average fuel
economy display every time you refuel. If you press the
RESET button in this mode while you are driving, the
system will reset this display and begin figuring fuel
economy from that point in time.
4-48
Page 217 of 472
Press the fuel button to display average fuel economy,
such as:
.AVERAGE FUEL ECONOMY 11.7 L/100 km or
.AVERAGE FUEL ECONOMY 20.1 MPG
Instantaneous Fuel Economy : Instantaneous fuel
economy reflects only the fuel economy that the vehicle
has right now and will change frequently as driving
conditions change. Unlike average fuel economy, this
menu item cannot be reset.
Press the fuel button again to display instantaneous fuel
economy, such as:
.INSTANT FUEL ECONOMY 11.7 L/100 km or
.INSTANT FUEL ECONOMY 20.1 MPG
Fuel Range : The range calculates the remaining
distance you can drive without refueling. It is based
on fuel economy and the fuel remaining in the tank.
Press the fuel button again to display the range,
such as:
.RANGE 48 km or
.RANGE 30 MI
If the LOW FUEL warning is displayed or if RANGE is
less than 64 km (40 miles), the display will read
RANGE LOW. The fuel economy data used to determine fuel range is
an average of recent driving conditions. As your driving
conditions change, this data is gradually updated
automatically.
If the vehicle has been idling for a long time, the
range displayed on the DIC could be abnormally low.
The vehicle must be driven 8–16 km (5–10 miles) to
get an accurate reading.
GAGES Button
The gauges button displays oil pressure, oil
temperature, coolant temperature, transmission fluid
temperature for automatic transmission vehicles only,
battery voltage, and tire pressure information.
Oil Pressure :
This display shows the oil pressure.
Press the gauges button to display the oil pressure,
such as:
.OIL PRESSURE 276 kPa or
.OIL PRESSURE 40 PSI
Oil Temperature : This display shows the oil
temperature.
Press the gauges button again to display the oil
temperature, such as:
.OIL TEMPERATURE 112°C or
.OIL TEMPERATURE 234°F
4-49
Page 218 of 472
If the oil temperature is low, the display will show OIL
TEMPERATURE LOW. If the oil temperature is high, the
display will show OIL TEMPERATURE HIGH.
Coolant Temperature : This display shows the engine
coolant temperature.
Press the gauges button again to display the coolant
temperature, such as:
.COOLANT TEMPERATURE 51°C or
.COOLANT TEMPERATURE 123°F
If the coolant temperature is low, the display will show
COOLANT TEMPERATURE LOW. If the coolant
temperature is high, the display will show COOLANT
TEMPERATURE HIGH.
Transmission Fluid Temperature : If you have an
automatic transmission vehicle, this display shows the
automatic transmission fluid temperature.
Press the gauges button again to display the automatic
transmission fluid temperature, such as:
.TRANS FLUID TEMP 51°C or
.TRANS FLUID TEMP 123°F If the transmission fluid temperature is low, the
display will show TRANS FLUID TEMP LOW. If the
transmission fluid temperature is high, the display
will show TRANS FLUID TEMP HIGH.
Battery Voltage :
This display shows the current
battery voltage.
Press the gauges button again to display the battery
voltage, such as:
.BATTERY VOLTAGE 13.5 VOLTS
Tire Pressure : This display shows the tire pressure for
each tire.
Press the gauges button again to display the tire
pressure for the front tires, such as:
.FRONT TIRE PRESSURES L 234 kPa
R 228 kPa or
.FRONT TIRE PRESSURES L 34 PSI R 33 PSI
Press the gauges button again to display the tire
pressure for the rear tires, such as:
.REAR TIRE PRESSURES L 234 kPa R 228 kPa or
.REAR TIRE PRESSURES L 34 PSI R 33 PSI
4-50
Page 219 of 472
TRIP Button
The TRIP button displays the odometer, trip distance,
elapsed time, average speed, and oil life remaining
information.
Odometer : The odometer shows how far your vehicle
has been driven in either kilometers or miles. Press the
TRIP button to display odometer readings, such as:
.ODOMETER 20008 km or
.ODOMETER 12345 MI
You can also display the odometer by turning on the
parking lamps.
Trip Odometers : There are two trip odometers.
Press the TRIP button to display TRIP ODOMETER A
readings and press the button again to display TRIP
ODOMETER B readings, such as:
.TRIP ODOMETER A 209.9 km or
.TRIP ODOMETER A 130.5 MI
.TRIP ODOMETER B 483.5 km or
.TRIP ODOMETER B 300.5 MI
Both of the trip odometers can be used simultaneously.
The trip odometers can be reset by pressing the RESET
button on the DIC. There is also a miles since last ignition feature that
displays the number of kilometers (miles) driven since
you last started the vehicle. Press and hold the RESET
button for three seconds, then release it. The kilometers
(miles) since the last ignition cycle will be set into the
trip odometer.
Elapsed Timer :
Press the TRIP button until ELAPSED
TIMER is displayed, such as ELAPSED TIMER .00.
When the ignition is in on, the DIC can be used as a
stopwatch. The display can show hours, minutes and
seconds. The elapsed time indicator will record up to
23 hours, 59 minutes and 59 seconds, then it will reset
to zero and continue counting. The display appears as
ELAPSED TIMER .00 in the elapsed time function.
You can start or stop the elapsed time by pressing the
RESET button. To reset the elapsed time to zero, press
the RESET button for three seconds while the timer is
displayed.
Pressing and holding the RESET button for at least
10 seconds will reset the timer display to the time since
last ignition cycle.
Average Speed : Press the TRIP button until the
average speed is displayed, such as:
.AVERAGE SPEED 100 km/h or
.AVERAGE SPEED 62 MPH
4-51
Page 220 of 472
Press and hold the RESET button to reset to
0.0 km/h (mph).
Engine Oil Life : Press the TRIP button until the engine
oil life is displayed, such as OIL LIFE REMAINING 89%.
This is an estimate of the engine oil's remaining useful
life. It will show 100% when the system is reset after
an oil change. It will alert you to change the oil on a
schedule consistent with your driving conditions.
When the remaining oil life is low, the system will alert
you with the message CHANGE ENGINE OIL.
Remember, you must reset the engine oil life system
yourself after each oil change. It will not reset itself.
To reset the system, see Engine Oil Life System
on
page 6‑25. Be careful not to reset the engine oil life
system accidentally at any time other than when the oil
has just been changed. It cannot be reset accurately
until the next oil change.
See Scheduled Maintenance
on page 7‑3andEngine
Oilon page 6‑19for more information.
OPTION Button
The OPTION button allows you to access the
PERSONAL OPTIONS menu and customize the
personalization settings on your vehicle. See DIC
Vehicle Personalization
on page 4‑71for more
information.
RESET Button
The RESET button, used along with other buttons, will
reset system functions and turn off or acknowledge
messages on the DIC.
DIC Warnings and Messages
Messages are displayed on the DIC to notify the driver
that the status of the vehicle has changed and that
some action may be needed by the driver to correct the
condition. Multiple messages may appear one after
another. You can scroll through the messages that
may have been sent at the same time. The DIC is
continuously updated with the vehicle performance
status.
Some messages may not require immediate action, but
you can press the RESET button to acknowledge that
you received the messages and to clear them from the
display.
Some messages cannot be cleared from the DIC
display because they are more urgent. These
messages require action before they can be cleared.
You should take any messages that appear on the
display seriously and remember that clearing the
messages will only make the messages disappear,
not correct the problem.
The following are the possible messages that can be
displayed and some information about them.
4-52
Page 221 of 472
ABS (Antilock Brake System) ACTIVE
This message displays when the Antilock Brake System
(ABS) is adjusting brake pressure to help avoid a
braking skid.
Slippery road conditions may exist if this message
is displayed, so adjust your driving accordingly. The
message stays on for a few seconds after the system
stops adjusting brake pressure. See Antilock Brake
System (ABS)
on page 5‑5for more information.
ACTIVE HANDLING
This message displays when the Active Handling
System is operating. The Active Handling System is a
computer controlled system that assists the driver in
controlling the vehicle in difficult driving conditions.
You may feel or hear the system working and see the
ACTIVE HANDLING message displayed in the DIC.
This message stays on for a few seconds following the
active handling event. This is normal when the system
is operating. See Active Handling System
on page 5‑8andBraking on page 5‑4.
ACTIVE HANDLING READY
This message displays when the functional check
of the Active Handling System has been completed.
See Active Handling System
on page 5‑8for more
information.
ATTACH TRUNK PARTITION
If the vehicle has a power convertible top, this message
displays and a sound will be heard if the trunk partition
is not in place. Open the hatch/trunk and make sure the
trunk partition is secure and no objects are on the trunk
partition. See Rear Storage Area
on page 3‑51for
more information.
BATTERY SAVER ACTIVE
This message displays when the vehicle has
detected that the battery voltage is dropping beyond
a reasonable point. The battery saver system starts
reducing certain features of the vehicle that you may
be able to notice. At the point that features are disabled,
this message is displayed. It means that the vehicle
is trying to save the charge in the battery. Turn off
unnecessary accessories to allow the battery to
recharge.
4-53
Page 222 of 472
BUCKLE PASSENGER
This message reminds you to buckle the passenger's
safety belt.
This message displays and a sound will be heard when
the ignition is on, the driver's safety belt is buckled, the
passenger's safety belt is unbuckled with the passenger
airbag enabled, and the vehicle is in motion. You should
have the passenger buckle their safety belt.
The reminder will be repeated if the ignition is on, the
vehicle is in motion, the driver is buckled and the
passenger is still unbuckled, and the passenger airbag
is enabled. If the passenger's safety belt is already
buckled, this message will not come on.
BUCKLE SEATBELT
This message reminds you to buckle the driver's
safety belt.
This message displays and a sound will be heard when
the ignition is on, the driver's safety belt is unbuckled,
and the vehicle is in motion. You should buckle your
safety belt.
If the driver remains unbuckled when the ignition is
on and the vehicle is in motion, the reminder will be
repeated. If the driver's safety belt is already buckled,
this message will not come on. This message is an additional reminder to the safety
belt reminder light in the instrument panel cluster.
See
Safety Belt Reminders
on page 4‑32for more
information.
CHANGE BRAKE PADS
On vehicles with electronic brake pad wear sensors,
this message will be displayed when the pads are worn.
See your dealer/retailer for service.
CHANGE ENGINE OIL
This message displays when the life of the engine
oil has expired. See Scheduled Maintenanceon
page 7‑3. After an oil change, the engine oil life
system must be reset. See “Engine Oil Life”under
DIC Operation and Displays
on page 4‑47. Also, see
Engine Oilon page 6‑19and Engine Oil Life Systemon page 6‑25for more information.
CHECK BRAKE FLUID
This message displays, a sound will be heard, and the
brake system warning light on the instrument panel
cluster turns on if the ignition is on to inform the driver
that the brake fluid level is low. See Brake System
Warning Light
on page 4‑36. Have the brake system
serviced by your dealer/retailer as soon as possible.
See Brakes on page 6‑43.
4-54