2010 CHEVROLET CORVETTE display
[x] Cancel search: displayPage 248 of 472

Audio System(s)
Determine which radio the vehicle has and read the
following pages to become familiar with its features.
{WARNING:
Taking your eyes off the road for extended periods
could cause a crash resulting in injury or death to
you or others. Do not give extended attention to
entertainment tasks while driving.
This system provides access to many audio and non
audio listings.
To minimize taking your eyes off the road while driving,
do the following while the vehicle is parked:
.Become familiar with the operation and controls of
the audio system.
.Set up the tone, speaker adjustments, and preset
radio stations.
For more information, see Defensive Driving
on
page 5‑2. Notice:
Contact your dealer/retailer before adding
any equipment.
Adding audio or communication equipment could
interfere with the operation of the vehicle's engine,
radio, or other systems, and could damage them.
Follow federal rules covering mobile radio and
telephone equipment.
The vehicle has Retained Accessory Power (RAP). With
RAP, the audio system can be played even after the
ignition is turned off. See Retained Accessory Power
(RAP)
on page 3‑24for more information.
Setting the Clock
To set the clock:
1. Press and hold H until the correct hour displays.
2. Press and hold M until the correct minute displays.
The clock mode automatically times out with the
changed display format set as the current default
setting.
4-80
Page 249 of 472
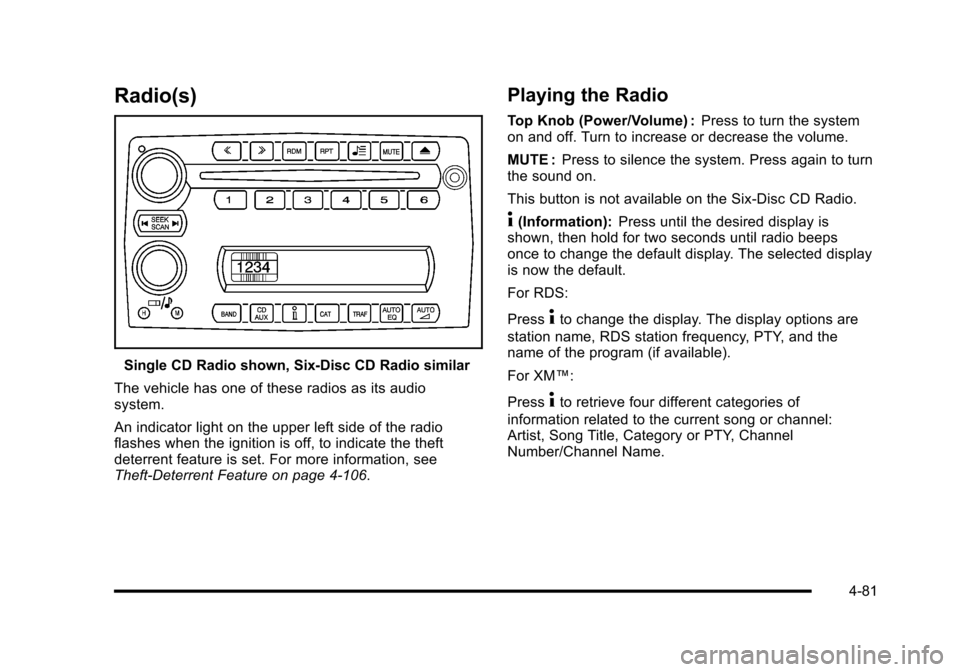
Radio(s)
Single CD Radio shown, Six-Disc CD Radio similar
The vehicle has one of these radios as its audio
system.
An indicator light on the upper left side of the radio
flashes when the ignition is off, to indicate the theft
deterrent feature is set. For more information, see
Theft-Deterrent Feature on page 4‑106.
Playing the Radio
Top Knob (Power/Volume) : Press to turn the system
on and off. Turn to increase or decrease the volume.
MUTE : Press to silence the system. Press again to turn
the sound on.
This button is not available on the Six-Disc CD Radio.
4(Information): Press until the desired display is
shown, then hold for two seconds until radio beeps
once to change the default display. The selected display
is now the default.
For RDS:
Press
4to change the display. The display options are
station name, RDS station frequency, PTY, and the
name of the program (if available).
For XM™:
Press
4to retrieve four different categories of
information related to the current song or channel:
Artist, Song Title, Category or PTY, Channel
Number/Channel Name.
4-81
Page 250 of 472
Audio Settings
Press and holdOewhen no tone or speaker control
is displayed to adjust all tone and speaker controls to
the middle position. AUDIO SETTINGS CENTERED
displays.
Adjusting the Tone (Bass/Treble)
O e(Bass/Treble): To adjust the Bass or Treble:
Press and release
O euntil BASS or TREBLE
displays.
.Turn theO eknob to increase or to decrease
the level.
.Press and hold theO eknob until the level
changes to the middle position.
Adjusting the Speakers (Balance/Fade)
O e(Balance/Fade): To adjust the Balance:
Press and release
O euntil BALANCE displays.
.Turn theOeknob to move the sound toward the
right or the left speakers.
.Press and hold theO eknob until the level
changes to the middle position. To adjust the Fade:
Press and release
O
euntil FADE displays
.Turn theOeknob to move the sound toward the
front or the rear speakers.
.Press and hold theO eknob until the level
changes to the middle position.
AUTO EQ (Automatic Equalization) : The radio saves
separate AUTO EQ settings for each preset and source.
For vehicles without the Bose
®sound system:
.Press AUTO EQ to select equalization settings
designed for CLASSICAL, POP, ROCK, JAZZ,
TALK, and COUNTRY.
.Selecting CUSTOM or changing bass or treble,
returns the EQ to the manual bass and treble
settings.
For vehicles with the Bose
®sound system:
.Press AUTO EQ to select equalization settings
from EQ1 through EQ6.
.Selecting CUSTOM or changing bass or treble,
returns the EQ to the manual bass and treble
settings.
4-82
Page 251 of 472
AUTOn(Automatic Volume):Automatic volume
automatically adjusts the audio system to make up for
road and wind noise, by increasing the volume as
vehicle speed increases.
For vehicles without the Bose
®sound system:
1. Set the volume at the desired level.
2. Press AUTO
nto select AUTO VOLUME MIN
(minimum), AUTO VOLUME MED (medium),
or AUTO VOLUME MAX (maximum). Each higher
setting provides more volume compensation at
faster vehicle speeds.
3. Press AUTO
nuntil AUTO VOLUME OFF
displays to turn automatic volume off. For vehicles with the Bose
®sound system:
Vehicles with the Bose
®sound system include Bose®
AudioPilot®noise compensation technology. AudioPilot®
continuously adjusts the audio system equalization
to compensate for background noise. This feature is
most effective at lower radio volume settings where
background noise can affect how well the audio is
heard. At higher volume settings, there may be little
or no adjustments by AudioPilot
®. For additional
information on AudioPilot®, visit bose.com/audiopilot.
To use AudioPilot
®:
1. Set the volume at the desired level.
2. Press AUTO
nuntil AUTO VOLUME ON
displays.
3. Press AUTO
nuntil AUTO VOLUME OFF
displays to turn off AudioPilot®.
4-83
Page 252 of 472
Using the Radio
Radio Data System (RDS)
RDS features are available for use only on FM stations
that broadcast RDS information. The station name or
call letters display while the radio is tuned to an RDS
station.
This system relies upon receiving specific information
from these stations and works only when the
information is available. In rare cases, a radio station
can broadcast incorrect information that causes the
radio features to work improperly. If this happens,
contact the radio station.
With RDS, the radio can:
.Seek to stations broadcasting the selected type of
programming.
.Receive announcements concerning local and
national emergencies.
.Display messages from radio stations.
.Seek to stations with traffic announcements.
.Provide the time of day.
.Provide a program type (PTY) for current
programming.
.Provide the name of the program being broadcast.
XM™ Satellite Radio Service
XM is a satellite radio service that is based in the
48 contiguous United States and 10 Canadian
provinces. XM Satellite Radio has a wide variety
of programming and commercial-free music,
coast-to-coast, and in digital-quality sound. A service
fee is required to receive the XM service. For more
information, contact XM at xmradio.com or call
1-800-929-2100 in the U.S. and xmradio.ca or call
1-877-438-9677 in Canada.
Finding an FM/AM/XM Station
BAND : Press to switch between FM1, FM2, AM, XM1
or XM2.
O e(Tune): Turn to select radio stations.
tSEEKu:Press to go to the previous or to the next
station and stay there.
The radio only stops at stations with a strong signal.
tSCANu: Press and holdtorufor two seconds
until FREQUENCY SCAN displays. The radio goes to a
station, plays for a few seconds, then goes on to the
next station. Press
toruagain to stop scanning.
4-84
Page 253 of 472
To scan preset stations:
Press and hold
torufor four seconds until PRESET
SCAN displays. The radio goes to the next preset
station, plays for a few seconds, then goes to the next
preset station. Press
toruagain or one of the
pushbuttons to stop scanning presets.
The radio only scans stations with a strong signal.
1-6 (Preset Pushbuttons) : Press to play stations that
are programmed to the radio preset pushbuttons.
Setting Preset Stations
Up to 30 stations (six FM1, six FM2, and six AM,
six XM1 and six XM2), and equalization settings for
each station can be programmed on the six numbered
pushbuttons.
To set presets:
1. Turn the radio on.
2. Press BAND to select FM1, FM2, AM, or XM1 or XM2.
3. Tune in the desired station. 4. Press AUTO EQ to select the equalization.
5. Press and hold one of the six numbered
pushbuttons until the radio beeps once.
6. Repeat the steps for each pushbutton.
Finding a Category (CAT) Station
(XM Satellite Radio Service Only)
To select an XM station by category: 1. Press CAT. The last selected category displays.
2. Turn the
O eknob to select a category.
3. Press
toruto go to a category's station.
SEEKING CATEGORY displays.
4. To go to another station within that category, press the CAT button to display the category, then press
toruto go to another station.
If the radio cannot find the desired category, NONE
displays and the radio returns to the last station tuned.
4-85
Page 254 of 472
SCAN :To scan the stations within a category:
1. Press CAT. The last selected category displays.
2. Turn the
O eknob to select a category.
3. Press and hold
toruuntil a beep sounds and
SCAN CATEGORY displays. The radio begins
scanning the stations in the category.
4. Press
toruto stop scanning.
Radio Messages
CAL ERR (Calibration Error) : Displays if the
radio is no longer configured properly for the vehicle.
The vehicle must be returned to your dealer/retailer
for service.
LOC (Locked) : Displays when the THEFTLOCK
®
system has locked up. The vehicle must be returned to
your dealer/retailer for service.
If any error occurs repeatedly or cannot be corrected,
contact your dealer/retailer.
RDS Messages
ALERT! : Alert warns of local or national emergencies.
When an alert announcement comes on the current
radio station, ALERT! displays. The announcement
is heard, even if the volume is low or a CD is playing.
If a CD is playing, play stops during the announcement.
Alert announcements cannot be turned off.
ALERT! is not affected by tests of the emergency
broadcast system. This feature is not supported by all
RDS stations.
4(Information): If the current station has a message,
INFO (information) displays. Press
4to see the
message. The message can display the artist, song
title, call in phone numbers, etc.
If the entire message is not displayed, parts of the
message appears every three seconds. To scroll
through the message, press and release
4. A new
group of words display after every press of the button.
Once the complete message has displayed, INFO
disappears from the display until another new message
is received. The last message can be displayed by
pressing this button. The last message until a new
message is received or the radio is tuned to a different
station.
NO INFO displays when a message is not available
from a station.
4-86
Page 255 of 472
TRAF (Traffic) :TA (traffic) displays when the station
broadcasts traffic announcements, the announcement
will be played.
Press TRAF and the radio seeks to a station that
broadcasts traffic announcements. When a station
is found, the radio stops seeking and TA displays.
NO TRAFFIC INFO displays if a station that broadcasts
traffic announcements can not be found.
Press TRAF to turn off the traffic announcements if TA
is on the display.
The radio plays the traffic announcement even if the
volume is low. The radio interrupts the play of a CD if
the last tuned station broadcasts traffic announcements.
This function does not apply to XM Satellite Radio
Service.
Radio Messages for XM Only
See XM Radio Messageson page 4‑95XM Radio
Messages later in this section for further detail.
Using the CD Player
The CD player can play smaller 3 inch (8 cm) single
CDs with an adapter ring.
A CD in the player it stays in the player when the
ignition is turned off. When the ignition or radio is turned
on, the CD starts to play where it stopped, if it was the
last selected audio source.
Loading a CD
Single CD Radio:
Insert the CD partway into the slot, label side up, until
the player pulls the CD in. The CD begins playing
automatically.
The CD symbol displays when a CD is inserted, and
the track number displays when each new track starts
to play.
Six-Disc CD Radio:
If more than one CD has been loaded, a number for
each CD displays.
M(Load): Press to load CDs into the CD player.
To insert one CD:
1. Press
M.
2. Load a CD and insert the CD partway into the slot, label side up when INSERT CD # displays.
The player pulls the CD in.
4-87