2010 CHEVROLET CORVETTE maintenance
[x] Cancel search: maintenancePage 7 of 472

Section 1 In Brief
Instrument Panel. . . . . . . . . . . . . . . . . . . . . . . . . . . . . . . . . . . 1-2
Initial Drive Information . . . . . . . . . . . . . . . . . . . . . . . . . . . 1-4
Remote Keyless Entry (RKE) System . . . . . . . . . . . 1-4
Door Locks . . . . . . . . . . . . . . . . . . . . . . . . . . . . . . . . . . . . . 1-5
Trunk Release . . . . . . . . . . . . . . . . . . . . . . . . . . . . . . . . . . 1-6
Windows . . . . . . . . . . . . . . . . . . . . . . . . . . . . . . . . . . . . . . . . 1-6
Seat Adjustment . . . . . . . . . . . . . . . . . . . . . . . . . . . . . . . . 1-7
Safety Belt . . . . . . . . . . . . . . . . . . . . . . . . . . . . . . . . . . . . . . 1-9
Sensing System for Passenger Airbag . . . . . . . . . 1-10
Mirror Adjustment . . . . . . . . . . . . . . . . . . . . . . . . . . . . . . 1-11
Steering Wheel Adjustment . . . . . . . . . . . . . . . . . . . . 1-12
Interior Lighting . . . . . . . . . . . . . . . . . . . . . . . . . . . . . . . . 1-13
Exterior Lighting . . . . . . . . . . . . . . . . . . . . . . . . . . . . . . . 1-13
Windshield Wiper/Washer . . . . . . . . . . . . . . . . . . . . . . 1-14
Climate Controls . . . . . . . . . . . . . . . . . . . . . . . . . . . . . . . 1-15
Transmission . . . . . . . . . . . . . . . . . . . . . . . . . . . . . . . . . . 1-15
Vehicle Features . . . . . . . . . . . . . . . . . . . . . . . . . . . . . . . . . . 1-16
Radio(s) . . . . . . . . . . . . . . . . . . . . . . . . . . . . . . . . . . . . . . . 1-16
Satellite Radio . . . . . . . . . . . . . . . . . . . . . . . . . . . . . . . . . 1-17 Portable Audio Devices . . . . . . . . . . . . . . . . . . . . . . . . 1-18
Steering Wheel Controls . . . . . . . . . . . . . . . . . . . . . . . 1-18
Bluetooth
®. . . . . . . . . . . . . . . . . . . . . . . . . . . . . . . . . . . . . 1-18
Navigation System . . . . . . . . . . . . . . . . . . . . . . . . . . . . . 1-19
Driver Information Center (DIC) . . . . . . . . . . . . . . . . 1-19
Cruise Control . . . . . . . . . . . . . . . . . . . . . . . . . . . . . . . . . 1-20
Power Outlets . . . . . . . . . . . . . . . . . . . . . . . . . . . . . . . . . 1-21
Roof Panel . . . . . . . . . . . . . . . . . . . . . . . . . . . . . . . . . . . . 1-21
Convertible . . . . . . . . . . . . . . . . . . . . . . . . . . . . . . . . . . . . 1-21
Performance and Maintenance . . . . . . . . . . . . . . . . . . 1-21
Traction Control System (TCS) . . . . . . . . . . . . . . . . 1-21
Towing . . . . . . . . . . . . . . . . . . . . . . . . . . . . . . . . . . . . . . . . . 1-22
Tire Pressure Monitor . . . . . . . . . . . . . . . . . . . . . . . . . . 1-22
Z06, Z16, and ZR1 Features . . . . . . . . . . . . . . . . . . . 1-23
Engine Oil Life System . . . . . . . . . . . . . . . . . . . . . . . . 1-24
Driving for Better Fuel Economy . . . . . . . . . . . . . . . 1-24
Battery . . . . . . . . . . . . . . . . . . . . . . . . . . . . . . . . . . . . . . . . . 1-24
Roadside Assistance Program . . . . . . . . . . . . . . . . . 1-25
OnStar
®. . . . . . . . . . . . . . . . . . . . . . . . . . . . . . . . . . . . . . . 1-25
1-1
Page 27 of 472
Power Outlets
The accessory power outlet can be used to connect
electrical equipment, such as a cellular phone.
The accessory power outlet is located inside the center
console storage compartment, on the forward left side.
To use the outlet, remove the tethered cap.
See Accessory Power Outlet(s) on page 4‑20.
Roof Panel
On vehicles with a removable roof panel, there are
three release latches. Two are located on the front of
the roof panel and the other is located on the back of
the roof panel. See Removing the Roof Panel
on
page 3‑54.
Until you are sure you can remove the roof panel by
yourself, have someone help you. Once removed, the
roof panel should always be stored properly in the rear
storage compartment.
For more information, see:
.Storing the Roof Panel on page 3‑56.
.Installing the Roof Panel on page 3‑58.
Convertible
If equipped, the convertible top can be lowered and
stowed under the tonneau cover behind the seats.
For step-by-step instructions, see Convertible Top
(Manual)
on page 3‑59or Convertible Top (Power)on
page 3‑66.
Performance and Maintenance
Traction Control System (TCS)
The traction control system limits wheel spin.
The system turns on automatically every time the
vehicle is started.
.To turn off traction control, press and releasedon
the console.
dilluminates and the appropriate
DIC message displays. See DIC Warnings and
Messages on page 4‑52.
.Press and release the button again to turn on
traction control.
See Traction Control System (TCS) on page 5‑6.
The vehicle has an Active Handling System that helps
maintain directional control of the vehicle in difficult
driving conditions. See Active Handling System
on
page 5‑8.
1-21
Page 28 of 472

The vehicle may have Competitive Driving Mode
(except ZR1), Performance Traction Management
(ZR1), and Launch Control systems designed to
allow increased performance while accelerating and
cornering. See Competitive Driving Mode on page 5‑9.
Towing
The vehicle was neither designed nor intended to be
towed with any of its wheels on the ground.
See Towing Your Vehicle
on page 5‑33and
Recreational Vehicle Towing on page 5‑33.
Tire Pressure Monitor
This vehicle may have a Tire Pressure Monitor
System (TPMS).
The Tire Pressure Monitor
alerts you when a
significant reduction in
pressure occurs in one or
more of the vehicle’s tires
by illuminating the low tire
pressure warning light on
the instrument cluster. The warning light will remain on until the tire pressure is
corrected. The proper tire pressures for your vehicle are
listed on the Tire and Loading Information label located
on the driver side center pillar (B pillar). See
Loading
the Vehicle
on page 5‑28.
You may notice during cooler conditions that the low tire
pressure warning light will appear when the vehicle is
first started and then turn off as you drive. This may be
an early indicator that your tire pressures are getting
low and the tires need to be inflated to the proper
pressure.
Note: The Tire Pressure Monitor can alert you about
low tire pressure, but it does not replace normal monthly
tire maintenance. It is the driver ’s responsibility to
maintain correct tire pressures.
See Tire Pressure Monitor System
on page 6‑72and
Tire Pressure Monitor Operation on page 6‑74.
1-22
Page 30 of 472
Engine Oil Life System
The engine oil life system calculates engine oil life
based on vehicle use and displays a DIC message
when it is necessary to change the engine oil and filter.
The oil life system should be reset to 100% only
following an oil change.
Resetting the Oil Life System
1. Press the TRIP button so the OIL LIFE percentageis displayed.
2. Press RESET and hold for two seconds. OIL LIFE REMAINING 100% will appear.
See Engine Oil Life System on page 6‑25.
Driving for Better Fuel Economy
Driving habits can affect fuel mileage. Here are some
driving tips to get the best fuel economy possible.
.Avoid fast starts and accelerate smoothly.
.Brake gradually and avoid abrupt stops.
.Avoid idling the engine for long periods of time.
.When road and weather conditions are
appropriate, use cruise control, if equipped.
.Always follow posted speed limits or drive more
slowly when conditions require.
.Keep vehicle tires properly inflated.
.Combine several trips into a single trip.
.Replace the vehicle's tires with the same
TPC Spec number molded into the tire's
sidewall near the size.
.Follow recommended scheduled maintenance.
Premium Fuel
This vehicle's engine was designed to use premium
unleaded gasoline. See Gasoline Octane on page 6‑7.
Battery
This vehicle has a maintenance free battery. See
Batteryon page 6‑49and Jump Starting on page 6‑50.
For ZO6, ZR1, and Grand Sport models the battery is
located in the rear hatch/trunk area. Access to the
battery is not necessary to jump start the vehicle.
There are positive (+) and negative (−) terminals in
the engine compartment.
1-24
Page 31 of 472

Roadside Assistance Program
U.S.:1-800-CHEV-USA (1-800-243-8872)
TTY Users: 1-888-889-2438
Canada: 1-800-268-6800
As the owner of a new Chevrolet, you are automatically
enrolled in the Roadside Assistance program. This
program provides technically trained advisors who are
available 24 hours a day, 365 days a year, minor repair
information or towing arrangements.
Roadside Assistance and OnStar
If you have a current OnStar subscription, press the
OnStar button and the current GPS location will be sent
to an OnStar Advisor who will assess your problem,
contact Roadside Assistance, and relay exact location
to get you the help you need.
Online Owner Center
The Online Owner Center is a complimentary service
that includes online service reminders, vehicle
maintenance tips, online owner manual, special
privileges and more.
Sign up today at:
www.gmownercenter.com/chevrolet (U.S.) or
www.gm.ca (Canada).
OnStar®
OnStar®uses several innovative technologies and live
advisors to provide a wide range of safety, security,
navigation, diagnostics, and calling services.
Automatic Crash Response
In a crash, built in sensors can automatically alert an
OnStar advisor who is immediately connected to the
vehicle to see if you need help.
1-25
Page 94 of 472
Restraint System Check
Checking the Restraint Systems
Safety Belts
Now and then, check that the safety belt reminder light,
safety belts, buckles, latch plates, retractors, and
anchorages are all working properly.
Look for any other loose or damaged safety belt system
parts that might keep a safety belt system from doing
its job. See your dealer/retailer to have it repaired.
Torn or frayed safety belts may not protect you in a
crash. They can rip apart under impact forces.
If a belt is torn or frayed, get a new one right away.
Make sure the safety belt reminder light is working.
See Safety Belt Reminders
on page 4‑32for more
information.
Keep safety belts clean and dry. See Care of Safety
Belts
on page 6‑93.
Airbags
The airbag system does not need regularly scheduled
maintenance or replacement. Make sure the airbag
readiness light is working. See Airbag Readiness Light
on page 4‑33for more information.
Notice: If an airbag covering is damaged, opened,
or broken, the airbag may not work properly. Do not
open or break the airbag coverings. If there are any
opened or broken airbag covers, have the airbag
covering and/or airbag module replaced. For the
location of the airbag modules, see What Makes an
Airbag Inflate?
on page 2‑50. See your dealer/
retailer for service.
2-60
Page 191 of 472
The system operates to reach the set temperature
as quickly as possible. The AUTO control system
works best with the windows up and the removable
roof installed or the convertible top up. 1. Press the AUTO button.
2. Adjust the temperature to a comfortable setting between 16°C (60°F) and 32°C (90°F). Choosing
the coldest or warmest temperature setting will
not cause the system to heat or cool any faster.
A setting of 23°C (73°F) is suggested.
In cold weather, the system will start at reduced
fan speeds to avoid blowing cold air into your
vehicle until warmer air is available. The system
starts out blowing air at the floor but may change
modes automatically as the vehicle warms up to
maintain the chosen temperature setting. The
length of time needed for warm up depends on the
outside temperature and the length of time that has
elapsed since the vehicle was last driven.
3. Wait for the system to regulate. This may take from 10 to 30 minutes. Then adjust the temperature,
if necessary.
Do not cover the solar sensor located in the center of
the instrument panel, near the windshield. For more
information on the solar sensor, see “Sensor”later in
this section.Manual Operation
Driver Power/Temperature : Press the driver
temperature knob to turn the climate control system off.
This is the only setting that completely shuts off the fan.
The digital display shows only the outside temperature.
The driver and the passenger set temperature and the
air intake mode can still be adjusted when the climate
control is off.
Passenger Power/Temperature : Press the passenger
temperature knob to turn the passenger's climate
control system on or off. Turn the knob to increase or
decrease the temperature for the passenger. If the
passenger's climate control system is off, the driver's
temperature knob will control the temperature for the
entire vehicle.
x 9 w (Fan) :Press to increase or decrease the fan
speed. The fan speed setting will appear in the display.
Pressing the arrows will delete AUTO from the digital
display. The fan graphics with the fan speed bars will be
shown. The AUTO button must be pressed to return to
the automatic fan control.
If the airflow seems low when the fan speed is at the
highest setting, the passenger compartment air filter
may need to be replaced. For more information, see
Passenger Compartment Air Filter
on page 4‑28and
Scheduled Maintenance on page 7‑3.
4-23
Page 196 of 472
Passenger Compartment Air Filter
The passenger compartment air filter removes certain
particles from the air including pollen and dust particles.
Reductions in airflow, which may occur more often in
dusty areas, indicate that the filter may need to be
replaced. See Scheduled Maintenance
on page 7‑3for information on how often to replace the filter.
Notice: Driving without a passenger compartment
air filter in place can cause water and small
particles, like paper and leaves, to be pulled into
your climate control system which may cause
damage to it. Make sure you always replace the
old filter with a new one.
The passenger compartment air filter is located on the
passenger side of the engine compartment near the
battery. See Engine Compartment Overview
on
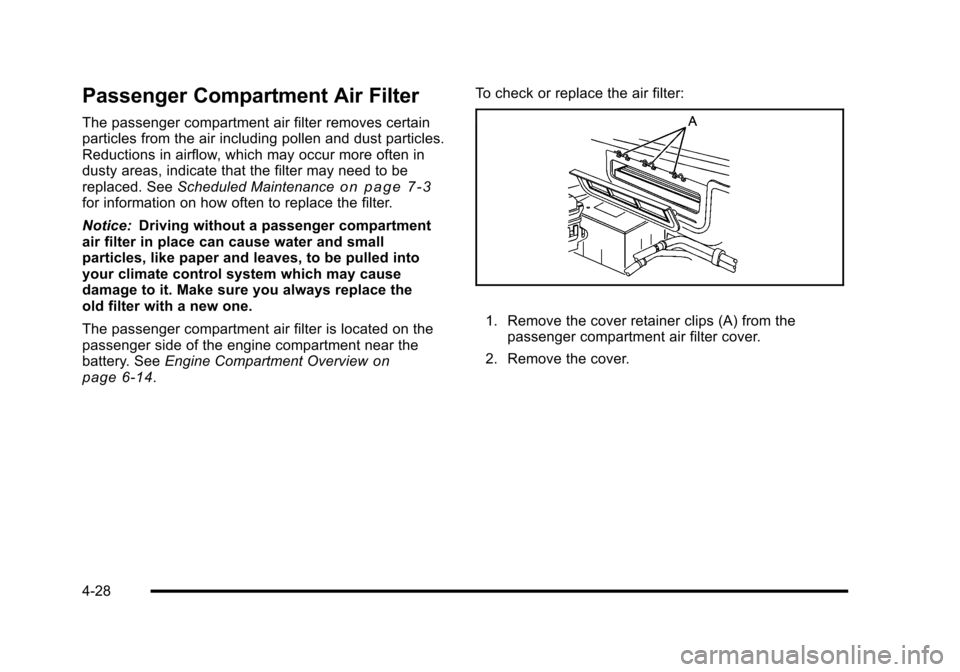
page 6‑14. To check or replace the air filter:
1. Remove the cover retainer clips (A) from the
passenger compartment air filter cover.
2. Remove the cover.
4-28