Page 317 of 472
Doing Your Own Service Work
{WARNING:
You can be injured and the vehicle could be
damaged if you try to do service work on a vehicle
without knowing enough about it.
.Be sure you have sufficient knowledge,
experience, the proper replacement parts,
and tools before attempting any vehicle
maintenance task.
.Be sure to use the proper nuts, bolts, and
other fasteners. English and metric fasteners
can be easily confused. If the wrong fasteners
are used, parts can later break or fall off.
You could be hurt. If doing some of your own service work, use the proper
service manual. It tells you much more about how to
service the vehicle than this manual can. To order
the proper service manual, see
Service Publications
Ordering Information on page 8‑16.
This vehicle has an airbag system. Before attempting
to do your own service work, see Servicing Your
Airbag-Equipped Vehicle on page 2‑58.
Keep a record with all parts receipts and list the
mileage and the date of any service work performed.
See Maintenance Record on page 7‑14.Adding Equipment to the Outside of
the Vehicle
Things added to the outside of the vehicle can affect
the airflow around it. This can cause wind noise and
can affect fuel economy and windshield washer
performance. Check with your dealer/retailer before
adding equipment to the outside of the vehicle.
6-5
Page 318 of 472
Fuel
Use of the recommended fuel is an important part
of the proper maintenance of this vehicle. To help
keep the engine clean and maintain optimum vehicle
performance, we recommend the use of gasoline
advertised as TOP TIER Detergent Gasoline.
Look for the TOP TIER label on the fuel pump to
ensure gasoline meets enhanced detergency standards
developed by auto companies. A list of marketers
providing TOP TIER Detergent Gasoline can be found
at www.toptiergas.com.
The 8th digit of the Vehicle Identification Number (VIN)
shows the code letter or number that identifies the
vehicle's engine. The VIN is at the top left of the
instrument panel. See Vehicle Identification Number
(VIN) on page 6‑99.
6-6
Page 336 of 472
2. Once the oil has been drained from the engine, remove the engine oil filter and allow the oil to
drain.
3. Re‐install both drain plugs and tighten them to 25 Y (18 lb ft).
4. Replace the oil filter and tighten it to 30 Y
(22 lb ft). See Maintenance Replacement Parts
on
page 7‑12for the correct filter.
5. Oil is filled through the opening in the top of the external engine oil tank. Remove the oil fill cap.
6. Add 9.9 L (10.5 quarts) of oil to the oil tank. See Capacities and Specifications on page 6‑108.
7. Install the oil fill cap and insert the dipstick, if removed.
8. Start the engine and let it run at idle for at least 15 seconds. This will circulate the fresh engine oil
through the lubrication system.
9. Shut off the engine and check the oil level as described under “Checking Engine Oil (ZO6, ZR1,
and Grand Sport).”
What Kind of Engine Oil to Use
Look for three things:
.GM4718M
This vehicle's engine requires a special oil
meeting GM Standard GM4718M. Oils meeting
this standard may be identified as synthetic.
However, not all synthetic oils will meet this
GM standard. Use only an oil that meets GM
Standard GM4718M.
Notice: Using oils that do not have the GM4718M
Standard designation can cause engine damage not
covered by the vehicle warranty.
.SAE 5W-30
SAE 5W-30 is best for the vehicle. These numbers
on an oil container show its viscosity, or thickness.
Do not use other viscosity oils such as
SAE 20W-50.
.American Petroleum Institute (API) starburst
symbol
6-24
Page 339 of 472
What to Do with Used Oil
Used engine oil contains certain elements that can be
unhealthy for your skin and could even cause cancer.
Do not let used oil stay on your skin for very long. Clean
your skin and nails with soap and water, or a good hand
cleaner. Wash or properly dispose of clothing or rags
containing used engine oil. See the manufacturer's
warnings about the use and disposal of oil products.
Used oil can be a threat to the environment. If you
change your own oil, be sure to drain all the oil from the
filter before disposal. Never dispose of oil by putting it in
the trash, pouring it on the ground, into sewers, or into
streams or bodies of water. Recycle it by taking it to a
place that collects used oil.
Engine Air Cleaner/Filter
See Engine Compartment Overviewon page 6‑14for
the location of the engine air cleaner/filter.
Notice: If you spray water into the engine air
cleaner/filter intake and water enters the engine
air cleaner/filter housing, you could damage your
vehicle's engine. The repairs would not be covered
by your warranty. Do not spray water into the
engine air cleaner/filter intake and/or housing. If you are cleaning the vehicle with the hood open, take
care not to spray water directly near the filter opening of
the air cleaner, as shown in the illustration, as this could
damage the vehicle's engine.
When to Inspect the Engine Air Cleaner/
Filter
Inspect the air cleaner/filter at the Maintenance
II
intervals and replace them at the first oil change after
each 80 000 km (50,000 mile) interval. See Scheduled
Maintenance
on page 7‑3for more information. If you
are driving in dusty/dirty conditions, inspect the filter at
each engine oil change.
How to Inspect the Engine Air Cleaner/
Filter
To inspect the air cleaner/filter, remove the filter from
the vehicle and lightly shake the filter to release loose
dust and dirt. If the filter remains caked with dirt, a new
filter is required.
6-27
Page 342 of 472
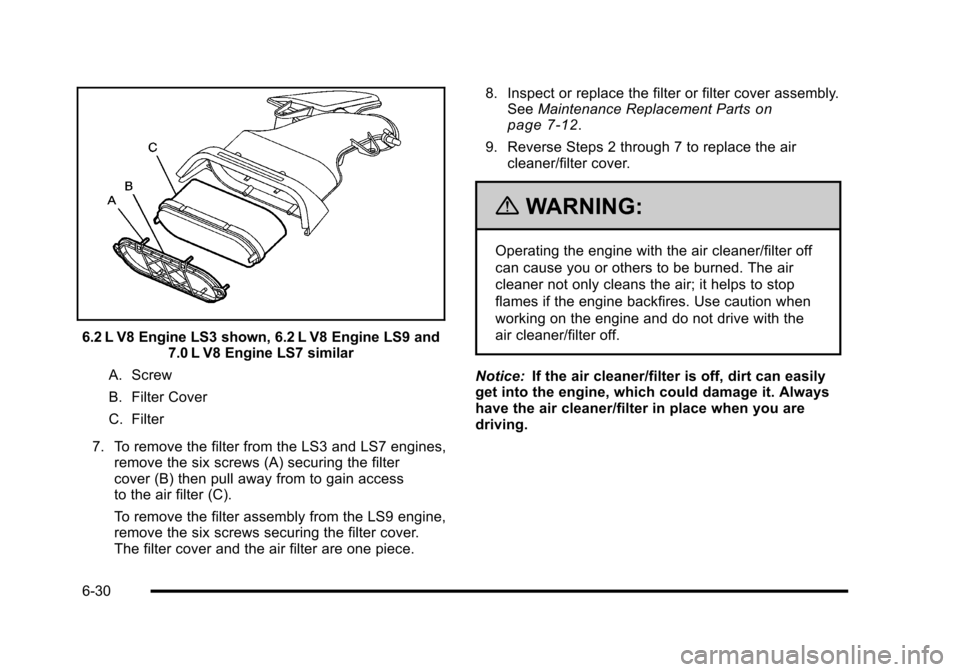
6.2 L V8 Engine LS3 shown, 6.2 L V8 Engine LS9 and 7.0 L V8 Engine LS7 similar
A. Screw
B. Filter Cover
C. Filter
7. To remove the filter from the LS3 and LS7 engines, remove the six screws (A) securing the filter
cover (B) then pull away from to gain access
to the air filter (C).
To remove the filter assembly from the LS9 engine,
remove the six screws securing the filter cover.
The filter cover and the air filter are one piece. 8. Inspect or replace the filter or filter cover assembly.
See Maintenance Replacement Parts
on
page 7‑12.
9. Reverse Steps 2 through 7 to replace the air cleaner/filter cover.
{WARNING:
Operating the engine with the air cleaner/filter off
can cause you or others to be burned. The air
cleaner not only cleans the air; it helps to stop
flames if the engine backfires. Use caution when
working on the engine and do not drive with the
air cleaner/filter off.
Notice: If the air cleaner/filter is off, dirt can easily
get into the engine, which could damage it. Always
have the air cleaner/filter in place when you are
driving.
6-30
Page 343 of 472
Automatic Transmission Fluid
How to Check Automatic Transmission
Fluid
It is not necessary to check the transmission fluid level.
A transmission fluid leak is the only reason for fluid
loss. If a leak occurs, take the vehicle to your dealer/
retailer service department and have it repaired as soon
as possible.
There is a special procedure for checking and changing
the transmission fluid. Because this procedure is
difficult, you should have this done at your dealer/
retailer service department. Contact your dealer/retailer
for additional information or the procedure can be found
in the service manual. To purchase a service manual,
see Service Publications Ordering Information
on
page 8‑16.
Notice: Use of the incorrect automatic transmission
fluid may damage the vehicle, and the damages may
not be covered by the vehicle's warranty. Always
use the automatic transmission fluid listed in
Recommended Fluids and Lubricants on page 7‑10. Change the fluid and filter at the intervals listed in
Scheduled Maintenance
on page 7‑3, and be sure
to use the fluid listed in Recommended Fluids and
Lubricants on page 7‑10.
Manual Transmission Fluid
It is not necessary to check the manual transmission
fluid level. A transmission fluid leak is the only reason
for fluid loss. If a leak occurs, take the vehicle to your
dealer/retailer service department and have it repaired
as soon as possible. See Recommended Fluids and
Lubricants
on page 7‑10for the proper fluid to use.
Hydraulic Clutch
It is not necessary to regularly check clutch fluid unless
you suspect there is a leak in the system. Adding fluid
will not correct a leak. A fluid loss in this system could
indicate a problem. Have the system inspected and
repaired.
6-31
Page 344 of 472
When to Check and What to Use
The hydraulic clutch fluid
reservoir cap has this
symbol on it. See Engine
Compartment Overview
on page 6‑14for
reservoir location.
Refer to the Maintenance Schedule for the proper
fluid to use. See Recommended Fluids and Lubricants
on page 7‑10. The fluid requires changing every
two years. See Scheduled Maintenance on page 7‑3.
How to Check and Add Fluid
Visually check the clutch fluid reservoir to make sure
the fluid level is at the MIN (minimum) line on the side
of the reservoir. The hydraulic clutch fluid system
should be closed and sealed.
Do not remove the cap to check the fluid level or to
top‐off the fluid level. Remove the cap only when
necessary to add the proper fluid until the level
reaches the MIN line.
Cooling System (Engine)
The cooling system allows the engine to maintain the
correct working temperature.
7.0L Engine shown, 6.2L Engine similar
A. Electric Engine Cooling Fan
B. Coolant Surge Tank with Pressure Cap
6-32
Page 356 of 472
Do not top off the brake fluid. Adding fluid does not
correct a leak. If fluid is added when the linings are
worn, there will be too much fluid when new brake
linings are installed. Add or remove brake fluid, as
necessary, only when work is done on the brake
hydraulic system.
{WARNING:
If too much brake fluid is added, it can spill on
the engine and burn, if the engine is hot enough.
You or others could be burned, and the vehicle
could be damaged. Add brake fluid only when
work is done on the brake hydraulic system.
See “Checking Brake Fluid” in this section.
Refer to the Maintenance Schedule to determine when
to check the brake fluid. See Scheduled Maintenance
on page 7‑3.
Checking Brake Fluid
Check brake fluid by looking at the brake fluid reservoir.
See Engine Compartment Overview on page 6‑14.
The fluid level should be above the MIN mark on the
reservoir. If it is not, have the brake hydraulic system
checked to see if there is a leak.
After work is done on the brake hydraulic system, make
sure the level is between the MIN and MAX marks.
What to Add
Use only new DOT 3 brake fluid from a sealed
container. See Recommended Fluids and Lubricantson
page 7‑10.
Always clean the brake fluid reservoir cap and the area
around the cap before removing it. This helps keep dirt
from entering the reservoir.
{WARNING:
With the wrong kind of fluid in the brake hydraulic
system, the brakes might not work well. This could
cause a crash. Always use the proper brake fluid.
6-44