2010 CHEVROLET CORVETTE trunk release
[x] Cancel search: trunk releasePage 7 of 472

Section 1 In Brief
Instrument Panel. . . . . . . . . . . . . . . . . . . . . . . . . . . . . . . . . . . 1-2
Initial Drive Information . . . . . . . . . . . . . . . . . . . . . . . . . . . 1-4
Remote Keyless Entry (RKE) System . . . . . . . . . . . 1-4
Door Locks . . . . . . . . . . . . . . . . . . . . . . . . . . . . . . . . . . . . . 1-5
Trunk Release . . . . . . . . . . . . . . . . . . . . . . . . . . . . . . . . . . 1-6
Windows . . . . . . . . . . . . . . . . . . . . . . . . . . . . . . . . . . . . . . . . 1-6
Seat Adjustment . . . . . . . . . . . . . . . . . . . . . . . . . . . . . . . . 1-7
Safety Belt . . . . . . . . . . . . . . . . . . . . . . . . . . . . . . . . . . . . . . 1-9
Sensing System for Passenger Airbag . . . . . . . . . 1-10
Mirror Adjustment . . . . . . . . . . . . . . . . . . . . . . . . . . . . . . 1-11
Steering Wheel Adjustment . . . . . . . . . . . . . . . . . . . . 1-12
Interior Lighting . . . . . . . . . . . . . . . . . . . . . . . . . . . . . . . . 1-13
Exterior Lighting . . . . . . . . . . . . . . . . . . . . . . . . . . . . . . . 1-13
Windshield Wiper/Washer . . . . . . . . . . . . . . . . . . . . . . 1-14
Climate Controls . . . . . . . . . . . . . . . . . . . . . . . . . . . . . . . 1-15
Transmission . . . . . . . . . . . . . . . . . . . . . . . . . . . . . . . . . . 1-15
Vehicle Features . . . . . . . . . . . . . . . . . . . . . . . . . . . . . . . . . . 1-16
Radio(s) . . . . . . . . . . . . . . . . . . . . . . . . . . . . . . . . . . . . . . . 1-16
Satellite Radio . . . . . . . . . . . . . . . . . . . . . . . . . . . . . . . . . 1-17 Portable Audio Devices . . . . . . . . . . . . . . . . . . . . . . . . 1-18
Steering Wheel Controls . . . . . . . . . . . . . . . . . . . . . . . 1-18
Bluetooth
®. . . . . . . . . . . . . . . . . . . . . . . . . . . . . . . . . . . . . 1-18
Navigation System . . . . . . . . . . . . . . . . . . . . . . . . . . . . . 1-19
Driver Information Center (DIC) . . . . . . . . . . . . . . . . 1-19
Cruise Control . . . . . . . . . . . . . . . . . . . . . . . . . . . . . . . . . 1-20
Power Outlets . . . . . . . . . . . . . . . . . . . . . . . . . . . . . . . . . 1-21
Roof Panel . . . . . . . . . . . . . . . . . . . . . . . . . . . . . . . . . . . . 1-21
Convertible . . . . . . . . . . . . . . . . . . . . . . . . . . . . . . . . . . . . 1-21
Performance and Maintenance . . . . . . . . . . . . . . . . . . 1-21
Traction Control System (TCS) . . . . . . . . . . . . . . . . 1-21
Towing . . . . . . . . . . . . . . . . . . . . . . . . . . . . . . . . . . . . . . . . . 1-22
Tire Pressure Monitor . . . . . . . . . . . . . . . . . . . . . . . . . . 1-22
Z06, Z16, and ZR1 Features . . . . . . . . . . . . . . . . . . . 1-23
Engine Oil Life System . . . . . . . . . . . . . . . . . . . . . . . . 1-24
Driving for Better Fuel Economy . . . . . . . . . . . . . . . 1-24
Battery . . . . . . . . . . . . . . . . . . . . . . . . . . . . . . . . . . . . . . . . . 1-24
Roadside Assistance Program . . . . . . . . . . . . . . . . . 1-25
OnStar
®. . . . . . . . . . . . . . . . . . . . . . . . . . . . . . . . . . . . . . . 1-25
1-1
Page 9 of 472

A.Outlet Adjustment on page 4‑27.
B. Head-Up Display (HUD)
on page 4‑16(If Equipped).
C. Turn Signal/Multifunction Lever
on page 4‑4.
Cruise Controlon page 4‑7. Fog Lampson
page 4‑13. Exterior Lamps on page 4‑11.
D. Manual Shift Paddles (If Equipped). See Automatic
Transmission Operation on page 3‑26.
E. Driver Information Center (DIC) on page 4‑47.
F. Instrument Panel Cluster on page 4‑30.
G. Windshield Wipers
on page 4‑6and Windshield
Washer on page 4‑6.
H. DIC Operation and Displays on page 4‑47.
I. Hazard Warning Flashers on page 4‑3.
J. Audio System(s) on page 4‑80.
K. Dual Automatic Climate Control System
on
page 4‑22.
L. Fuel Door Release Button. See Filling the
Tank
on page 6‑9. Hatch/Trunk Release Button.
See “Hatch/Trunk Lid Release” underHatchon
page 3‑14.
M. Instrument Panel Brightness on page 4‑15.
N. Power Folding Top Switch (If Equipped). See Convertible Top (Manual)
on page 3‑59orConvertible Top (Power) on page 3‑66. O.
Bluetooth
®on page 4‑96(If Equipped).
Audio Steering Wheel Controlson page 4‑107(If Equipped).
P. Tilt Wheel on page 4‑3.
Q. Horn on page 4‑3.
R. Telescopic Wheel Button (If Equipped). See Tilt Wheel on page 4‑3.
S. Ignition Positions on page 3‑23.
T. Heated Seats
on page 2‑4(If Equipped).
U. Shift Lever (Automatic Shown). See Automatic
Transmission Operation
on page 3‑26or Manual
Transmission Operation on page 3‑32.
V. Active Handling System on page 5‑8.
W. Accessory Power Outlet(s) on page 4‑20.
X. Selective Ride Control on page 5‑14.
Y. Cupholders on page 3‑50.
Z. Ashtray(s) and Cigarette Lighter on page 4‑21.
AA. Parking Brake on page 3‑34.
AB. Glove Box on page 3‑50.
AC. Instrument Panel Fuse Block on page 6‑101.
1-3
Page 12 of 472

Trunk Release
Opening and Closing the Hatch/Trunk
There are three ways to open the hatch/trunk:
.Touch the button located above the license plate.
The Keyless Access transmitter must be within
three feet of the button.
.Press theVbutton located to the left of the
steering wheel.
.Press the}button on the Keyless Access
transmitter.
For more information see Hatch on page 3‑14.
Windows
The power window switches are located on each door.
Pull up or press down on the front of the switch to raise
or lower the window.
For more information, see Power Windows
on
page 3‑17.
1-6
Page 102 of 472

Keyless Trunk Opening
Press the hatch/trunk release button located on the rear
of the hatch/trunk lid above the license plate to open the
trunk if the keyless access transmitter is within range.
See Hatch
on page 3‑14for additional information.
There are other conditions that can affect the
performance of the transmitter. See Keyless Access
System
on page 3‑5Keyless Access System.
This vehicle comes with
two transmitters.
Q(Lock): Press once to lock the doors. WhenQis
pressed twice, the lights flash and the horn sounds to
confirm locking.
K(Unlock): Press once to unlock only the driver door.
Press
Ktwice within five seconds to unlock both doors.
The interior lamps may come on.
Pressing
Kalso recalls the memory settings.
See Memory Seat, Mirrors and Steering Wheel
on
page 2‑4for more information.
}(Hatch/Trunk): Press and hold for about
one second to unlock the hatch/trunk. If the engine
is running, the shift lever must be in P (Park) for an
automatic transmission. For a manual transmission,
the shift lever must be in NEUTRAL with the parking
brake set.
L(Panic): Press to sound the horn. Press any other
button on the keyless access transmitter to stop it.
The vehicle comes with two transmitters. Each
transmitter will have a number on top of it, “1”or“2”.
These numbers correspond to the driver of the vehicle.
For example, the memory seat position for driver 1 will
be recalled when using the transmitter labeled “1”,
if enabled through the DIC. See Memory Seat, Mirrors
and Steering Wheel
on page 2‑4and DIC Vehicle
Personalizationon page 4‑71for more information.
3-6
Page 111 of 472

Hatch/Trunk Lid Release
There are several ways to release the hatch/trunk lid.
If your vehicle has an automatic transmission, the shift
lever must be in P (Park). For manual transmission
vehicles, the parking brake must be set when the
ignition is started for the hatch/trunk release to operate.
The parking brake does not need to be set when the
ignition is off for the hatch/trunk release to operate.
See Parking Brake on page 3‑34.
V (Hatch/Trunk) : Press the hatch/trunk lid release
button, located on the instrument panel to the left of the
steering wheel. The theft-deterrent alarm system must
not be armed.
} (Hatch/Trunk) : Press the hatch/trunk lid release
button on the keyless access transmitter. See Keyless
Access System on page 3‑5.
Press the hatch/trunk release button located on the rear
of the hatch/trunk lid above the license plate, as long as
you have your transmitter with you.
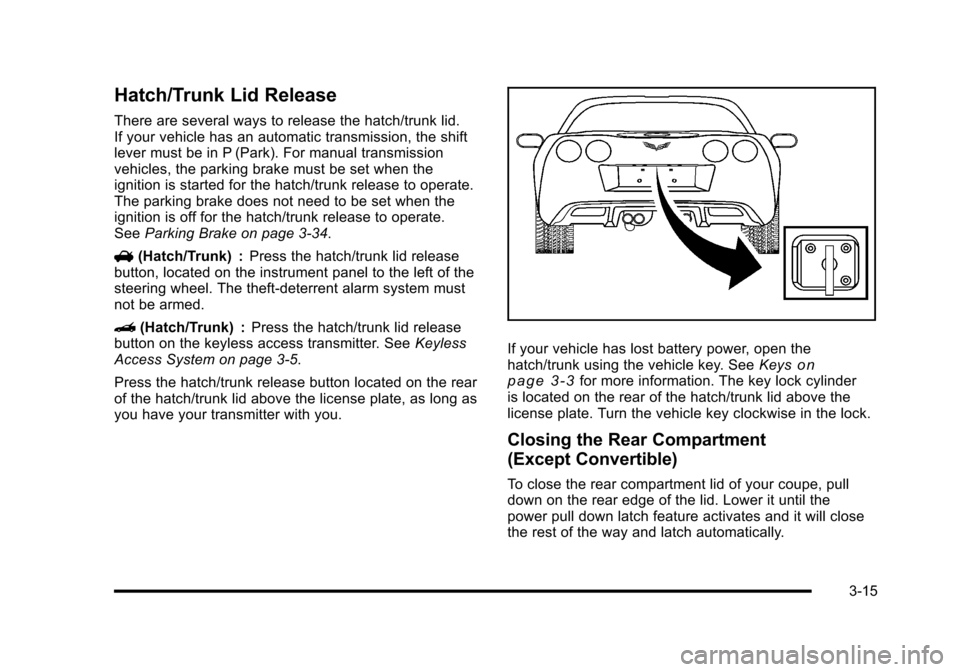
If your vehicle has lost battery power, open the
hatch/trunk using the vehicle key. See Keyson
page 3‑3for more information. The key lock cylinder
is located on the rear of the hatch/trunk lid above the
license plate. Turn the vehicle key clockwise in the lock.
Closing the Rear Compartment
(Except Convertible)
To close the rear compartment lid of your coupe, pull
down on the rear edge of the lid. Lower it until the
power pull down latch feature activates and it will close
the rest of the way and latch automatically.
3-15
Page 112 of 472

Emergency Trunk Release Handle
(Coupe)
Notice:Do not use the emergency trunk release
handle as a tie-down or anchor point when securing
items in the trunk as it could damage the handle.
The emergency trunk release handle is only
intended to aid a person trapped in a latched trunk,
enabling them to open the trunk from the inside.
There is a glow-in-the-dark emergency trunk release
handle located on the rear wall of the trunk below the
latch. This handle will glow following exposure to light.
Pull the release handle down to open the trunk from the
inside.
Windows
{WARNING:
Leaving children, helpless adults, or pets in a
vehicle with the windows closed is dangerous.
They can be overcome by the extreme heat and
suffer permanent injuries or even death from heat
stroke. Never leave a child, a helpless adult, or a
pet alone in a vehicle, especially with the windows
closed in warm or hot weather.
3-16
Page 116 of 472

Testing the Alarm
To test the system: 1. Make sure the trunk lid/hatch is latched.
2. Lower the window on the driver door.
3. Manually arm the system.
4. Close the doors and wait 30 seconds.
5. Reach through the open window and manually pull the release lever on the floor.
6. Press the unlock button on the transmitter to turn off the alarm.
If the alarm does not sound, check to see if the horn
works. The horn fuse may be blown. See Fuses and
Circuit Breakers
on page 6‑101. If the horn works, but
the alarm does not go off, see your dealer/retailer.
Disarming the System
Press the unlock button on the keyless access
transmitter or squeeze the door handle sensor while
the transmitter is near the vehicle to unlock a door.
Unlocking a door any other way sets off the alarm.
If the alarm sounds, press the unlock button on the
keyless access transmitter to disarm it.
Do not leave the key or device that disarms or
deactivates the theft deterrent system in the vehicle.
Immobilizer
See Radio Frequency Statementon page 8‑20for information regarding Part 15 of the Federal
Communications Commission (FCC) Rules and
RSS-210/211 of Industry Canada.
Immobilizer Operation
The vehicle has a passive theft-deterrent system.
The system is automatically armed when the ignition is
turned off.
The immobilization system is disarmed when the
ignition is turned to OFF/ACCESSORY or START and
a valid transmitter is found in the vehicle.
You do not have to manually arm or disarm the system.
The security light comes on if there is a problem with
arming or disarming the theft-deterrent system.
The system has one or more keyless access
transmitters that are matched to an immobilizer control
unit in the vehicle. Only a correctly matched keyless
access transmitter starts the vehicle. The vehicle may
not start if the keyless access transmitter is damaged.
If the engine does not start and the security light comes
on, there may be a problem with the immobilizer
system. Press the START button again.
3-20
Page 158 of 472

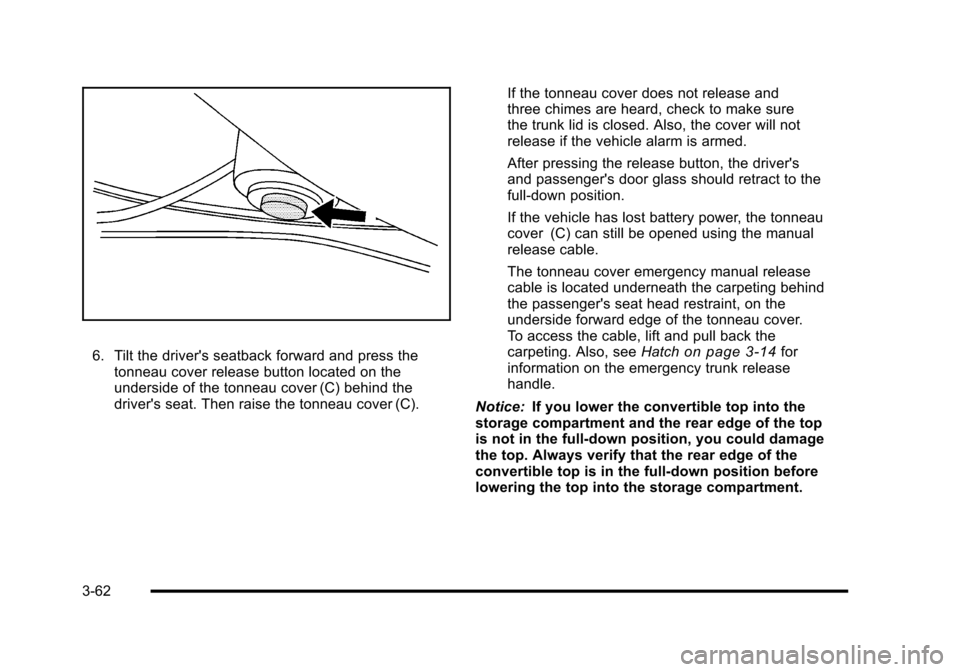
6. Tilt the driver's seatback forward and press the tonneau cover release button located on the
underside of the tonneau cover (C) behind the
driver's seat. Then raise the tonneau cover (C). If the tonneau cover does not release and
three chimes are heard, check to make sure
the trunk lid is closed. Also, the cover will not
release if the vehicle alarm is armed.
After pressing the release button, the driver's
and passenger's door glass should retract to the
full-down position.
If the vehicle has lost battery power, the tonneau
cover (C) can still be opened using the manual
release cable.
The tonneau cover emergency manual release
cable is located underneath the carpeting behind
the passenger's seat head restraint, on the
underside forward edge of the tonneau cover.
To access the cable, lift and pull back the
carpeting. Also, see
Hatchon page 3‑14for
information on the emergency trunk release
handle.
Notice: If you lower the convertible top into the
storage compartment and the rear edge of the top
is not in the full-down position, you could damage
the top. Always verify that the rear edge of the
convertible top is in the full-down position before
lowering the top into the storage compartment.
3-62