2010 CHEVROLET CORVETTE display
[x] Cancel search: displayPage 136 of 472
Compass Calibration
PressPonce to turn the compass display on or off.
If after several seconds the display does not show a
compass heading, there may be a strong magnetic
field interfering with the compass. Interference can be
caused by a magnetic antenna mount, note pad holder
or similar object. If the letter C or CAL appears in the
compass window, the compass needs calibration.
Depending on the mirror, in order to calibrate, CAL must
be displayed in the mirror compass windows. If CAL is
not displayed, press
Pfor several seconds or until
CAL is displayed.
If the compass has map lamps, it can be placed in
calibration mode by pressing and holding the left map
light button until a C appears on the compass display.
The mirror compass can be calibrated by driving the
vehicle in circles at 5 mph (8 km/h) or less until the
display reads a direction.
Compass Variance
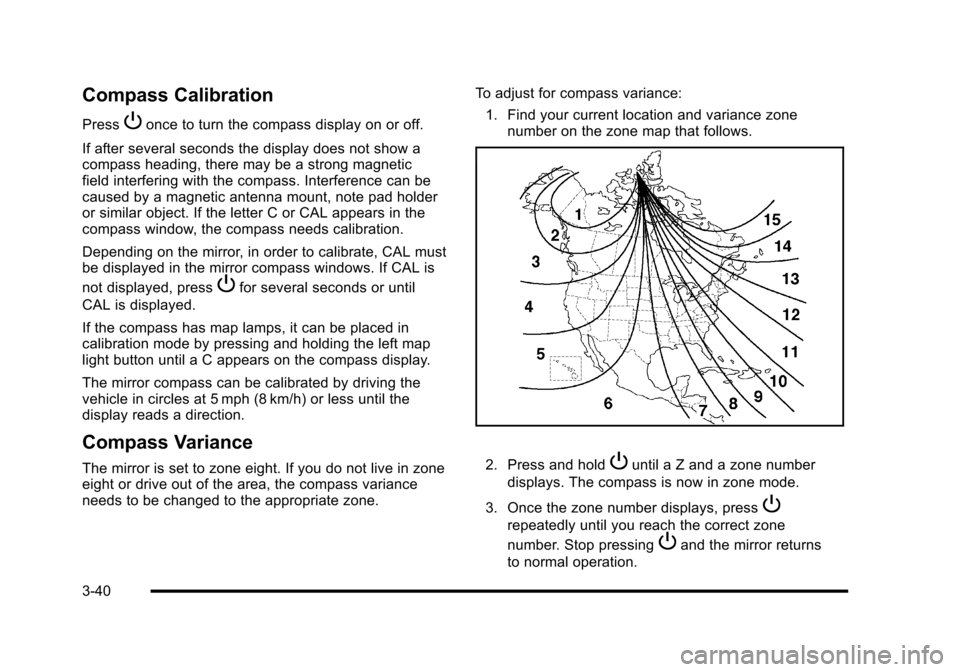
The mirror is set to zone eight. If you do not live in zone
eight or drive out of the area, the compass variance
needs to be changed to the appropriate zone. To adjust for compass variance:
1. Find your current location and variance zone number on the zone map that follows. 2. Press and holdPuntil a Z and a zone number
displays. The compass is now in zone mode.
3. Once the zone number displays, press
P
repeatedly until you reach the correct zone
number. Stop pressing
Pand the mirror returns
to normal operation.
3-40
Page 147 of 472
Rear Storage Area
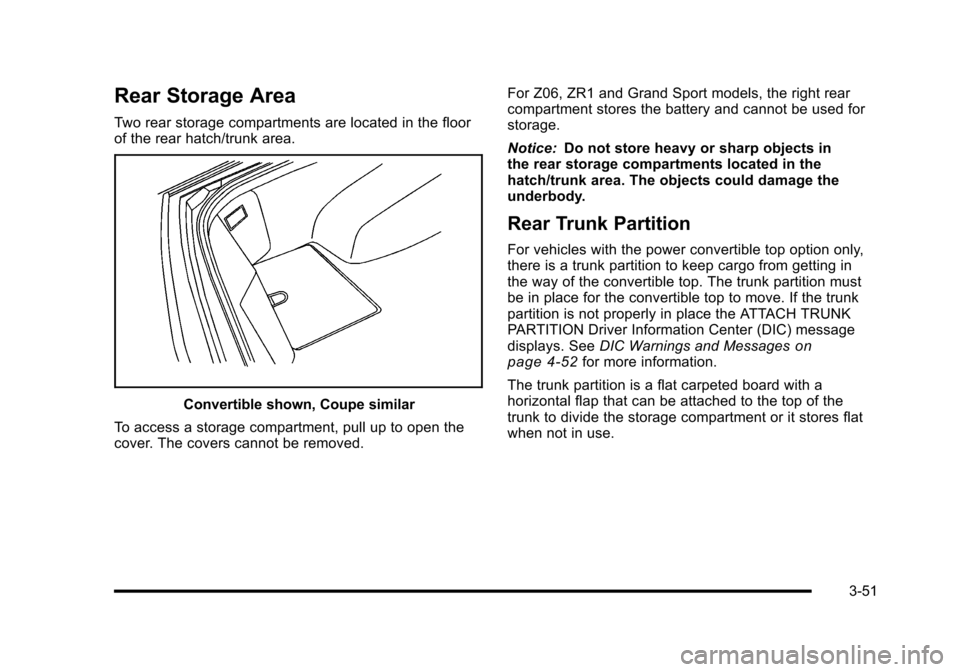
Two rear storage compartments are located in the floor
of the rear hatch/trunk area.
Convertible shown, Coupe similar
To access a storage compartment, pull up to open the
cover. The covers cannot be removed. For Z06, ZR1 and Grand Sport models, the right rear
compartment stores the battery and cannot be used for
storage.
Notice:
Do not store heavy or sharp objects in
the rear storage compartments located in the
hatch/trunk area. The objects could damage the
underbody.
Rear Trunk Partition
For vehicles with the power convertible top option only,
there is a trunk partition to keep cargo from getting in
the way of the convertible top. The trunk partition must
be in place for the convertible top to move. If the trunk
partition is not properly in place the ATTACH TRUNK
PARTITION Driver Information Center (DIC) message
displays. See DIC Warnings and Messages
on
page 4‑52for more information.
The trunk partition is a flat carpeted board with a
horizontal flap that can be attached to the top of the
trunk to divide the storage compartment or it stores flat
when not in use.
3-51
Page 164 of 472
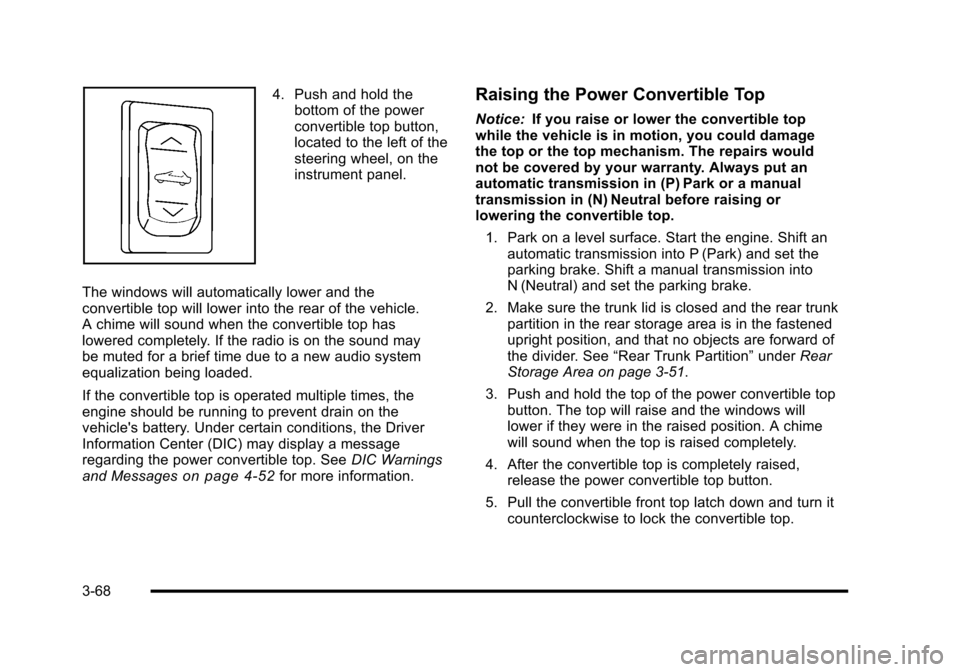
4. Push and hold the bottom of the power
convertible top button,
located to the left of the
steering wheel, on the
instrument panel.
The windows will automatically lower and the
convertible top will lower into the rear of the vehicle.
A chime will sound when the convertible top has
lowered completely. If the radio is on the sound may
be muted for a brief time due to a new audio system
equalization being loaded.
If the convertible top is operated multiple times, the
engine should be running to prevent drain on the
vehicle's battery. Under certain conditions, the Driver
Information Center (DIC) may display a message
regarding the power convertible top. See DIC Warnings
and Messages
on page 4‑52for more information.
Raising the Power Convertible Top
Notice: If you raise or lower the convertible top
while the vehicle is in motion, you could damage
the top or the top mechanism. The repairs would
not be covered by your warranty. Always put an
automatic transmission in (P) Park or a manual
transmission in (N) Neutral before raising or
lowering the convertible top.
1. Park on a level surface. Start the engine. Shift an automatic transmission into P (Park) and set the
parking brake. Shift a manual transmission into
N (Neutral) and set the parking brake.
2. Make sure the trunk lid is closed and the rear trunk partition in the rear storage area is in the fastened
upright position, and that no objects are forward of
the divider. See “Rear Trunk Partition” underRear
Storage Area on page 3‑51.
3. Push and hold the top of the power convertible top button. The top will raise and the windows will
lower if they were in the raised position. A chime
will sound when the top is raised completely.
4. After the convertible top is completely raised, release the power convertible top button.
5. Pull the convertible front top latch down and turn it counterclockwise to lock the convertible top.
3-68
Page 167 of 472
3. Use the wrench, located in the console, and turn the pressure release bolt counterclockwise
one revolution, to relieve pressure to the hydraulic
pump. This will allow you to manually raise the
convertible top.
4. Then follow the steps under raising the manual convertible top. See “Convertible Top (Manual)”
under Convertible Top (Manual)
on page 3‑59or
Convertible Top (Power) on page 3‑66
When power is restored to the vehicle, the hydraulic
bolt must be tightened, by turning it clockwise.
The power convertible top button can then be
used to lower or raise the convertible top. If the power convertible top is operated multiple times,
the engine should be running to prevent drain on the
vehicle's battery. Under certain conditions, the Driver
Information Center (DIC) may display a message
regarding the power top. See
DIC Warnings and
Messages
on page 4‑52for more information.
If the battery has been disconnected, the power
windows must be initialized for the power top to
operate. See Power Windows
on page 3‑17for
more information.
3-71
Page 169 of 472

Section 4 Instrument Panel
Instrument Panel Overview. . . . . . . . . . . . . . . . . . . . . . . . 4-3
Hazard Warning Flashers . . . . . . . . . . . . . . . . . . . . . . . 4-3
Horn . . . . . . . . . . . . . . . . . . . . . . . . . . . . . . . . . . . . . . . . . . . . 4-3
Tilt Wheel . . . . . . . . . . . . . . . . . . . . . . . . . . . . . . . . . . . . . . . 4-3
Turn Signal/Multifunction Lever . . . . . . . . . . . . . . . . . . 4-4
Turn and Lane-Change Signals (Auto Signal) . . . 4-5
Headlamp High/Low-Beam Changer . . . . . . . . . . . . 4-5
Flash-to-Pass . . . . . . . . . . . . . . . . . . . . . . . . . . . . . . . . . . . 4-5
Windshield Wipers . . . . . . . . . . . . . . . . . . . . . . . . . . . . . . 4-6
Windshield Washer . . . . . . . . . . . . . . . . . . . . . . . . . . . . . 4-6
Cruise Control . . . . . . . . . . . . . . . . . . . . . . . . . . . . . . . . . . 4-7
Exterior Lamps . . . . . . . . . . . . . . . . . . . . . . . . . . . . . . . . . 4-11
Wiper Activated Headlamps . . . . . . . . . . . . . . . . . . . 4-12
Headlamps on Reminder . . . . . . . . . . . . . . . . . . . . . . 4-12
Daytime Running Lamps (DRL) . . . . . . . . . . . . . . . . 4-12
Fog Lamps . . . . . . . . . . . . . . . . . . . . . . . . . . . . . . . . . . . . 4-13
Twilight Sentinel
®. . . . . . . . . . . . . . . . . . . . . . . . . . . . . . 4-14
Exterior Lighting Battery Saver . . . . . . . . . . . . . . . . . 4-15
Instrument Panel Brightness . . . . . . . . . . . . . . . . . . . 4-15
Courtesy Lamps . . . . . . . . . . . . . . . . . . . . . . . . . . . . . . . 4-15
Entry/Exit Lighting . . . . . . . . . . . . . . . . . . . . . . . . . . . . . 4-15
Reading Lamps . . . . . . . . . . . . . . . . . . . . . . . . . . . . . . . . 4-15
Battery Run-Down Protection . . . . . . . . . . . . . . . . . . 4-16
Head-Up Display (HUD) . . . . . . . . . . . . . . . . . . . . . . . 4-16
Accessory Power Outlet(s) . . . . . . . . . . . . . . . . . . . . . 4-20
Ashtray(s) and Cigarette Lighter . . . . . . . . . . . . . . . 4-21 Climate Controls
. . . . . . . . . . . . . . . . . . . . . . . . . . . . . . . . . . 4-22
Dual Automatic Climate Control System . . . . . . . 4-22
Outlet Adjustment . . . . . . . . . . . . . . . . . . . . . . . . . . . . . . 4-27
Passenger Compartment Air Filter . . . . . . . . . . . . . 4-28
Warning Lights, Gauges, and Indicators . . . . . . . . 4-29
Instrument Panel Cluster . . . . . . . . . . . . . . . . . . . . . . . 4-30
Speedometer and Odometer . . . . . . . . . . . . . . . . . . . 4-32
Tachometer . . . . . . . . . . . . . . . . . . . . . . . . . . . . . . . . . . . . 4-32
Safety Belt Reminders . . . . . . . . . . . . . . . . . . . . . . . . . 4-32
Airbag Readiness Light . . . . . . . . . . . . . . . . . . . . . . . . 4-33
Passenger Airbag Status Indicator . . . . . . . . . . . . . 4-34
Voltmeter Gauge . . . . . . . . . . . . . . . . . . . . . . . . . . . . . . . 4-35
One-to-Four Shift Light (Manual Transmission) . . . . . . . . . . . . . . . . . . . . . . . . . . . . . . . 4-36
Brake System Warning Light . . . . . . . . . . . . . . . . . . . 4-36
Antilock Brake System (ABS) Warning Light . . . . . . . . . . . . . . . . . . . . . . . . . . . . . . . 4-37
Traction Control System (TCS) Warning Light . . . . . . . . . . . . . . . . . . . . . . . . . . . . . . . . 4-38
Active Handling System Light . . . . . . . . . . . . . . . . . . 4-39
Engine Coolant Temperature Gauge . . . . . . . . . . . 4-40
Tire Pressure Light . . . . . . . . . . . . . . . . . . . . . . . . . . . . 4-40
Malfunction Indicator Lamp . . . . . . . . . . . . . . . . . . . . 4-41
Engine Oil Pressure Gauge . . . . . . . . . . . . . . . . . . . . 4-44
Security Light . . . . . . . . . . . . . . . . . . . . . . . . . . . . . . . . . . 4-45
4-1
Page 170 of 472

Section 4 Instrument Panel
Fog Lamp Light . . . . . . . . . . . . . . . . . . . . . . . . . . . . . . . . 4-45
Lights On Reminder . . . . . . . . . . . . . . . . . . . . . . . . . . . 4-45
Highbeam On Light . . . . . . . . . . . . . . . . . . . . . . . . . . . . 4-45
Fuel Gauge . . . . . . . . . . . . . . . . . . . . . . . . . . . . . . . . . . . . 4-46
Boost Gauge (ZR1 Only) . . . . . . . . . . . . . . . . . . . . . . 4-47
Driver Information Center (DIC) . . . . . . . . . . . . . . . . . . 4-47
DIC Operation and Displays . . . . . . . . . . . . . . . . . . . 4-47
DIC Warnings and Messages . . . . . . . . . . . . . . . . . . 4-52
Other Messages . . . . . . . . . . . . . . . . . . . . . . . . . . . . . . . 4-70
DIC Vehicle Personalization . . . . . . . . . . . . . . . . . . . 4-71 Audio System(s)
. . . . . . . . . . . . . . . . . . . . . . . . . . . . . . . . . . 4-80
Setting the Clock . . . . . . . . . . . . . . . . . . . . . . . . . . . . . . 4-80
Radio(s) . . . . . . . . . . . . . . . . . . . . . . . . . . . . . . . . . . . . . . . 4-81
Using an MP3 . . . . . . . . . . . . . . . . . . . . . . . . . . . . . . . . . 4-92
XM Radio Messages . . . . . . . . . . . . . . . . . . . . . . . . . . . 4-95
Navigation/Radio System . . . . . . . . . . . . . . . . . . . . . . 4-96
Bluetooth
®. . . . . . . . . . . . . . . . . . . . . . . . . . . . . . . . . . . . . 4-96
Theft-Deterrent Feature . . . . . . . . . . . . . . . . . . . . . . 4-106
Audio Steering Wheel Controls . . . . . . . . . . . . . . . 4-107
Radio Reception . . . . . . . . . . . . . . . . . . . . . . . . . . . . . . 4-108
Diversity Antenna System . . . . . . . . . . . . . . . . . . . . 4-109
XM™ Satellite Radio Antenna System . . . . . . . . 4-109
4-2
Page 175 of 472
{WARNING:
In freezing weather, do not use your washer until
the windshield is warmed. Otherwise the washer
fluid can form ice on the windshield, blocking your
vision.
If the fluid in the windshield washer fluid reservoir is low,
the message CHECK WASHER FLUID will appear on
the Driver Information Center (DIC) display. It will take
15 seconds after the bottle is refilled for this message to
turn off. For information on the correct washer fluid to
use, see Windshield Washer Fluid
on page 6‑42and
Recommended Fluids and Lubricants on page 7‑10.
Cruise Control
With cruise control, a speed of about 40 km/h (25 mph)
or more can be maintained without keeping your foot on
the accelerator. Cruise control does not work at speeds
below about 40 km/h (25 mph).
Cruise control will not work if the parking brake is set,
or if the master cylinder brake fluid level is low.
{WARNING:
Cruise control can be dangerous where you
cannot drive safely at a steady speed. So, do not
use the cruise control on winding roads or in
heavy traffic.
Cruise control can be dangerous on slippery
roads. On such roads, fast changes in tire traction
can cause excessive wheel slip, and you could
lose control. Do not use cruise control on slippery
roads.
If the vehicle is in cruise control, and has the Traction
Control System (TCS), and it begins to limit wheel
spin, the cruise control automatically disengages.
See Traction Control System (TCS)
on page 5‑6.
When road conditions allow the cruise control to be
safely used again, it can be turned back on.
4-7
Page 176 of 472
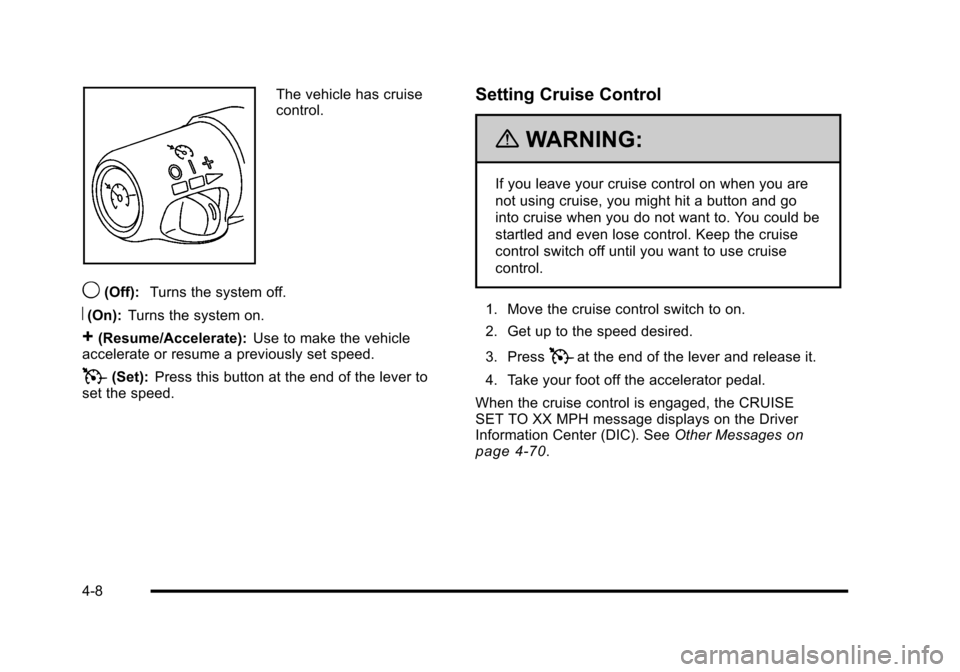
The vehicle has cruise
control.
9(Off): Turns the system off.
R(On):Turns the system on.
+(Resume/Accelerate): Use to make the vehicle
accelerate or resume a previously set speed.
T(Set): Press this button at the end of the lever to
set the speed.
Setting Cruise Control
{WARNING:
If you leave your cruise control on when you are
not using cruise, you might hit a button and go
into cruise when you do not want to. You could be
startled and even lose control. Keep the cruise
control switch off until you want to use cruise
control.
1. Move the cruise control switch to on.
2. Get up to the speed desired.
3. Press
Tat the end of the lever and release it.
4. Take your foot off the accelerator pedal.
When the cruise control is engaged, the CRUISE
SET TO XX MPH message displays on the Driver
Information Center (DIC). See Other Messages
on
page 4‑70.
4-8