2010 CHEVROLET CORVETTE maintenance schedule
[x] Cancel search: maintenance schedulePage 30 of 472
Engine Oil Life System
The engine oil life system calculates engine oil life
based on vehicle use and displays a DIC message
when it is necessary to change the engine oil and filter.
The oil life system should be reset to 100% only
following an oil change.
Resetting the Oil Life System
1. Press the TRIP button so the OIL LIFE percentageis displayed.
2. Press RESET and hold for two seconds. OIL LIFE REMAINING 100% will appear.
See Engine Oil Life System on page 6‑25.
Driving for Better Fuel Economy
Driving habits can affect fuel mileage. Here are some
driving tips to get the best fuel economy possible.
.Avoid fast starts and accelerate smoothly.
.Brake gradually and avoid abrupt stops.
.Avoid idling the engine for long periods of time.
.When road and weather conditions are
appropriate, use cruise control, if equipped.
.Always follow posted speed limits or drive more
slowly when conditions require.
.Keep vehicle tires properly inflated.
.Combine several trips into a single trip.
.Replace the vehicle's tires with the same
TPC Spec number molded into the tire's
sidewall near the size.
.Follow recommended scheduled maintenance.
Premium Fuel
This vehicle's engine was designed to use premium
unleaded gasoline. See Gasoline Octane on page 6‑7.
Battery
This vehicle has a maintenance free battery. See
Batteryon page 6‑49and Jump Starting on page 6‑50.
For ZO6, ZR1, and Grand Sport models the battery is
located in the rear hatch/trunk area. Access to the
battery is not necessary to jump start the vehicle.
There are positive (+) and negative (−) terminals in
the engine compartment.
1-24
Page 94 of 472
Restraint System Check
Checking the Restraint Systems
Safety Belts
Now and then, check that the safety belt reminder light,
safety belts, buckles, latch plates, retractors, and
anchorages are all working properly.
Look for any other loose or damaged safety belt system
parts that might keep a safety belt system from doing
its job. See your dealer/retailer to have it repaired.
Torn or frayed safety belts may not protect you in a
crash. They can rip apart under impact forces.
If a belt is torn or frayed, get a new one right away.
Make sure the safety belt reminder light is working.
See Safety Belt Reminders
on page 4‑32for more
information.
Keep safety belts clean and dry. See Care of Safety
Belts
on page 6‑93.
Airbags
The airbag system does not need regularly scheduled
maintenance or replacement. Make sure the airbag
readiness light is working. See Airbag Readiness Light
on page 4‑33for more information.
Notice: If an airbag covering is damaged, opened,
or broken, the airbag may not work properly. Do not
open or break the airbag coverings. If there are any
opened or broken airbag covers, have the airbag
covering and/or airbag module replaced. For the
location of the airbag modules, see What Makes an
Airbag Inflate?
on page 2‑50. See your dealer/
retailer for service.
2-60
Page 191 of 472
The system operates to reach the set temperature
as quickly as possible. The AUTO control system
works best with the windows up and the removable
roof installed or the convertible top up. 1. Press the AUTO button.
2. Adjust the temperature to a comfortable setting between 16°C (60°F) and 32°C (90°F). Choosing
the coldest or warmest temperature setting will
not cause the system to heat or cool any faster.
A setting of 23°C (73°F) is suggested.
In cold weather, the system will start at reduced
fan speeds to avoid blowing cold air into your
vehicle until warmer air is available. The system
starts out blowing air at the floor but may change
modes automatically as the vehicle warms up to
maintain the chosen temperature setting. The
length of time needed for warm up depends on the
outside temperature and the length of time that has
elapsed since the vehicle was last driven.
3. Wait for the system to regulate. This may take from 10 to 30 minutes. Then adjust the temperature,
if necessary.
Do not cover the solar sensor located in the center of
the instrument panel, near the windshield. For more
information on the solar sensor, see “Sensor”later in
this section.Manual Operation
Driver Power/Temperature : Press the driver
temperature knob to turn the climate control system off.
This is the only setting that completely shuts off the fan.
The digital display shows only the outside temperature.
The driver and the passenger set temperature and the
air intake mode can still be adjusted when the climate
control is off.
Passenger Power/Temperature : Press the passenger
temperature knob to turn the passenger's climate
control system on or off. Turn the knob to increase or
decrease the temperature for the passenger. If the
passenger's climate control system is off, the driver's
temperature knob will control the temperature for the
entire vehicle.
x 9 w (Fan) :Press to increase or decrease the fan
speed. The fan speed setting will appear in the display.
Pressing the arrows will delete AUTO from the digital
display. The fan graphics with the fan speed bars will be
shown. The AUTO button must be pressed to return to
the automatic fan control.
If the airflow seems low when the fan speed is at the
highest setting, the passenger compartment air filter
may need to be replaced. For more information, see
Passenger Compartment Air Filter
on page 4‑28and
Scheduled Maintenance on page 7‑3.
4-23
Page 196 of 472
Passenger Compartment Air Filter
The passenger compartment air filter removes certain
particles from the air including pollen and dust particles.
Reductions in airflow, which may occur more often in
dusty areas, indicate that the filter may need to be
replaced. See Scheduled Maintenance
on page 7‑3for information on how often to replace the filter.
Notice: Driving without a passenger compartment
air filter in place can cause water and small
particles, like paper and leaves, to be pulled into
your climate control system which may cause
damage to it. Make sure you always replace the
old filter with a new one.
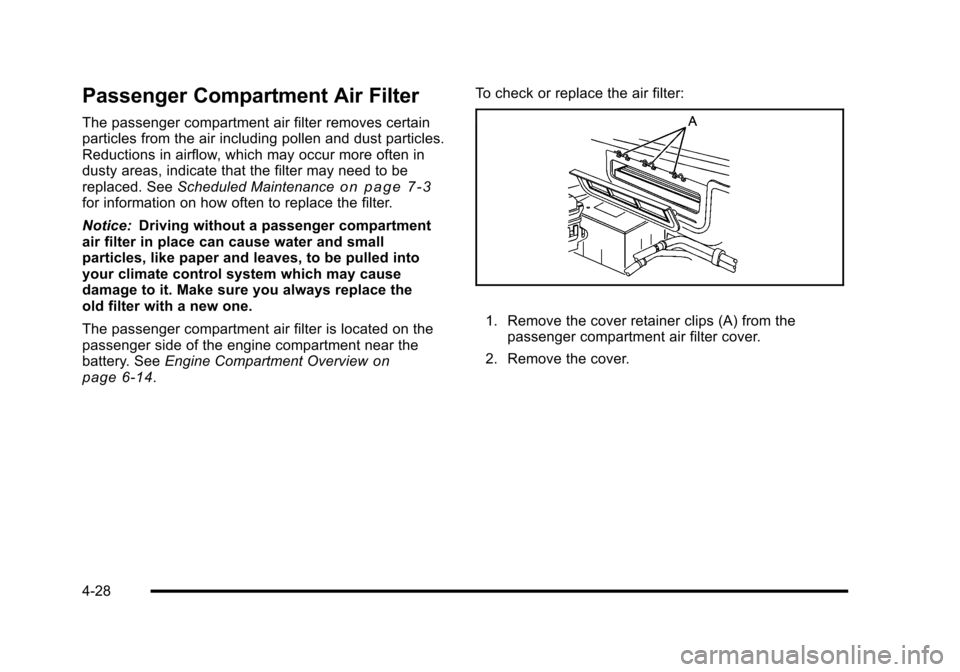
The passenger compartment air filter is located on the
passenger side of the engine compartment near the
battery. See Engine Compartment Overview
on
page 6‑14. To check or replace the air filter:
1. Remove the cover retainer clips (A) from the
passenger compartment air filter cover.
2. Remove the cover.
4-28
Page 212 of 472
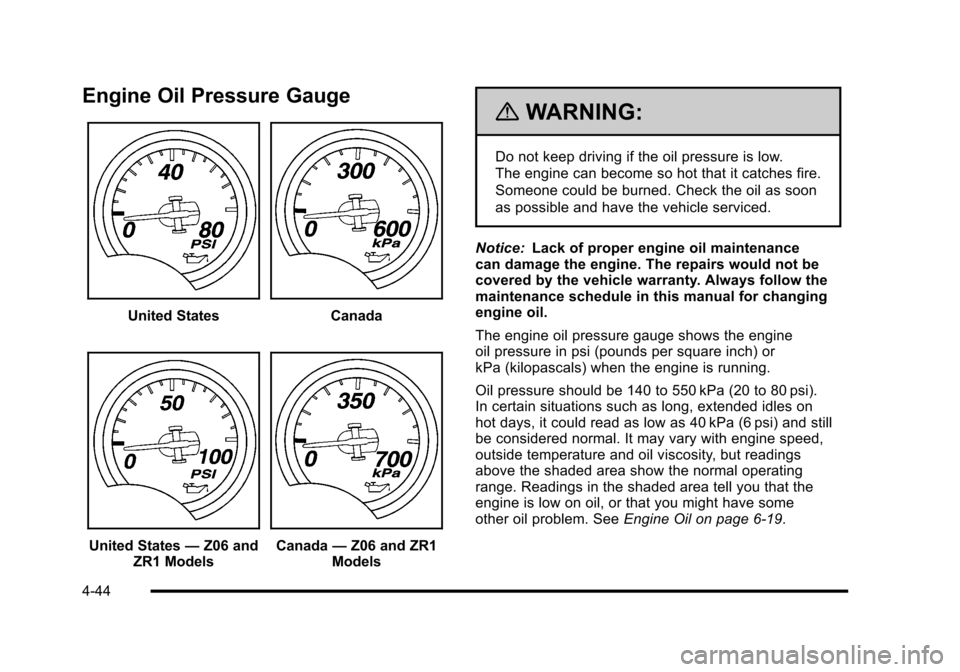
Engine Oil Pressure Gauge
United StatesCanada
United States—Z06 and
ZR1 Models Canada —Z06 and ZR1
Models
{WARNING:
Do not keep driving if the oil pressure is low.
The engine can become so hot that it catches fire.
Someone could be burned. Check the oil as soon
as possible and have the vehicle serviced.
Notice: Lack of proper engine oil maintenance
can damage the engine. The repairs would not be
covered by the vehicle warranty. Always follow the
maintenance schedule in this manual for changing
engine oil.
The engine oil pressure gauge shows the engine
oil pressure in psi (pounds per square inch) or
kPa (kilopascals) when the engine is running.
Oil pressure should be 140 to 550 kPa (20 to 80 psi).
In certain situations such as long, extended idles on
hot days, it could read as low as 40 kPa (6 psi) and still
be considered normal. It may vary with engine speed,
outside temperature and oil viscosity, but readings
above the shaded area show the normal operating
range. Readings in the shaded area tell you that the
engine is low on oil, or that you might have some
other oil problem. See Engine Oil on page 6‑19.
4-44
Page 220 of 472
Press and hold the RESET button to reset to
0.0 km/h (mph).
Engine Oil Life : Press the TRIP button until the engine
oil life is displayed, such as OIL LIFE REMAINING 89%.
This is an estimate of the engine oil's remaining useful
life. It will show 100% when the system is reset after
an oil change. It will alert you to change the oil on a
schedule consistent with your driving conditions.
When the remaining oil life is low, the system will alert
you with the message CHANGE ENGINE OIL.
Remember, you must reset the engine oil life system
yourself after each oil change. It will not reset itself.
To reset the system, see Engine Oil Life System
on
page 6‑25. Be careful not to reset the engine oil life
system accidentally at any time other than when the oil
has just been changed. It cannot be reset accurately
until the next oil change.
See Scheduled Maintenance
on page 7‑3andEngine
Oilon page 6‑19for more information.
OPTION Button
The OPTION button allows you to access the
PERSONAL OPTIONS menu and customize the
personalization settings on your vehicle. See DIC
Vehicle Personalization
on page 4‑71for more
information.
RESET Button
The RESET button, used along with other buttons, will
reset system functions and turn off or acknowledge
messages on the DIC.
DIC Warnings and Messages
Messages are displayed on the DIC to notify the driver
that the status of the vehicle has changed and that
some action may be needed by the driver to correct the
condition. Multiple messages may appear one after
another. You can scroll through the messages that
may have been sent at the same time. The DIC is
continuously updated with the vehicle performance
status.
Some messages may not require immediate action, but
you can press the RESET button to acknowledge that
you received the messages and to clear them from the
display.
Some messages cannot be cleared from the DIC
display because they are more urgent. These
messages require action before they can be cleared.
You should take any messages that appear on the
display seriously and remember that clearing the
messages will only make the messages disappear,
not correct the problem.
The following are the possible messages that can be
displayed and some information about them.
4-52
Page 222 of 472
BUCKLE PASSENGER
This message reminds you to buckle the passenger's
safety belt.
This message displays and a sound will be heard when
the ignition is on, the driver's safety belt is buckled, the
passenger's safety belt is unbuckled with the passenger
airbag enabled, and the vehicle is in motion. You should
have the passenger buckle their safety belt.
The reminder will be repeated if the ignition is on, the
vehicle is in motion, the driver is buckled and the
passenger is still unbuckled, and the passenger airbag
is enabled. If the passenger's safety belt is already
buckled, this message will not come on.
BUCKLE SEATBELT
This message reminds you to buckle the driver's
safety belt.
This message displays and a sound will be heard when
the ignition is on, the driver's safety belt is unbuckled,
and the vehicle is in motion. You should buckle your
safety belt.
If the driver remains unbuckled when the ignition is
on and the vehicle is in motion, the reminder will be
repeated. If the driver's safety belt is already buckled,
this message will not come on. This message is an additional reminder to the safety
belt reminder light in the instrument panel cluster.
See
Safety Belt Reminders
on page 4‑32for more
information.
CHANGE BRAKE PADS
On vehicles with electronic brake pad wear sensors,
this message will be displayed when the pads are worn.
See your dealer/retailer for service.
CHANGE ENGINE OIL
This message displays when the life of the engine
oil has expired. See Scheduled Maintenanceon
page 7‑3. After an oil change, the engine oil life
system must be reset. See “Engine Oil Life”under
DIC Operation and Displays
on page 4‑47. Also, see
Engine Oilon page 6‑19and Engine Oil Life Systemon page 6‑25for more information.
CHECK BRAKE FLUID
This message displays, a sound will be heard, and the
brake system warning light on the instrument panel
cluster turns on if the ignition is on to inform the driver
that the brake fluid level is low. See Brake System
Warning Light
on page 4‑36. Have the brake system
serviced by your dealer/retailer as soon as possible.
See Brakes on page 6‑43.
4-54
Page 298 of 472
After conversion to the high performance brake fluid,
follow the brake fluid service recommendations outlined
by the fluid manufacturer. Do not use silicone or
DOT‐5 brake fluids.
If the vehicle is a Z06, ZR1, or Grand Sport model, it
has greaseable outer ends on both of the rear toe‐links.
Under normal use, lubrication should be performed as
described in the maintenance schedule. See Scheduled
Maintenance
on page 7‑3and Recommended Fluids
and Lubricantson page 7‑10. If using the vehicle for
racing, lubrication should be performed at the end of
each racing day. See your dealer/retailer for lubrication
and make sure any needed repairs are made at once.
Proper procedures for performing these services can be
found in the service manual. See Service Publications
Ordering Information on page 8‑16.
If the vehicle is used for racing or other competitive
driving, the rear axle fluid temperatures may be higher
than would occur in normal driving. We recommend that
the rear axle fluid be drained and refilled with new fluid
after every 24 hours of racing or competitive driving.
See Recommended Fluids and Lubricants
on
page 7‑10for what fluid to use.
ZR1 Brake Burnish Procedure
Notice: These procedures are specific to the ZR1
with ceramic brake rotors. These procedures should
not be run on other Corvette models as damage
may result.
Notice: The new vehicle break‐in period should be
completed before performing the brake burnish
procedure or damage may occur to the powertrain/
engine. See New Vehicle Break-In on page 3‑21.
When performed as instructed, these procedures will
not damage the brakes. During the burnishing
procedure, the brake pads will smoke and produce an
odor. The braking force and pedal travel may increase.
After the procedure is complete, the brake pads may
appear white at the rotor contact.
5-20