2010 CHEVROLET CORVETTE checking oil
[x] Cancel search: checking oilPage 29 of 472
Z06, Z16, and ZR1 Features
Checking Engine Oil
ZO6, Z16 (Grand Sport), and ZR1 models have a high
performance dry sump lubrication system. This system
operates differently than a standard engine lubrication
system. See Engine Oil on page 6‑19.
You should check the oil level only after the engine has
been thoroughly warmed up and then shut off for at
least five minutes. This ensures that the oil level
reading obtained will be accurate.
Jump Starting the Battery
The battery of ZO6, Z16 (Grand Sport), and
ZR1 models is in the rear of the vehicle. You do not
need to access the battery for jump starting. There are
remote positive (+) and negative (−) terminals under the
hood for this purpose. See Battery
on page 6‑49and
Jump Starting on page 6‑50.
Brake Noise
Under certain weather or operating conditions,
occasional brake noise might be heard with the
vehicle's performance braking system. This brake
system is designed for superior fade resistance and
consistent operation using high performance brake
pads. Brake noise is normal and does not affect system
performance. See Braking on page 5‑4.
Car Wash Guidelines
Automatic car washes are not recommended for this
vehicle. Some car washes cause damage to the
vehicle, the wheels, and the convertible top, if the
vehicle is so equipped.
If you drive the vehicle through an automatic
car wash that does not have enough clearance for
the undercarriage and/or wide rear tires and wheels,
you could damage the vehicle. Verify with the manager
of the car wash that the vehicle will fit before entering
the car wash or use a touchless car wash. See
Washing Your Vehicle on page 6‑94.
1-23
Page 313 of 472
Section 6 Service and Appearance Care
Service. . . . . . . . . . . . . . . . . . . . . . . . . . . . . . . . . . . . . . . . . . . . . 6-3
Accessories and Modifications . . . . . . . . . . . . . . . . . . 6-3
California Proposition 65 Warning . . . . . . . . . . . . . . . 6-4
California Perchlorate Materials Requirements . . . . . . . . . . . . . . . . . . . . . . . . . . . . . . . . . 6-4
Doing Your Own Service Work . . . . . . . . . . . . . . . . . . 6-5
Adding Equipment to the Outside of the Vehicle . . . . . . . . . . . . . . . . . . . . . . . . . . . . . . . . . . . . . . . . 6-5
Fuel . . . . . . . . . . . . . . . . . . . . . . . . . . . . . . . . . . . . . . . . . . . . . . . . . 6-6
Gasoline Octane . . . . . . . . . . . . . . . . . . . . . . . . . . . . . . . . 6-7
Gasoline Specifications . . . . . . . . . . . . . . . . . . . . . . . . . 6-7
California Fuel . . . . . . . . . . . . . . . . . . . . . . . . . . . . . . . . . . 6-7
Additives . . . . . . . . . . . . . . . . . . . . . . . . . . . . . . . . . . . . . . . . 6-8
Fuels in Foreign Countries . . . . . . . . . . . . . . . . . . . . . . 6-9
Filling the Tank . . . . . . . . . . . . . . . . . . . . . . . . . . . . . . . . . . 6-9
Filling a Portable Fuel Container . . . . . . . . . . . . . . . 6-12
Checking Things Under the Hood . . . . . . . . . . . . . . . 6-12
Hood Release . . . . . . . . . . . . . . . . . . . . . . . . . . . . . . . . . 6-13
Engine Compartment Overview . . . . . . . . . . . . . . . . 6-14
Engine Oil . . . . . . . . . . . . . . . . . . . . . . . . . . . . . . . . . . . . . 6-19
Engine Oil Life System . . . . . . . . . . . . . . . . . . . . . . . . 6-25
Engine Air Cleaner/Filter . . . . . . . . . . . . . . . . . . . . . . . 6-27
Automatic Transmission Fluid . . . . . . . . . . . . . . . . . . 6-31
Manual Transmission Fluid . . . . . . . . . . . . . . . . . . . . 6-31
Hydraulic Clutch . . . . . . . . . . . . . . . . . . . . . . . . . . . . . . . 6-31
Cooling System (Engine) . . . . . . . . . . . . . . . . . . . . . . 6-32 Cooling System (Intercooler) . . . . . . . . . . . . . . . . . . . 6-33
Engine Coolant . . . . . . . . . . . . . . . . . . . . . . . . . . . . . . . . 6-34
Engine Overheating . . . . . . . . . . . . . . . . . . . . . . . . . . . 6-38
Overheated Engine Protection
Operating Mode . . . . . . . . . . . . . . . . . . . . . . . . . . . . . 6-41
Power Steering Fluid . . . . . . . . . . . . . . . . . . . . . . . . . . 6-41
Windshield Washer Fluid . . . . . . . . . . . . . . . . . . . . . . 6-42
Brakes . . . . . . . . . . . . . . . . . . . . . . . . . . . . . . . . . . . . . . . . . 6-43
Battery . . . . . . . . . . . . . . . . . . . . . . . . . . . . . . . . . . . . . . . . . 6-49
Jump Starting . . . . . . . . . . . . . . . . . . . . . . . . . . . . . . . . . . 6-50
Rear Axle . . . . . . . . . . . . . . . . . . . . . . . . . . . . . . . . . . . . . . . . . 6-55
Headlamp Aiming . . . . . . . . . . . . . . . . . . . . . . . . . . . . . . . . 6-55
Bulb Replacement . . . . . . . . . . . . . . . . . . . . . . . . . . . . . . . . 6-56
High Intensity Discharge (HID) Lighting . . . . . . . . 6-56
Halogen Bulbs . . . . . . . . . . . . . . . . . . . . . . . . . . . . . . . . . 6-56
Headlamps, Front Turn Signal, and Parking Lamps . . . . . . . . . . . . . . . . . . . . . . . . . . . . . . . . . . . . . . . 6-56
Taillamps, Turn Signal, and Stoplamps . . . . . . . . 6-58
Replacement Bulbs . . . . . . . . . . . . . . . . . . . . . . . . . . . . 6-58
Windshield Replacement . . . . . . . . . . . . . . . . . . . . . . . . . 6-59
Windshield Wiper Blade Replacement . . . . . . . . . . . 6-59
Tires . . . . . . . . . . . . . . . . . . . . . . . . . . . . . . . . . . . . . . . . . . . . . . . 6-62
Winter Tires . . . . . . . . . . . . . . . . . . . . . . . . . . . . . . . . . . . . 6-63
Tire Sidewall Labeling . . . . . . . . . . . . . . . . . . . . . . . . . 6-64
Tire Terminology and Definitions . . . . . . . . . . . . . . . 6-66
6-1
Page 324 of 472
Filling a Portable Fuel Container
{WARNING:
Never fill a portable fuel container while it is in
the vehicle. Static electricity discharge from the
container can ignite the fuel vapor. You can be
badly burned and the vehicle damaged if this
occurs. To help avoid injury to you and others:
.Dispense fuel only into approved containers.
.Do not fill a container while it is inside a
vehicle, in a vehicle's trunk, pickup bed,
or on any surface other than the ground.
.Bring the fill nozzle in contact with the inside
of the fill opening before operating the nozzle.
Contact should be maintained until the filling is
complete.
.Do not smoke while pumping fuel.
.Do not use a cellular phone while
pumping fuel.
Checking Things Under
the Hood
{WARNING:
An electric fan under the hood can start up and
injure you even when the engine is not running.
Keep hands, clothing, and tools away from any
underhood electric fan.
{WARNING:
Things that burn can get on hot engine parts and
start a fire. These include liquids like fuel, oil,
coolant, brake fluid, windshield washer and other
fluids, and plastic or rubber. You or others could
be burned. Be careful not to drop or spill things
that will burn onto a hot engine.
6-12
Page 327 of 472

A. Clutch Master Cylinder Reservoir (If Equipped). See Hydraulic Clutch on page 6‑31.
B. Windshield Washer Fluid Reservoir. See “Adding
Washer Fluid” underWindshield Washer Fluid
on
page 6‑42.
C. Brake Fluid Reservoir. See “Brake Fluid”under
Brakes on page 6‑43.
D. Coolant Surge Tank and Pressure Cap. See Engine Coolant on page 6‑34.
E. Engine Air Cleaner/Filter on page 6‑27.
F. Power Steering Fluid Reservoir. See Power
Steering Fluid on page 6‑41. G. Engine Oil Fill Cap. See
“When to Add Engine Oil”
under Engine Oil on page 6‑19.
H. Engine Oil Dipstick. See “Checking Engine Oil”
under Engine Oil on page 6‑19.
I. Engine Compartment Fuse Block on page 6‑104.
J. Passenger Compartment Air Filter (Out of View). See Passenger Compartment Air Filter
on
page 4‑28.
K. Battery on page 6‑49.
6-15
Page 329 of 472
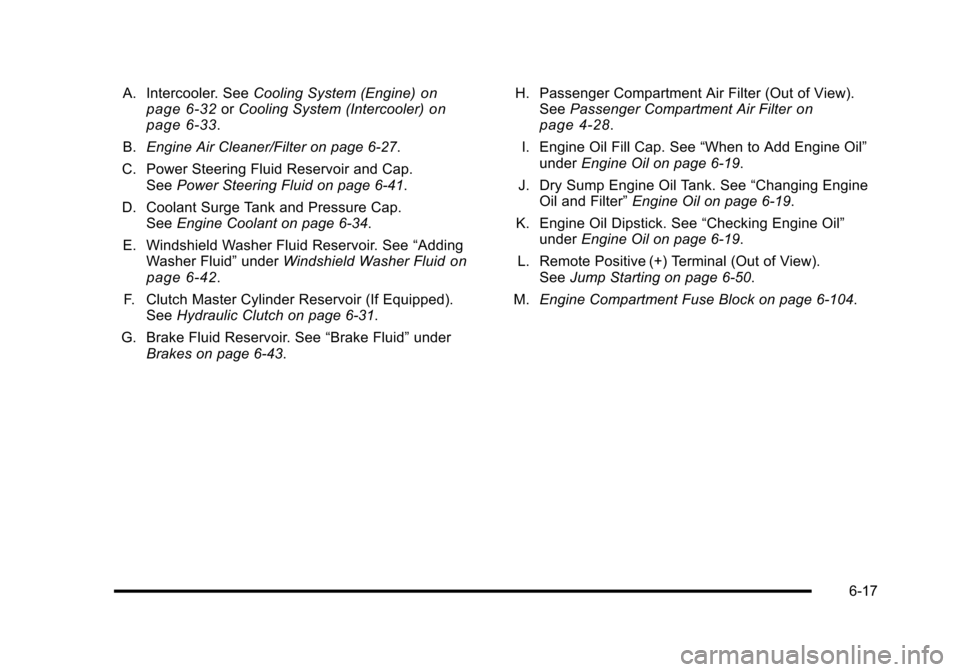
A. Intercooler. SeeCooling System (Engine)on
page 6‑32or Cooling System (Intercooler)on
page 6‑33.
B. Engine Air Cleaner/Filter on page 6‑27.
C. Power Steering Fluid Reservoir and Cap. See Power Steering Fluid on page 6‑41.
D. Coolant Surge Tank and Pressure Cap. See Engine Coolant on page 6‑34.
E. Windshield Washer Fluid Reservoir. See “Adding
Washer Fluid” underWindshield Washer Fluid
on
page 6‑42.
F. Clutch Master Cylinder Reservoir (If Equipped). See Hydraulic Clutch on page 6‑31.
G. Brake Fluid Reservoir. See “Brake Fluid”under
Brakes on page 6‑43. H. Passenger Compartment Air Filter (Out of View).
See Passenger Compartment Air Filter
on
page 4‑28.
I. Engine Oil Fill Cap. See “When to Add Engine Oil”
under Engine Oil on page 6‑19.
J. Dry Sump Engine Oil Tank. See “Changing Engine
Oil and Filter” Engine Oil on page 6‑19.
K. Engine Oil Dipstick. See “Checking Engine Oil”
under Engine Oil on page 6‑19.
L. Remote Positive (+) Terminal (Out of View). See Jump Starting on page 6‑50.
M. Engine Compartment Fuse Block on page 6‑104.
6-17
Page 331 of 472
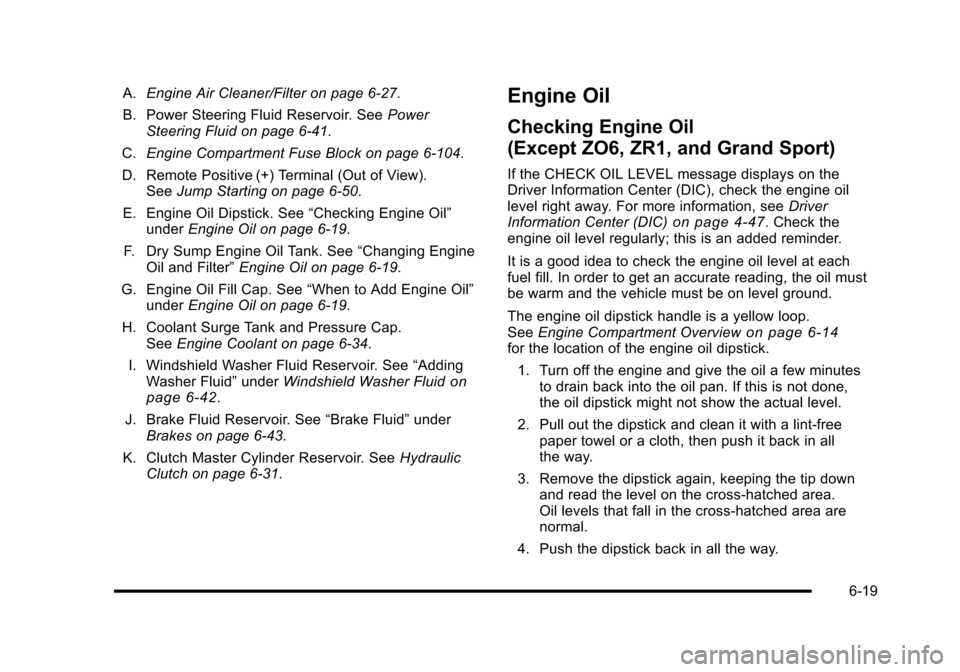
A.Engine Air Cleaner/Filter on page 6‑27.
B. Power Steering Fluid Reservoir. See Power
Steering Fluid on page 6‑41.
C. Engine Compartment Fuse Block on page 6‑104.
D. Remote Positive (+) Terminal (Out of View). See Jump Starting on page 6‑50.
E. Engine Oil Dipstick. See “Checking Engine Oil”
under Engine Oil on page 6‑19.
F. Dry Sump Engine Oil Tank. See “Changing Engine
Oil and Filter” Engine Oil on page 6‑19.
G. Engine Oil Fill Cap. See “When to Add Engine Oil”
under Engine Oil on page 6‑19.
H. Coolant Surge Tank and Pressure Cap. See Engine Coolant on page 6‑34.
I. Windshield Washer Fluid Reservoir. See “Adding
Washer Fluid” underWindshield Washer Fluid
on
page 6‑42.
J. Brake Fluid Reservoir. See “Brake Fluid”under
Brakes on page 6‑43.
K. Clutch Master Cylinder Reservoir. See Hydraulic
Clutch on page 6‑31.
Engine Oil
Checking Engine Oil
(Except ZO6, ZR1, and Grand Sport)
If the CHECK OIL LEVEL message displays on the
Driver Information Center (DIC), check the engine oil
level right away. For more information, see Driver
Information Center (DIC)
on page 4‑47. Check the
engine oil level regularly; this is an added reminder.
It is a good idea to check the engine oil level at each
fuel fill. In order to get an accurate reading, the oil must
be warm and the vehicle must be on level ground.
The engine oil dipstick handle is a yellow loop.
See Engine Compartment Overview
on page 6‑14for the location of the engine oil dipstick.
1. Turn off the engine and give the oil a few minutes to drain back into the oil pan. If this is not done,
the oil dipstick might not show the actual level.
2. Pull out the dipstick and clean it with a lint‐free paper towel or a cloth, then push it back in all
the way.
3. Remove the dipstick again, keeping the tip down and read the level on the cross‐hatched area.
Oil levels that fall in the cross‐hatched area are
normal.
4. Push the dipstick back in all the way.
6-19
Page 333 of 472
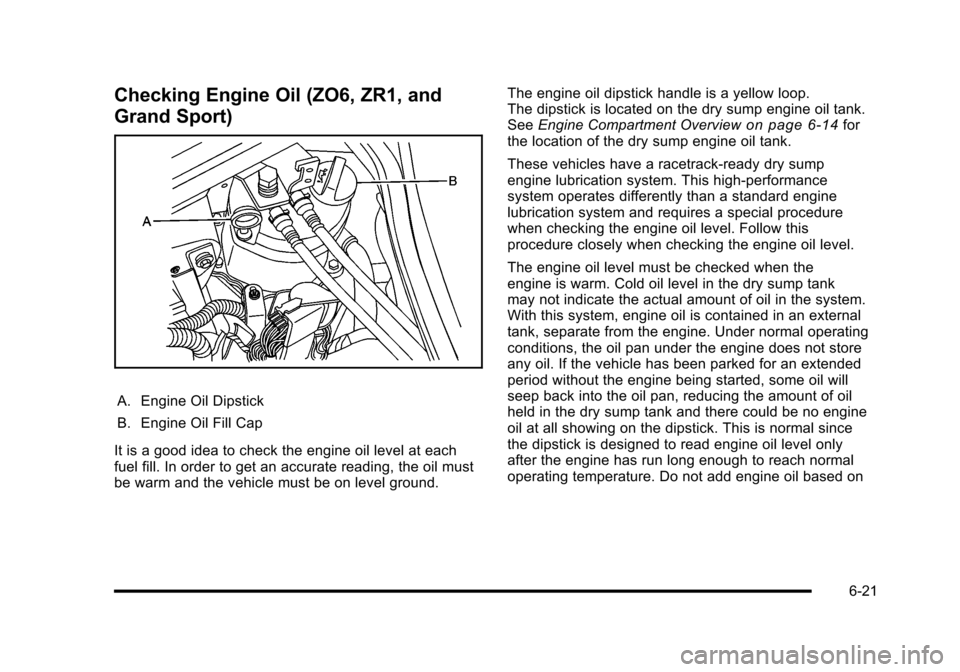
Checking Engine Oil (ZO6, ZR1, and
Grand Sport)
A. Engine Oil Dipstick
B. Engine Oil Fill Cap
It is a good idea to check the engine oil level at each
fuel fill. In order to get an accurate reading, the oil must
be warm and the vehicle must be on level ground. The engine oil dipstick handle is a yellow loop.
The dipstick is located on the dry sump engine oil tank.
See
Engine Compartment Overview
on page 6‑14for
the location of the dry sump engine oil tank.
These vehicles have a racetrack‐ready dry sump
engine lubrication system. This high‐performance
system operates differently than a standard engine
lubrication system and requires a special procedure
when checking the engine oil level. Follow this
procedure closely when checking the engine oil level.
The engine oil level must be checked when the
engine is warm. Cold oil level in the dry sump tank
may not indicate the actual amount of oil in the system.
With this system, engine oil is contained in an external
tank, separate from the engine. Under normal operating
conditions, the oil pan under the engine does not store
any oil. If the vehicle has been parked for an extended
period without the engine being started, some oil will
seep back into the oil pan, reducing the amount of oil
held in the dry sump tank and there could be no engine
oil at all showing on the dipstick. This is normal since
the dipstick is designed to read engine oil level only
after the engine has run long enough to reach normal
operating temperature. Do not add engine oil based on
6-21
Page 334 of 472
cold engine dipstick readings. The engine oil level on
the dipstick will also be inaccurate if checked while the
engine is running. 1. To obtain an accurate engine oil level reading, warm up the engine to at least 80°C (175°F).
Cold oil will not give a correct oil level reading.
2. Once the engine is warm, turn off the engine. Checking the oil while the engine is running will
result in an incorrect oil level reading.
3. Wait at least five minutes (but not more than 20 minutes) to allow oil to drain and settle in the
engine.
4. Remove the dipstick from the external engine oil tank and clean it with a lint‐free paper towel or a
cloth. Re‐insert the dipstick into the external oil
tank, pushing it all the way in until it stops.
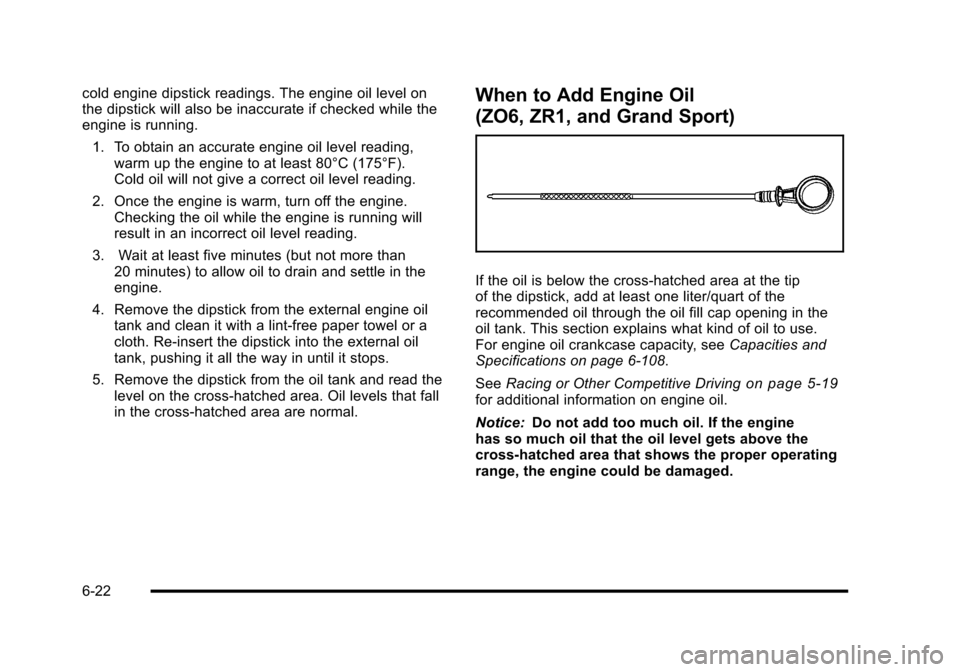
5. Remove the dipstick from the oil tank and read the level on the cross‐hatched area. Oil levels that fall
in the cross‐hatched area are normal.When to Add Engine Oil
(ZO6, ZR1, and Grand Sport)
If the oil is below the cross-hatched area at the tip
of the dipstick, add at least one liter/quart of the
recommended oil through the oil fill cap opening in the
oil tank. This section explains what kind of oil to use.
For engine oil crankcase capacity, see Capacities and
Specifications on page 6‑108.
See Racing or Other Competitive Driving
on page 5‑19for additional information on engine oil.
Notice: Do not add too much oil. If the engine
has so much oil that the oil level gets above the
cross-hatched area that shows the proper operating
range, the engine could be damaged.
6-22