Page 153 of 360

Tra ns mi ssio n -
----------------
Aut omat ic selec to r l ever lock
The se lector lever is locked in the P and N positions when the igni
tion is turned on. To move the lever from these positions the driver
must depress the brake pedal. As a reminder to the driver, the
follow ing warning appears in the instrument cluster display when
the selector is in
P and N:
W hen sta tio nary app ly footbrake while selecting g ear
A time delay e lement prevents the selector lever from locking when
it is moved through the
N position (going from R to Dl. The locking
e lement will lock the selector lever if the lever is left in N (Neutral)
for more than approximately 1 second, without the brake peda l
being pressed.
At speeds above about 3 mph (5 km/h) the Automatic Shift Lock is
automatically deactivated in the
N position .
Interlock butt on
The lock button on the selector lever prevents the lever from being
accidentally shifted into certain positions. Pressing this button
deactivates the selector lever lock. Depending on the direction of
the shift, the selector lever locks at different positions. The positions
are highlighted in the illustration =>
page 150, fig. 161.
Igniti on key sa fe ty in te rlo ck
The key cannot be removed from the ignition unless the selector
lever is in the
P park position. When the ignition key is removed, the
selector lever wil l be locked in the
P position. •
Applies to vehicles : with automatic transm iss ion
Kick-down
The kick-down feature allows the vehicle to generate
maximum acceleration .
When you press the acce lerator pedal beyond the resistance point
that is reached at ful l throttle, the transmission wi ll select a lower
gear ratio based on vehic le speed and engine RPM. The engine RPM
Controls and equip
ment
wi ll be controlled to produce maximum vehic le acceleration as long
as you continue to press the accelerator pedal beyond this resis
tance point .
& WARNING
Be care ful whe n usi ng the kick -dow n fe atur e on slipp ery ro ads .
R apid acc eleration may cau se th e v ehicle to skid . •
App lies to vehicles : with automat ic transm ission
Dynamic shift program (DSP)
The aut omatic transmission is electronically controlled.
The transmission is se lf adapting and will a ut oma tica lly se lect the
best shift program suited to the driving conditions and driving style.
The transmission will select one of the
eco nom y programs when
you drive at a steady speed or a g radually changing speed without
heavy acceleration. This achieves optimum fuel efficiency, with early
upshifting and delayed downshifting.
The transmission will automatically select the
s p ort y shift programs
when you drive at higher speeds, or with heavy acceleration and
frequent ly changing speeds . Upshifts are delayed to make full use
of engine power . Downshifting takes place at higher engine speeds
than in the economy programs .
The se lect ion of the most su itable shift program is a continuous,
automatic process. The driver can also make the transmission
sw itch to a sporty program by
quick ly pressing down the gas peda l.
This causes the transmission to shift down to a lower gear to
achieve rapid acceleration, e.g. for quickly passing another vehicle .
You do not need to press the gas pedal into the kick-down range.
After the transm ission has upshifted, the original program is
selected accord ing to your driving sty le.
An additiona l shift program allows the automatic transmission to
select the proper gear for uph ill and downhi ll gradients. ..,.
I • •
Page 154 of 360

-Tr
ansmi ssio n
..__ ______________ _
This keeps the transmission from shifting up and down unneces
sari ly on hills. The transmission will shift down to a lower gear when
the driver presses the brake pedal on a downhi ll gradient. This
makes use of the braking effect of the engine without the need to
shift down manually. •
Applies to vehi cles: with aut om ati c transmi ssio n
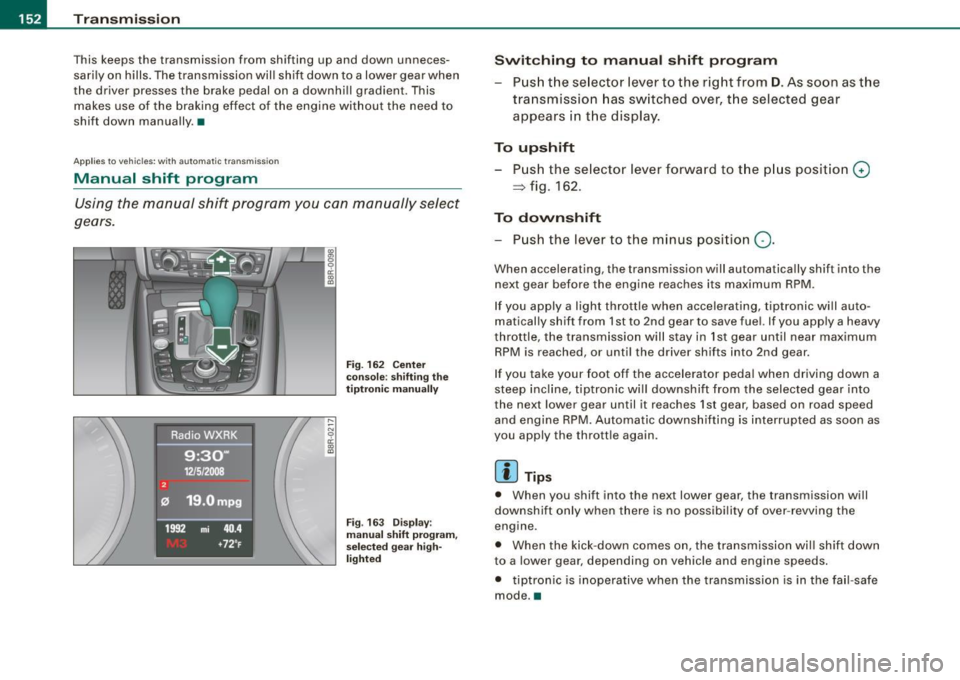
Manual shift program
Using the manual shift program you can manually select
gears.
F ig . 162 Ce nter
conso le : sh if ting the
t iptr oni c man ually
Fig . 163 Disp lay:
m anua l shi ft p rogra m ,
selected gear hig h
li g ht ed
Swit chin g to m anu al s hift pr ogr am
Push the se lector lever to the right from D . As soon as the
transmission has switched over, the selected gear
appears in the display .
To upshift
Push the selector lever forward to the p lus position G)
~ fig . 162.
To dovvnshift
- Push the lever to the minus position Q.
When accelerating , the transmission will automatically shift into the
next gear before the engine reaches its maximum RPM .
If you apply a light throttle when accelerating, tiptronic wi ll au to
matically shift from 1st to 2nd gear to save fuel. If you apply a heavy
throttle, the transmission will s tay in 1st gear until near maximum
RPM is reached, or unti l the driver shif ts into 2nd gear.
If you take your foot off the accelerator peda l when driving down a
steep inc line, tiptronic wi ll downshift from the selected gear into
the neX1 lower gear until it reaches 1st gear, based on road speed
and engine RPM. Automatic downshifting is interrupted as soon as
you apply the thrott le again .
[ i ] Tips
• When you shift into the next lower gear, the transmission will
downshift only when there is no possibi lity of over -revving the
engine .
• When the kick-down comes on , the transmission wil l shift down
to a lower gear , depending on vehicle and engine speeds .
• tiptron ic is inoperative when the transmission is in the fa il-safe
mode. •
Page 155 of 360

Transmi ssion -_______________ ___.
Applies to vehi cles : wi th tip troni c st eer ing w heel
Steering wheel with tiptronic
The shift buttons on the steering wheel allow the driver to
shift gears manually.
F ig . 164 Steer in g
whee l: S hift b utt ons
- To downshift, touch the button on the left Q .
- To upshift , touch the button on t he r ight G) .
The shift buttons are activated when the selector lever is in D, S or
in the manual shift program (tip tronic) .
Of course, you can continue to use the manual shift program with
t he selector lever on the center console .•
A pplies to vehicle s: with automatic t ran sm iss ion
Fail -safe mode
If tiptronic suffers a malfunction, the f ail-safe mode main
tains minimum drivability .
In the event of particular system malfunctions, the automatic trans
mission switches to the fail-safe mode . This is signaled by all the
segments in the display illuminating or going out.
Con tro ls and eq uip
ment
You can continue to move the selector lever to a ll positions . The
manual shift p rogram (tiptronic) is switched off in the fail -safe
mode.
I n selector lever positions D and Sand in the manual shift program,
the transm ission remains in 3rd gear if 1st, 2nd or 3rd gear was
engaged previously. The transmission remains in 5th gear, if 4th, 5th
or 6th gear was engaged previously .
The next time you drive off or start the engine, 3rd gear is engaged .
You can continue to use reverse gear. But the electronic loc kout for
reverse gear is turned off .
0 Note
If the transmission switches to fail-sa fe mode, you should take the
vehicle to an authorized Audi dea le rship as soon as possib le to have
t he condition corrected .•
A pplies to vehi cles : w ith au to m atic t ran smi ssio n
Automatic transmission malfunction t'.!>
In the event of a system malfunction, the automatic transm ission
switches to emergency operation mode .
Gearb ox malfun cti on: you can continue dr iving
You can continue to drive the veh icle. See an authori zed Audi dealer
or other qua lified workshop at the next opportunity .
Gearbo x m alfun ction : you can continue driving !limited
fun ctionality )
There is a serious system ma lfunction:
• The program shifts only into certain gears .
• The engine may stall.
• I t is not poss ib le to restart the engine if it has been switched of f.
• Continuing to drive could resu lt in subsequent damage . .,,_
Vehicle care I I Technical data
Page 156 of 360

• ..__T_ ra_ n_s_ m_ i_ s _s_ i_ o _n ___________________________________________________ _
0 Note
If the transmission switches to fail-safe mode, you should take the
vehicle to an authorized Audi dealership as soon as possible to have
the condition corrected .•
A pplies to veh icles : with aut om at ic transmi ssio n
Emergency release of the selector lever
If the vehicle's power supply fails, the selector lever can
be released in an emergency.
Fig. 165 Removing
ashtray insert
Fig. 166 Emergency
release for selector
lever
The emergency release is located under the insert for the
ashtray . -
Slide open the cover for the ashtray.
- Release the ashtray by pushing the switch@~ fig. 165
to the right.
- Remove the ashtray insert @.
- Now you can see a small cover in the ashtray holder on
the front of the ashtray recess.
- Release and remove this cover.
- You now have access to a bolt . Using a screwdriver or
similar, press the bolt down and hold it down ~ fig. 166.
Now press the interlock and move the selector lever to
the
N position.
Th e selector le ve r can only be moved from th e P position if the igni
tion key is in the lock and the ignition is turned on. If the vehicle has
to be pushed or towed if the power supply fails (e.g. battery is
discharged), the selector lever must first be moved to the
N position
using the emergency locking device. •
Page 157 of 360

Park ass ist -
----------------
Park assist
Applies to vehicle s: wi th pa rki ng system
Parking system
Different park assist systems may be used for parking or
maneuvering, depending on the vehicle's features.
P a rk in g sy ste m (r ea r)* :
For the parking system (rear), the acoustic park assist system is
insta lled in the rear of the vehicle=>
page 155.
The rear parking assist system uses ultrasonic sensors to determine
the distance of the vehicle from a detected obstacle. There are a
t otal of four sensors loca ted on the rear bumper (two in the midd le
and two on the sides).
P a rking s ystem (r e ar , w ith rear vi ew camera )*:
For the parking system (rear, wi th rear view camera) , the rear
acoustic park ass ist system is integrated in the rear of the vehicle
and the rear view camera is integrated in the rear lid=>
page 159.
The parking system (rear, with rear view camera) uses ultrasonic
sensors to determ ine the distance of the vehicle from a detected
obstacle. There ar e a total of four sensors located on the rear
bumper (two in the middle and two on the sides). •
Controls and equip
ment
Parking system (rear)
A pplie s to vehic les : w ith p arking syste m (re ar)
Rear acoustic park assist
The rear acoustic park assist warns y ou of obsta cles or
objects behind your car.
D esc ripti on
The rear acoustic parking assist system determines the distance of
the vehicle from an obstacle using ultrasonic sensors. There are 4
sensors in the rear bumper.
The range at which the sensors start to measure is
a bo ut:
To the sid e
Acti va tio n
2 ft (0.60 ml
5.2 ft ( 1.60 m)
Acoustic parking assist is activated automatically when
r e ver se gea r
is engaged . A brief tone confirms that the system is activated .
Warning tones
Distance warning is given by warning tones which are generated by
the rear signa l generator. The volume and the pitch of the wa rning
tones can be adjusted in the MMI* =>
page 156.
Reversing
Distance warn ing when reversing starts when an obstacle is
detected in the range of the parking assist system . As the distance
decreases, the time interval between the audible tones becomes
shorter .
When the distance is less than 1ft (0.30 ml, the tone becomes continuous. At this point you should stop backing up .
I • •
Page 158 of 360

• .___P_ a_r_ k_ a_s_ s_ i _s_ t ____________________________________________________ _
Please note that low objects already signalled by a warning can
disappear fro m the system 's detectio n range and wil l n ot con tinu e
to be signa lled .
If the distance to an obstacle remains the same, the vo lume of the
d istance wa rni ng i s gradually reduced after a bout 4 seconds .
Approaching another obstacle wi ll result in the distance warning
sound ing at th e nor mal vo lume agai n.
Malfunctions in the system If a warnin g tone is audib le for about five seconds when you turn on
the ignition, there is a ma lfunction in the system. Have the prob lem
corrected by y our aut horiz ed Aud i deale r.
Keep the sensors in the rear bu mper c lean and free from ice so that
th e acous tic par k ass is t sy stem can f unction properl y.
& WARNING
• Sensors have dead spaces in which objects cannot be
detected . Be especially alert for small children and animals , since
they are not always detected by the sensors.
• The acoustic parking system is not a substitute for the dr iver's
own caution and alertness . Ultimate responsibility always
remains with the driver during parking and similar maneuvers .
Always watch where you are driving .
• You should always adjust the volume and frequency of the
warning tones so that you can easily hear the acoustic distance
warn ing even if the radio is play ing , the air-conditioner blower is
on High or there is a high level of outside noise.
-Check the settings whenever anyone else has driven the
vehicle before you.
0 Note
• Reme mber that low obstacles for wh ic h a war ning has already
been issued may "dive" below the system's sensing zone if the
v ehicl e is be ing backe d up close r. In t his cas e, t he wa rnin g so und shutting off does
not indicate that you have c leared the obstacle .
In stea d, impact is im min ent.
• Objects such as trai ler hitches, chains, narrow posts or fences
cov ered by a t hin lay er of p ain t may no t always be detecte d by t he
syst em . T hey can stil l damage your vehicle without warning.
[ i ] Tips
K eep the sensors in the rear bumper clean and free of snow and ice
s o t hat the ac oustic parki ng a ssis t s ystem ca n fu nc tio n proper ly.•
Ap plies to ve hic le s : w ith pa rk ing syst em (rea r)
Adjusting the warning tones
Th e warning ton es can be adj usted in the MM /*.
-Select: [CARI> Parking system.
• Rear volume - rea r sens or vo lum e
• Rear frequency -rea r sensor frequency
Fig . 167 MMI displ ay:
parking system
• In-car entertainment fader -when the parking system is
sw itched o n, t he v olum e of the ac tive a udio sou rce is lo wered .
Page 159 of 360

____________________________________________________ P_a _ r_ k_ a_s_ s_ i_ s _t _ __._
The newly adjusted value is briefly heard from the signal generator.
The settings are automatically stored and assigned to the master
key with remote control. •
Parking system (rear, with
camera)
.
rear view
Applies to vehicles : w ith park in g sys tem (rear, with rear view came ra )
Introduction
Fig . 168 Parking
mode 1: reverse
parking
Fig . 169 Parking
mode 2 : parallel
park ing
Vehicles with the parking system are equipped with a rear view
camera in addition to the acous tic parking system.
Con tro ls and eq uip
ment You can choose between two modes to assist you with parking
. For
example, you can use "parking mode 1" when parking in a parking
space or garage~ fig. 168. When you want to park para llel to the
edge of the street, se lect "parking mode 2"
~ fig. 169.
The rear acoustic park assist system is integrated in the rear of the
vehicle and the rear view camera is integrated in the rear lid
~ page 159.
& WARNING
• The rear view camera has blind spots, in which objects cannot
be detected . Be especially careful to check for small children and
animals before backing up . Small children and animals will not
always be detected by the sensors. •
App lies to veh ic les : wi th p arking system ( rea r, wi th r ear vi ew ca mera)
General Information
Vehicle care I I
®
Fig . 170 Covered area
(D and unco vered a rea
@ of the rear view
cam era .,,_
Technical data
Page 160 of 360

• ..__P_ a_r _k _ a_s _ s_ i_ s _t ____________________________________________________ _
•
Sensor s in th e bump er
Fig . 17 1 Tru nk l id:
L oca tion of th e r ear
vi ew c amera
Sensors are located in the rear bumpers. If these detect an obstac le,
audible and visual signals warn you . The range at which the sensors
begin to measure is approximately:
To the side 2 ft (0.60 ml
Center rear
5.2 ft (1.60 m)
Distance warning when reversing starts when an obstacle is
detected in the range of the parking assist system. As the distance
decreases, the time interval between the audible tones becomes
shorter.
When the distance is less than 1ft (0.30 ml, the tone becomes continuous . At this point you should stop backing up.
If the distance to an obstacle stays the same, the vo lume of the
distance signal chime is gradually reduced after about 4 seconds
(does not affect the continuous signal tone). Approaching another
obstac le wi ll cause the distance signal to sound again at the normal
volume.
R ea r vi ew camera cover age ar ea
The MMI display shows the area covered by the rear view camera
=>
page 157, fig . 170 G) . Objects that are not in the area covered 0
are not shown on the MMI display. We recommend that you practice parking with the rear view camera
in a traffic -free location or parking lot to become familiar with the
system, the orientation lines, and their function. When doing this,
there should be good ligh t and weather conditions.
In the MMI d isplay, objec ts or vehicles appear closer or further away
if:
• you are driving in reverse gear from a level surface onto an
incline, or a downward slope,
• you are driving in reverse gear toward protruding objects,
• the vehic le is carrying too much load in the rear.
The accuracy of the orientation lines and b lue surfaces diminishes
if:
• the rear view camera does not provide a reliable image, for
example, in poor visibility conditions or if the lens is dirty,
• the image on the screen is not visible due to sun glare and reflec
tion.
C aring for the rear vi ew c amera l en s
The rear view camera is located above the rear license plate bracket.
For the parking assist to operate, the lens => fig. 171 must be kept
clean :
• Dampen the lens with a household alcohol -based glass cleaner,
and clean the lens with a dry cloth
~ 0 .
• Remove snow with a hand brush and ice preferably with a de
icing spray=>
0 .
& WARNING
• The p arking aid cannot repl ace the driver' s attentio n. The
driv er alo ne is re spon sible for parkin g and similar dri ving m aneu
v ers .
• Alway s keep your eyes on the vehicle' s surrounding s, usin g the
r ea r vie w mirror as w ell. ..,.