Page 169 of 364

___________________________________________________ P_ a_r _k _ a_s _s_ i_s _t __ ffllll
• Remove snow with a hand brush and ice preferably with a de- ic ing
spray ~(D .
& WARNING
• The park ing aid cannot repla ce the dri ver' s attention . The
dri ver alone is res pon sible f or p arking and sim ilar dri ving m aneu
ve rs.
• Always keep yo ur eyes on the vehicle 's su rro unding s, usi ng th e
r e ar -view mirror a s we ll.
• Do not all ow y ourself to be dist racted from tr affic b y th e re ar
v iew cam era pic ture s.
• If the p osit ion and the in stall ati on ang le of the came ra has
c hange d, fo r ex ample, aft er a rea r end collisi on, do n ot contin ue
to u se the system for safe ty rea sons . Ha ve it ch ecked b y a qualifi ed
d eal ers hip.
0 Note
• Low obstacles a lready s ignaled by a warning can disappear from
the system's detection range as they are approached and will not
cont inue to be s ignaled. Objects such as bar rier chains, t railer draw
bars, thin painted vertical poles or fences may not be detected by the
system, pos ing ris k of damage .
• Never use warm or hot water to remove snow or ice from the rear
view came ra lens -danger of crack format io n on the lens!
• When cleaning the lens, never use products that are abrasive.•
Controls and equip
ment Safety first
A
pp lies to vehicles : wi th par king syst em (r e a r) a nd r ear-v iew came ra
Sw itching on /off
The rearview camera switches on automatically together
with the acoustic and optical park assist when you put the
vehicle in reverse .
Activation
-Put the vehicle in reverse gear, the acoustic parking
system with rear-view camera is activated automatically .
Activation of the acoustic pa rking system is confirmed by
a brief acknowledgement sound .
Switching between the rearview camera and
optical display
-Press the Graphic control button~ page 168, fig. 171 ®
to see the optical display.
- Press the
Rear view control button to see the rearview
camera image.
Deactivat ion
- Take the vehicle out of reverse gear. The acoust ic parking
system is immediate ly deactivated, and the rear-v iew
camera picture is deactivated automatically after a period
of about 15 seconds, or
- Switch the ignition off, the entire acoustic parking system
is automatically deactiva ted.
T he rear-view camera will deactivate a utoma tica lly when you shift
into a forward gear and dr ive faster than about 9 mph (15 km/h) .
Th e de lay in deactivating the camera provides an uninterrupted view
behind the vehicle espec ia lly when maneuver ing in tight parking
spaces and prevents the picture from turning off the every time you
shift out of reverse. _..
Vehicle care Technical data
Page 170 of 364

ffl..__P_ a_r_ k_ a_ s_ s_ is_t ____________________________________________________ _
If the warning message appears in the display but not the rear-view
camera picture, read and confirm the warn ing message. The acous tic
distance s ignal is always active .
If you press a function button on the MMI control console, the rear
view camera picture disappears. T he rear-view camera picture reap
pears the next time you park .
Further information on the wa rning message and the MM I control
console can be found in the MMI instruction booklet.
(I) Tips
• The rear -view camera picture is available as soon as the MM I
Display or the MMI is switched on, or the start-up phase is completed.
• Keep the sensors in the rear bumper and the rear-view camera lens
clean and free of snow and ice, so that the parking system can work
properly . Please follow the additional notes on~
page 171. •
Applie s to veh icl es : wi th park ing syst em (r e a r) an d rear-vi ew cam era
Reverse Parking
Parking mode 1 can be used when parking in a garage or
parking space.
Fig.171 MMI D ispl ay :
Aimin g at a park in g
spot F
ig .172 MMI D isplay:
Ali gni ng the vehi cle
-Switch the MMI on and select the r everse gear .
- Turn the steering wheel until the orange orientation lines
(D appear in the parking spot=> fig . 171. Use the mark
ings @to help you estimate the distance from an
obstacle. Each marking corresponds to 3 ft (1 m). The blue area re presents an extension of the vehicle's outline
by approx imately 16 ft (5 m) to the rear.
- While driving in reverse gear, adjust the steering whee l
angle to fit the parking space with the aid of the orange
orie ntation lines=>
0. ® marks the rear b umper . You
should stop driving in reverse as soon as and no later than
when the red orientation line© abuts an object=>&!
& WARNING
• The r ear -view cam era d oes not show th e entire are a behind th e
v eh icle ~
page 166, fig. 169. Watch out especia lly f or sm all c hil
d ren and an imal s. The rear -view camera cannot alwa ys detect
them, posing risk o f an acc ident !
• Plea se not e that object s not tou ching the gro un d c an app ear to
be furthe r away than th ey re a lly are (for exampl e, th e bumpe r of
a parked vehi cle, a traile r hitch , or the rea r of a truck ). In thi s ca se, .,
Page 171 of 364

----------------------------------------------~P~a..!..r ~k :...:a:!.s~s!..:is~t ~_J-
& WARN ING (continued)
y ou sh oul d no t use th e help line s to help w ith pa rki ng, wh ic h
p os es dang er of an a ccident!
0 Note
• Low obstacles a lready s ignaled by a wa rning can disappear from
t he sys tem' s de tec tion range as they are approached and will no t
cont inue to be s ignaled. Objects such as bar rier chains, trailer draw
bars, thin pa inted vertical poles or fences may not be detected by the
system, posing risk of damage.
• In the MMI display, the direc tion of travel of the vehicle rear is
represented depend ing on the stee ring whee l angle. The vehicle front
swings out more than the vehicle rear . Maintain plenty of distance
from an obstacle so that your outs ide mirror or a corner of your
vehicle does not collide with any obstacles -danger of accident! •
Applies to veh icl es: wit h pa rk ing syst em (rear ) and re ar-v iew ca mer a
Parallel Parking
Use parking mode 2 to help you park on the edge of a
street.
Con tro ls a nd e quip
m en t
Fig.173 MMI Display :
b lu e s urface In th e
par king s lot
Vehicle OP-eration
Fig.174 MM I Dis pl ay:
Bl ue cur ve on t h cur b
The following steps apply only when there is no obstacl e
(such as a wall) near the parking spot. Otherw ise, please read
the "Tips o n Parking Next to Obstacles" .
- Activate the turn signal.
- Switch the MMI on and select the reverse gear. The
parking a id turns on and parking mode 1 appears on the
display.
- Position your vehicle parallel to the edge of the street,
approximately 1 meter from a parked vehicle.
- Press the
Mode ~ fig. 173 © control button on the MMI
control console . Parking mode 2 appears .
- Back up in reverse gear a nd alig n your veh icle so that the
blue area
0 borders on the rear end of the veh icle or on
the parking spot line . The blue area represents an exten
sion of the vehicle's out line by approximately 5 m to the
rear. The long side of the b lue area should be on the curb .
The entire blue area must fit into the park ing spot.
- Whi le the vehicle is stationary, turn the steering whee l to
the right as far as it will go . _.,
Vehicle care Do-it-yourselt service iTechnical data
Page 172 of 364

lffl!IL____:P:....::a:.:r..:k:..:::a::s:.:s::.:i~s:.:t :..._ _________________________________________________ _
- Back into the parking space until the blue curve touches
the curb~
page 169, fig . 174. Stop the vehic le .
- While the ve hicle is stationa ry, turn the steering whee l to
the left as far as i t will go.
- Continue to back up into the parking spot until the ve hicle
is parked parallel to the curb. ® mar ks the rear bumper.
You shou ld stop dr iving i n reverse as soon as and no later
than when the red orientation line
0 abuts a n object
~ & !Kee p an eye on the front of your vehicle wh ile doing
this ~0.
Parking next to obs tacles
When there is an obstacle (such as a wall) next to the parking spot,
c hoose a spo t w it h more space on the sides. Position the long side of
the blue area so that there is sufficient space from the curb. The area
must not be on the curb . You will a lso need to star t turning the
steering wheel much earlier. There should be a suff icie nt amount of
space between the c urb and the b lue c urve, and the b lue c urve
=> page 169, fig. 17 4 must not touch the curb .
& WARNING
• The rea r-v iew camera does not show the entire area behind the
vehicle =>
page 166, fig. 169 . Watch out e spe cially for small chil
dr en and animal s. The rear-view camera cannot alway s det ect
them, posing risk of an accident!
• Please note that objects not touch ing the ground can appear to
be further away than they really are (for example, the bumper of
a park ed vehicle, a trailer hit ch , or the rear of a truck) . In this case ,
you should not use the help lines to help with parking , which
po ses danger of an accid ent!
0 Note
In the MMI display, the d irection of t ravel of the vehicle rear is rep re
sented depending o n the steering wheel angle . The ve hicle front
swi ngs ou t mo re than the ve hicl e rea r. M aintain plenty of d istance
from an obstacle so that your outside mirror or a corner of your
veh icle does not collide w ith any obstacles - d anger of a ccident!
[ i ] Tips
Th e left or rig ht or ientation lines and surfaces w ill be displayed,
depending on the tur n signa l being used .•
A pp lies to veh icles: with par king system (rear) and r ear-view camera
Adjusting the display and warning tones
The display* and warning tones can be adjusted in the
radio or in the MM!*.
-Select : [CAR)> Parking system.
Display
• Off -when the parking system is switched off, only aud ible sig nals
are g iven.
• On -when the pa rking system is switched on , eithe r the visua l
display or the p ictu re from the rearview camera is displayed.
Warn ing tones
• Front volume -front sensor vo lume
• Front frequency -front sensor frequency
• Rear volume -rear senso r vo lume
• Rear frequency -rear sensor freq uency
• In-car ent ertainment fader -when the park ing system is sw itched
on, the volume of the active audio source is lowere d.
Th e newly adju ste d val ue is briefly he ard from the signal generato r . ..
Page 173 of 364
Park assist -
----------------
[I) Tips
• The warn ing tones can also be adjusted directly by the visual
display or the picture from the rearview camera. Simply press the
Settings control button.
• Changed settings are activated when parking system is switched
on again.
• Th e settings are automatically stored and assigned to the remote
control key .•
Ap plies to vehicl es: wit h pa rk ing System (re ar) and rea r-v iew ca mera
Acoustic parking system error message
If a warning tone is aud ible for about five seconds when you turn on
the ignition, there is a malfunction in the system. Have the problem
corrected by yo ur authorized Audi dealer .
Keep the sensors in the rear bumper clean and free from ice so that
the acoustic park assist system can function properly. •
Controls and equip
ment Safety first
Vehicle care Technical data
Page 174 of 364

-HomeLink ® •m ___________________ _
Homelink®
Universal remote control
Applies to veh icles: w ith Hom elin k® un iversal re m ote contro l
General information
The Homelink ® feature can learn up to three radio
frequency codes for most current transmitters used for
operating garage doors, estate gates , home or outdoor
lighting systems, and other devices.
Yo u must fi rst p rogr am the Home link® tra nsmi tte r be fore you can
use the system=>
page 173, "Programming the Home link ® trans
m itter".
In order to program the Homelink ® transm itter fo r devices utilizing
rolling code, a second person on a ladder who can sa fely reach t he
garage door opener motor is recommended. It is also necessary to
locate the "learn" button on yo ur garage door opener motor . Re fer to
t he oper ating ins truc tions fo r th e opene r, as the loca tion and color o f
this button may vary by manufacturer .
Yo u can still use the original remote control for the device at any
t ime .
& WARNING
• Never use the Homelink'"' transmitter with any garage door
opener that does have not the safety stop and rever se feature as
required by fed eral safety standards. This includes any garage
door opener model manufactured before April
l , 1982 .
• A garage door opener which cannot detect an object, signaling
the door to stop and reverse does not meet current federal safety
standards . Using a garage door opener without these features
increases risk of serious injury or death.
& WARNING (cont inu ed )
• For safety reasons never release the parking brake o r start the
engine while anyone i s standing in front of the vehicle .
• A ga rage door or an estate gate may sometimes be set in
motion when the Homelink ® remote control is being
programmed. If the device is repeatedly activated, this can over
s train motor and dam age its electri cal components -an over
heated motor is a fi re hazard!
• To avoid pos sible injurie s or property damage , plea se always
make absolutely certain that no persons or objects are located in
the range of motion of any equipment being operated.
[ i ] Tips
• If you would like mo re inf orma tion o n Hom eli nk ®, whe re to
purchase the Homelink ® compat ible products, or would like to
purc hase the Homeli nk® Home Lighting Pac kage, p lease ca ll to ll
free : 1-800-355-3515 .
• F or Declaration of Compliance to United Sta tes FCC an d Indus try
Canada regulations=>
page 346. •
Page 175 of 364

HomeLink® -_______________ __.
Applies to veh icles : w ith Home link® un iversa l remote cont rol
Programming the Homelink ® transmitter
The transmitter is programmed in two phases . For rolling
code transmitters, a third phase is also necessary .
Fig. 175 Overhead
console: Homelink ®
k eypa d
Fig. 176 Radiator
grille
Phase 1: programming the overhead keypad
1. Make sure your vehicle is within operating range of the
remote controlled garage door opener .
2. Set the parking brake=>
& in "General information" on
page 172 .
3. Turn the ignition on . Do not start the engine!
Con tro ls a nd e quip
m en t Vehicle
OP-eration
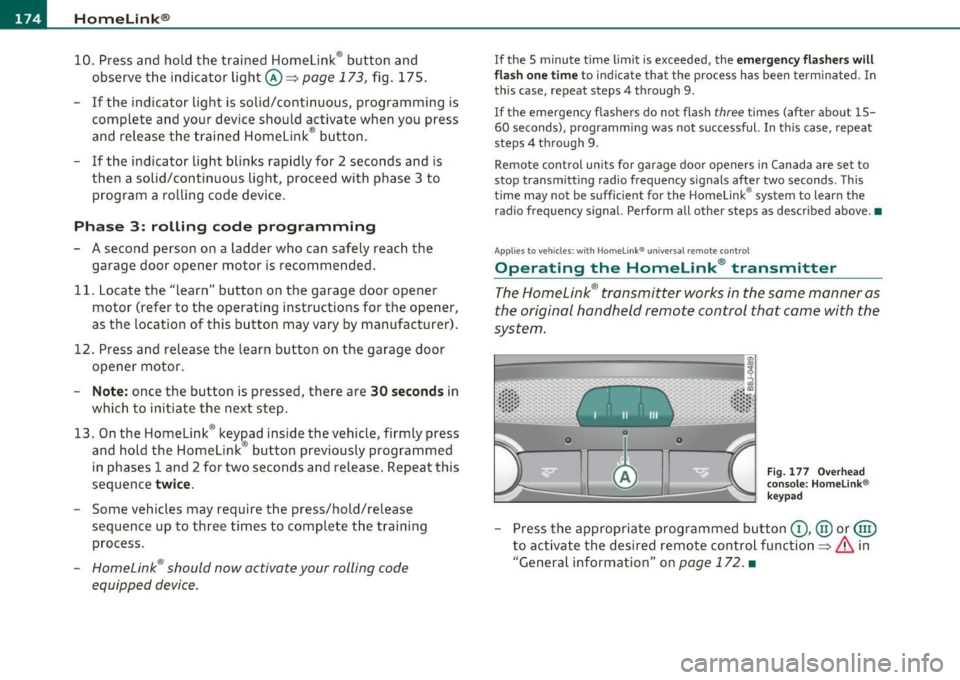
4. Press and hold the two outside Homelink ® buttons G)and
@ for approximately 20 seconds until indicator light@
=> fig. 175 begins to flash . Then release both buttons. Do
not hold the buttons for longer than
30 seconds .
- This procedure only needs to be performed
once. It erases
the factory-set default codes and does not have to be
repeated to program additional remote controls.
5. Press and hold the Homelink ® button G), @ or@ until
the indicator light @starts flashing
slowly . Release the
button.
- The system will remain in programming mode for 5
minutes. Co to the front of the vehicle and proceed with
phase
2.
Phase 2: at the radiator grille
6. Point the original remote control to the m iddle of the
radiator grille of your vehicle=> fig.
176.
7. Hold the original remote control at a distance between O
S in. (0-13 cm) (use the shortest distance possible) .
8 . Press and hold the activation button on the remote
control.
- May be different in Canada . If so, press and re-press
(cycle) the activation button on your remote control every
two seconds.
9. The emergency flashers will flash
three times (after about
15-60 seconds) when the programming is successful.
Release the button on the remote control.
- To program more devices , repeat steps 4 to 9.
Vehicle care Do-it-yourselt service iTechnical data
Page 176 of 364

IIIIL----.:H....:..: o:....:m..:..:.. e= L:.:.i :....: n :.:.k :....: ® __________________________________________________ _
10. Press and hold the trained Homelink® button and
o bserve the in dicator light©==>
page 173, fig. 175.
- If the indicator light is solid/continuous, programming is
complete and your device should activate when you press
and release the trained Homelink ® button .
- If the indicator light blinks rapidly for 2 seconds and is
then a solid/continuous light , proceed with phase 3 to
program a rolling code device .
Phase 3: rolling code progr amming
- A second person on a ladder who can safely reach the
garage door opener motor is recommended.
11. Locate the "learn" button on the garage door opener
motor (refer to the operating instructions for the opener,
as the location of this button may vary by manufacturer) .
12. Press and release the learn button on the garage door opener motor.
- Note: once the button is pressed, the re are 30 seconds in
which to initiate the next s tep .
13. On the Homelink ® keyJ)ad inside the vehicle, firmly press
and hold the Homelink ® button previously programmed
in phases 1 and 2 for two seconds and release. Repeat this
sequence
twice .
-Some vehicles may require the press/hold/release
sequence up to three times to complete the training
process .
-Homelink ® should now activate your rolling code
equipped device .
If the 5 minute time limit is exceeded, the emergency fl ash ers will
fla sh one time
to ind icate that the process has been terminated. In
this case, repeat steps 4 th rough 9 .
If the emergency flashers do not flash
three times (after about 15-
60 seconds), programming was not s uccessful. In th is case, repeat
steps 4 through 9.
Remote control un its for garage doo r openers in Canada are se t to
stop transmitting radio frequency signals after two seconds. This
time may not be sufficient for the Homelink ® system to learn the
radio frequency signal. Perform all other steps as descr ibed above .•
App lies to veh icles: with H omelink ® un iversa l re mote cont ro l
Operating the Homelink ® transmitter
The Homelink ® transmitter works in the same manner as
the original hand held remote control that came with the
system .
0
•
0
~
Fig . 1 77 Ove rhead
co nso le: H om elin k®
k ey pad
- Press the app ropriate programmed bu tton G) , @ or@
to activate the desired remo te cont rol function ==>
& in
"General information" on
page 172. •