Page 2007 of 2453

PM-24
Suspension
PERIODIC MAINTENANCE SERVICES
17.Suspension
A: INSPECTION
1. SUSPENSION BALL JOINT
1) Jack-up the vehicle until front wheels are off
ground.
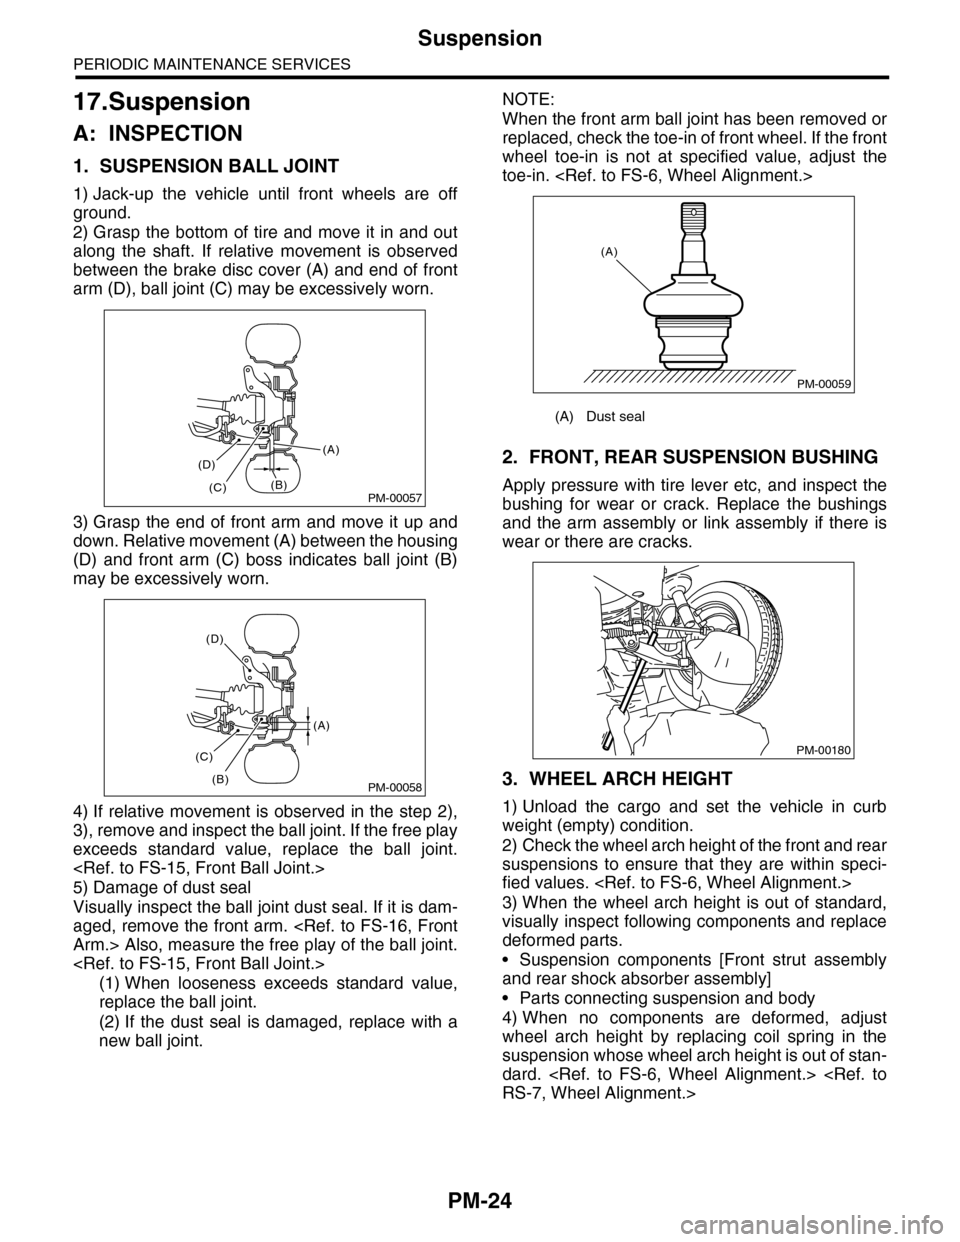
2) Grasp the bottom of tire and move it in and out
along the shaft. If relative movement is observed
between the brake disc cover (A) and end of front
arm (D), ball joint (C) may be excessively worn.
3) Grasp the end of front arm and move it up and
down. Relative movement (A) between the housing
(D) and front arm (C) boss indicates ball joint (B)
may be excessively worn.
4) If relative movement is observed in the step 2),
3), remove and inspect the ball joint. If the free play
exceeds standard value, replace the ball joint.
5) Damage of dust seal
Visually inspect the ball joint dust seal. If it is dam-
aged, remove the front arm.
Arm.> Also, measure the free play of the ball joint.
(1) When looseness exceeds standard value,
replace the ball joint.
(2) If the dust seal is damaged, replace with a
new ball joint.
NOTE:
When the front arm ball joint has been removed or
replaced, check the toe-in of front wheel. If the front
wheel toe-in is not at specified value, adjust the
toe-in.
2. FRONT, REAR SUSPENSION BUSHING
Apply pressure with tire lever etc, and inspect the
bushing for wear or crack. Replace the bushings
and the arm assembly or link assembly if there is
wear or there are cracks.
3. WHEEL ARCH HEIGHT
1) Unload the cargo and set the vehicle in curb
weight (empty) condition.
2) Check the wheel arch height of the front and rear
suspensions to ensure that they are within speci-
fied values.
3) When the wheel arch height is out of standard,
visually inspect following components and replace
deformed parts.
•Suspension components [Front strut assembly
and rear shock absorber assembly]
•Parts connecting suspension and body
4) When no components are deformed, adjust
wheel arch height by replacing coil spring in the
suspension whose wheel arch height is out of stan-
dard.
RS-7, Wheel Alignment.>
PM-00057
(A)
(B)(C)
(D)
PM-00058
(A)
(B)
(C)
(D)
(A) Dust seal
PM-00059
(A)
PM-00180
Page 2037 of 2453
5AT-21
General Description
AUTOMATIC TRANSMISSION
398643600 GAUGE Used for measuring the total end play, extension
end play and drive pinion height.
378744300 PISTON GUIDE Used for measuring height from mating surface
of the main case to pressure plate.
499737100 PULLER SET Used for removing the reduction driven gear
assembly.
498077600 REMOVER Used for removing the ball bearing.
18667AA010 HOLDER • Used for removing and installing the drive pin-
ion lock nut.
•Used as a handle to rotate gear when check-
ing tooth contact.
ILLUSTRATION TOOL NUMBER DESCRIPTION REMARKS
ST-398643600
ST-378744300
ST-499737100
ST-498077300
ST18667AA010
Page 2040 of 2453
5AT-24
General Description
AUTOMATIC TRANSMISSION
499587100 OIL SEAL
INSTALLER
Used for installing the oil seal.
499787500 ADAPTER Used for removing and installing drive pinion lock
nut.
499575400 GAUGE Used for measuring height of total end play.
18762AA000 COMPRESSOR
SPECIAL TOOL
Used for disassembling multi-plate clutch for shift
transmission.
499755602
(Newly adopted tool)
PRESS Used for installing the parking gear.
ILLUSTRATION TOOL NUMBER DESCRIPTION REMARKS
ST-499587100
ST-499787500
ST-499575400
ST18762AA000
ST-499755602
Page 2081 of 2453

5AT-65
Transfer Clutch
AUTOMATIC TRANSMISSION
25.Transfer Clutch
A: REMOVAL
1) Remove the transmission assembly from vehicle
body.
Transmission Assembly.>
2) Remove the extension case, and then remove
the transfer clutch.
Extension Case.>,
BLY, Extension Case.>
B: INSTALLATION
1) Select the rear drive shaft shim.
ADJUSTMENT, Transfer Clutch.>
2) Select driven plate No. 3.
JUSTMENT, Transfer Clutch.>
3) Install the extension case.
STALLATION, Extension Case.>
4) Install the transmission assembly to the vehicle.
Transmission Assembly.>
C: INSPECTION
•Inspect the drive plate facing for wear and dam-
age.
•Make sure the snap ring is not worn and the re-
turn spring has no permanent distortion, damage,
or deformation.
•Check that the D-ring is not damaged.
•Inspect the extension end play, and adjust it to
within the standard value.
JUSTMENT, Transfer Clutch.>
D: ADJUSTMENT
1. REAR DRIVE SHAFT SHIM SELECTION
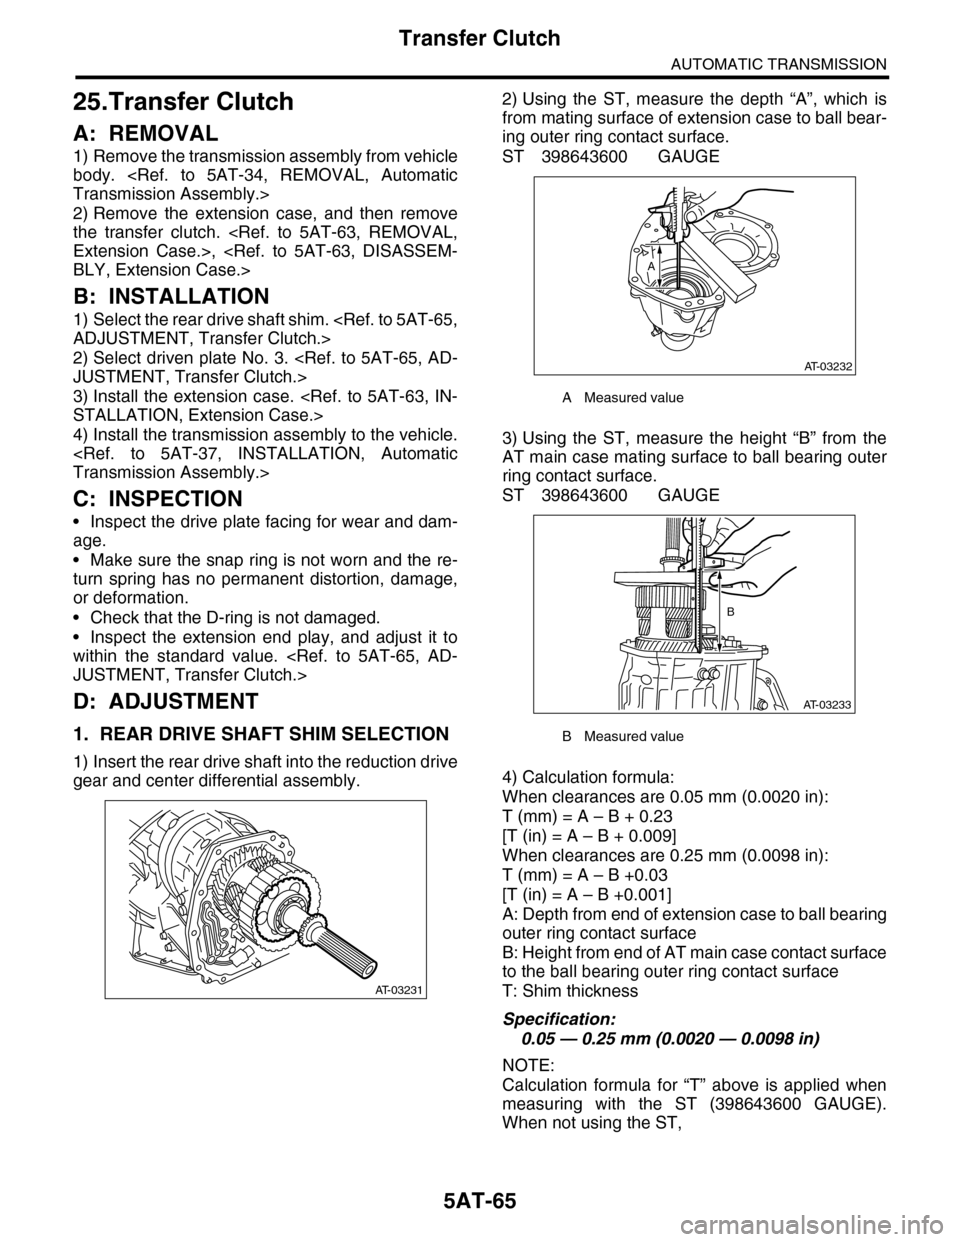
1) Insert the rear drive shaft into the reduction drive
gear and center differential assembly.
2) Using the ST, measure the depth “A”, which is
from mating surface of extension case to ball bear-
ing outer ring contact surface.
ST 398643600 GAUGE
3) Using the ST, measure the height “B” from the
AT main case mating surface to ball bearing outer
ring contact surface.
ST 398643600 GAUGE
4) Calculation formula:
When clearances are 0.05 mm (0.0020 in):
T (mm) = A – B + 0.23
[T (in) = A – B + 0.009]
When clearances are 0.25 mm (0.0098 in):
T (mm) = A – B +0.03
[T (in) = A – B +0.001]
A: Depth from end of extension case to ball bearing
outer ring contact surface
B: Height from end of AT main case contact surface
to the ball bearing outer ring contact surface
T: Shim thickness
Specification:
0.05 — 0.25 mm (0.0020 — 0.0098 in)
NOTE:
Calculation formula for “T” above is applied when
measuring with the ST (398643600 GAUGE).
When not using the ST,
AT-03231
AMeasured value
BMeasured value
AT-03232
A
AT-03233
B
Page 2082 of 2453

5AT-66
Transfer Clutch
AUTOMATIC TRANSMISSION
When clearances are 0.05 mm (0.0020 in):
T (mm) = (A – α) – ((B – β) – 0.28) – 0.05
[T (in) = (A – α) – ((B – β) – 0.011) – 0.0020]
When clearances are 0.25 mm (0.0098 in):
T (mm) = (A – α) – ((B – β) – 0.28) – 0.25
[T (in) = (A – α) – ((B – β) – 0.011) – 0.0098]
is applied.
T: Shim thickness
A: Depth from end of extension case to ball bearing
outer ring contact surface
B: Height from end of AT main case contact surface
to the ball bearing outer ring contact surface
α: Thickness of collar used when measuring “A”
β: Thickness of collar used when measuring “B”
0.28 (0.011): Gasket thickness (Unit mm (in))
2. SELECTION OF DRIVEN PLATE NO. 3
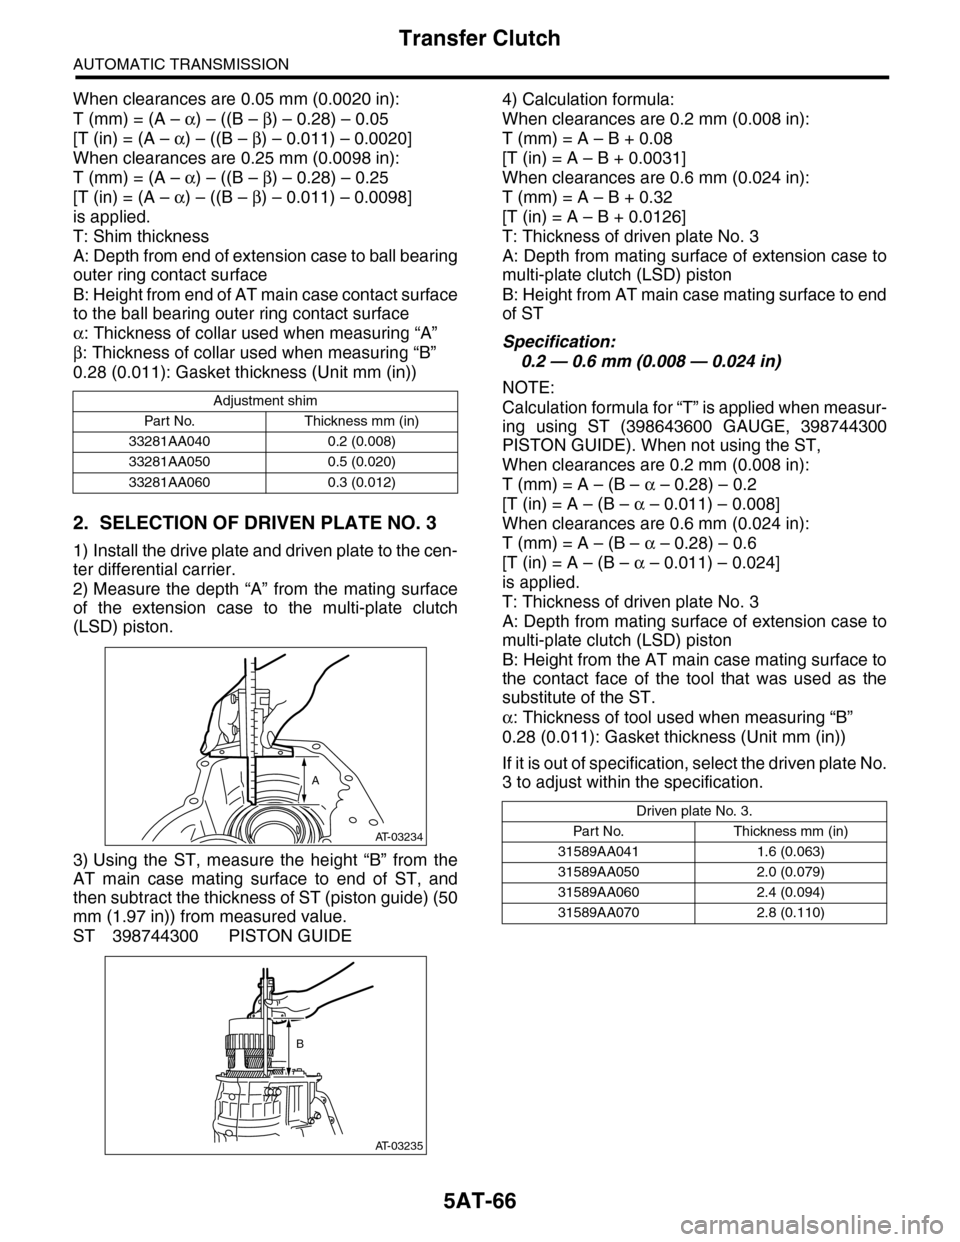
1) Install the drive plate and driven plate to the cen-
ter differential carrier.
2) Measure the depth “A” from the mating surface
of the extension case to the multi-plate clutch
(LSD) piston.
3) Using the ST, measure the height “B” from the
AT main case mating surface to end of ST, and
then subtract the thickness of ST (piston guide) (50
mm (1.97 in)) from measured value.
ST 398744300 PISTON GUIDE
4) Calculation formula:
When clearances are 0.2 mm (0.008 in):
T (mm) = A – B + 0.08
[T (in) = A – B + 0.0031]
When clearances are 0.6 mm (0.024 in):
T (mm) = A – B + 0.32
[T (in) = A – B + 0.0126]
T: Thickness of driven plate No. 3
A: Depth from mating surface of extension case to
multi-plate clutch (LSD) piston
B: Height from AT main case mating surface to end
of ST
Specification:
0.2 — 0.6 mm (0.008 — 0.024 in)
NOTE:
Calculation formula for “T” is applied when measur-
ing using ST (398643600 GAUGE, 398744300
PISTON GUIDE). When not using the ST,
When clearances are 0.2 mm (0.008 in):
T (mm) = A – (B – α – 0.28) – 0.2
[T (in) = A – (B – α – 0.011) – 0.008]
When clearances are 0.6 mm (0.024 in):
T (mm) = A – (B – α – 0.28) – 0.6
[T (in) = A – (B – α – 0.011) – 0.024]
is applied.
T: Thickness of driven plate No. 3
A: Depth from mating surface of extension case to
multi-plate clutch (LSD) piston
B: Height from the AT main case mating surface to
the contact face of the tool that was used as the
substitute of the ST.
α: Thickness of tool used when measuring “B”
0.28 (0.011): Gasket thickness (Unit mm (in))
If it is out of specification, select the driven plate No.
3 to adjust within the specification.
Adjustment shim
Par t No. Thickness mm (in)
33281AA040 0.2 (0.008)
33281AA050 0.5 (0.020)
33281AA060 0.3 (0.012)
AT-03234
A
AT-03235
B
Driven plate No. 3.
Par t N o. Thickness mm (in)
31589AA041 1.6 (0.063)
31589AA050 2.0 (0.079)
31589AA060 2.4 (0.094)
31589AA070 2.8 (0.110)
Page 2085 of 2453
5AT-69
Reduction Driven Gear
AUTOMATIC TRANSMISSION
4) Using the ST, remove the parking gear.
ST 18767AA000 REMOVER
D: ASSEMBLY
1) Using the ST, install the parking gear.
ST 499755602 PRESS
2) Install the snap ring.
3) Install the new ball bearing to reduction driven
gear using press.
ST 18654AA000 INSTALLER
4) Install the ball bearing on the reverse side with
the same procedure as step 3).
ST 18654AA000 INSTALLER
E: INSPECTION
Make sure the ball bearing and gear is not de-
formed or damaged.
F: ADJUSTMENT
1) Using the ST, measure the height “A” from the
AT main case mating surface to ball bearing outer
ring contact surface.
ST 499575400 GAUGE
2) Using the ST, measure the depth “B”, which is
from mating surface of extension case to ball bear-
ing outer ring contact surface.
ST 499575400 GAUGE
(A) Ball bearing 1
AT-03265
ST
ST
AT-03264
AT-03267
ST
AT-03268
ST
AT-03269
ST
A
AT-03270
ST
B
Page 2086 of 2453
5AT-70
Reduction Driven Gear
AUTOMATIC TRANSMISSION
3) Calculation formula:
Select the ball bearing shim from the table to adjust
clearances within 0.05 — 0.25 mm (0.0020 —
0.0098 in).
When clearances are 0.05 mm (0.0020 in):
T (mm) = B – A + 0.23
[T (in) = B – A + 0.0091]
When clearances are 0.25 mm (0.0098 in):
T (mm) = B – A + 0.03
[T (in) = B – A + 0.0011]
T: Shim clearance
A: Height from the mating surface of the AT main
case to the ball bearing outer ring end surface
B: Depth from mating surface of extension case to
ball bearing outer ring contact surface
Reduction gear shim
Par t No. Thickness mm (in)
31288AA030 0.2 (0.008)
31288AA050 0.5 (0.020)
31288AA060 0.3 (0.012)
Page 2100 of 2453

5AT-84
Drive Pinion Shaft Assembly
AUTOMATIC TRANSMISSION
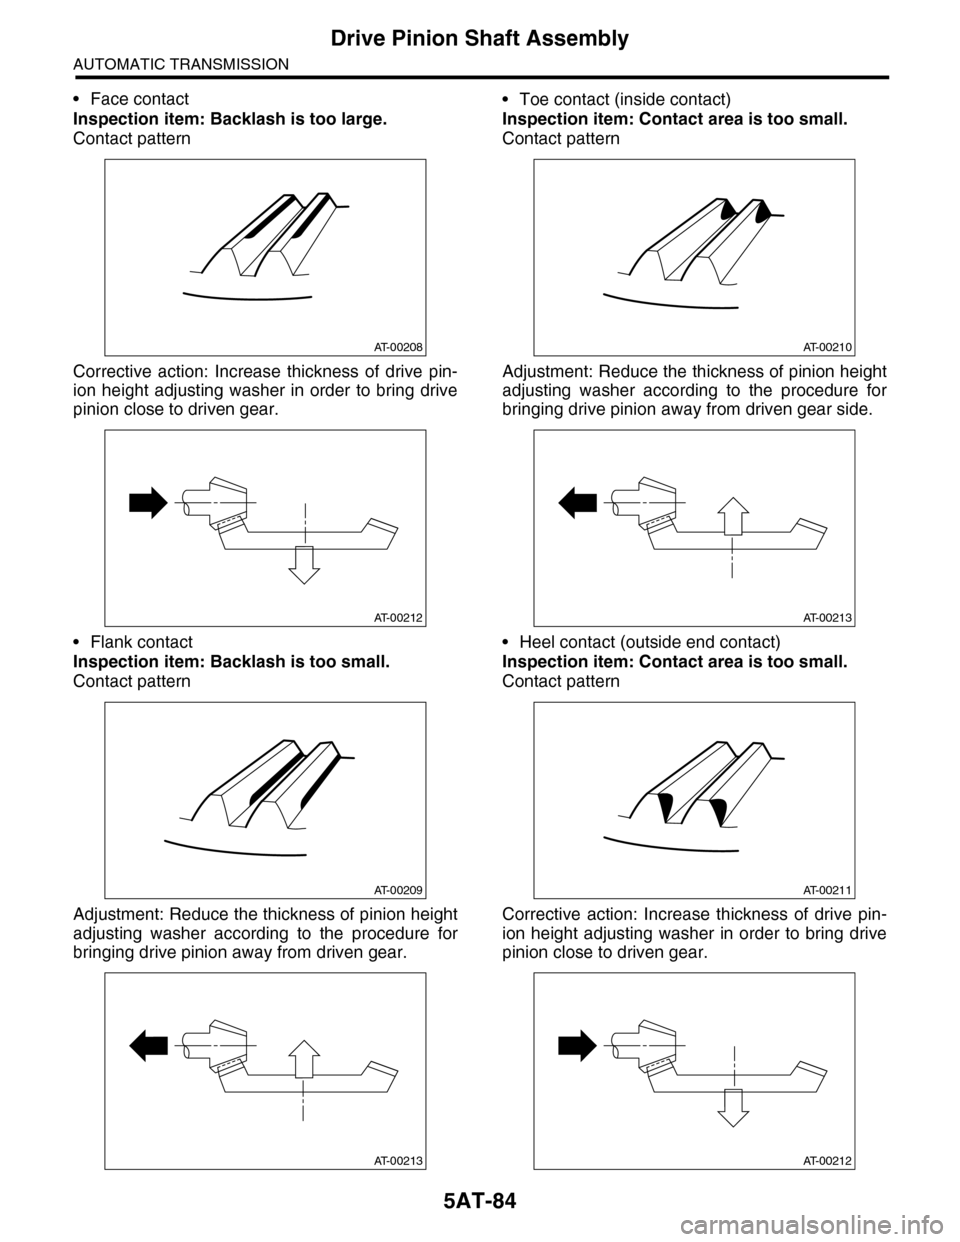
•Face contact
Inspection item: Backlash is too large.
Contact pattern
Corrective action: Increase thickness of drive pin-
ion height adjusting washer in order to bring drive
pinion close to driven gear.
•Flank contact
Inspection item: Backlash is too small.
Contact pattern
Adjustment: Reduce the thickness of pinion height
adjusting washer according to the procedure for
bringing drive pinion away from driven gear.
•Toe contact (inside contact)
Inspection item: Contact area is too small.
Contact pattern
Adjustment: Reduce the thickness of pinion height
adjusting washer according to the procedure for
bringing drive pinion away from driven gear side.
•Heel contact (outside end contact)
Inspection item: Contact area is too small.
Contact pattern
Corrective action: Increase thickness of drive pin-
ion height adjusting washer in order to bring drive
pinion close to driven gear.
AT-00208
AT-00212
AT-00209
AT-00213
AT-00210
AT-00213
AT-00211
AT-00212