Page 1966 of 2453
SC(H6DO)-8
Starter
STARTING/CHARGING SYSTEMS
14) Remove the shaft assembly, overrunning
clutch and lever from front bracket as a unit.
15) Remove the overrunning clutch from shaft as-
sembly as follows:
(1) Remove the stopper from snap ring by light-
ly tapping the stopper with an appropriate tool
(such as a fit socket wrench).
(2) Remove the snap ring, stopper and clutch
from shaft.
16) Remove the snap ring.
17) Remove the shock absorber bearing, wave
washer and internal gear from shaft.
18) Remove the front bearing from front bracket.
(1) Set an appropriate tool (φ13 mm) to front
bearing.
(2) Using a press, remove the front bearing.
(A) Front bracket
(B) Lever
(C) Shaft ASSY
(A) Socket wrench
(B) Snap ring
(C) Shaft
(D) Stopper
SC-02052
(B)
(A)
(C)
SC-00014
(A)
(B)
(C)(D)
(A) Shock absorber bearing
(B) Wave washer
(C) Internal gear
SC-02053
SC-02054
(C)
(A)
(B)
SC-02055
Page 1967 of 2453

SC(H6DO)-9
Starter
STARTING/CHARGING SYSTEMS
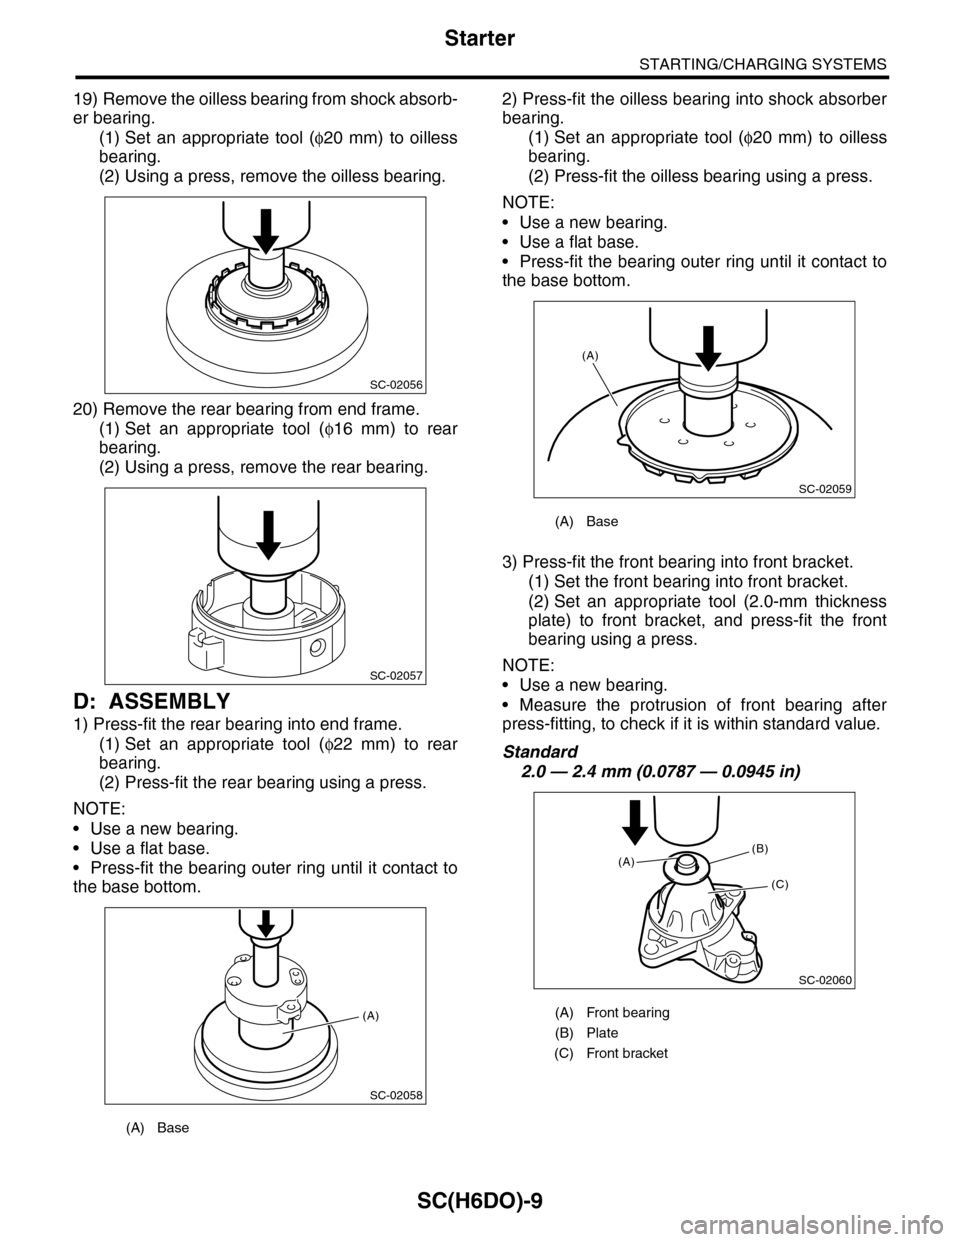
19) Remove the oilless bearing from shock absorb-
er bearing.
(1) Set an appropriate tool (φ20 mm) to oilless
bearing.
(2) Using a press, remove the oilless bearing.
20) Remove the rear bearing from end frame.
(1) Set an appropriate tool (φ16 mm) to rear
bearing.
(2) Using a press, remove the rear bearing.
D: ASSEMBLY
1) Press-fit the rear bearing into end frame.
(1) Set an appropriate tool (φ22 mm) to rear
bearing.
(2) Press-fit the rear bearing using a press.
NOTE:
•Use a new bearing.
•Use a flat base.
•Press-fit the bearing outer ring until it contact to
the base bottom.
2) Press-fit the oilless bearing into shock absorber
bearing.
(1) Set an appropriate tool (φ20 mm) to oilless
bearing.
(2) Press-fit the oilless bearing using a press.
NOTE:
•Use a new bearing.
•Use a flat base.
•Press-fit the bearing outer ring until it contact to
the base bottom.
3) Press-fit the front bearing into front bracket.
(1) Set the front bearing into front bracket.
(2) Set an appropriate tool (2.0-mm thickness
plate) to front bracket, and press-fit the front
bearing using a press.
NOTE:
•Use a new bearing.
•Measure the protrusion of front bearing after
press-fitting, to check if it is within standard value.
Standard
2.0 — 2.4 mm (0.0787 — 0.0945 in)
(A) Base
SC-02056
SC-02057
SC-02058
(A)
(A) Base
(A) Front bearing
(B) Plate
(C) Front bracket
SC-02059
(A)
SC-02060
(B)
(C)
(A)
Page 1968 of 2453

SC(H6DO)-10
Starter
STARTING/CHARGING SYSTEMS
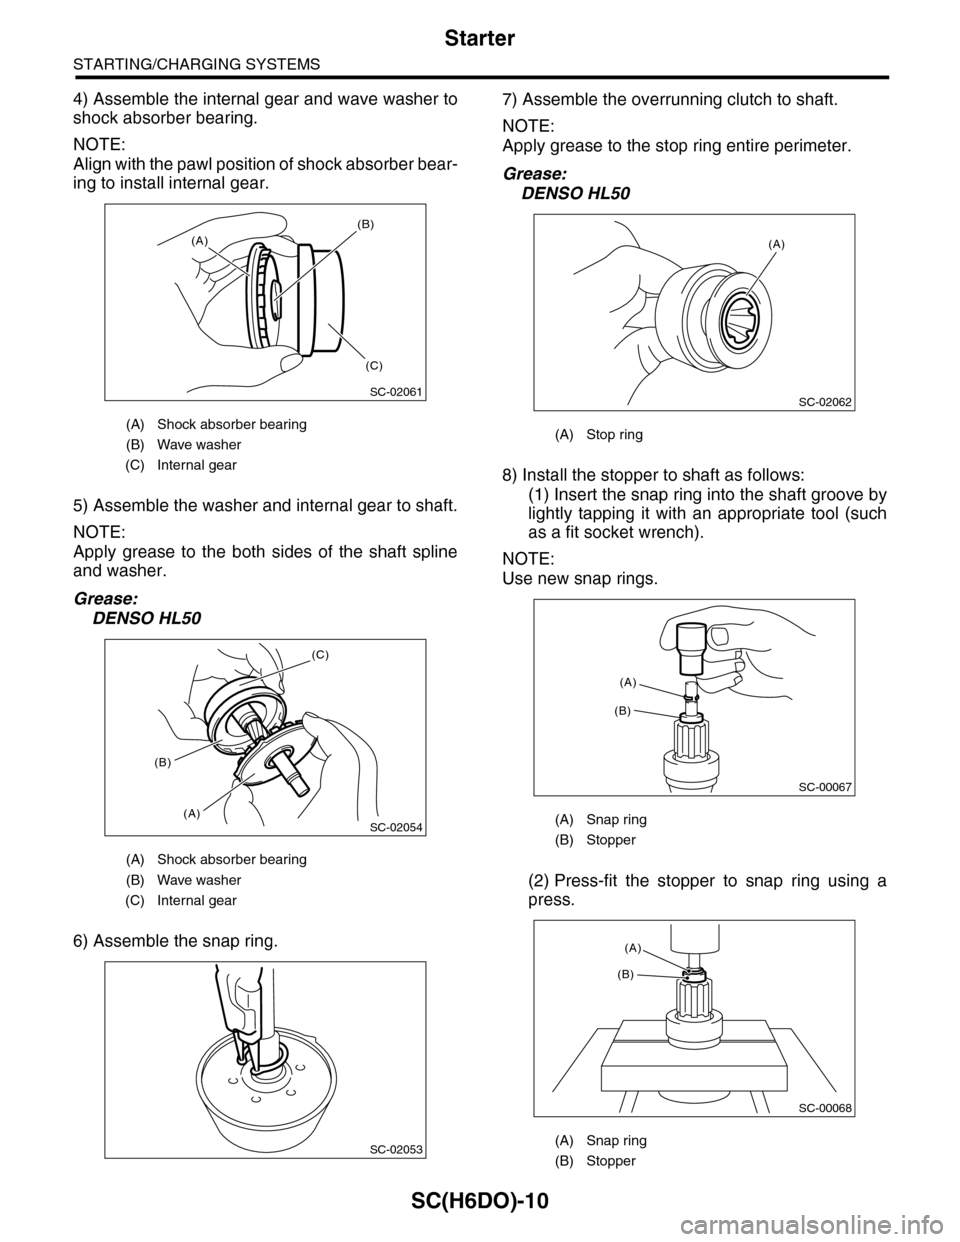
4) Assemble the internal gear and wave washer to
shock absorber bearing.
NOTE:
Align with the pawl position of shock absorber bear-
ing to install internal gear.
5) Assemble the washer and internal gear to shaft.
NOTE:
Apply grease to the both sides of the shaft spline
and washer.
Grease:
DENSO HL50
6) Assemble the snap ring.
7) Assemble the overrunning clutch to shaft.
NOTE:
Apply grease to the stop ring entire perimeter.
Grease:
DENSO HL50
8) Install the stopper to shaft as follows:
(1) Insert the snap ring into the shaft groove by
lightly tapping it with an appropriate tool (such
as a fit socket wrench).
NOTE:
Use new snap rings.
(2) Press-fit the stopper to snap ring using a
press.
(A) Shock absorber bearing
(B) Wave washer
(C) Internal gear
(A) Shock absorber bearing
(B) Wave washer
(C) Internal gear
SC-02061
(A)
(B)
(C)
SC-02054
(C)
(A)
(B)
SC-02053
(A) Stop ring
(A) Snap ring
(B) Stopper
(A) Snap ring
(B) Stopper
SC-02062
(A)
SC-00067
(B)
(A)
SC-00068
(A)
(B)
Page 1969 of 2453
SC(H6DO)-11
Starter
STARTING/CHARGING SYSTEMS
9) Install the shaft assembly to front bracket.
(1) Apply grease to the sliding part (A) of lever
pin and the pole piece (B) of arm.
Grease:
DENSO HL50
(2) Insert the lever arm into the position on over
running clutch as shown in the figure.
(3) Align the shaft assembly to the position on
front bracket as shown in the figure.
10) Install the rubber seal.
11) Install the planetary gear.
(1) Apply a grease to the pin (A) and bushing
(B).
(2) Assemble the planetary gear to pin.
(3) Apply grease to the planetary gear clear-
ance (A) and pin upper part (B).
NOTE:
•Apply grease so that it contacts each gear.
•be careful not to allow dirt to get in.
Grease:
DENSO HL50
(A) Lever
SC-02063
(A) (B)
SC-02064
(A)
SC-02065
(A) Rubber seal
SC-02066
(A)
SC-02067
(B)
(A)
(A)
SC-02068
(B)
(A)(A)
Page 1970 of 2453
SC(H6DO)-12
Starter
STARTING/CHARGING SYSTEMS
12) Assemble the brush assembly to end frame.
NOTE:
•Be careful not to allow grease to get on brush.
•Align the rubber seal part with end frame groove.
Tightening torque:
1.4 N·m (0.14 kgf-m, 1.03 ft-lb)
13) Install the armature to end frame.
NOTE:
•Apply grease to the rear bearing inner circumfer-
ence.
•Be careful not to allow grease to attach to com-
mutator.
Grease:
DENSO HL50
14) Set the space ring, then assemble the snap
ring.
NOTE:
•Use new snap rings.
•Check the dimension of (A) in the figure after as-
sembling snap ring. If it exceeds 5.0 mm (0.20 in),
assemble a new snap ring again.
15) Install the end frame cover.
SC-02048
SC-02047
(A) End frame cover
SC-02045
SC-02069
(A)
(A)
SC-02044
Page 1971 of 2453

SC(H6DO)-13
Starter
STARTING/CHARGING SYSTEMS
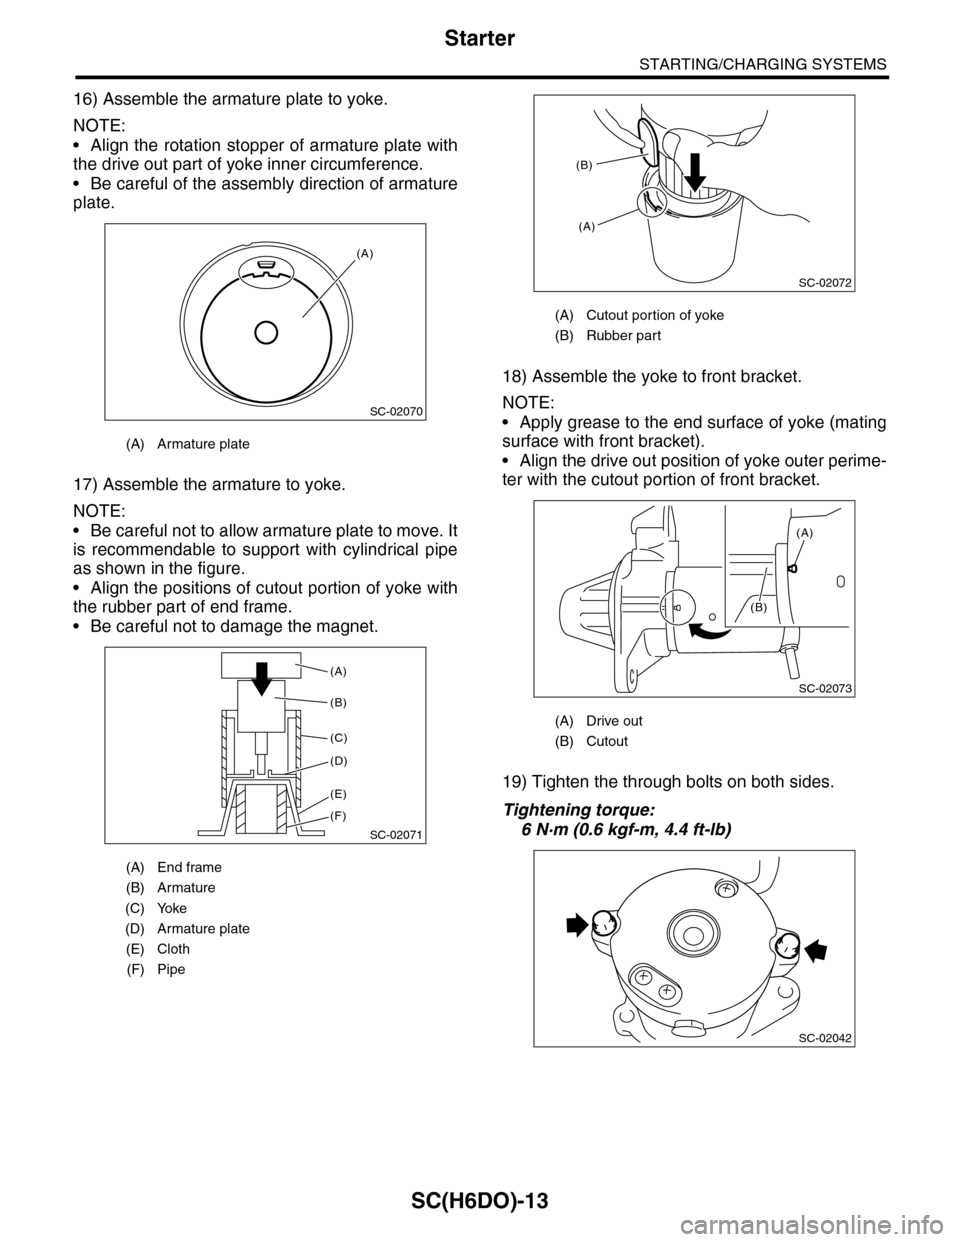
16) Assemble the armature plate to yoke.
NOTE:
•Align the rotation stopper of armature plate with
the drive out part of yoke inner circumference.
•Be careful of the assembly direction of armature
plate.
17) Assemble the armature to yoke.
NOTE:
•Be careful not to allow armature plate to move. It
is recommendable to support with cylindrical pipe
as shown in the figure.
•Align the positions of cutout portion of yoke with
the rubber part of end frame.
•Be careful not to damage the magnet.
18) Assemble the yoke to front bracket.
NOTE:
•Apply grease to the end surface of yoke (mating
surface with front bracket).
•Align the drive out position of yoke outer perime-
ter with the cutout portion of front bracket.
19) Tighten the through bolts on both sides.
Tightening torque:
6 N·m (0.6 kgf-m, 4.4 ft-lb)
(A) Armature plate
(A) End frame
(B) Armature
(C) Yoke
(D) Armature plate
(E) Cloth
(F) Pipe
SC-02070
(A)
SC-02071
(A)
(B)
(C)
(D)
(E)
(F)
(A) Cutout portion of yoke
(B) Rubber part
(A) Drive out
(B) Cutout
SC-02072
(B)
(A)
SC-02073
(A)
(B)
SC-02042
Page 1972 of 2453
SC(H6DO)-14
Starter
STARTING/CHARGING SYSTEMS
20) Install the rear cover.
21) Install the magnet switch assembly to front
bracket.
(1) Assemble the plunger hook to lever.
NOTE:
Apply grease to the plunger hook and sleeve inner
circumference.
Grease:
DENSO HL50
(2) Assemble the plunger spring and magnet
switch to front bracket.
NOTE:
Apply grease to the end surface of magnet switch
as shown in the figure.
Grease:
DENSO HL50
(3) Tighten the bolt.
Tightening torque:
7.5 N·m (0.8 kgf-m, 5.5 ft-lb)
22) Connect the harness to terminal M of magnet
switch assembly.
Tightening torque:
10 N·m (1.0 kgf-m, 7.4 ft-lb)
(A) Lever
(B) Plunger hook
(A) 5 mm
SC-02041
SC-02074
(A)
(B)
SC-02075
(A)
(A) Plunger
(B) Plunger spring
(C) Magnet switch
(A) Terminal M
SC-02076
(C)
(B)(A)
SC-02040
(A)
SC-02039
Page 1973 of 2453

SC(H6DO)-15
Starter
STARTING/CHARGING SYSTEMS
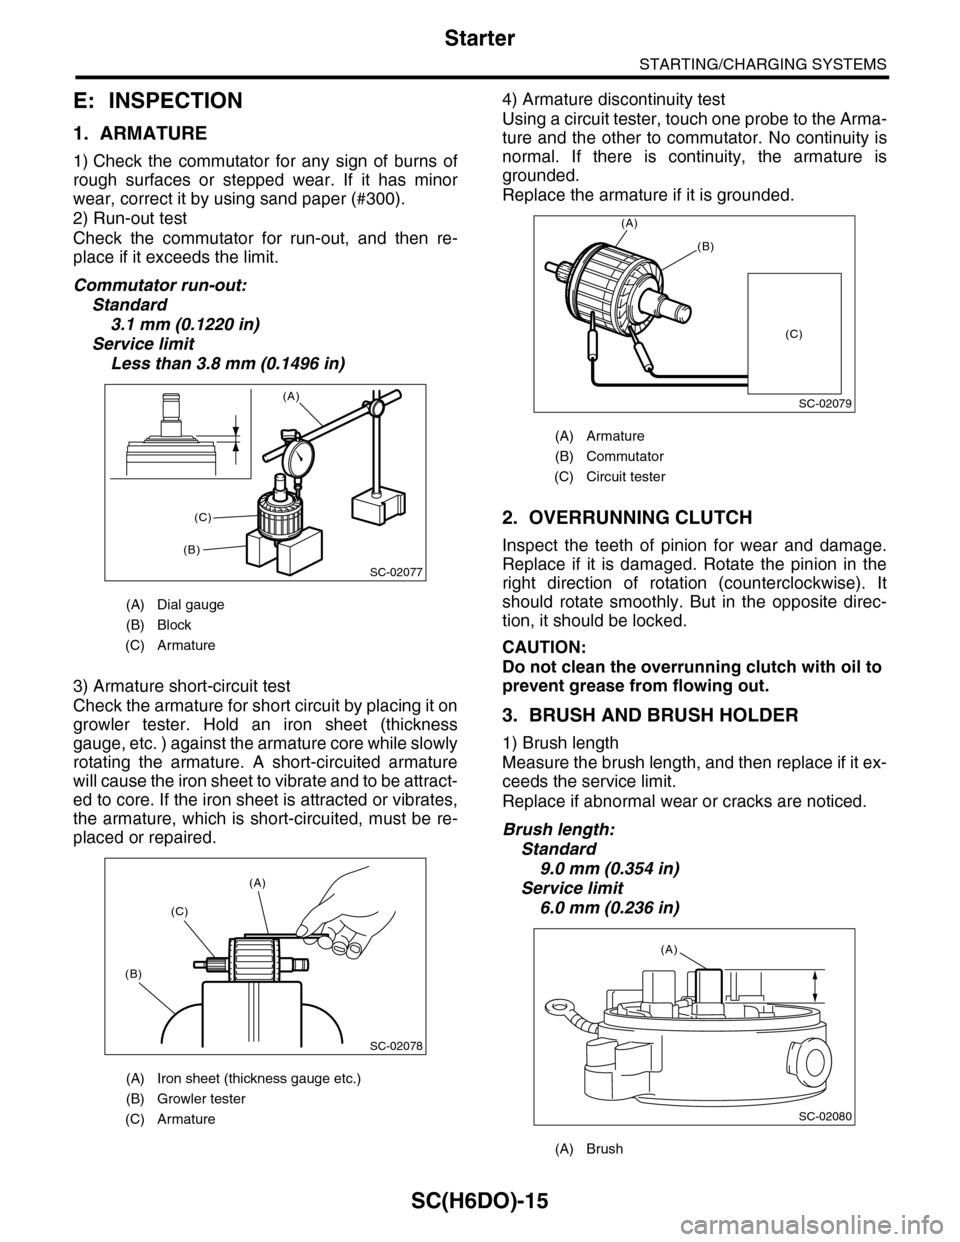
E: INSPECTION
1. ARMATURE
1) Check the commutator for any sign of burns of
rough surfaces or stepped wear. If it has minor
wear, correct it by using sand paper (#300).
2) Run-out test
Check the commutator for run-out, and then re-
place if it exceeds the limit.
Commutator run-out:
Standard
3.1 mm (0.1220 in)
Service limit
Less than 3.8 mm (0.1496 in)
3) Armature short-circuit test
Check the armature for short circuit by placing it on
growler tester. Hold an iron sheet (thickness
gauge, etc. ) against the armature core while slowly
rotating the armature. A short-circuited armature
will cause the iron sheet to vibrate and to be attract-
ed to core. If the iron sheet is attracted or vibrates,
the armature, which is short-circuited, must be re-
placed or repaired.
4) Armature discontinuity test
Using a circuit tester, touch one probe to the Arma-
ture and the other to commutator. No continuity is
normal. If there is continuity, the armature is
grounded.
Replace the armature if it is grounded.
2. OVERRUNNING CLUTCH
Inspect the teeth of pinion for wear and damage.
Replace if it is damaged. Rotate the pinion in the
right direction of rotation (counterclockwise). It
should rotate smoothly. But in the opposite direc-
tion, it should be locked.
CAUTION:
Do not clean the overrunning clutch with oil to
prevent grease from flowing out.
3. BRUSH AND BRUSH HOLDER
1) Brush length
Measure the brush length, and then replace if it ex-
ceeds the service limit.
Replace if abnormal wear or cracks are noticed.
Brush length:
Standard
9.0 mm (0.354 in)
Service limit
6.0 mm (0.236 in)
(A) Dial gauge
(B) Block
(C) Armature
(A) Iron sheet (thickness gauge etc.)
(B) Growler tester
(C) Armature
SC-02077
(A)
(B)
(C)
SC-02078
(A)
(C)
(B)
(A) Armature
(B) Commutator
(C) Circuit tester
(A) Brush
SC-02079
(A)
(B)
(C)
SC-02080
(A)