Page 1133 of 2453

CO(H6DO)-14
Thermostat
COOLING
5. Thermostat
A: REMOVAL
1) Set the vehicle on a lift.
2) Lift-up the vehicle.
3) Remove the under cover.
4) Drain engine coolant completely.
COOLANT, REPLACEMENT, Engine Coolant.>
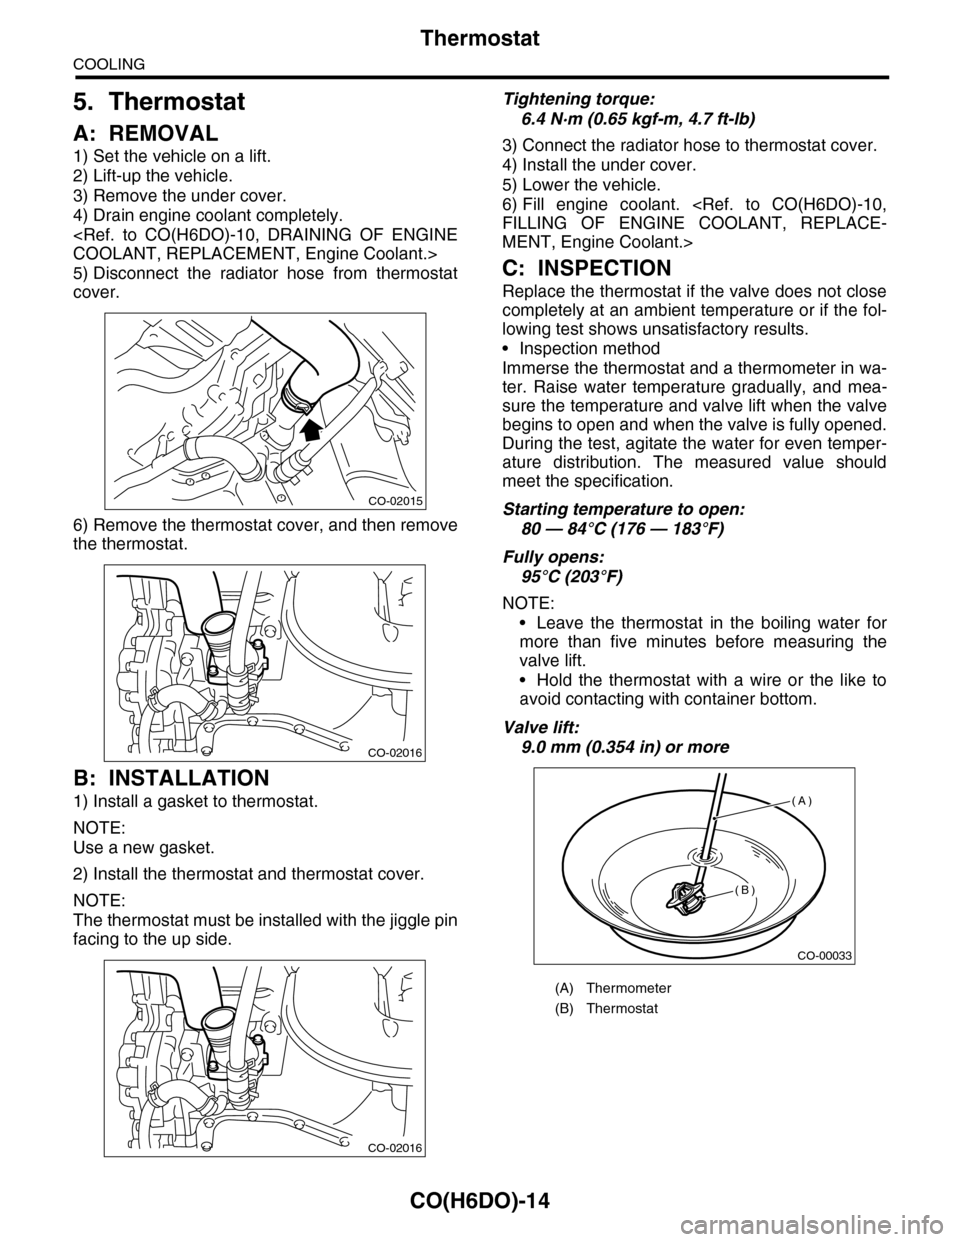
5) Disconnect the radiator hose from thermostat
cover.
6) Remove the thermostat cover, and then remove
the thermostat.
B: INSTALLATION
1) Install a gasket to thermostat.
NOTE:
Use a new gasket.
2) Install the thermostat and thermostat cover.
NOTE:
The thermostat must be installed with the jiggle pin
facing to the up side.
Tightening torque:
6.4 N·m (0.65 kgf-m, 4.7 ft-lb)
3) Connect the radiator hose to thermostat cover.
4) Install the under cover.
5) Lower the vehicle.
6) Fill engine coolant.
FILLING OF ENGINE COOLANT, REPLACE-
MENT, Engine Coolant.>
C: INSPECTION
Replace the thermostat if the valve does not close
completely at an ambient temperature or if the fol-
lowing test shows unsatisfactory results.
•Inspection method
Immerse the thermostat and a thermometer in wa-
ter. Raise water temperature gradually, and mea-
sure the temperature and valve lift when the valve
begins to open and when the valve is fully opened.
During the test, agitate the water for even temper-
ature distribution. The measured value should
meet the specification.
Starting temperature to open:
80 — 84°C (176 — 183°F)
Fully opens:
95°C (203°F)
NOTE:
•Leave the thermostat in the boiling water for
more than five minutes before measuring the
valve lift.
•Hold the thermostat with a wire or the like to
avoid contacting with container bottom.
Valve lift:
9.0 mm (0.354 in) or more
CO-02015
CO-02016
CO-02016
(A) Thermometer
(B) Thermostat
CO-00033
(A)
(B)
Page 1136 of 2453
CO(H6DO)-17
Radiator
COOLING
B: INSTALLATION
1) Install the radiator lower cushion to the vehicle.
2) Install the radiator to vehicle.
NOTE:
Insert the pins on the lower side of radiator into the
radiator lower cushions on the vehicle side.
3) Hold the harness of the ambient temperature
sensor with a clip.
4) Hold the radiator and condenser with bolts.
Tightening torque:
7.5 N·m (0.76 kgf-m, 5.5 ft-lb)
5) Install the front bumper.
LATION, Front Bumper.>
6) Connect the ATF cooler hoses.
7) Connect the radiator hose.
8) Install the reservoir tank.
9) Connect the connector of the radiator fan control
unit.
CO-02187
CO-02186
CO-02185
CO-02184
CO-02183
CO-02182
Page 1137 of 2453
CO(H6DO)-18
Radiator
COOLING
10) Install the radiator stay.
(1) Install the latch.
Tightening torque:
33 N·m (3.4 kgf-m, 25 ft-lb)
(2) Install the radiator hose bracket.
(3) Hold the harness to the radiator stay with a
clip.
(4) Tighten the bolts on the left side of the radi-
ator stay.
Tightening torque:
18 N·m (1.8 kgf-m, 13.3 ft-lb)
(5) Tighten the bolts on the right side of the ra-
diator stay.
Tightening torque:
18 N·m (1.8 kgf-m, 13.3 ft-lb)
11) Install the radiator upper brackets.
Tightening torque:
12 N·m (1.2 kgf-m, 8.9 ft-lb)
12) Lift-up the vehicle.
13) Connect the radiator hose.
CO-02179
CO-02180
CO-02181
CO-02177
CO-02015
Page 1138 of 2453

CO(H6DO)-19
Radiator
COOLING
14) Tighten the bolts on the lower side of the radia-
tor stay.
Tightening torque:
18 N·m (1.8 kgf-m, 13.3 ft-lb)
15) Lower the vehicle.
16) Connect the ground cable to battery.
17) Fill engine coolant.
COOLANT, REPLACEMENT, Engine Coolant.>
18) Check the ATF level and replenish it if neces-
sary.
mission Fluid.>
19) Lift-up the vehicle.
20) Install the under cover.
21) Lower the vehicle.
22) Install the front upper cover.
23) Install the air intake duct.
INSTALLATION, Air Intake Duct.>
24) Install the collector cover.
C: INSPECTION
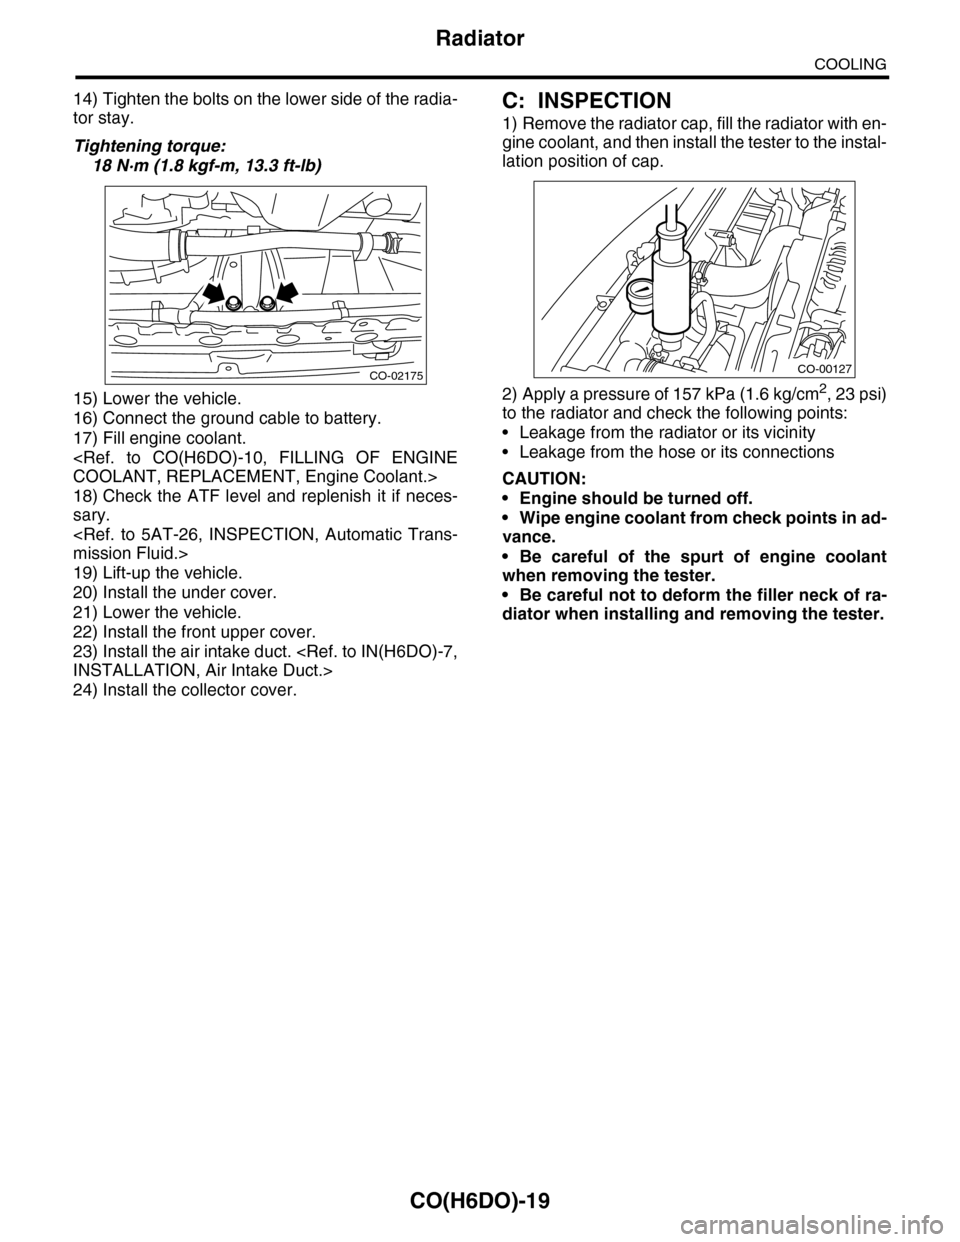
1) Remove the radiator cap, fill the radiator with en-
gine coolant, and then install the tester to the instal-
lation position of cap.
2) Apply a pressure of 157 kPa (1.6 kg/cm2, 23 psi)
to the radiator and check the following points:
•Leakage from the radiator or its vicinity
•Leakage from the hose or its connections
CAUTION:
•Engine should be turned off.
•Wipe engine coolant from check points in ad-
vance.
•Be careful of the spurt of engine coolant
when removing the tester.
•Be careful not to deform the filler neck of ra-
diator when installing and removing the tester.
CO-02175CO-00127
Page 1141 of 2453
CO(H6DO)-22
Radiator Main Fan and Fan Motor
COOLING
(5) Remove the bolts on the right side of the ra-
diator stay.
13) Disconnect the connector from radiator fan
control unit.
14) Remove the reservoir tank.
15) Remove the bolts on the upper side of the radi-
ator fan shroud.
16) Remove the radiator fan shroud.
NOTE:
When pulling the radiator fan shroud up, be careful
not to hit and damage the radiator and ATF hoses.
B: INSTALLATION
1) Tighten the bolts on the top side of the radiator
fan shroud.
Tightening torque:
7.5 N·m (0.76 kgf-m, 5.5 ft-lb)
2) Install the reservoir tank.
Tightening torque:
7.5 N·m (0.76 kgf-m, 5.5 ft-lb)
3) Connect the connector of the radiator fan control
unit.
CO-02181
CO-02182
CO-02183
CO-02189
CO-02189
CO-02183
CO-02182
Page 1142 of 2453
CO(H6DO)-23
Radiator Main Fan and Fan Motor
COOLING
4) Install the radiator stay.
(1) Install the latch.
Tightening torque:
33 N·m (3.4 kgf-m, 25 ft-lb)
(2) Connect the radiator hose brackets.
(3) Hold the harness to the radiator stay with a
clip.
(4) Tighten the bolts on the left side of the radi-
ator stay.
Tightening torque:
18 N·m (1.8 kgf-m, 13.3 ft-lb)
(5) Tighten the bolts on the right side of the ra-
diator stay.
Tightening torque:
18 N·m (1.8 kgf-m, 13.3 ft-lb)
5) Install the radiator upper brackets.
Tightening torque:
12 N·m (1.2 kgf-m, 8.9 ft-lb)
6) Install the front upper cover.
7) Install the air intake duct.
INSTALLATION, Air Intake Duct.>
8) Lift-up the vehicle.
CO-02179
CO-02180
CO-02181
CO-02177
CO-02176
Page 1143 of 2453
CO(H6DO)-24
Radiator Main Fan and Fan Motor
COOLING
9) Tighten the bolts on the lower side of the radiator
stay.
Tightening torque:
18 N·m (1.8 kgf-m, 13.3 ft-lb)
10) Tighten the bolts on the lower side of the radia-
tor fan shroud.
Tightening torque:
7.5 N·m (0.76 kgf-m, 5.5 ft-lb)
11) Install the under cover.
12) Lower the vehicle.
13) Connect the ground cable to battery.
14) Install the collector cover.
C: DISASSEMBLY
1) Disconnect the connector from radiator fan con-
trol unit.
2) Remove the radiator main fan.
3) Remove the radiator main fan motor.
D: ASSEMBLY
Assemble in the reverse order of disassembly.
Tightening torque:
3.8 N·m (0.39 kgf-m, 2.8 ft-lb)
Tightening torque:
6.3 N·m (0.64 kgf-m, 4.6 ft-lb)
(A) Connector
(B) Clip
CO-02175
CO-02188
CO-02190
(A)
(B)
CO-02199
CO-02200
CO-02200
CO-02199
Page 1144 of 2453
CO(H6DO)-25
Radiator Sub Fan and Fan Motor
COOLING
9. Radiator Sub Fan and Fan
Motor
A: REMOVAL
Refer to the radiator main fan & fan motor.
CO(H6DO)-21, REMOVAL, Radiator Main Fan and
Fan Motor.>
B: INSTALLATION
Refer to the radiator main fan & fan motor.
CO(H6DO)-22, INSTALLATION, Radiator Main
Fan and Fan Motor.>
C: DISASSEMBLY
1) Disconnect the connector from radiator fan con-
trol unit.
2) Remove the radiator sub fan.
3) Remove the radiator sub fan motor.
D: ASSEMBLY
Assemble in the reverse order of disassembly.
Tightening torque:
3.8 N·m (0.39 kgf-m, 2.8 ft-lb)
Tightening torque:
6.3 N·m (0.64 kgf-m, 4.6 ft-lb)
(A) Connector
(B) Clip
CO-02201
(A)(B)
CO-02202
CO-02203
CO-02203
CO-02202