2009 SUBARU TRIBECA turn signal
[x] Cancel search: turn signalPage 2225 of 2453
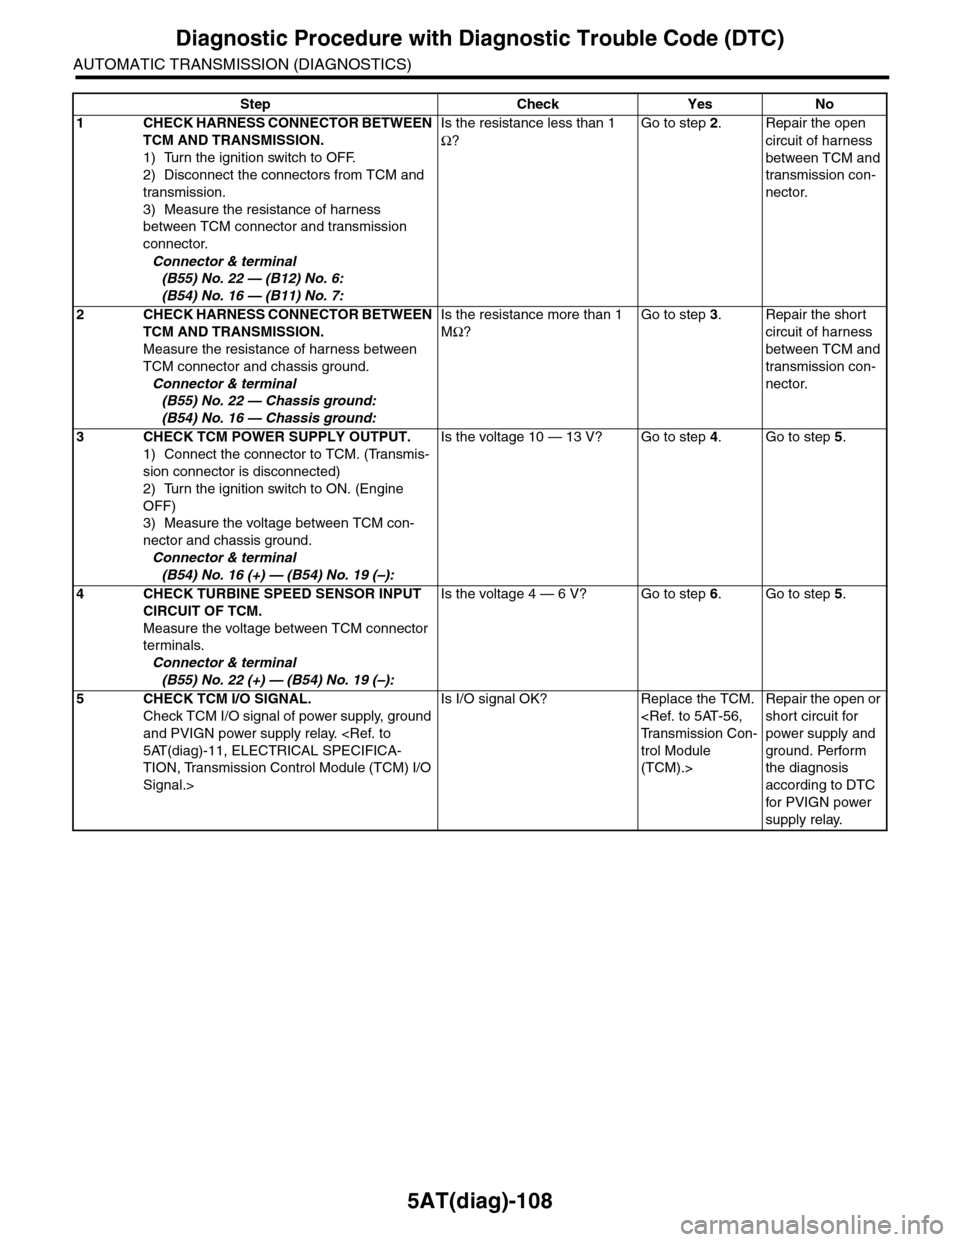
5AT(diag)-108
Diagnostic Procedure with Diagnostic Trouble Code (DTC)
AUTOMATIC TRANSMISSION (DIAGNOSTICS)
Step Check Yes No
1CHECK HARNESS CONNECTOR BETWEEN
TCM AND TRANSMISSION.
1) Turn the ignition switch to OFF.
2) Disconnect the connectors from TCM and
transmission.
3) Measure the resistance of harness
between TCM connector and transmission
connector.
Connector & terminal
(B55) No. 22 — (B12) No. 6:
(B54) No. 16 — (B11) No. 7:
Is the resistance less than 1
Ω?
Go to step 2.Repair the open
circuit of harness
between TCM and
transmission con-
nector.
2CHECK HARNESS CONNECTOR BETWEEN
TCM AND TRANSMISSION.
Measure the resistance of harness between
TCM connector and chassis ground.
Connector & terminal
(B55) No. 22 — Chassis ground:
(B54) No. 16 — Chassis ground:
Is the resistance more than 1
MΩ?
Go to step 3.Repair the short
circuit of harness
between TCM and
transmission con-
nector.
3CHECK TCM POWER SUPPLY OUTPUT.
1) Connect the connector to TCM. (Transmis-
sion connector is disconnected)
2) Turn the ignition switch to ON. (Engine
OFF)
3) Measure the voltage between TCM con-
nector and chassis ground.
Connector & terminal
(B54) No. 16 (+) — (B54) No. 19 (–):
Is the voltage 10 — 13 V? Go to step 4.Go to step 5.
4CHECK TURBINE SPEED SENSOR INPUT
CIRCUIT OF TCM.
Measure the voltage between TCM connector
terminals.
Connector & terminal
(B55) No. 22 (+) — (B54) No. 19 (–):
Is the voltage 4 — 6 V? Go to step 6.Go to step 5.
5CHECK TCM I/O SIGNAL.
Check TCM I/O signal of power supply, ground
and PVIGN power supply relay.
TION, Transmission Control Module (TCM) I/O
Signal.>
Is I/O signal OK? Replace the TCM.
trol Module
(TCM).>
Repair the open or
short circuit for
power supply and
ground. Perform
the diagnosis
according to DTC
for PVIGN power
supply relay.
Page 2226 of 2453
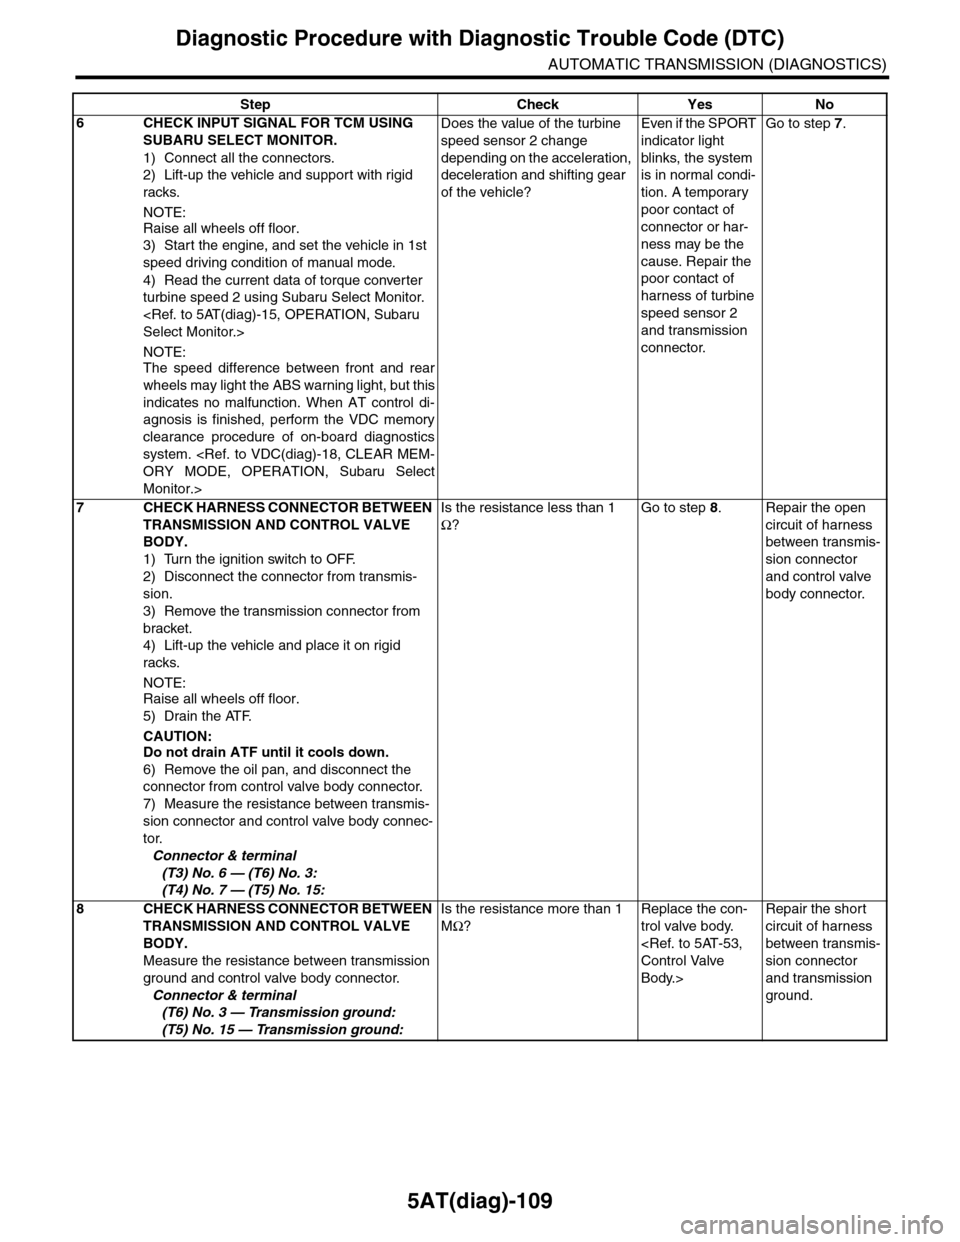
5AT(diag)-109
Diagnostic Procedure with Diagnostic Trouble Code (DTC)
AUTOMATIC TRANSMISSION (DIAGNOSTICS)
6CHECK INPUT SIGNAL FOR TCM USING
SUBARU SELECT MONITOR.
1) Connect all the connectors.
2) Lift-up the vehicle and support with rigid
racks.
NOTE:
Raise all wheels off floor.
3) Start the engine, and set the vehicle in 1st
speed driving condition of manual mode.
4) Read the current data of torque converter
turbine speed 2 using Subaru Select Monitor.
NOTE:The speed difference between front and rear
wheels may light the ABS warning light, but this
indicates no malfunction. When AT control di-
agnosis is finished, perform the VDC memory
clearance procedure of on-board diagnostics
system.
Monitor.>
Does the value of the turbine
speed sensor 2 change
depending on the acceleration,
deceleration and shifting gear
of the vehicle?
Even if the SPORT
indicator light
blinks, the system
is in normal condi-
tion. A temporary
poor contact of
connector or har-
ness may be the
cause. Repair the
poor contact of
harness of turbine
speed sensor 2
and transmission
connector.
Go to step 7.
7CHECK HARNESS CONNECTOR BETWEEN
TRANSMISSION AND CONTROL VALVE
BODY.
1) Turn the ignition switch to OFF.
2) Disconnect the connector from transmis-
sion.
3) Remove the transmission connector from
bracket.
4) Lift-up the vehicle and place it on rigid
racks.
NOTE:
Raise all wheels off floor.
5) Drain the ATF.
CAUTION:Do not drain ATF until it cools down.
6) Remove the oil pan, and disconnect the
connector from control valve body connector.
7) Measure the resistance between transmis-
sion connector and control valve body connec-
tor.
Connector & terminal
(T3) No. 6 — (T6) No. 3:
(T4) No. 7 — (T5) No. 15:
Is the resistance less than 1
Ω?
Go to step 8.Repair the open
circuit of harness
between transmis-
sion connector
and control valve
body connector.
8CHECK HARNESS CONNECTOR BETWEEN
TRANSMISSION AND CONTROL VALVE
BODY.
Measure the resistance between transmission
ground and control valve body connector.
Connector & terminal
(T6) No. 3 — Transmission ground:
(T5) No. 15 — Transmission ground:
Is the resistance more than 1
MΩ?
Replace the con-
trol valve body.
Body.>
Repair the short
circuit of harness
between transmis-
sion connector
and transmission
ground.
Step Check Yes No
Page 2228 of 2453
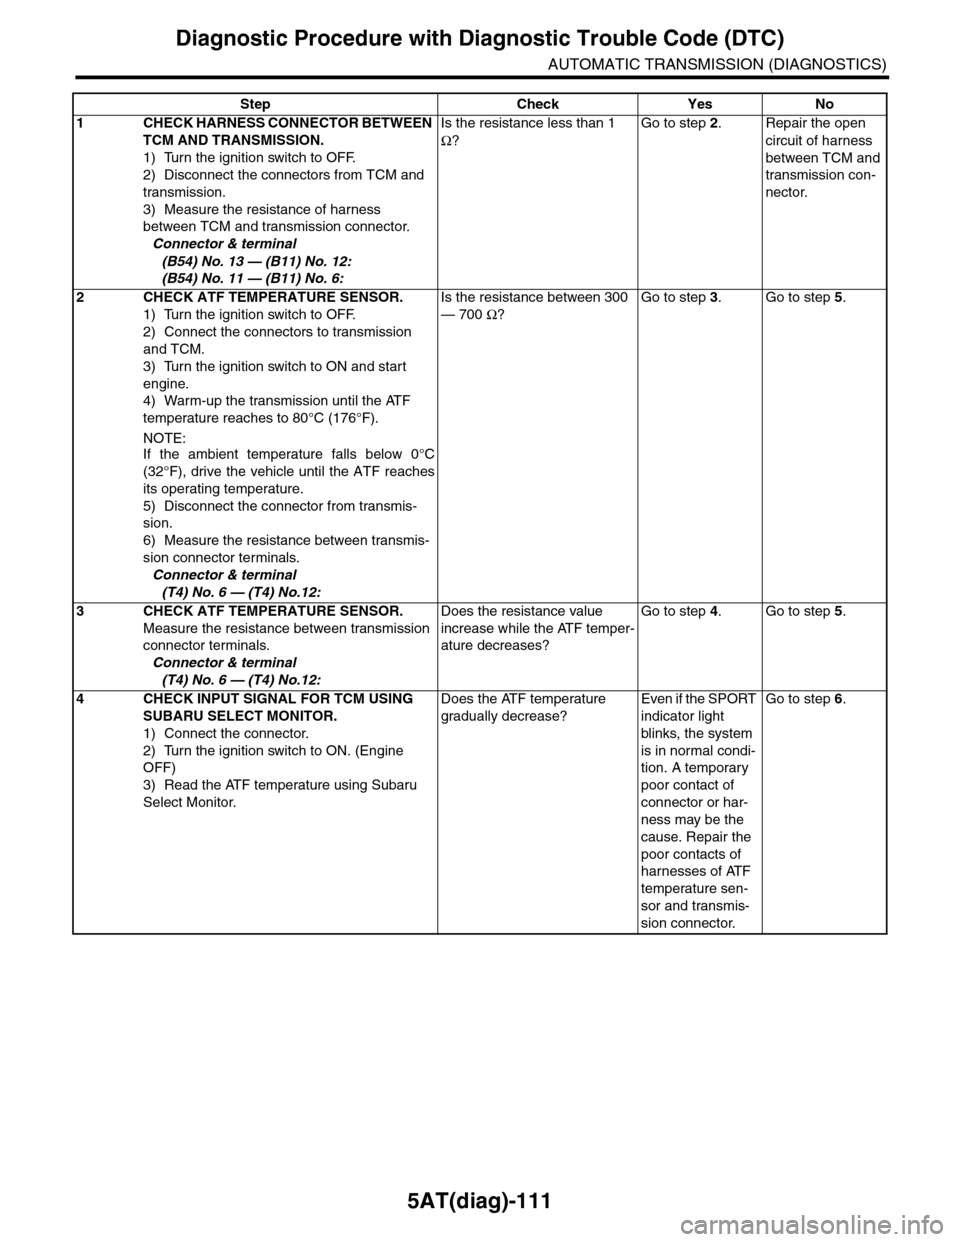
5AT(diag)-111
Diagnostic Procedure with Diagnostic Trouble Code (DTC)
AUTOMATIC TRANSMISSION (DIAGNOSTICS)
Step Check Yes No
1CHECK HARNESS CONNECTOR BETWEEN
TCM AND TRANSMISSION.
1) Turn the ignition switch to OFF.
2) Disconnect the connectors from TCM and
transmission.
3) Measure the resistance of harness
between TCM and transmission connector.
Connector & terminal
(B54) No. 13 — (B11) No. 12:
(B54) No. 11 — (B11) No. 6:
Is the resistance less than 1
Ω?
Go to step 2.Repair the open
circuit of harness
between TCM and
transmission con-
nector.
2CHECK ATF TEMPERATURE SENSOR.
1) Turn the ignition switch to OFF.
2) Connect the connectors to transmission
and TCM.
3) Turn the ignition switch to ON and start
engine.
4) Warm-up the transmission until the ATF
temperature reaches to 80°C (176°F).
NOTE:
If the ambient temperature falls below 0°C
(32°F), drive the vehicle until the ATF reaches
its operating temperature.
5) Disconnect the connector from transmis-
sion.
6) Measure the resistance between transmis-
sion connector terminals.
Connector & terminal
(T4) No. 6 — (T4) No.12:
Is the resistance between 300
— 700 Ω?
Go to step 3.Go to step 5.
3CHECK ATF TEMPERATURE SENSOR.
Measure the resistance between transmission
connector terminals.
Connector & terminal
(T4) No. 6 — (T4) No.12:
Does the resistance value
increase while the ATF temper-
ature decreases?
Go to step 4.Go to step 5.
4CHECK INPUT SIGNAL FOR TCM USING
SUBARU SELECT MONITOR.
1) Connect the connector.
2) Turn the ignition switch to ON. (Engine
OFF)
3) Read the ATF temperature using Subaru
Select Monitor.
Does the ATF temperature
gradually decrease?
Even if the SPORT
indicator light
blinks, the system
is in normal condi-
tion. A temporary
poor contact of
connector or har-
ness may be the
cause. Repair the
poor contacts of
harnesses of ATF
temperature sen-
sor and transmis-
sion connector.
Go to step 6.
Page 2231 of 2453
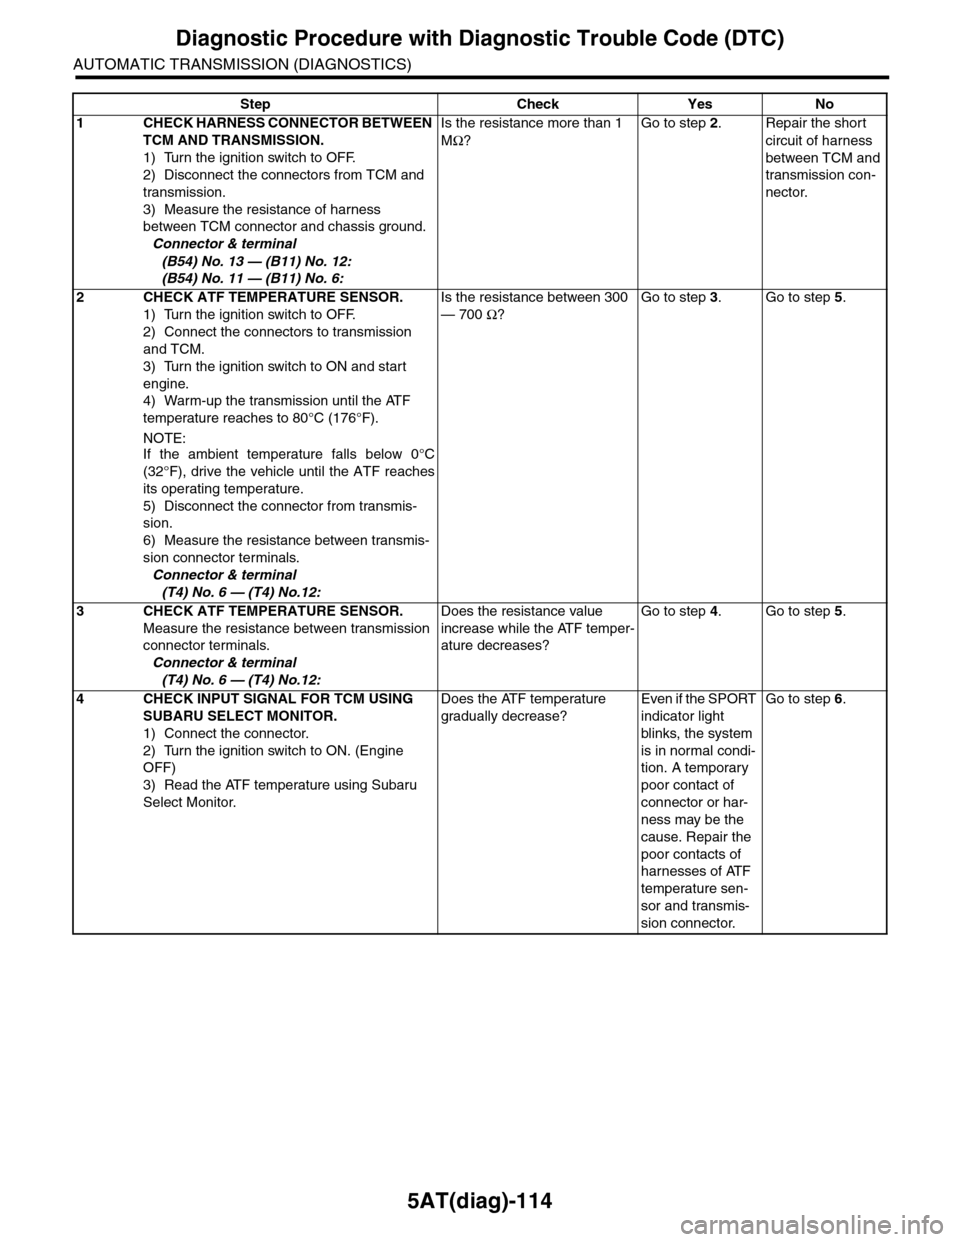
5AT(diag)-114
Diagnostic Procedure with Diagnostic Trouble Code (DTC)
AUTOMATIC TRANSMISSION (DIAGNOSTICS)
Step Check Yes No
1CHECK HARNESS CONNECTOR BETWEEN
TCM AND TRANSMISSION.
1) Turn the ignition switch to OFF.
2) Disconnect the connectors from TCM and
transmission.
3) Measure the resistance of harness
between TCM connector and chassis ground.
Connector & terminal
(B54) No. 13 — (B11) No. 12:
(B54) No. 11 — (B11) No. 6:
Is the resistance more than 1
MΩ?
Go to step 2.Repair the short
circuit of harness
between TCM and
transmission con-
nector.
2CHECK ATF TEMPERATURE SENSOR.
1) Turn the ignition switch to OFF.
2) Connect the connectors to transmission
and TCM.
3) Turn the ignition switch to ON and start
engine.
4) Warm-up the transmission until the ATF
temperature reaches to 80°C (176°F).
NOTE:
If the ambient temperature falls below 0°C
(32°F), drive the vehicle until the ATF reaches
its operating temperature.
5) Disconnect the connector from transmis-
sion.
6) Measure the resistance between transmis-
sion connector terminals.
Connector & terminal
(T4) No. 6 — (T4) No.12:
Is the resistance between 300
— 700 Ω?
Go to step 3.Go to step 5.
3CHECK ATF TEMPERATURE SENSOR.
Measure the resistance between transmission
connector terminals.
Connector & terminal
(T4) No. 6 — (T4) No.12:
Does the resistance value
increase while the ATF temper-
ature decreases?
Go to step 4.Go to step 5.
4CHECK INPUT SIGNAL FOR TCM USING
SUBARU SELECT MONITOR.
1) Connect the connector.
2) Turn the ignition switch to ON. (Engine
OFF)
3) Read the ATF temperature using Subaru
Select Monitor.
Does the ATF temperature
gradually decrease?
Even if the SPORT
indicator light
blinks, the system
is in normal condi-
tion. A temporary
poor contact of
connector or har-
ness may be the
cause. Repair the
poor contacts of
harnesses of ATF
temperature sen-
sor and transmis-
sion connector.
Go to step 6.
Page 2235 of 2453
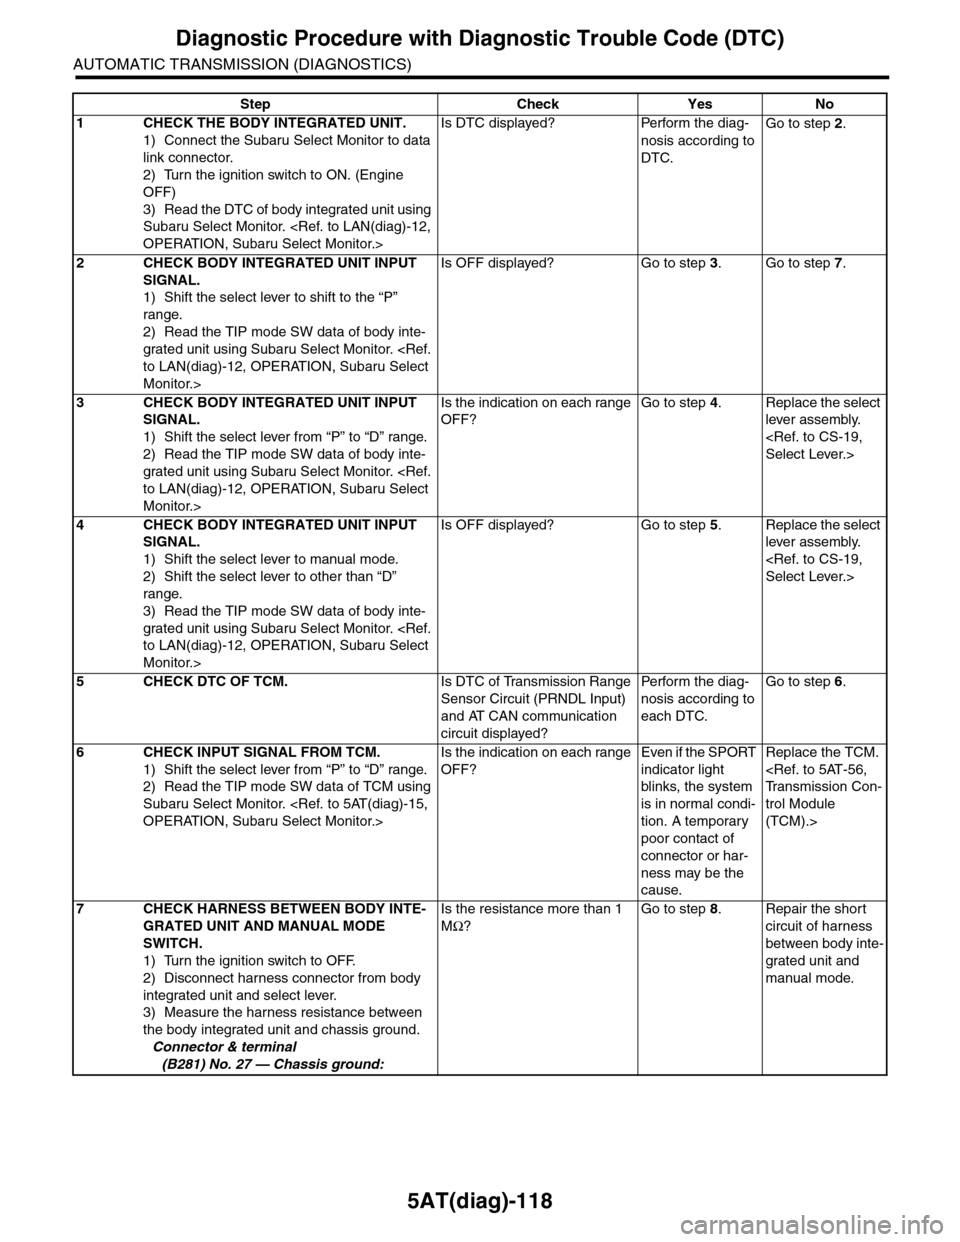
5AT(diag)-118
Diagnostic Procedure with Diagnostic Trouble Code (DTC)
AUTOMATIC TRANSMISSION (DIAGNOSTICS)
Step Check Yes No
1CHECK THE BODY INTEGRATED UNIT.
1) Connect the Subaru Select Monitor to data
link connector.
2) Turn the ignition switch to ON. (Engine
OFF)
3) Read the DTC of body integrated unit using
Subaru Select Monitor.
Is DTC displayed? Perform the diag-
nosis according to
DTC.
Go to step 2.
2CHECK BODY INTEGRATED UNIT INPUT
SIGNAL.
1) Shift the select lever to shift to the “P”
range.
2) Read the TIP mode SW data of body inte-
grated unit using Subaru Select Monitor.
Monitor.>
Is OFF displayed? Go to step 3.Go to step 7.
3CHECK BODY INTEGRATED UNIT INPUT
SIGNAL.
1) Shift the select lever from “P” to “D” range.
2) Read the TIP mode SW data of body inte-
grated unit using Subaru Select Monitor.
Monitor.>
Is the indication on each range
OFF?
Go to step 4.Replace the select
lever assembly.
4CHECK BODY INTEGRATED UNIT INPUT
SIGNAL.
1) Shift the select lever to manual mode.
2) Shift the select lever to other than “D”
range.
3) Read the TIP mode SW data of body inte-
grated unit using Subaru Select Monitor.
Monitor.>
Is OFF displayed? Go to step 5.Replace the select
lever assembly.
5CHECK DTC OF TCM.Is DTC of Transmission Range
Sensor Circuit (PRNDL Input)
and AT CAN communication
circuit displayed?
Pe r for m t h e d ia g -
nosis according to
each DTC.
Go to step 6.
6CHECK INPUT SIGNAL FROM TCM.
1) Shift the select lever from “P” to “D” range.
2) Read the TIP mode SW data of TCM using
Subaru Select Monitor.
Is the indication on each range
OFF?
Even if the SPORT
indicator light
blinks, the system
is in normal condi-
tion. A temporary
poor contact of
connector or har-
ness may be the
cause.
Replace the TCM.
trol Module
(TCM).>
7CHECK HARNESS BETWEEN BODY INTE-
GRATED UNIT AND MANUAL MODE
SWITCH.
1) Turn the ignition switch to OFF.
2) Disconnect harness connector from body
integrated unit and select lever.
3) Measure the harness resistance between
the body integrated unit and chassis ground.
Connector & terminal
(B281) No. 27 — Chassis ground:
Is the resistance more than 1
MΩ?
Go to step 8.Repair the short
circuit of harness
between body inte-
grated unit and
manual mode.
Page 2239 of 2453
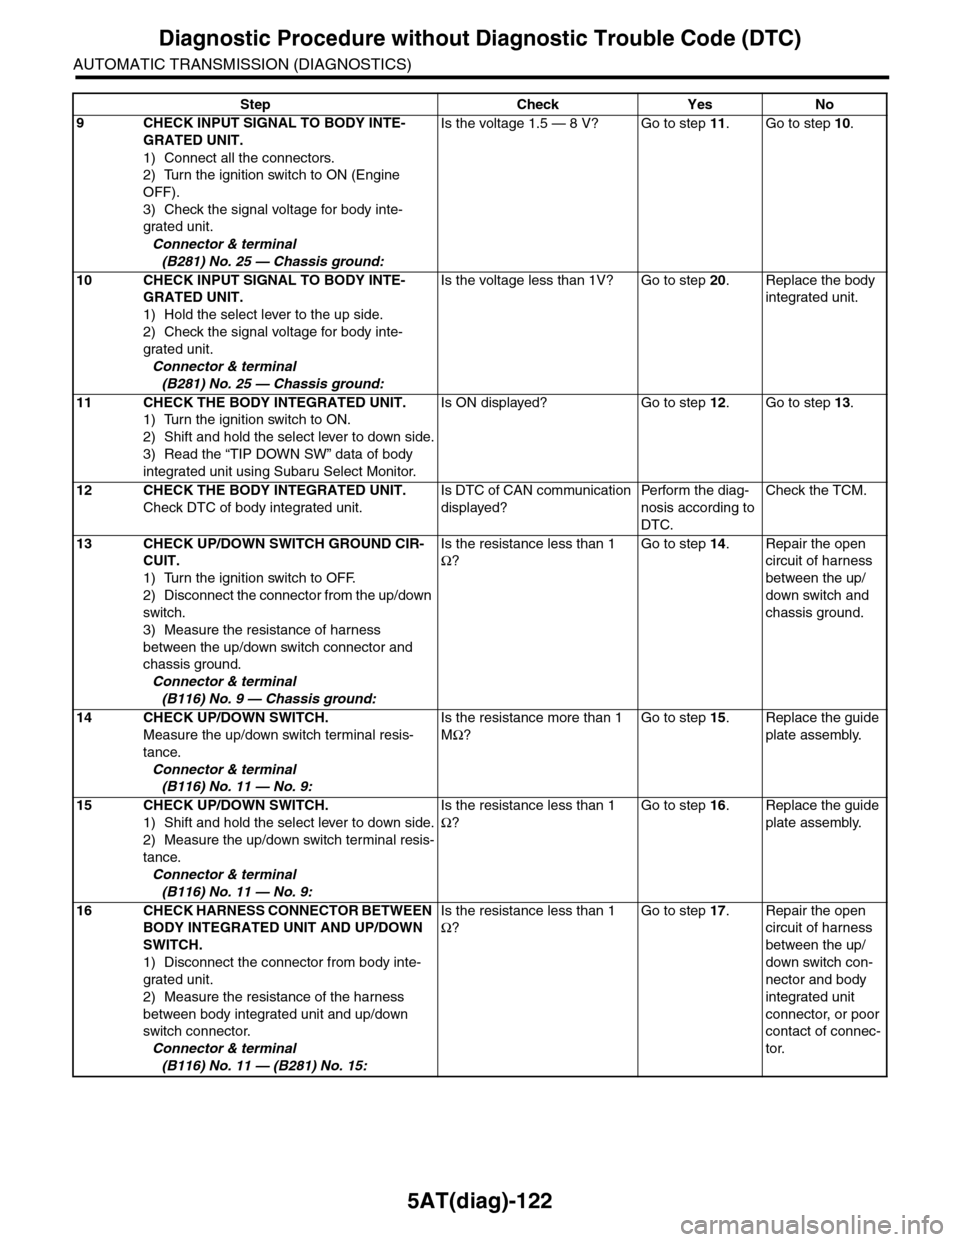
5AT(diag)-122
Diagnostic Procedure without Diagnostic Trouble Code (DTC)
AUTOMATIC TRANSMISSION (DIAGNOSTICS)
9CHECK INPUT SIGNAL TO BODY INTE-
GRATED UNIT.
1) Connect all the connectors.
2) Turn the ignition switch to ON (Engine
OFF).
3) Check the signal voltage for body inte-
grated unit.
Connector & terminal
(B281) No. 25 — Chassis ground:
Is the voltage 1.5 — 8 V? Go to step 11.Go to step 10.
10 CHECK INPUT SIGNAL TO BODY INTE-
GRATED UNIT.
1) Hold the select lever to the up side.
2) Check the signal voltage for body inte-
grated unit.
Connector & terminal
(B281) No. 25 — Chassis ground:
Is the voltage less than 1V? Go to step 20.Replace the body
integrated unit.
11 CHECK THE BODY INTEGRATED UNIT.
1) Turn the ignition switch to ON.
2) Shift and hold the select lever to down side.
3) Read the “TIP DOWN SW” data of body
integrated unit using Subaru Select Monitor.
Is ON displayed? Go to step 12.Go to step 13.
12 CHECK THE BODY INTEGRATED UNIT.
Check DTC of body integrated unit.
Is DTC of CAN communication
displayed?
Pe r for m t h e d ia g -
nosis according to
DTC.
Check the TCM.
13 CHECK UP/DOWN SWITCH GROUND CIR-
CUIT.
1) Turn the ignition switch to OFF.
2) Disconnect the connector from the up/down
switch.
3) Measure the resistance of harness
between the up/down switch connector and
chassis ground.
Connector & terminal
(B116) No. 9 — Chassis ground:
Is the resistance less than 1
Ω?
Go to step 14.Repair the open
circuit of harness
between the up/
down switch and
chassis ground.
14 CHECK UP/DOWN SWITCH.
Measure the up/down switch terminal resis-
tance.
Connector & terminal
(B116) No. 11 — No. 9:
Is the resistance more than 1
MΩ?
Go to step 15.Replace the guide
plate assembly.
15 CHECK UP/DOWN SWITCH.
1) Shift and hold the select lever to down side.
2) Measure the up/down switch terminal resis-
tance.
Connector & terminal
(B116) No. 11 — No. 9:
Is the resistance less than 1
Ω?
Go to step 16.Replace the guide
plate assembly.
16 CHECK HARNESS CONNECTOR BETWEEN
BODY INTEGRATED UNIT AND UP/DOWN
SWITCH.
1) Disconnect the connector from body inte-
grated unit.
2) Measure the resistance of the harness
between body integrated unit and up/down
switch connector.
Connector & terminal
(B116) No. 11 — (B281) No. 15:
Is the resistance less than 1
Ω?
Go to step 17.Repair the open
circuit of harness
between the up/
down switch con-
nector and body
integrated unit
connector, or poor
contact of connec-
tor.
Step Check Yes No
Page 2240 of 2453
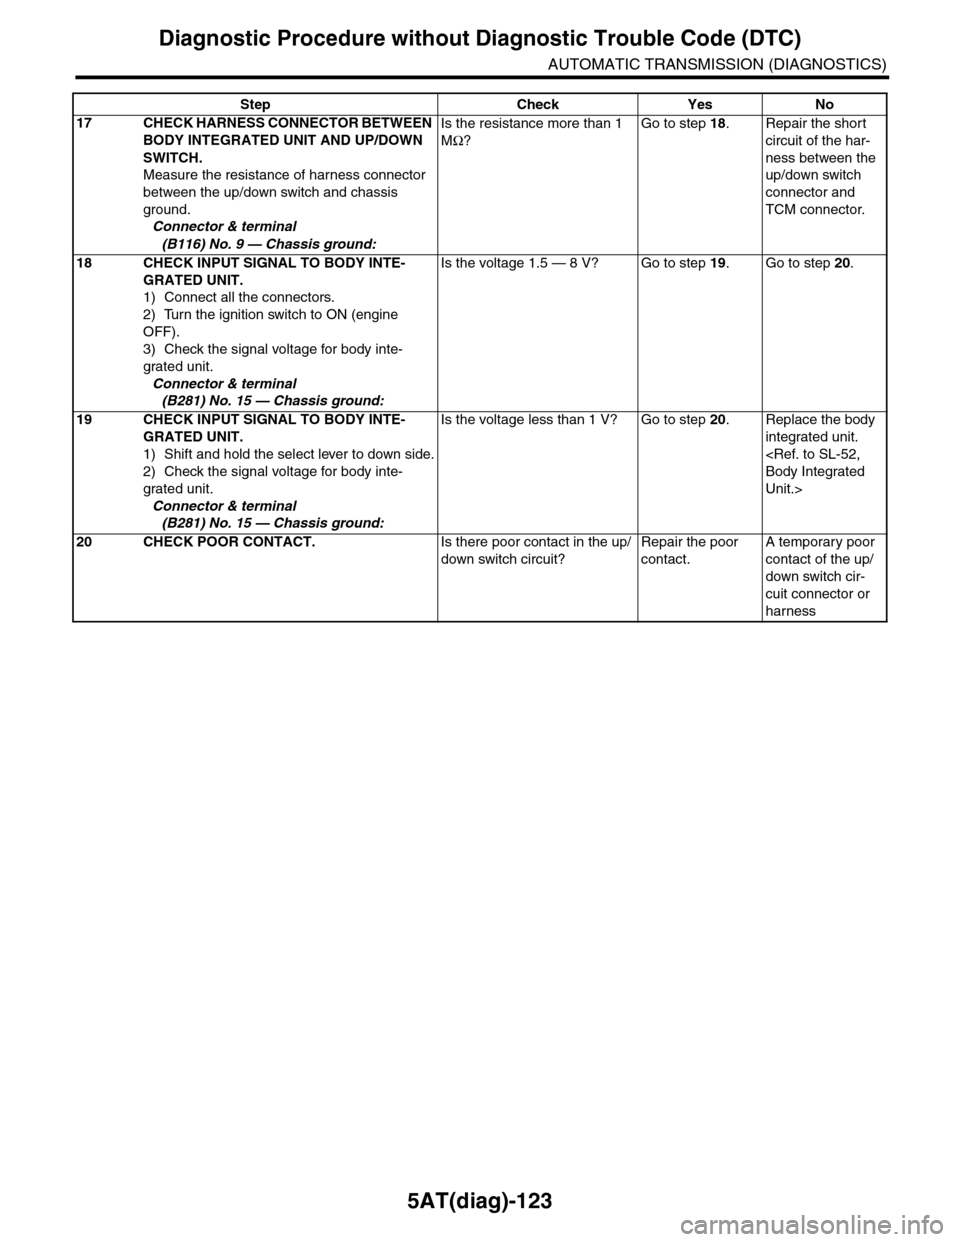
5AT(diag)-123
Diagnostic Procedure without Diagnostic Trouble Code (DTC)
AUTOMATIC TRANSMISSION (DIAGNOSTICS)
17 CHECK HARNESS CONNECTOR BETWEEN
BODY INTEGRATED UNIT AND UP/DOWN
SWITCH.
Measure the resistance of harness connector
between the up/down switch and chassis
ground.
Connector & terminal
(B116) No. 9 — Chassis ground:
Is the resistance more than 1
MΩ?
Go to step 18.Repair the short
circuit of the har-
ness between the
up/down switch
connector and
TCM connector.
18 CHECK INPUT SIGNAL TO BODY INTE-
GRATED UNIT.
1) Connect all the connectors.
2) Turn the ignition switch to ON (engine
OFF).
3) Check the signal voltage for body inte-
grated unit.
Connector & terminal
(B281) No. 15 — Chassis ground:
Is the voltage 1.5 — 8 V? Go to step 19.Go to step 20.
19 CHECK INPUT SIGNAL TO BODY INTE-
GRATED UNIT.
1) Shift and hold the select lever to down side.
2) Check the signal voltage for body inte-
grated unit.
Connector & terminal
(B281) No. 15 — Chassis ground:
Is the voltage less than 1 V? Go to step 20.Replace the body
integrated unit.
Unit.>
20 CHECK POOR CONTACT.Is there poor contact in the up/
down switch circuit?
Repair the poor
contact.
A temporary poor
contact of the up/
down switch cir-
cuit connector or
harness
Step Check Yes No
Page 2259 of 2453
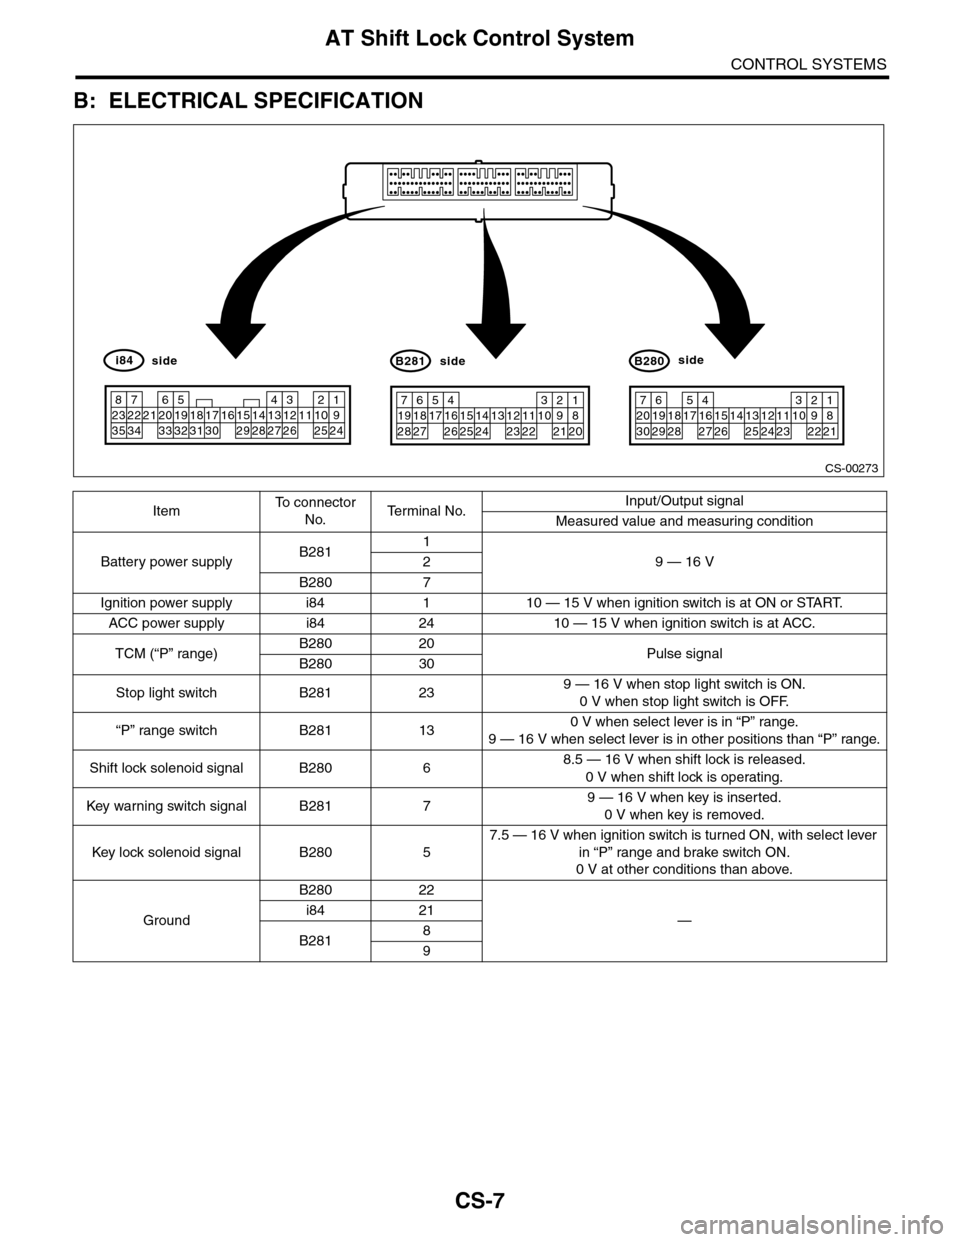
CS-7
AT Shift Lock Control System
CONTROL SYSTEMS
B: ELECTRICAL SPECIFICATION
ItemTo c o n n e c t o r
No.Te r m i n a l N o .Input/Output signal
Measured value and measuring condition
Battery power supplyB2811
9 — 16 V2
B280 7
Ignition power supply i84 1 10 — 15 V when ignition switch is at ON or START.
ACC power supply i84 24 10 — 15 V when ignition switch is at ACC.
TCM (“P” range)B280 20Pulse signalB280 30
Stop light switch B281 239 — 16 V when stop light switch is ON.
0 V when stop light switch is OFF.
“P” range switch B281 130 V when select lever is in “P” range.
9 — 16 V when select lever is in other positions than “P” range.
Shift lock solenoid signal B280 68.5 — 16 V when shift lock is released.
0 V when shift lock is operating.
Key war ning switch signal B281 79 — 16 V when key is inserted.
0 V when key is removed.
Key lock solenoid signal B280 5
7.5 — 16 V when ignition switch is turned ON, with select lever
in “P” range and brake switch ON.
0 V at other conditions than above.
Ground
B280 22
—i84 21
B2818
9
CS-00273
71928
61827
51741626152514241312231122
3102921
1820
B281side
72030
619291828
51741627152614132512241123
3102922
1821
B280side
82335
722342162033
51932183117301615291428
41327
312261121025
1924
i84side