2009 SUBARU TRIBECA fuel
[x] Cancel search: fuelPage 1432 of 2453
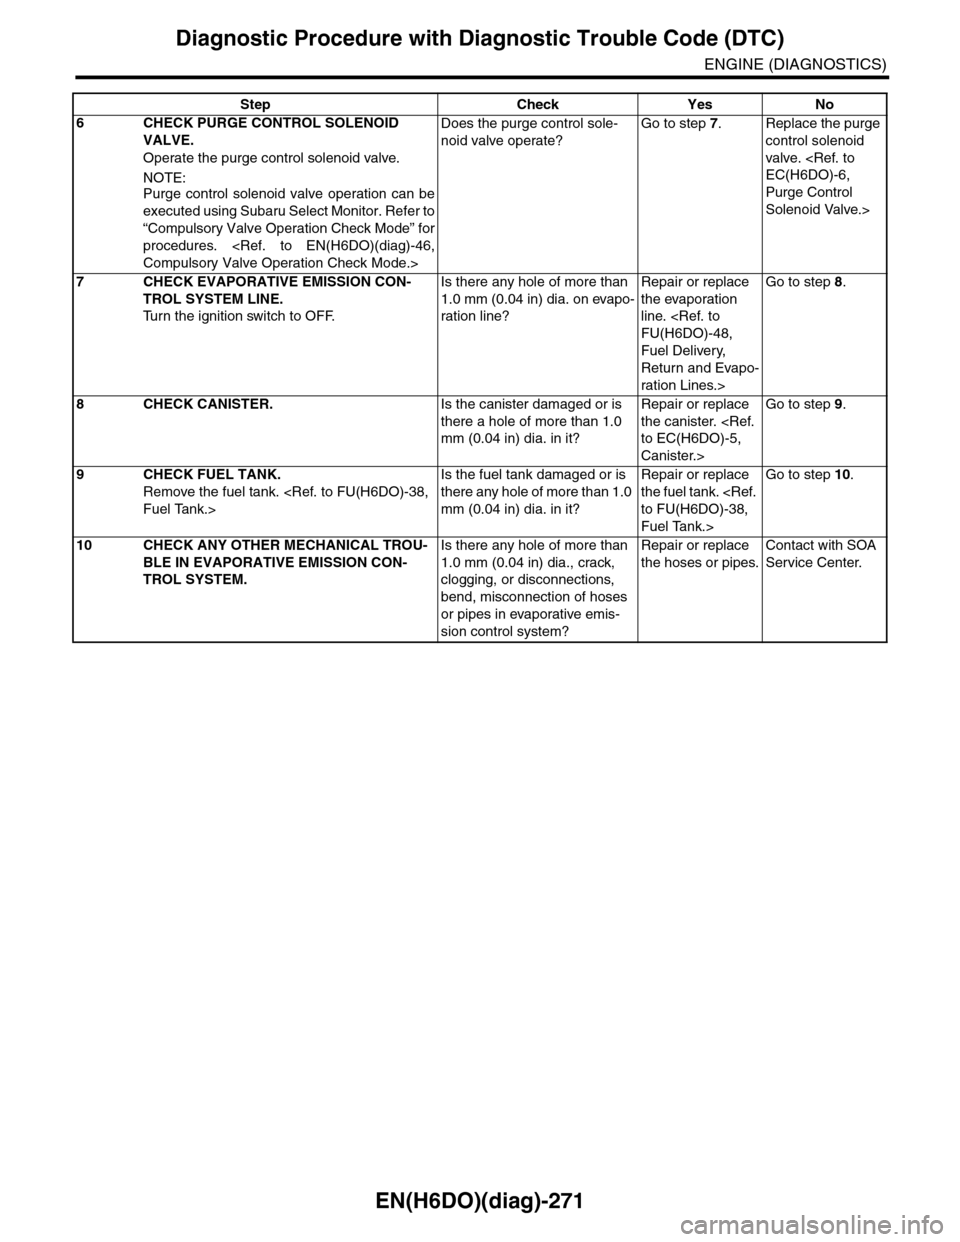
EN(H6DO)(diag)-271
Diagnostic Procedure with Diagnostic Trouble Code (DTC)
ENGINE (DIAGNOSTICS)
6CHECK PURGE CONTROL SOLENOID
VALVE.
Operate the purge control solenoid valve.
NOTE:Purge control solenoid valve operation can be
executed using Subaru Select Monitor. Refer to
“Compulsory Valve Operation Check Mode” for
procedures.
Does the purge control sole-
noid valve operate?
Go to step 7.Replace the purge
control solenoid
valve.
Purge Control
Solenoid Valve.>
7CHECK EVAPORATIVE EMISSION CON-
TROL SYSTEM LINE.
Tu r n t h e i g n i t i o n s w i t c h t o O F F.
Is there any hole of more than
1.0 mm (0.04 in) dia. on evapo-
ration line?
Repair or replace
the evaporation
line.
Fuel Delivery,
Return and Evapo-
ration Lines.>
Go to step 8.
8CHECK CANISTER.Is the canister damaged or is
there a hole of more than 1.0
mm (0.04 in) dia. in it?
Repair or replace
the canister.
Canister.>
Go to step 9.
9CHECK FUEL TANK.
Remove the fuel tank.
Is the fuel tank damaged or is
there any hole of more than 1.0
mm (0.04 in) dia. in it?
Repair or replace
the fuel tank.
Fuel Tank.>
Go to step 10.
10 CHECK ANY OTHER MECHANICAL TROU-
BLE IN EVAPORATIVE EMISSION CON-
TROL SYSTEM.
Is there any hole of more than
1.0 mm (0.04 in) dia., crack,
clogging, or disconnections,
bend, misconnection of hoses
or pipes in evaporative emis-
sion control system?
Repair or replace
the hoses or pipes.
Contact with SOA
Service Center.
Step Check Yes No
Page 1438 of 2453
EN(H6DO)(diag)-277
Diagnostic Procedure with Diagnostic Trouble Code (DTC)
ENGINE (DIAGNOSTICS)
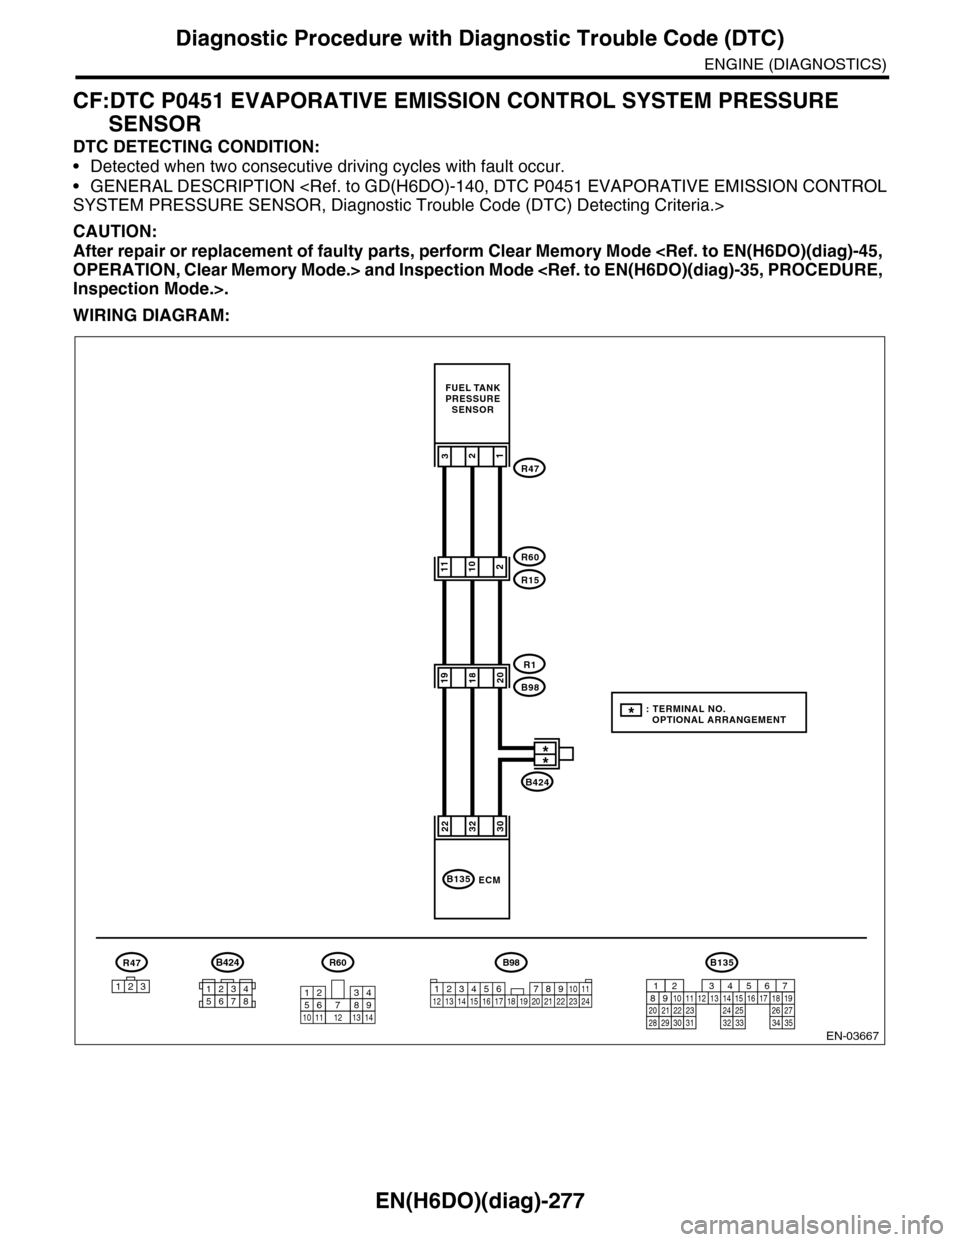
CF:DTC P0451 EVAPORATIVE EMISSION CONTROL SYSTEM PRESSURE
SENSOR
DTC DETECTING CONDITION:
•Detected when two consecutive driving cycles with fault occur.
•GENERAL DESCRIPTION
CAUTION:
After repair or replacement of faulty parts, perform Clear Memory Mode
WIRING DIAGRAM:
EN-03667
B424
312
223230
ECMB135
R47
R60
R15
R1
B98
123
R47
11210
192018
FUEL TANKPRESSURESENSOR
B424
34561278
: TERMINAL NO. OPTIONAL ARRANGEMENT*
**
B98
123456 78910 1112 13 16 1714 15 18 19 2021222324
R60
12
10115634897131412
B135
567821943102422 23 2511 12 13 14 1526 2728
16 17 18 1920 2129 30 31 32 33 34 35
Page 1439 of 2453
EN(H6DO)(diag)-278
Diagnostic Procedure with Diagnostic Trouble Code (DTC)
ENGINE (DIAGNOSTICS)
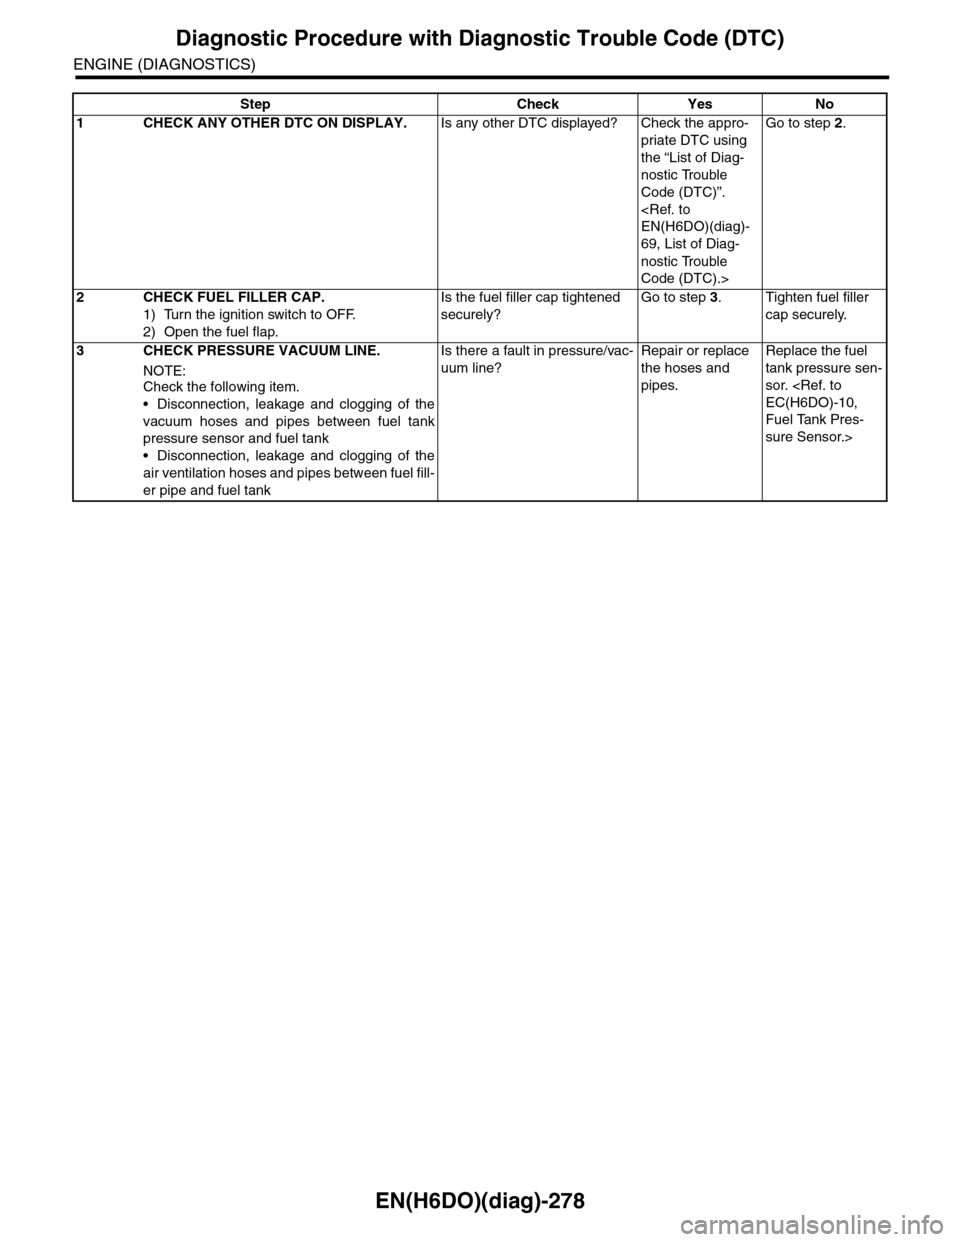
Step Check Yes No
1CHECK ANY OTHER DTC ON DISPLAY.Is any other DTC displayed? Check the appro-
priate DTC using
the “List of Diag-
nostic Trouble
Code (DTC)”.
69, List of Diag-
nostic Trouble
Code (DTC).>
Go to step 2.
2CHECK FUEL FILLER CAP.
1) Turn the ignition switch to OFF.
2) Open the fuel flap.
Is the fuel filler cap tightened
securely?
Go to step 3.Tighten fuel filler
cap securely.
3CHECK PRESSURE VACUUM LINE.
NOTE:Check the following item.
•Disconnection, leakage and clogging of the
vacuum hoses and pipes between fuel tank
pressure sensor and fuel tank
•Disconnection, leakage and clogging of the
air ventilation hoses and pipes between fuel fill-
er pipe and fuel tank
Is there a fault in pressure/vac-
uum line?
Repair or replace
the hoses and
pipes.
Replace the fuel
tank pressure sen-
sor.
Fuel Tank Pres-
sure Sensor.>
Page 1440 of 2453
EN(H6DO)(diag)-279
Diagnostic Procedure with Diagnostic Trouble Code (DTC)
ENGINE (DIAGNOSTICS)
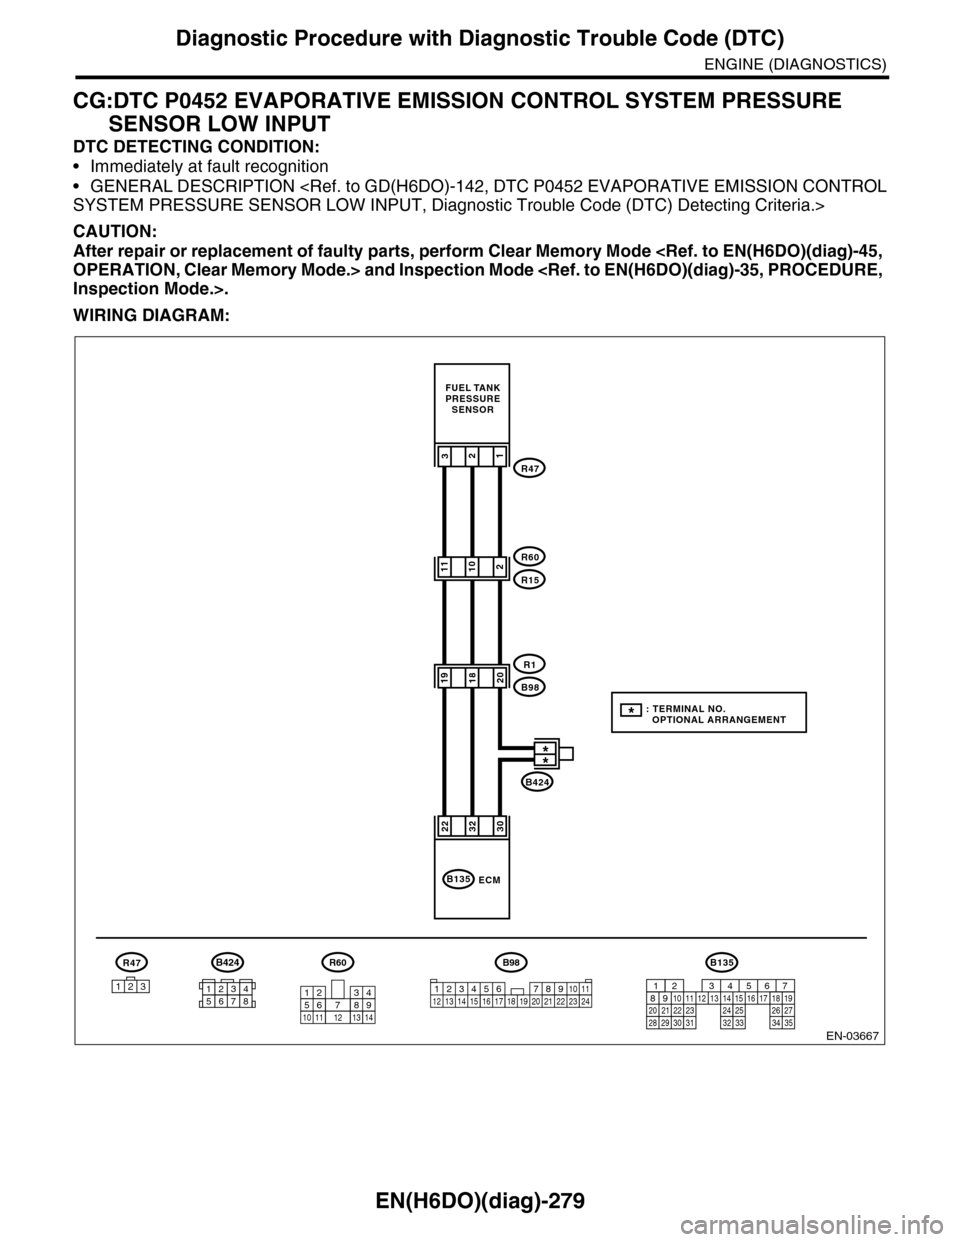
CG:DTC P0452 EVAPORATIVE EMISSION CONTROL SYSTEM PRESSURE
SENSOR LOW INPUT
DTC DETECTING CONDITION:
•Immediately at fault recognition
•GENERAL DESCRIPTION
CAUTION:
After repair or replacement of faulty parts, perform Clear Memory Mode
WIRING DIAGRAM:
EN-03667
B424
312
223230
ECMB135
R47
R60
R15
R1
B98
123
R47
11210
192018
FUEL TANKPRESSURESENSOR
B424
34561278
: TERMINAL NO. OPTIONAL ARRANGEMENT*
**
B98
123456 78910 1112 13 16 1714 15 18 19 2021222324
R60
12
10115634897131412
B135
567821943102422 23 2511 12 13 14 1526 2728
16 17 18 1920 2129 30 31 32 33 34 35
Page 1441 of 2453
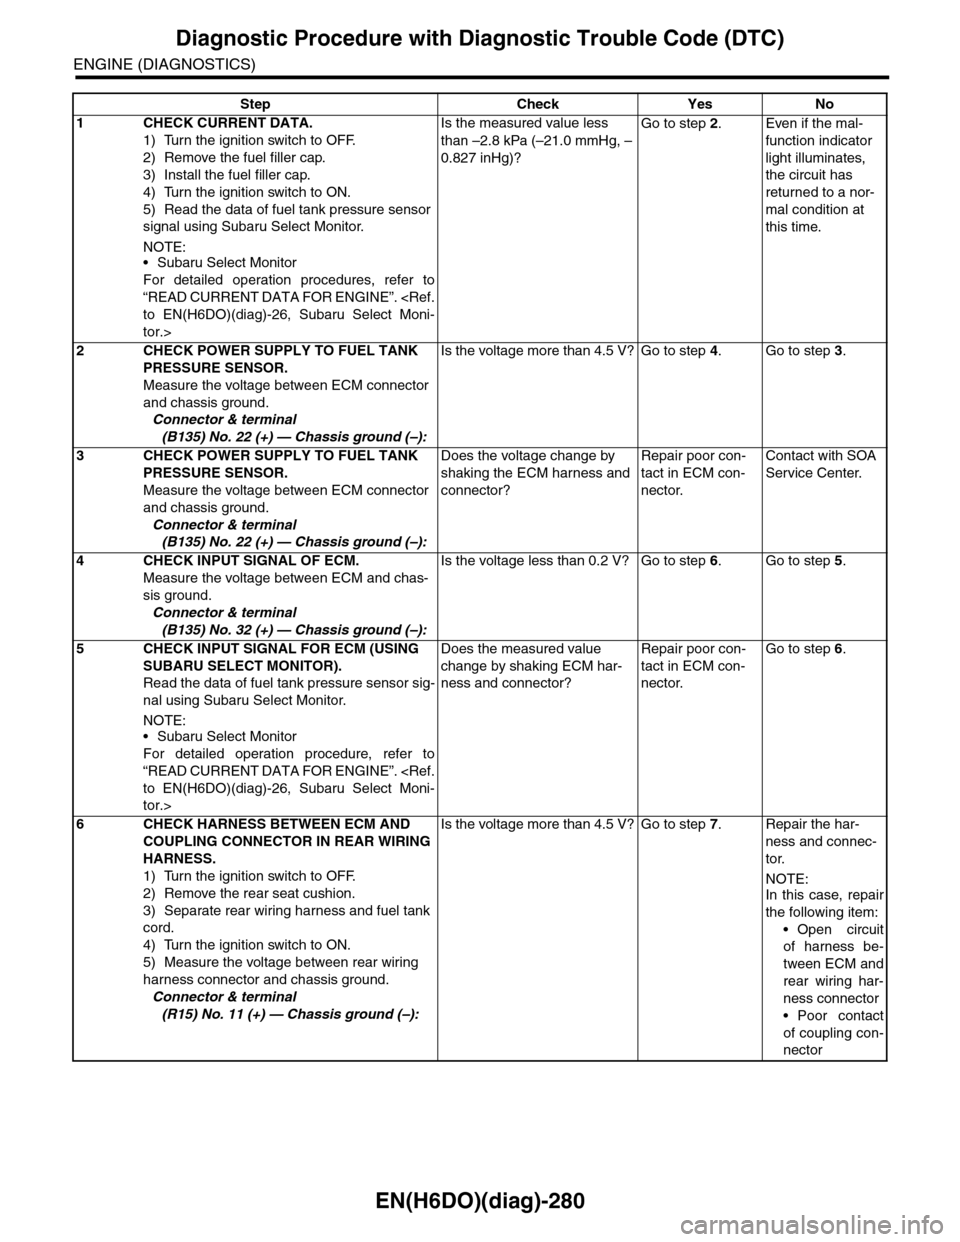
EN(H6DO)(diag)-280
Diagnostic Procedure with Diagnostic Trouble Code (DTC)
ENGINE (DIAGNOSTICS)
Step Check Yes No
1CHECK CURRENT DATA.
1) Turn the ignition switch to OFF.
2) Remove the fuel filler cap.
3) Install the fuel filler cap.
4) Turn the ignition switch to ON.
5) Read the data of fuel tank pressure sensor
signal using Subaru Select Monitor.
NOTE:•Subaru Select Monitor
For detailed operation procedures, refer to
“READ CURRENT DATA FOR ENGINE”.
tor.>
Is the measured value less
than –2.8 kPa (–21.0 mmHg, –
0.827 inHg)?
Go to step 2.Even if the mal-
function indicator
light illuminates,
the circuit has
returned to a nor-
mal condition at
this time.
2CHECK POWER SUPPLY TO FUEL TANK
PRESSURE SENSOR.
Measure the voltage between ECM connector
and chassis ground.
Connector & terminal
(B135) No. 22 (+) — Chassis ground (–):
Is the voltage more than 4.5 V? Go to step 4.Go to step 3.
3CHECK POWER SUPPLY TO FUEL TANK
PRESSURE SENSOR.
Measure the voltage between ECM connector
and chassis ground.
Connector & terminal
(B135) No. 22 (+) — Chassis ground (–):
Does the voltage change by
shaking the ECM harness and
connector?
Repair poor con-
tact in ECM con-
nector.
Contact with SOA
Service Center.
4CHECK INPUT SIGNAL OF ECM.
Measure the voltage between ECM and chas-
sis ground.
Connector & terminal
(B135) No. 32 (+) — Chassis ground (–):
Is the voltage less than 0.2 V? Go to step 6.Go to step 5.
5CHECK INPUT SIGNAL FOR ECM (USING
SUBARU SELECT MONITOR).
Read the data of fuel tank pressure sensor sig-
nal using Subaru Select Monitor.
NOTE:
•Subaru Select Monitor
For detailed operation procedure, refer to
“READ CURRENT DATA FOR ENGINE”.
tor.>
Does the measured value
change by shaking ECM har-
ness and connector?
Repair poor con-
tact in ECM con-
nector.
Go to step 6.
6CHECK HARNESS BETWEEN ECM AND
COUPLING CONNECTOR IN REAR WIRING
HARNESS.
1) Turn the ignition switch to OFF.
2) Remove the rear seat cushion.
3) Separate rear wiring harness and fuel tank
cord.
4) Turn the ignition switch to ON.
5) Measure the voltage between rear wiring
harness connector and chassis ground.
Connector & terminal
(R15) No. 11 (+) — Chassis ground (–):
Is the voltage more than 4.5 V? Go to step 7.Repair the har-
ness and connec-
tor.
NOTE:In this case, repair
the following item:
•Open circuit
of harness be-
tween ECM and
rear wiring har-
ness connector
•Poor contact
of coupling con-
nector
Page 1442 of 2453
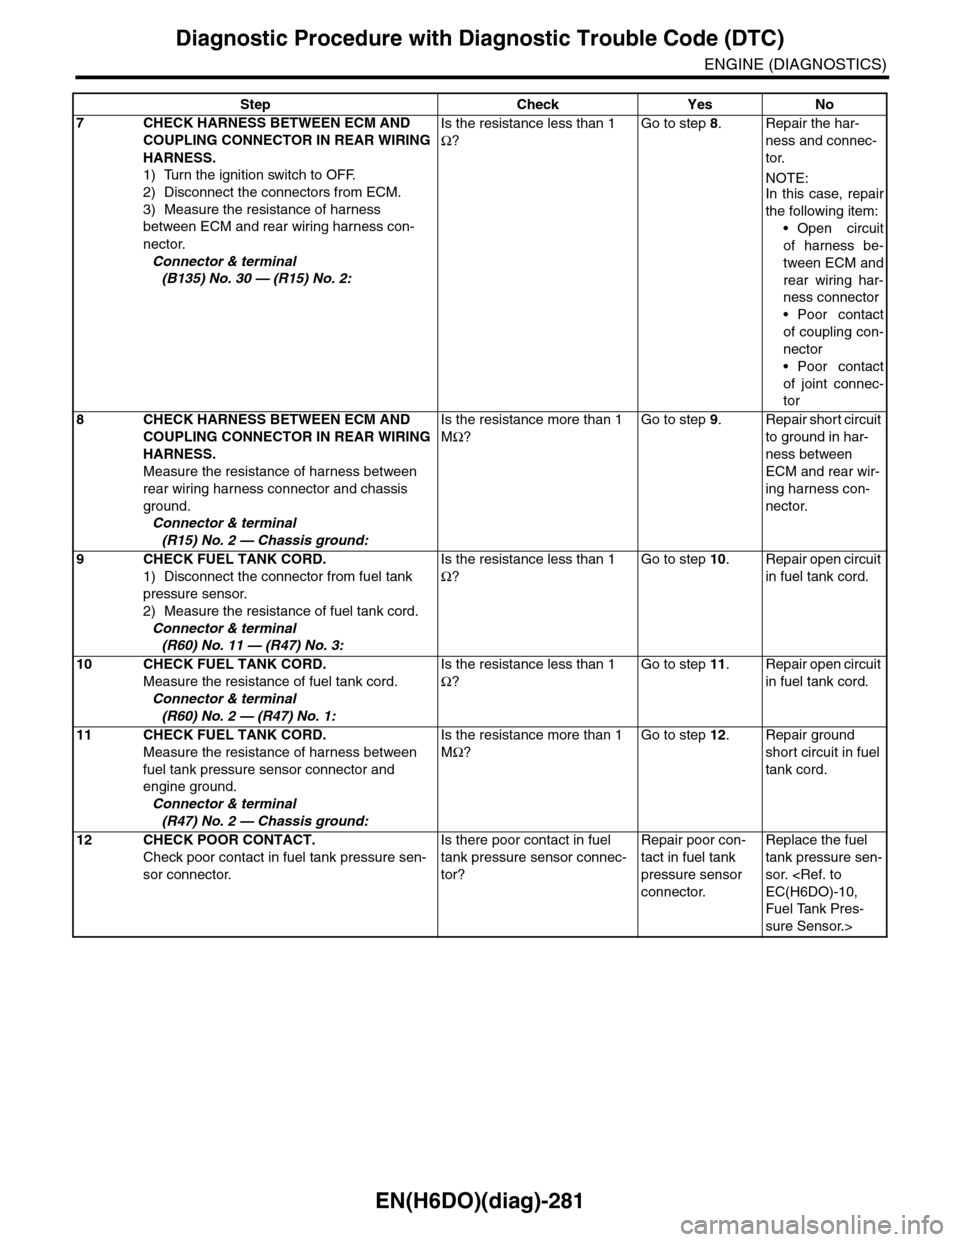
EN(H6DO)(diag)-281
Diagnostic Procedure with Diagnostic Trouble Code (DTC)
ENGINE (DIAGNOSTICS)
7CHECK HARNESS BETWEEN ECM AND
COUPLING CONNECTOR IN REAR WIRING
HARNESS.
1) Turn the ignition switch to OFF.
2) Disconnect the connectors from ECM.
3) Measure the resistance of harness
between ECM and rear wiring harness con-
nector.
Connector & terminal
(B135) No. 30 — (R15) No. 2:
Is the resistance less than 1
Ω?
Go to step 8.Repair the har-
ness and connec-
tor.
NOTE:In this case, repair
the following item:
•Open circuit
of harness be-
tween ECM and
rear wiring har-
ness connector
•Poor contact
of coupling con-
nector
•Poor contact
of joint connec-
tor
8CHECK HARNESS BETWEEN ECM AND
COUPLING CONNECTOR IN REAR WIRING
HARNESS.
Measure the resistance of harness between
rear wiring harness connector and chassis
ground.
Connector & terminal
(R15) No. 2 — Chassis ground:
Is the resistance more than 1
MΩ?
Go to step 9.Repair short circuit
to ground in har-
ness between
ECM and rear wir-
ing harness con-
nector.
9CHECK FUEL TANK CORD.
1) Disconnect the connector from fuel tank
pressure sensor.
2) Measure the resistance of fuel tank cord.
Connector & terminal
(R60) No. 11 — (R47) No. 3:
Is the resistance less than 1
Ω?
Go to step 10.Repair open circuit
in fuel tank cord.
10 CHECK FUEL TANK CORD.
Measure the resistance of fuel tank cord.
Connector & terminal
(R60) No. 2 — (R47) No. 1:
Is the resistance less than 1
Ω?
Go to step 11.Repair open circuit
in fuel tank cord.
11 CHECK FUEL TANK CORD.
Measure the resistance of harness between
fuel tank pressure sensor connector and
engine ground.
Connector & terminal
(R47) No. 2 — Chassis ground:
Is the resistance more than 1
MΩ?
Go to step 12.Repair ground
short circuit in fuel
tank cord.
12 CHECK POOR CONTACT.
Check poor contact in fuel tank pressure sen-
sor connector.
Is there poor contact in fuel
tank pressure sensor connec-
tor?
Repair poor con-
tact in fuel tank
pressure sensor
connector.
Replace the fuel
tank pressure sen-
sor.
Fuel Tank Pres-
sure Sensor.>
Step Check Yes No
Page 1443 of 2453
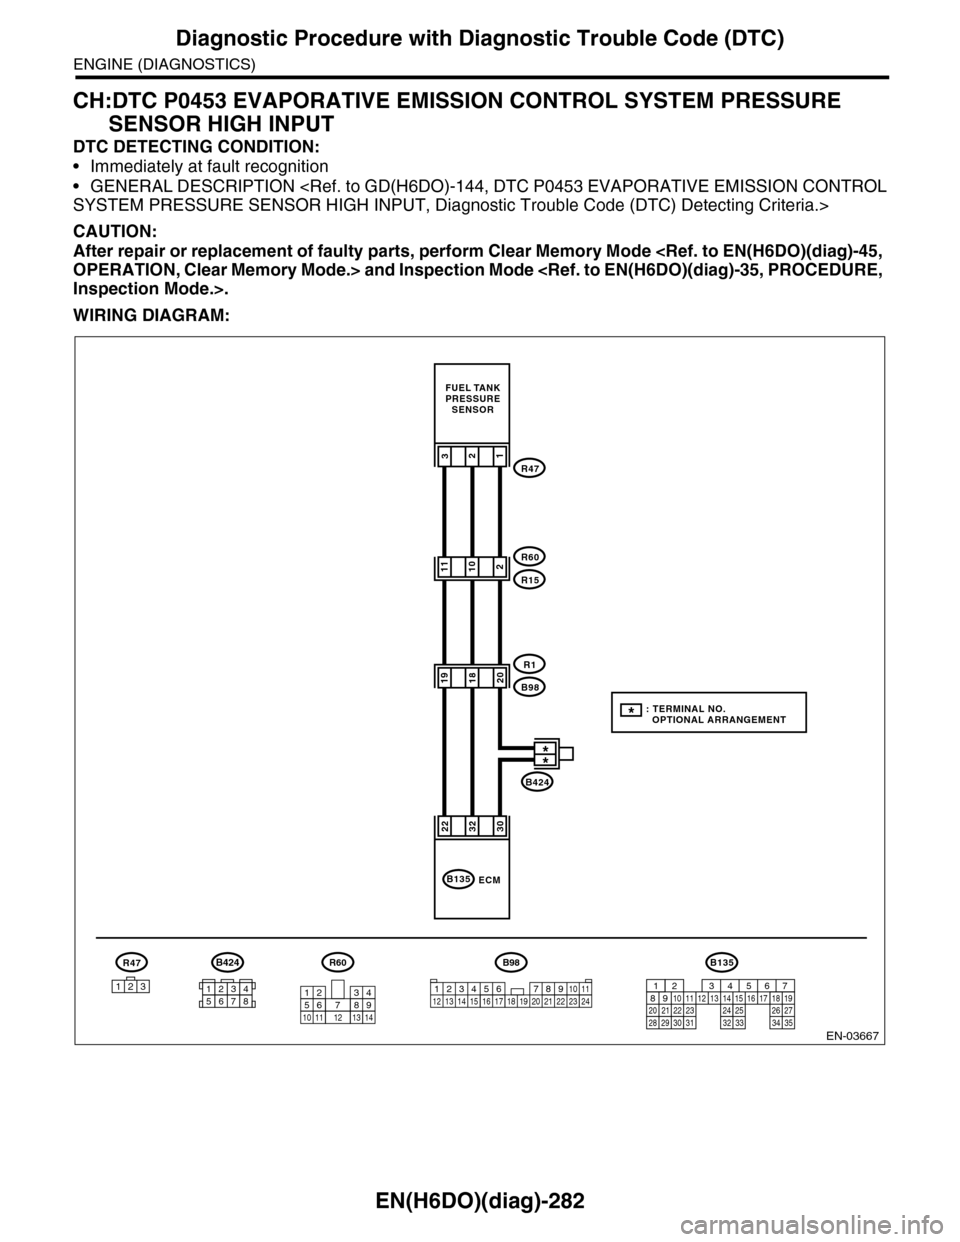
EN(H6DO)(diag)-282
Diagnostic Procedure with Diagnostic Trouble Code (DTC)
ENGINE (DIAGNOSTICS)
CH:DTC P0453 EVAPORATIVE EMISSION CONTROL SYSTEM PRESSURE
SENSOR HIGH INPUT
DTC DETECTING CONDITION:
•Immediately at fault recognition
•GENERAL DESCRIPTION
CAUTION:
After repair or replacement of faulty parts, perform Clear Memory Mode
WIRING DIAGRAM:
EN-03667
B424
312
223230
ECMB135
R47
R60
R15
R1
B98
123
R47
11210
192018
FUEL TANKPRESSURESENSOR
B424
34561278
: TERMINAL NO. OPTIONAL ARRANGEMENT*
**
B98
123456 78910 1112 13 16 1714 15 18 19 2021222324
R60
12
10115634897131412
B135
567821943102422 23 2511 12 13 14 1526 2728
16 17 18 1920 2129 30 31 32 33 34 35
Page 1444 of 2453
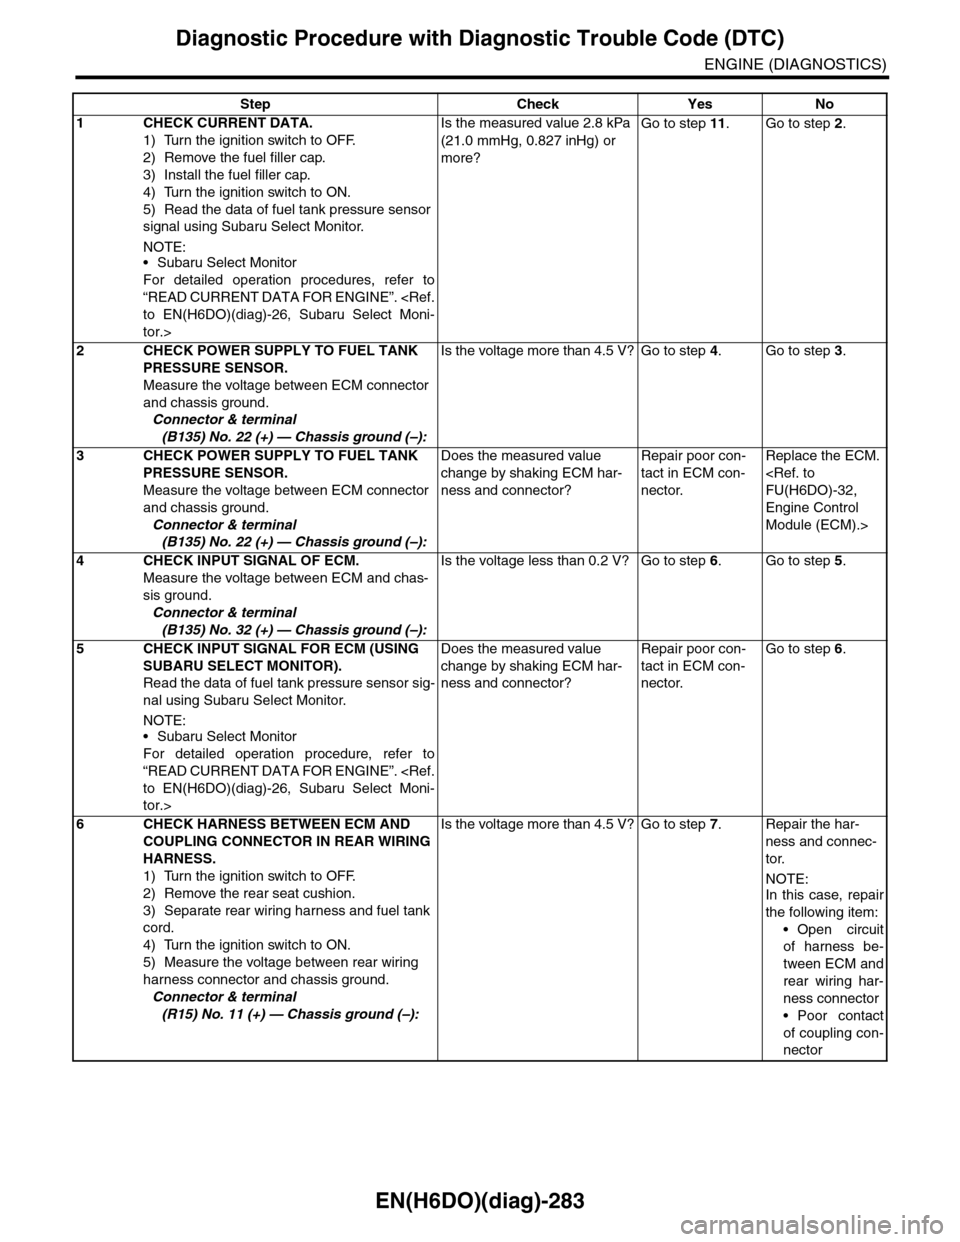
EN(H6DO)(diag)-283
Diagnostic Procedure with Diagnostic Trouble Code (DTC)
ENGINE (DIAGNOSTICS)
Step Check Yes No
1CHECK CURRENT DATA.
1) Turn the ignition switch to OFF.
2) Remove the fuel filler cap.
3) Install the fuel filler cap.
4) Turn the ignition switch to ON.
5) Read the data of fuel tank pressure sensor
signal using Subaru Select Monitor.
NOTE:•Subaru Select Monitor
For detailed operation procedures, refer to
“READ CURRENT DATA FOR ENGINE”.
tor.>
Is the measured value 2.8 kPa
(21.0 mmHg, 0.827 inHg) or
more?
Go to step 11.Go to step 2.
2CHECK POWER SUPPLY TO FUEL TANK
PRESSURE SENSOR.
Measure the voltage between ECM connector
and chassis ground.
Connector & terminal
(B135) No. 22 (+) — Chassis ground (–):
Is the voltage more than 4.5 V? Go to step 4.Go to step 3.
3CHECK POWER SUPPLY TO FUEL TANK
PRESSURE SENSOR.
Measure the voltage between ECM connector
and chassis ground.
Connector & terminal
(B135) No. 22 (+) — Chassis ground (–):
Does the measured value
change by shaking ECM har-
ness and connector?
Repair poor con-
tact in ECM con-
nector.
Replace the ECM.
Engine Control
Module (ECM).>
4CHECK INPUT SIGNAL OF ECM.
Measure the voltage between ECM and chas-
sis ground.
Connector & terminal
(B135) No. 32 (+) — Chassis ground (–):
Is the voltage less than 0.2 V? Go to step 6.Go to step 5.
5CHECK INPUT SIGNAL FOR ECM (USING
SUBARU SELECT MONITOR).
Read the data of fuel tank pressure sensor sig-
nal using Subaru Select Monitor.
NOTE:
•Subaru Select Monitor
For detailed operation procedure, refer to
“READ CURRENT DATA FOR ENGINE”.
tor.>
Does the measured value
change by shaking ECM har-
ness and connector?
Repair poor con-
tact in ECM con-
nector.
Go to step 6.
6CHECK HARNESS BETWEEN ECM AND
COUPLING CONNECTOR IN REAR WIRING
HARNESS.
1) Turn the ignition switch to OFF.
2) Remove the rear seat cushion.
3) Separate rear wiring harness and fuel tank
cord.
4) Turn the ignition switch to ON.
5) Measure the voltage between rear wiring
harness connector and chassis ground.
Connector & terminal
(R15) No. 11 (+) — Chassis ground (–):
Is the voltage more than 4.5 V? Go to step 7.Repair the har-
ness and connec-
tor.
NOTE:In this case, repair
the following item:
•Open circuit
of harness be-
tween ECM and
rear wiring har-
ness connector
•Poor contact
of coupling con-
nector