Page 1212 of 2453
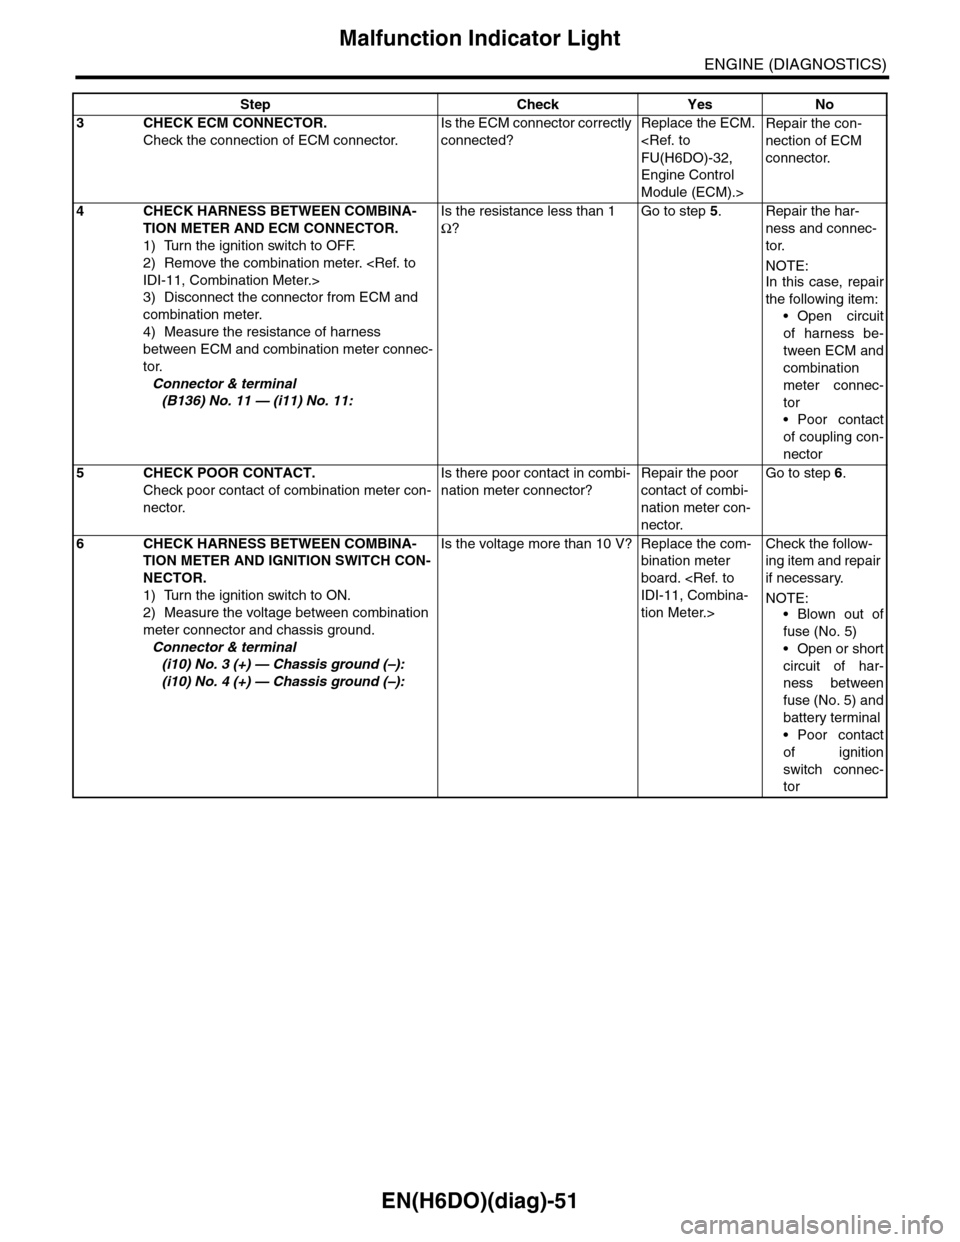
EN(H6DO)(diag)-51
Malfunction Indicator Light
ENGINE (DIAGNOSTICS)
3CHECK ECM CONNECTOR.
Check the connection of ECM connector.
Is the ECM connector correctly
connected?
Replace the ECM.
FU(H6DO)-32,
Engine Control
Module (ECM).>
Repair the con-
nection of ECM
connector.
4CHECK HARNESS BETWEEN COMBINA-
TION METER AND ECM CONNECTOR.
1) Turn the ignition switch to OFF.
2) Remove the combination meter.
IDI-11, Combination Meter.>
3) Disconnect the connector from ECM and
combination meter.
4) Measure the resistance of harness
between ECM and combination meter connec-
tor.
Connector & terminal
(B136) No. 11 — (i11) No. 11:
Is the resistance less than 1
Ω?
Go to step 5.Repair the har-
ness and connec-
tor.
NOTE:In this case, repair
the following item:
•Open circuit
of harness be-
tween ECM and
combination
meter connec-
tor
•Poor contact
of coupling con-
nector
5CHECK POOR CONTACT.
Check poor contact of combination meter con-
nector.
Is there poor contact in combi-
nation meter connector?
Repair the poor
contact of combi-
nation meter con-
nector.
Go to step 6.
6CHECK HARNESS BETWEEN COMBINA-
TION METER AND IGNITION SWITCH CON-
NECTOR.
1) Turn the ignition switch to ON.
2) Measure the voltage between combination
meter connector and chassis ground.
Connector & terminal
(i10) No. 3 (+) — Chassis ground (–):
(i10) No. 4 (+) — Chassis ground (–):
Is the voltage more than 10 V? Replace the com-
bination meter
board.
IDI-11, Combina-
tion Meter.>
Check the follow-
ing item and repair
if necessary.
NOTE:
•Blown out of
fuse (No. 5)
•Open or short
circuit of har-
ness between
fuse (No. 5) and
battery terminal
•Poor contact
of ignition
switch connec-
tor
Step Check Yes No
Page 1213 of 2453
EN(H6DO)(diag)-52
Malfunction Indicator Light
ENGINE (DIAGNOSTICS)
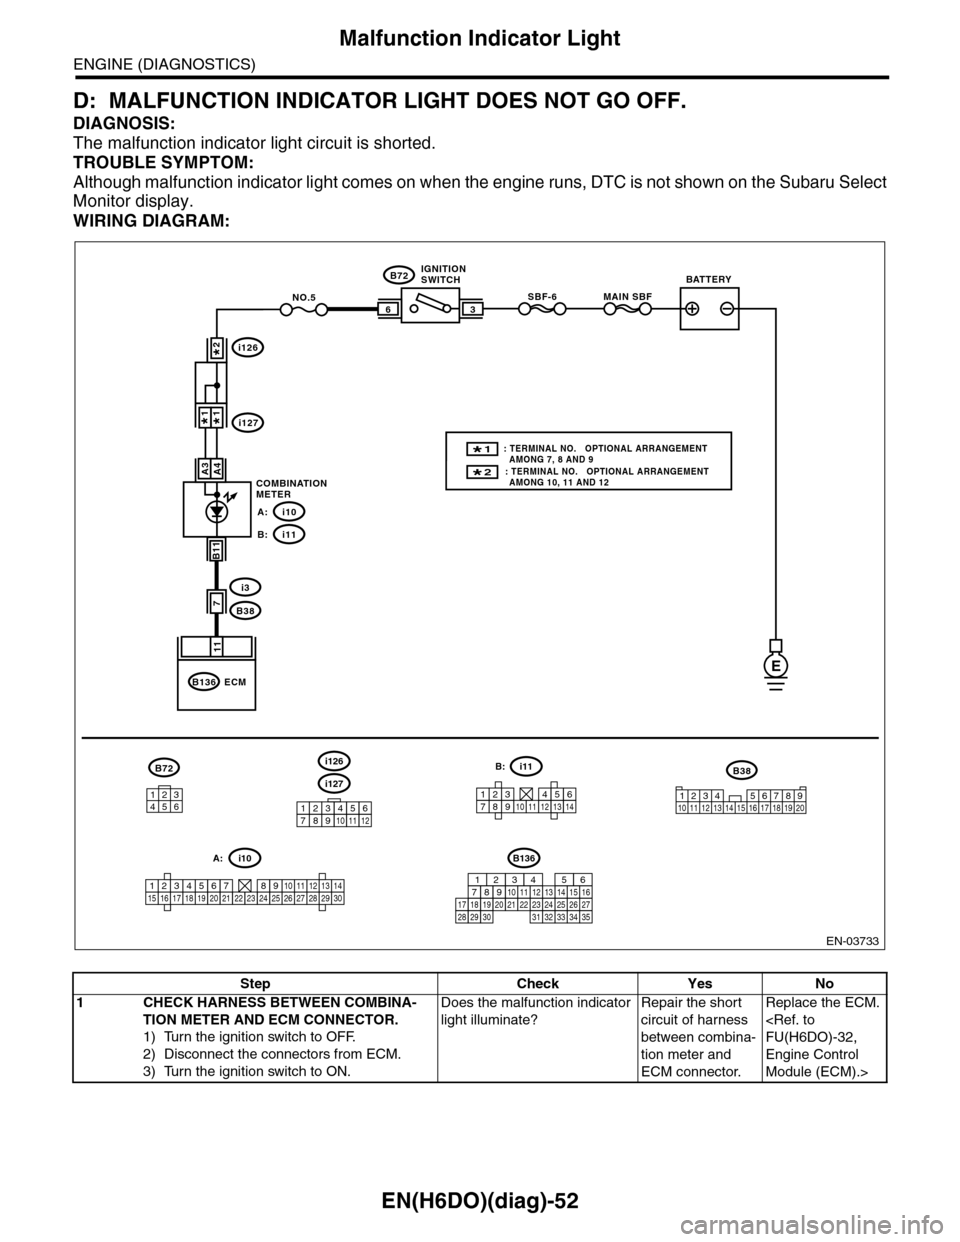
D: MALFUNCTION INDICATOR LIGHT DOES NOT GO OFF.
DIAGNOSIS:
The malfunction indicator light circuit is shorted.
TROUBLE SYMPTOM:
Although malfunction indicator light comes on when the engine runs, DTC is not shown on the Subaru Select
Monitor display.
WIRING DIAGRAM:
EN-03733
3
B72
i3
B38
B136
SBF-66
11
A4
7
MAIN SBFNO.5
B11
E
A3
B72
134562
B38
1234 5678910 11 12 13 14 15 16 17 18 19 20
ECM
COMBINATIONMETER
IGNITIONSWITCHBATTERY
i126
i1271*1*
2*
i10A:
i11B:
i127
i126
123456789101112
1234567891011121314
i11B:
123456789101112131415161718192021222324252627282930
i10A:
2* : TERMINAL NO. OPTIONAL ARRANGEMENT AMONG 10, 11 AND 12
1* : TERMINAL NO. OPTIONAL ARRANGEMENT AMONG 7, 8 AND 9
B136
16101112131415252430
9871718192028212223293231
123456
2726333435
Step Check Yes No
1CHECK HARNESS BETWEEN COMBINA-
TION METER AND ECM CONNECTOR.
1) Turn the ignition switch to OFF.
2) Disconnect the connectors from ECM.
3) Turn the ignition switch to ON.
Does the malfunction indicator
light illuminate?
Repair the short
circuit of harness
between combina-
tion meter and
ECM connector.
Replace the ECM.
FU(H6DO)-32,
Engine Control
Module (ECM).>
Page 1214 of 2453
EN(H6DO)(diag)-53
Malfunction Indicator Light
ENGINE (DIAGNOSTICS)
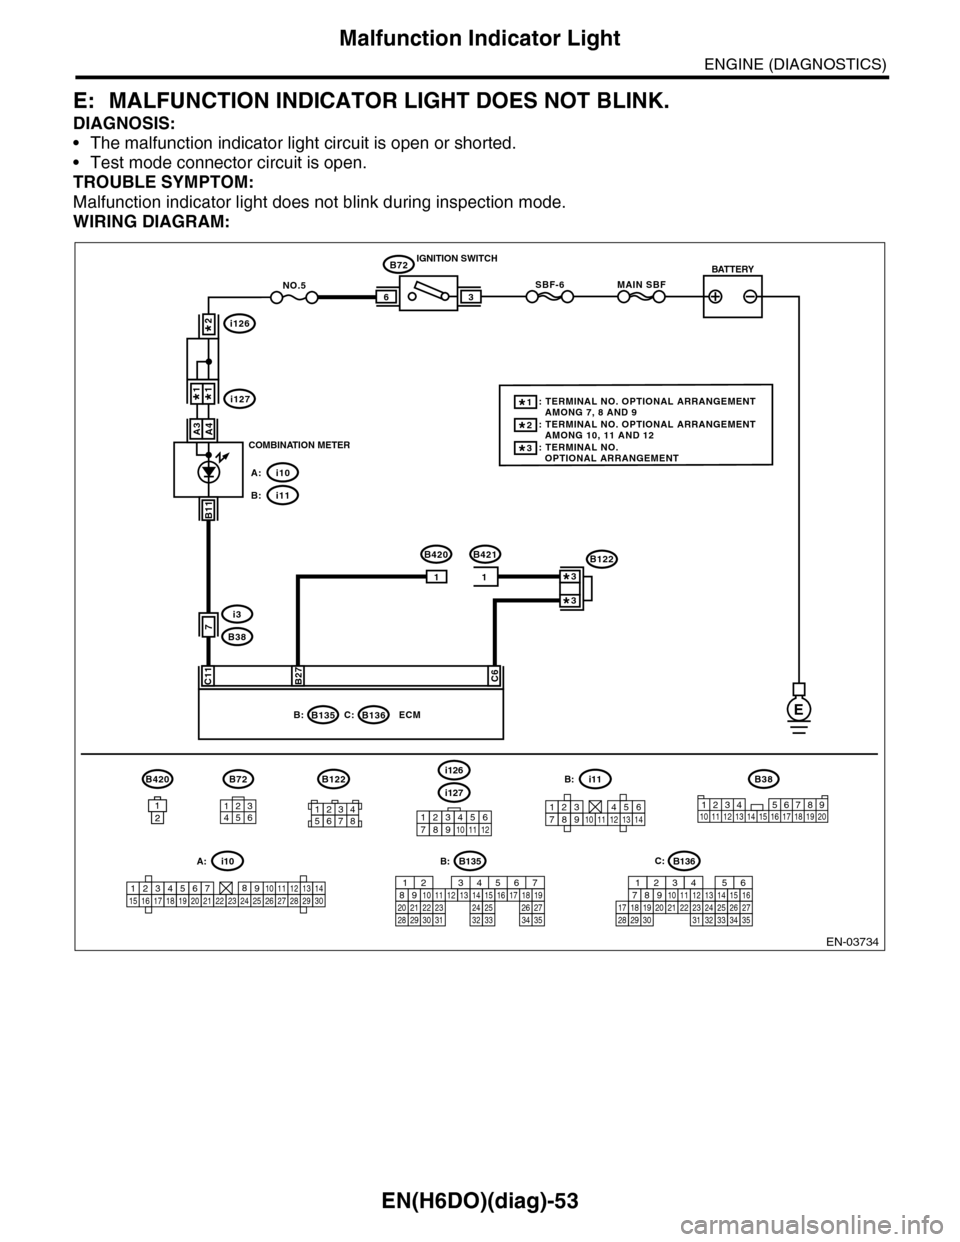
E: MALFUNCTION INDICATOR LIGHT DOES NOT BLINK.
DIAGNOSIS:
•The malfunction indicator light circuit is open or shorted.
•Test mode connector circuit is open.
TROUBLE SYMPTOM:
Malfunction indicator light does not blink during inspection mode.
WIRING DIAGRAM:
EN-03734
i126
i1271*1*
2*
i10A:
i11B:
BATTERY
3
B72
B420B421
IGNITION SWITCH
COMBINATION METER
B135B:
SBF-66
C11B27C6
ECM
B72
7
MAIN SBFNO.5
11
B420
1212
B11
i3
B38
E
A4A3
B136C:
134562
B38
1234 5678910 11 12 13 14 15 16 17 18 19 2012345678
B122
3*: TERMINAL NO. OPTIONAL ARRANGEMENT
2*: TERMINAL NO. OPTIONAL ARRANGEMENT AMONG 10, 11 AND 12
1*: TERMINAL NO. OPTIONAL ARRANGEMENT AMONG 7, 8 AND 9
B122
3*
3*
i127
i126
123456789101112
1234567891011121314
i11B:
123456789101112131415161718192021222324252627282930
i10A:B135
5672134
29
101112131415252416
30
98171819202821222332312627333435
B:B136
16101112131415252430
9871718192028212223293231
123456
2726333435
C:
Page 1216 of 2453
EN(H6DO)(diag)-55
Malfunction Indicator Light
ENGINE (DIAGNOSTICS)
F: MALFUNCTION INDICATOR LIGHT REMAINS BLINKING.
DIAGNOSIS:
Test mode connector circuit is shorted.
TROUBLE SYMPTOM:
Malfunction indicator light blinks when test mode connector is not connected.
WIRING DIAGRAM:
EN-03734
i126
i1271*1*
2*
i10A:
i11B:
BATTERY
3
B72
B420B421
IGNITION SWITCH
COMBINATION METER
B135B:
SBF-66
C11B27C6
ECM
B72
7
MAIN SBFNO.5
11
B420
1212
B11
i3
B38
E
A4A3
B136C:
134562
B38
1234 5678910 11 12 13 14 15 16 17 18 19 2012345678
B122
3*: TERMINAL NO. OPTIONAL ARRANGEMENT
2*: TERMINAL NO. OPTIONAL ARRANGEMENT AMONG 10, 11 AND 12
1*: TERMINAL NO. OPTIONAL ARRANGEMENT AMONG 7, 8 AND 9
B122
3*
3*
i127
i126
123456789101112
1234567891011121314
i11B:
123456789101112131415161718192021222324252627282930
i10A:B135
5672134
29
101112131415252416
30
98171819202821222332312627333435
B:B136
16101112131415252430
9871718192028212223293231
123456
2726333435
C:
Page 1454 of 2453
EN(H6DO)(diag)-293
Diagnostic Procedure with Diagnostic Trouble Code (DTC)
ENGINE (DIAGNOSTICS)
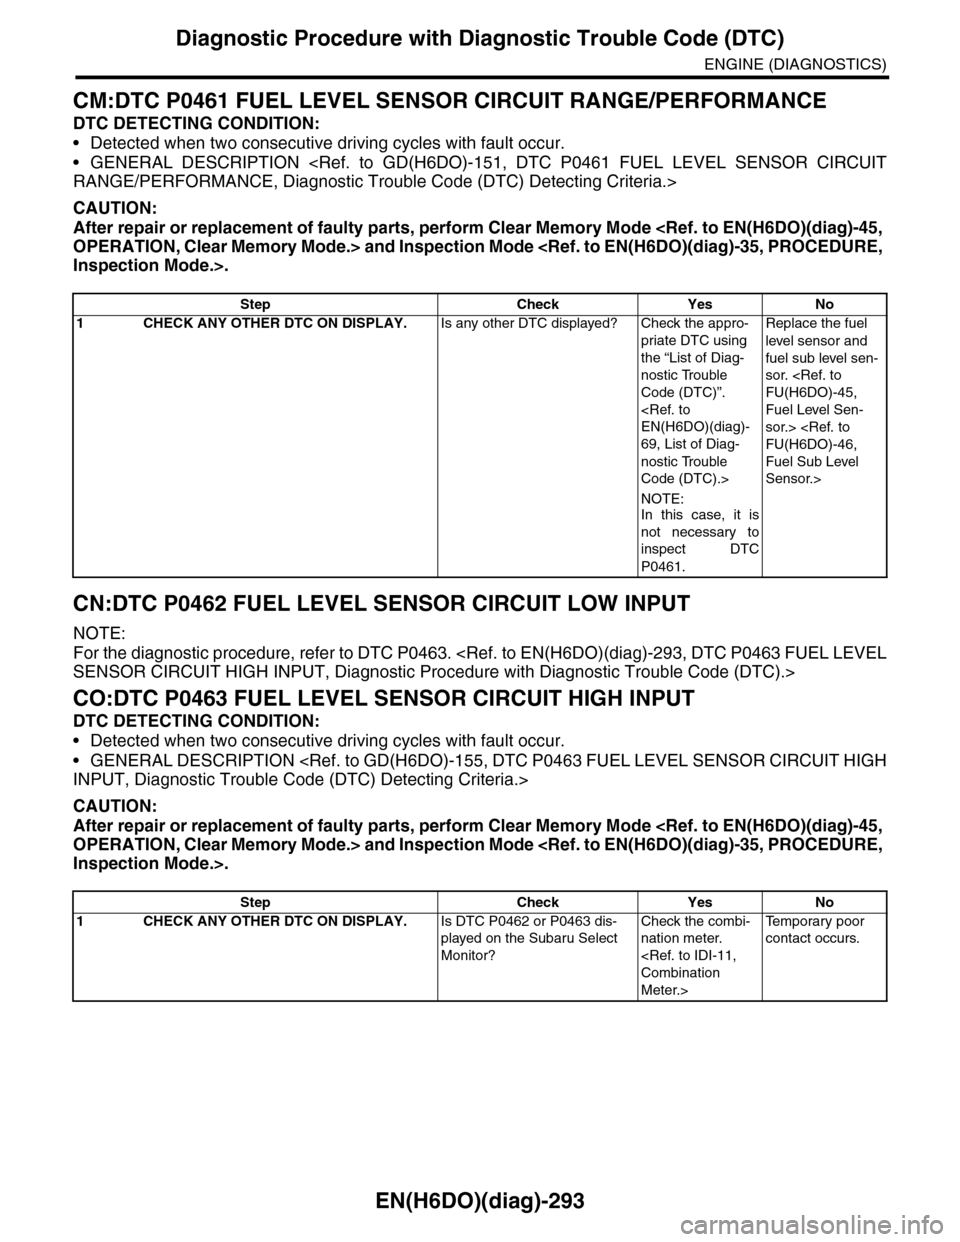
CM:DTC P0461 FUEL LEVEL SENSOR CIRCUIT RANGE/PERFORMANCE
DTC DETECTING CONDITION:
•Detected when two consecutive driving cycles with fault occur.
•GENERAL DESCRIPTION
RANGE/PERFORMANCE, Diagnostic Trouble Code (DTC) Detecting Criteria.>
CAUTION:
After repair or replacement of faulty parts, perform Clear Memory Mode
OPERATION, Clear Memory Mode.> and Inspection Mode
Inspection Mode.>.
CN:DTC P0462 FUEL LEVEL SENSOR CIRCUIT LOW INPUT
NOTE:
For the diagnostic procedure, refer to DTC P0463.
SENSOR CIRCUIT HIGH INPUT, Diagnostic Procedure with Diagnostic Trouble Code (DTC).>
CO:DTC P0463 FUEL LEVEL SENSOR CIRCUIT HIGH INPUT
DTC DETECTING CONDITION:
•Detected when two consecutive driving cycles with fault occur.
•GENERAL DESCRIPTION
INPUT, Diagnostic Trouble Code (DTC) Detecting Criteria.>
CAUTION:
After repair or replacement of faulty parts, perform Clear Memory Mode
OPERATION, Clear Memory Mode.> and Inspection Mode
Inspection Mode.>.
Step Check Yes No
1CHECK ANY OTHER DTC ON DISPLAY.Is any other DTC displayed? Check the appro-
priate DTC using
the “List of Diag-
nostic Trouble
Code (DTC)”.
EN(H6DO)(diag)-
69, List of Diag-
nostic Trouble
Code (DTC).>
NOTE:In this case, it is
not necessary to
inspect DTC
P0461.
Replace the fuel
level sensor and
fuel sub level sen-
sor.
FU(H6DO)-45,
Fuel Level Sen-
sor.>
FU(H6DO)-46,
Fuel Sub Level
Sensor.>
Step Check Yes No
1CHECK ANY OTHER DTC ON DISPLAY.Is DTC P0462 or P0463 dis-
played on the Subaru Select
Monitor?
Check the combi-
nation meter.
Combination
Meter.>
Te m p o r a r y p o o r
contact occurs.
Page 1455 of 2453
EN(H6DO)(diag)-294
Diagnostic Procedure with Diagnostic Trouble Code (DTC)
ENGINE (DIAGNOSTICS)
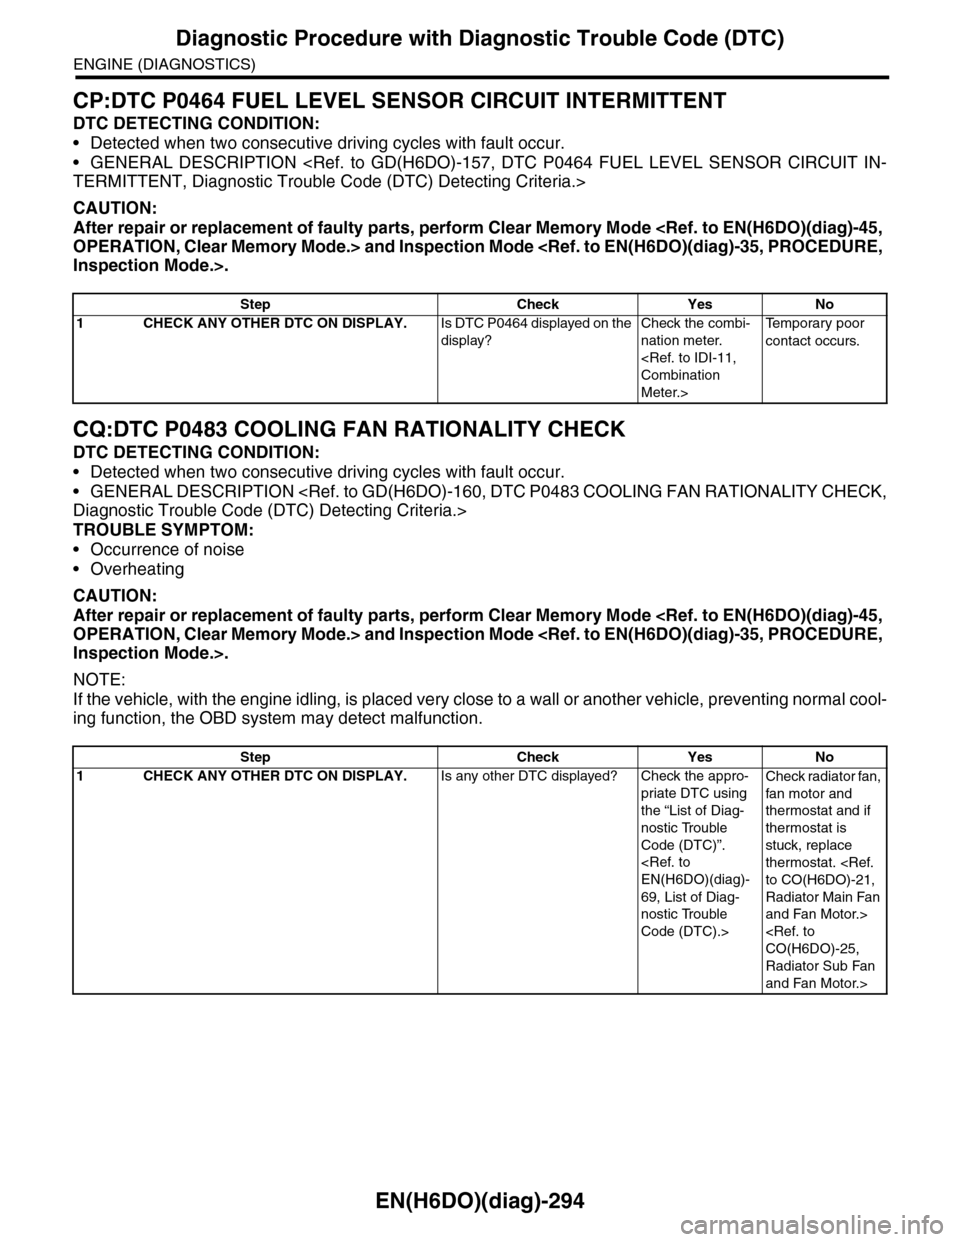
CP:DTC P0464 FUEL LEVEL SENSOR CIRCUIT INTERMITTENT
DTC DETECTING CONDITION:
•Detected when two consecutive driving cycles with fault occur.
•GENERAL DESCRIPTION
TERMITTENT, Diagnostic Trouble Code (DTC) Detecting Criteria.>
CAUTION:
After repair or replacement of faulty parts, perform Clear Memory Mode
OPERATION, Clear Memory Mode.> and Inspection Mode
Inspection Mode.>.
CQ:DTC P0483 COOLING FAN RATIONALITY CHECK
DTC DETECTING CONDITION:
•Detected when two consecutive driving cycles with fault occur.
•GENERAL DESCRIPTION
Diagnostic Trouble Code (DTC) Detecting Criteria.>
TROUBLE SYMPTOM:
•Occurrence of noise
•Overheating
CAUTION:
After repair or replacement of faulty parts, perform Clear Memory Mode
OPERATION, Clear Memory Mode.> and Inspection Mode
Inspection Mode.>.
NOTE:
If the vehicle, with the engine idling, is placed very close to a wall or another vehicle, preventing normal cool-
ing function, the OBD system may detect malfunction.
Step Check Yes No
1CHECK ANY OTHER DTC ON DISPLAY.Is DTC P0464 displayed on the
display?
Check the combi-
nation meter.
Combination
Meter.>
Te m p o r a r y p o o r
contact occurs.
Step Check Yes No
1CHECK ANY OTHER DTC ON DISPLAY.Is any other DTC displayed? Check the appro-
priate DTC using
the “List of Diag-
nostic Trouble
Code (DTC)”.
EN(H6DO)(diag)-
69, List of Diag-
nostic Trouble
Code (DTC).>
Check radiator fan,
fan motor and
thermostat and if
thermostat is
stuck, replace
thermostat.
to CO(H6DO)-21,
Radiator Main Fan
and Fan Motor.>
CO(H6DO)-25,
Radiator Sub Fan
and Fan Motor.>
Page 1854 of 2453
LU(H6DO)-5
Oil Pressure System
LUBRICATION
2. Oil Pressure System
A: WIRING DIAGRAM
LU-02159
E
i3
B38
i126
i127
B21
E2
14
E11
NO.5SBF-6MAIN SBF
B72
36
B10
i10
31
A4A3
B72
1345621234 5678910 11 12 13 14 15 16 17 18 19 20
B38B21
123412131415567816171819910 1120212223 24 25 2627 28 29 3031 32 33
3534 37363938 41404342 4445 47464948 51505352 54
A:
i11B:
BATTERYIGNITIONSWITCH
COMBINATIONMETER
OIL PRESSUREWA R N I N G L I G H T
OIL PRESSURESWITCH
1*1*
2*
i127
i126
123456789101112
1234567891011121314
i11B:
123456789101112131415161718192021222324252627282930
i10A:
2* :TERMINAL NO. OPTIONAL ARRANGEMENT AMONG 10, 11 AND 12
1*: TERMINAL NO. OPTIONAL ARRANGEMENT AMONG 7, 8 AND 9
Page 1855 of 2453
LU(H6DO)-6
Oil Pressure System
LUBRICATION
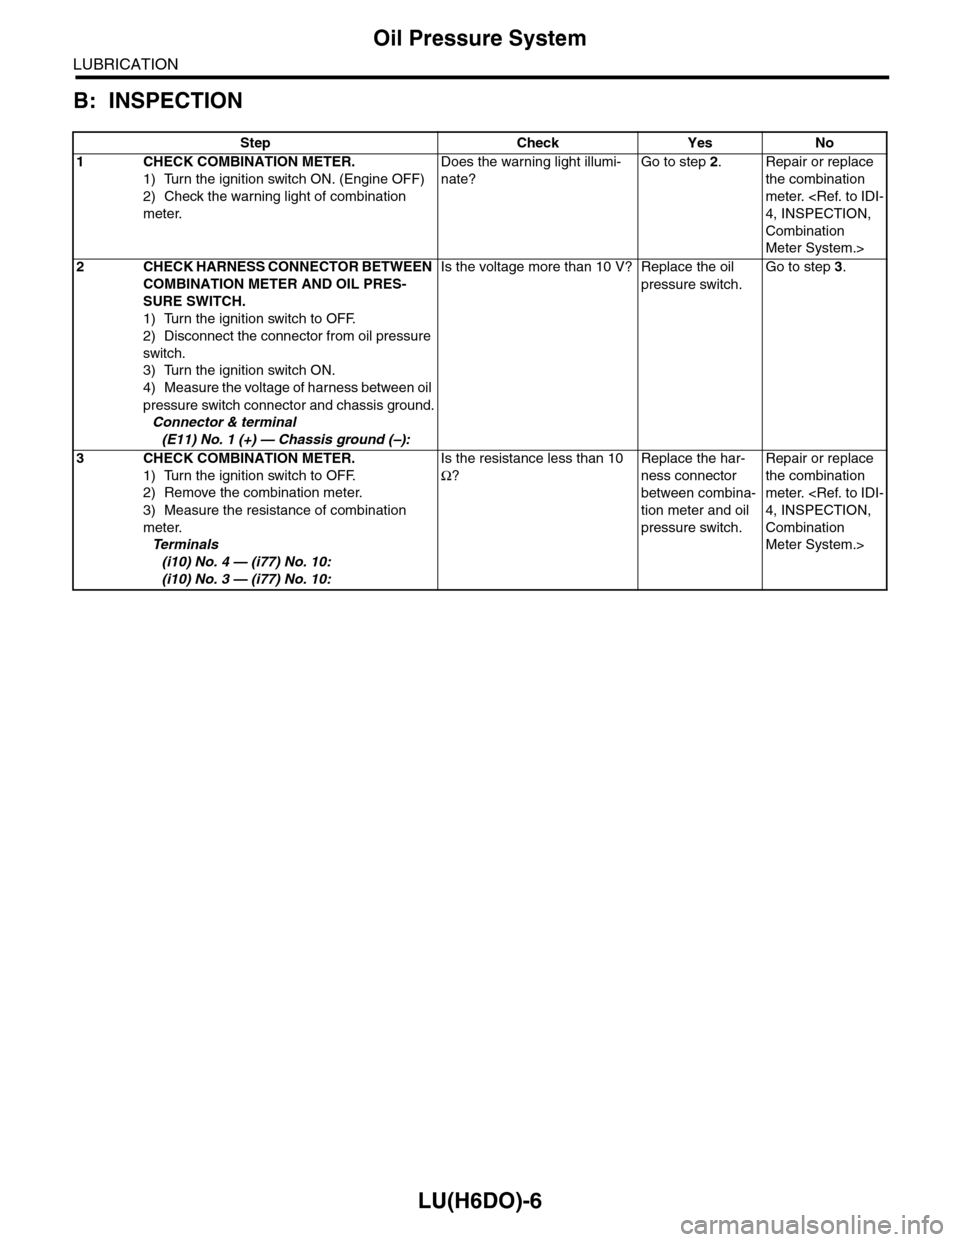
B: INSPECTION
Step Check Yes No
1CHECK COMBINATION METER.
1) Turn the ignition switch ON. (Engine OFF)
2) Check the warning light of combination
meter.
Does the warning light illumi-
nate?
Go to step 2.Repair or replace
the combination
meter.
4, INSPECTION,
Combination
Meter System.>
2CHECK HARNESS CONNECTOR BETWEEN
COMBINATION METER AND OIL PRES-
SURE SWITCH.
1) Turn the ignition switch to OFF.
2) Disconnect the connector from oil pressure
switch.
3) Turn the ignition switch ON.
4) Measure the voltage of harness between oil
pressure switch connector and chassis ground.
Connector & terminal
(E11) No. 1 (+) — Chassis ground (–):
Is the voltage more than 10 V? Replace the oil
pressure switch.
Go to step 3.
3CHECK COMBINATION METER.
1) Turn the ignition switch to OFF.
2) Remove the combination meter.
3) Measure the resistance of combination
meter.
Te r m i n a l s
(i10) No. 4 — (i77) No. 10:
(i10) No. 3 — (i77) No. 10:
Is the resistance less than 10
Ω?
Replace the har-
ness connector
between combina-
tion meter and oil
pressure switch.
Repair or replace
the combination
meter.
4, INSPECTION,
Combination
Meter System.>