Page 89 of 124
 89
Audio Operation
Note
lIf a PIN code is not input within ten seconds, the system returns to the previous screen.
l If the input PIN code does not match the registered PIN code, ‘Wrong PIN was inpu")
89
Audio Operation
Note
lIf a PIN code is not input within ten seconds, the system returns to the previous screen.
l If the input PIN code does not match the registered PIN code, ‘Wrong PIN was input.
Please input PIN again.’ is displayed for three seconds and the system returns to the PIN
code input screen.
nIndividual Channel Locking
If a channel is locked, the channel is muted.
Note
If the registered ID code is forgotten, return the ID code to the default '0000'.
( page 88)
Locking a channel
1. Select a channel to be locked by pressing the TRACK button or turning the tune audio dial.
Example: Select channel 100
Registered PIN code input preparation
2. Press the on-screen button.
3. The screen changes to Parental Lock mode and ‘INPUT PIN ----’ is displayed.
Registered PIN code input
4. Press the on-screen button.
5. Input the 4-digit registered PIN code. Example: If the registered PIN code is ‘2323’, input ‘2323’.\
Registered PIN code input confirmation
6. Confirm the input PIN code by pressing the on-screen button.
7. If it matches with the registered PIN code, ‘LOCKED’ is displayed.
8. The parental lock is activated. At this time, mute is on and no sound is heard.
Note
l If a PIN code is not input for ten seconds, the system returns to the previous screen.
l If the input PIN code does not match the registered PIN code, ‘Wrong PIN was input.
Please input the PIN again.’ is displayed for three seconds and the system returns to the
PIN code input screen.
nLock Cancellation
Unlocking a channel
1. Select the channel to be unlocked.
Registered PIN code input
2. Press the on-screen button.
3. Screen changes to Parental Lock mode and ‘INPUT PIN ----’ is displayed.
4. Press the on-screen button.
5. Input the 4-digits registered PIN code.
Example :
If the registered PIN code is ‘2323’, input ‘2323’.
Registered PIN code input confirmation
6. Confirm the input PIN code by short-pressing the on-screen button.
�)�9�C�2�%�:�-�C�)�2���F�S�S�O�����4�E�K�I�����������8�L�Y�V�W�H�E�]�����%�T�V�M�P���������������������������������4�1
Page 90 of 124
 90
Before
UseGetting
started
RoutingAddress
Book
Vo i c e Recognition
Navigation
Set Up
RDM-TMC
Audio Operation
Navigation
Set Up
7. If the PIN code matches the previously registered PIN code, th")
90
Before
UseGetting
started
RoutingAddress
Book
Vo i c e Recognition
Navigation
Set Up
RDM-TMC
Audio Operation
Navigation
Set Up
7. If the PIN code matches the previously registered PIN code, the system returns to the
normal mode.
8. The parental lock is now released. At this time, mute is off and the sound can be heard.
Note
l If an ID code is not input for ten seconds, the system returns to the previous screen.
l If the input PIN code does not match the registered PIN code, ‘Wrong PIN was input.
Please input the PIN again.’ is displayed for three seconds and the system returns to the
PIN code input screen.
nMaster Code
The Master Code is used to initialize or re-initialize the PIN code in the event that the code is
not set to ‘0000’ and/or the personalized PIN code is not known. The initialization process
resets the PIN code to ‘0000’. The master code can potentially def\
eat the intent of the
security of the parental lock if it is located by persons not authorized by the owner to access
certain channels.
Sirius Satellite Radio Master Code: ‘0913’
nError Signs
(1) Depending on the surrounding conditions (such as large trees, buildings, or tunnels) and special weather conditions, the reception of SIRIUS radio waves may be decreased or
temporarily interrupted. ‘ACQUIRING SIGNAL’ may appear.
The ‘ACQUIRING SIGNAL’ message will clear after one of the following occurs:
1. When the , , , , , or on-screen button is pressed.
2. When the weather conditions have been improved.
(2) In case of an antenna malfunction, ‘ANTENNA FAIL’ is displayed. Check the satellite radio antenna (refer to the ‘Antenna’ in the owner’s manual.), antenna
cable and DLP antenna connector.
The ‘ANTENNA FAIL’ message will clear after the antenna connection failure has been
restored.
Note
If a broken DLP* unit is replaced with a new unit, cancel the license for the broken unit and
make sure to carry out new registration for the replaced unit. If the license for the broken unit
is not canceled, you will be charged a reception fee for both units.
* DLP: Down Link Processor (SATELLITE RADIO Module)
�)�9�C�2�%�:�-�C�)�2���F�S�S�O�����4�E�K�I�����������8�L�Y�V�W�H�E�]�����%�T�V�M�P���������������������������������4�1
Page 91 of 124
 91
Audio Operation
On-screen buttons other than those specified in the above figure are not functional.
nWhat is Bluetooth Audio?
By programming portable audio devices equipped with the Bluetooth comm")
91
Audio Operation
On-screen buttons other than those specified in the above figure are not functional.
nWhat is Bluetooth Audio?
By programming portable audio devices equipped with the Bluetooth communication function
to the vehicle’s Bluetooth unit, you can listen to music or audio recorded on these audio
devices from the vehicle’s speakers.
After programming, operate the audio system’s control panel or the navigation system to play/
stop the music or audio.
Bluetooth version : Ver. 2.0 or higher Profile Audio profile
• HFP (Hands Free Profile) Ver. 1.5
• DUN (Dial-up Networking Profile) Ver. 1.1
Audio profile
• A2DP (Advanced Audio Distribution Profile) Ver. 1.0
• AVRCP (Audio/Video Remote Control Profile) Ver. 1.0
A2DP is a profile which transmits only audio to the Bluetooth unit. If your Bluetooth audio
device corresponds only to A2DP, but not AVRCP, you cannot operate it using the control
panel of the vehicle’s audio or navigation systems. In this case, the Bluetooth audio device
can be operated by controlling the device itself, the same as when a portable audio system
without the Bluetooth communication function is connected to the AUX terminal.
Operating the Bluetooth Audio
Always program audio devices to the Bluetooth audio system while the vehicle is
stopped.
Because only specified Bluetooth audio devices can be used, consult an
Authorized Mazda Dealer when purchasing or changing devices.
Bluetooth audio devices which correspond to specified Bluetooth versions and
profiles can be Bluetooth-connected to the vehicle’s Bluetooth unit, however, even
among these devices are ones which cannot be Bluetooth-connected or have
limited functionality. Each device to be used with the vehicle’s Bluetooth unit
needs to be checked individually for compatibility. Consult an Authorized Mazda
Dealer concerning device compatibility.
•Phone : 800-430-0153
•Web : www.MazdaUSA.com/bluetooth
LOAD /
PUSHPOWERPUSHAUDIO
VOL
SOURCE
SCAN
SEEK
TRACK
MAP
DISP
MENU
VOICE RETURN
TUNE
Source button
Device name
on-screen button
on-screen button
on-screen button
SOUND
SETTINGS
Caution
�)�9�C�2�%�:�-�C�)�2���F�S�S�O�����4�E�K�I�����������8�L�Y�V�W�H�E�]�����%�T�V�M�P���������������������������������4�1
Page 92 of 124
 92
Before
UseGetting
started
RoutingAddress
Book
Vo i c e Recognition
Navigation
Set Up
RDM-TMC
Audio Operation
Navigation
Set Up
Yes: Available
No: Not available
Bluetooth is the registered trad")
92
Before
UseGetting
started
RoutingAddress
Book
Vo i c e Recognition
Navigation
Set Up
RDM-TMC
Audio Operation
Navigation
Set Up
Yes: Available
No: Not available
Bluetooth is the registered trademark of Bluetooth SIG. Inc.
Note
l
It may not be possible to play a Bluetooth audio device if it is placed anywhere transmission
is compromised, such as inside a metal container or the trunk. Move the Bluetooth audio
device to a location where transmission is possible.
l Battery consumption of Bluetooth audio devices is higher while Bluetooth-connected.
l If a non-Bluetooth device is to be used, a commercially-available Bluetooth adapter is
required. When playing an audio device with a Bluetooth adapter installed, programming of
the audio device may not be possible or audio may not be heard from the vehicle speakers
if the connection of the adapter and the device is poor. If this happens, check if the
Bluetooth adapter is properly connected.
nBluetooth audio device programming
Any Bluetooth audio device must be programmed to the vehicle’s Bluetooth unit before it can
be listened to over the vehicle’s speakers.
A maximum of seven devices including Bluetooth audio devices and hands-free mobile
phones can be programmed to one vehicle.
Note
lAlways perform Bluetooth audio device programming while the vehicle is stopped.
l If a Bluetooth device has already been programmed to the vehicle as a hands-free mobile
phone, it does not need to be programmed again when using the device as a Bluetooth
audio device. Conversely, it does not need to be programmed again as a hands-free mobile
phone if it has already been programmed as a Bluetooth audio device.
l The transmission range of a Bluetooth audio device is about 10 m (32 ft).
l Therefore, if there is another Bluetooth audio device within a 10 m (32 ft) radius of the
vehicle, the device may be identified and programmed instead.
Concerning the operation of a Bluetooth audio device itself, refer to its instruction manual.
Some Bluetooth audio devices have PIN codes (four digits). Refer to the audio device’s
instruction manual because the programming procedure differs depending on whether it has
a PIN code or not. Function A2DP A2DP+AVRCP
Playback No Yes
Pause No Yes
File(Track)
up/down No Yes
�)�9�C�2�%�:�-�C�)�2���F�S�S�O�����4�E�K�I�����������8�L�Y�V�W�H�E�]�����%�T�V�M�P���������������������������������4�1
Page 93 of 124
93
Audio Operation
1. Press the SOURCE button.
2. Press the on-screen button.
3. Press the on-screen button.
4. Press the
on-screen button.
5. Press the on-screen button.
6. A “Pairing is in progress” message with a PIN number is displayed.
�)�9�C�2�%�:�-�C�)�2���F�S�S�O�����4�E�K�I�����������8�L�Y�V�W�H�E�]�����%�T�V�M�P���������������������������������4�1
Page 94 of 124
 94
Before
UseGetting
started
RoutingAddress
Book
Vo i c e Recognition
Navigation
Set Up
RDM-TMC
Audio Operation
Navigation
Set Up
Note
l
If the programming failed, a message indicating a programm")
94
Before
UseGetting
started
RoutingAddress
Book
Vo i c e Recognition
Navigation
Set Up
RDM-TMC
Audio Operation
Navigation
Set Up
Note
l
If the programming failed, a message indicating a programming error is displayed for three
seconds then the screen returns to the normal display.
l Programming cannot be performed while the vehicle is moving. When the vehicle starts to
move, the buttons other than the on-screen button are grayed out.
l If seven Bluetooth audio devices have been already programmed, additional programming
cannot be performed. Delete one programmed Bluetooth audio device to program another
one.
nDeleting the link to a Bluetooth audio device
7. If the programming is successful, the
Bluetooth audio name is displayed with a
message “PAIRING COMPLETE” for three
seconds.
1. Press the SOURCE button.
2. Press the on-screen button.
3. Press the on-screen button.
4. Press the on-screen button.
�)�9�C�2�%�:�-�C�)�2���F�S�S�O�����4�E�K�I�����������8�L�Y�V�W�H�E�]�����%�T�V�M�P���������������������������������4�1
Page 95 of 124
95
Audio Operation
Note
lA Bluetooth audio device cannot be deleted while it is being connected.
l If the programmed Bluetooth audio device deletion failed, a message indicating a deletion
failure is displayed for three seconds then the screen returns to the normal display.
l Programming cannot be performed while the vehicle is moving. When the vehicle starts to
move, the buttons other than the on-screen button are grayed out. 5. Press the on-screen button of the Bluetooth
audio device you would like to delete from the
programmed Bluetooth audio devices.
6. Press the on-screen button.
7. A confirmation screen is displayed to ask if the device is deleted. If the on-screen
button is pressed, the programmed Bluetooth
audio device can be deleted
On-screen buttons for programmed
Bluetooth audio divices
�)�9�C�2�%�:�-�C�)�2���F�S�S�O�����4�E�K�I�����������8�L�Y�V�W�H�E�]�����%�T�V�M�P���������������������������������4�1
Page 96 of 124
 96
Before
UseGetting
started
RoutingAddress
Book
Vo i c e Recognition
Navigation
Set Up
RDM-TMC
Audio Operation
Navigation
Set Up
nChanging programmed Bluetooth device
1. Press the SOURCE button.")
96
Before
UseGetting
started
RoutingAddress
Book
Vo i c e Recognition
Navigation
Set Up
RDM-TMC
Audio Operation
Navigation
Set Up
nChanging programmed Bluetooth device
1. Press the SOURCE button.
2. Press the on-screen button.
3. Press the on-screen button.
4. Press the
on-screen button.
5. Press the on-screen button of the Bluetooth device you would like to choose from the
programmed Bluetooth devices.
• : Completed pairing as Hands-free mobile phone. Highlighted while
connected.
• : Completed pairing as Bluetooth audio device. Highlighted while connected.
6. The Bluetooth Device Setting screen is displayed.
• DEVICE NAME: Name of the Bluetooth device
• PHONE: Status as Hands-free mobile phone
• AUDIO: Status as Bluetooth audio device
7. If the PHONE or AUDIO on-screen button is pressed, the selected phone or audio
function becomes operable.
On-screen buttons for programmed
Bluetooth audio divices
�)�9�C�2�%�:�-�C�)�2���F�S�S�O�����4�E�K�I�����������8�L�Y�V�W�H�E�]�����%�T�V�M�P���������������������������������4�1
 1
1 2
2 3
3 4
4 5
5 6
6 7
7 8
8 9
9 10
10 11
11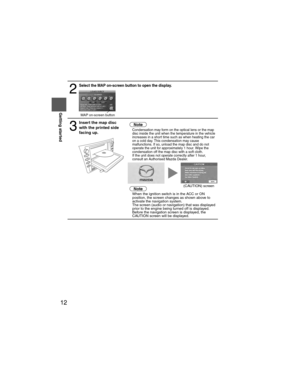 12
12 13
13 14
14 15
15 16
16 17
17 18
18 19
19 20
20 21
21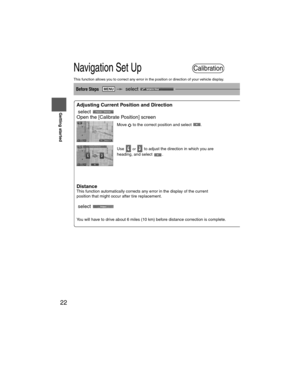 22
22 23
23 24
24 25
25 26
26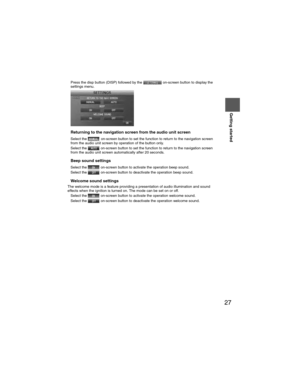 27
27 28
28 29
29 30
30 31
31 32
32 33
33 34
34 35
35 36
36 37
37 38
38 39
39 40
40 41
41 42
42 43
43 44
44 45
45 46
46 47
47 48
48 49
49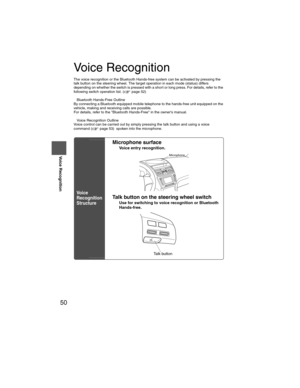 50
50 51
51 52
52 53
53 54
54 55
55 56
56 57
57 58
58 59
59 60
60 61
61 62
62 63
63 64
64 65
65 66
66 67
67 68
68 69
69 70
70 71
71 72
72 73
73 74
74 75
75 76
76 77
77 78
78 79
79 80
80 81
81 82
82 83
83 84
84 85
85 86
86 87
87 88
88 89
89 90
90 91
91 92
92 93
93 94
94 95
95 96
96 97
97 98
98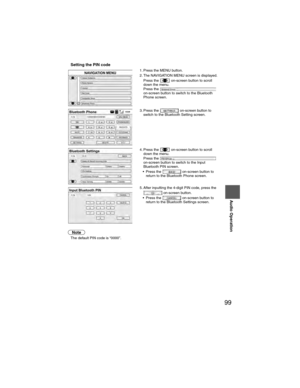 99
99 100
100 101
101 102
102 103
103 104
104 105
105 106
106 107
107 108
108 109
109 110
110 111
111 112
112 113
113 114
114 115
115 116
116 117
117 118
118 119
119 120
120 121
121 122
122 123
123 93
Audio Operation
1. Press the SOURCE button.
2. Press the on-screen button.
3. Press the on-screen button.
4. Press the
on-screen button.
5. Press the on-screen button.
6. A “Pairing is in")
 95
Audio Operation
Note
lA Bluetooth audio device cannot be deleted while it is being connected.
l If the programmed Bluetooth audio device deletion failed, a message indicating a deletion
failure i")