Page 25 of 124
 25
Getting started
Screen Names and Functions
Screens Before Setting Route
(1) Map Orientation control( page 28)
(2) GPS (Global Positioning System) marker( page 57)(3) ClockClock will be displayed wh")
25
Getting started
Screen Names and Functions
Screens Before Setting Route
(1) Map Orientation control( page 28)
(2) GPS (Global Positioning System) marker( page 57)(3) ClockClock will be displayed when you set up
Clock on Navigation Set Up On.
(4) Vehicle marker
Shows the current position and
direction of your vehicle.
(5) Scale display
Displays the scale of the map.
(6) Distance from current position Displays the distance from the current
position to the position pointed by . (7) Current Road Name
Shows the name of the road you are
currently driving on.
(8) Set Destination buttonThe position indicated by the mark “ ” in the
scroll map is used as destination, memory
point or way point.
(9) Store Memory Point button
Stores markers on the map.
(10) POI (Point of Interest) Display button ( page 38)
(11) Zoom in ( page 28)
(12) Zoom out
( page 28)
Screens During Route Guidance
(1) Distance and Time to Destination displayDisplays the time* and distance to the
destination or way point.
Selecting this will display the next and
further information on the way point or
time and distance to the destination.
(* Either required time or estimated time
arrival)
(2) Route display Shows the provided route as a thick
blue line. (3) Turn Arrow displayShows the direction to turn at the next
junction and the distance to the junction.
(4) Route Preferences button( page 42)
MAP
(4)
(3)(1)
(2)(7)
(8) (10)
(9)(5)(11)(12) MAP SCROLL
(6)
(4)
(3)
(1)
(2)
�)�9�C�2�%�:�-�C�)�2���F�S�S�O�����4�E�K�I�����������8�Y�I�W�H�E�]�����%�T�V�M�P���������������������������������4�1
Page 26 of 124
 26
RoutingAddress
Book
Getting started
Display menu screen will be shown when you press the disp button (DISP).
Press the disp button (DISP) to display the display menu.
nAdjusting the screen quality")
26
RoutingAddress
Book
Getting started
Display menu screen will be shown when you press the disp button (DISP).
Press the disp button (DISP) to display the display menu.
nAdjusting the screen quality
l
Screen brightness
Press the on-screen button to brighten the screen, or to darken.
l Screen contrast
Press the on-screen button to increase contrast, to decrease.
Note
lSelect the on-screen button to restore the adjustment values to the default settings.lThe screen changes to SETTINGS when the on-screen button is selected.
nTurning off the display
Select the on-screen button to turn off the display.
Press the MAP or MENU button to turn on the display.
Press the RETURN button to return to the display previously shown.
nTilt display operation
Select the on-screen button to tilt the display, to close it.
The display angle can be adjusted in three stages.
When opening, the display angle changes one stage at a time each time the on-
screen button is pressed.
When closing, the display angle changes one stage at a time each time the on-screen
button is pressed.
nDaytime/Night screen
When the headlights are on, daytime mode can also be selected (if a brighter screen is
needed at night). This selection can only be done when the headlights are on.
l The screen can be returned to the daytime screen while the headlights or running lights are
on by rotating the dashboard illumination knob clockwise fully. You will hear a beep sound
and the illumination dimmer will be canceled.
Screen adjustments, beep alert and other settings
�)�9�C�2�%�:�-�C�)�2���F�S�S�O�����4�E�K�I�����������8�Y�I�W�H�E�]�����%�T�V�M�P���������������������������������4�1
Page 27 of 124
 27
Getting started
Press the disp button (DISP) followed by the on-screen button to display the
settings menu.
nReturning to the navigation screen from the audio unit screen
l Select the on-screen")
27
Getting started
Press the disp button (DISP) followed by the on-screen button to display the
settings menu.
nReturning to the navigation screen from the audio unit screen
l Select the on-screen button to set the function to return to the navigation screen
from the audio unit screen by operation of the button only.
l Select the on-screen button to set the function to return to the navigation screen
from the audio unit screen automatically after 20 seconds.
nBeep sound settings
lSelect the on-screen button to activate the operation beep sound.
l Select the on-screen button to deactivate the operation beep sound.
nWelcome sound settings
The welcome mode is a feature providing a presentation of audio illumination and sound
effects when the ignition is turned on. The mode can be set on or off.
lSelect the on-screen button to activate the operation welcome sound.
l Select the on-screen button to deactivate the operation welcome sound.
�)�9�C�2�%�:�-�C�)�2���F�S�S�O�����4�E�K�I�����������8�L�Y�V�W�H�E�]�����%�T�V�M�P���������������������������������4�1
Page 28 of 124
 28
RoutingAddress
Book
Getting started
Screen change
nDo not keep your eyes fixed on the monitor screen or operate the system
while driving
Do not change the settings and destination locations while")
28
RoutingAddress
Book
Getting started
Screen change
nDo not keep your eyes fixed on the monitor screen or operate the system
while driving
Do not change the settings and destination locations while driving. Minimize the time
spent viewing the monitor screen and listening to the voice guidance while driving.
Operating the system will distract the driver from looking ahead of the vehicle and may
cause an accident. Always stop the vehicle in a safe location and use the parking brake
before operating the system.
Map
orientation
Map scale
Warning
1
Select , on-
screen button.lNorth Up: Geographic north is up.
lHead Up: The direction you are
heading is up.
1
Select or on-screen
button.
lThe map can be displayed in
14 steps with scales from
to . l
ZOOM OUT
lZOOM IN
(more detail.)
Imperial
display1/32 mi
(mile) 1/4 mi
(mile) 2 mi
(mile) 16 mi
(mile) 128 mi
(mile)
Metric
display50 m 500 m 4 km 32 km 256 km
�)�9�C�2�%�:�-�C�)�2���F�S�S�O�����4�E�K�I�����������8�L�Y�V�W�H�E�]�����%�T�V�M�P���������������������������������4�1
Page 29 of 124
29
Getting started
MEMO
�)�9�C�2�%�:�-�C�)�2���F�S�S�O�����4�E�K�I�����������8�L�Y�V�W�H�E�]�����%�T�V�M�P���������������������������������4�1
Page 30 of 124
30
Before
UseGetting
started
Routing
Destination Entry and Route Search
l
You can set the destination using various methods provided by the system.
Before Steps select
Change
(Change
Search Area)
MENU
Open the
[DESTINATION
ENTRY] Menu
Select
�)�9�C�2�%�:�-�C�)�2���F�S�S�O�����4�E�K�I�����������8�L�Y�V�W�H�E�]�����%�T�V�M�P���������������������������������4�1
Page 31 of 124
 31
Before
UseGetting
started
Routing
lFor Character Entry, please refer to page 39.
lDo not keep your eyes fixed on the monitor screen or operate the system while driving.Do not change the settings a")
31
Before
UseGetting
started
Routing
lFor Character Entry, please refer to page 39.
lDo not keep your eyes fixed on the monitor screen or operate the system while driving.Do not change the settings and destination locations while driving. Minimize the time spent
viewing the monitor screen and listening to the voice guidance while driving. Operating the system
will distract the driver from looking ahead of the vehicle and may cause an accident. Always stop
the vehicle in a safe location before operating the system.
lRoute searches with the navigation system can include roads that you cannot drive on and roads that you
are prohibited from driving on due to traffic regulations. Please comply with the traffic regulations.
Warnings
Select the desired Search Area
: ALABAMA
: ARIZONA
: ARKANSAS
: CALIFORNIA
: COLORADO
: CONNECTICUT
: DELAWARE
: FLORIDA
: GEORGIA
: IDAHO
: ILLINOIS
: INDIANA
: IOWA
: KANSAS
: KENTUCKY
: LOUISIANA
: MAINE
: MARYLAND
:
MASSACHUSETTS : MICHIGAN
: MINNESOTA
: MISSISSIPPI
: MISSOURI : MONTANA
: NEBRASKA
: NEVADA
: NEW HAMPSHIRE : NEW JERSEY
: NEW MEXICO
: NEW YORK
:
NORTH CAROLINA : NORTH DAKOTA
: OHIO
: OKLAHOMA
: OREGON
: PENNSYLVANIA
: RHODE ISLAND
:
SOUTH CAROLINA : SOUTH DAKOTA
: TENNESSEE
: TEXAS
: UTAH
: VERMONT
: VIRGINIA
: WASHINGTON
: WEST VIRGINIA : WISCONSIN
: WYOMING
:
WASHINGTON, D.C. : ALBERTA
: ONTARIO
: QUEBEC
:
SASKATCHEWAN : NEWFOUNDLAND
AND LABRADOR
: NEW BRUNSWICK : NOVA SCOTIA
: NUNAVUT
:
BRITISH COLUMBIA : PRINCE EDWARD ISLAND : MANITOBA
: NORTHWEST TERRITORIES : YUKON
: ALASKA
: HAWAII
: PUERTO RICO
: VIRGIN ISLANDS
OF THE U.S
The information for these countries and regions is recorded on a separate media.
ALAZARCACOCTDE
GAIDILINIAKSKYLAMEMDMAMIMNMSMO
MTNENVNHNJNMNYNCNDOHOKORPARISCSDTNTXUTVTVAWAWV
WIWYDCABONQCSK
NBNSNUBCPEMBNTYTAKHIPRVI
�)�9�C�2�%�:�-�C�)�2���F�S�S�O�����4�E�K�I�����������8�L�Y�V�W�H�E�]�����%�T�V�M�P���������������������������������4�1
Page 32 of 124
32
Before
UseGetting
started
Routing
Destination Entry and Route Search
Address
Open the
[DESTINATION
ENTRY] Menu SelectWhen narrowing
down to city name
Select
:
Cancel the citselection.
:
Displays list of
city name
s
nearest the currposition.
:
Displays the cname input
screen.
When narrowing
down to street name
Select
Enter the strename and
select
When narrowing
down to house no.
Select
Enter the
house no. an
select
�)�9�C�2�%�:�-�C�)�2���F�S�S�O�����4�E�K�I�����������8�L�Y�V�W�H�E�]�����%�T�V�M�P���������������������������������4�1
 1
1 2
2 3
3 4
4 5
5 6
6 7
7 8
8 9
9 10
10 11
11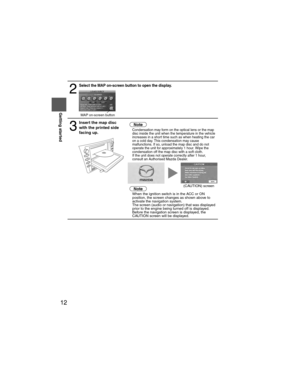 12
12 13
13 14
14 15
15 16
16 17
17 18
18 19
19 20
20 21
21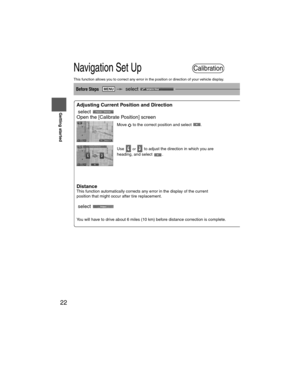 22
22 23
23 24
24 25
25 26
26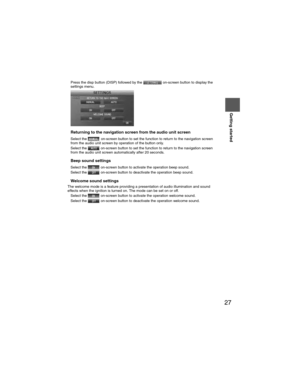 27
27 28
28 29
29 30
30 31
31 32
32 33
33 34
34 35
35 36
36 37
37 38
38 39
39 40
40 41
41 42
42 43
43 44
44 45
45 46
46 47
47 48
48 49
49 50
50 51
51 52
52 53
53 54
54 55
55 56
56 57
57 58
58 59
59 60
60 61
61 62
62 63
63 64
64 65
65 66
66 67
67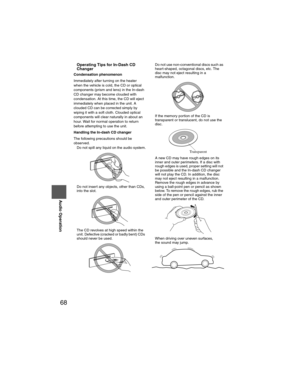 68
68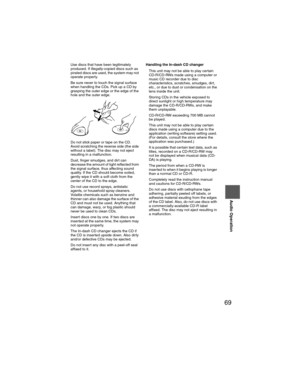 69
69 70
70 71
71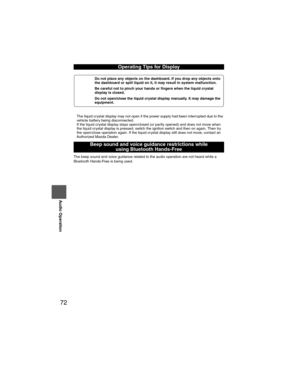 72
72 73
73 74
74 75
75 76
76 77
77 78
78 79
79 80
80 81
81 82
82 83
83 84
84 85
85 86
86 87
87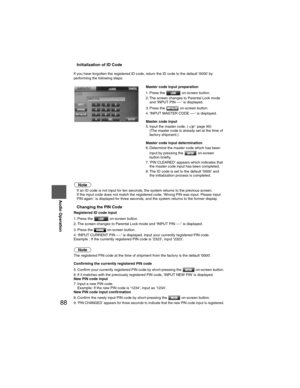 88
88 89
89 90
90 91
91 92
92 93
93 94
94 95
95 96
96 97
97 98
98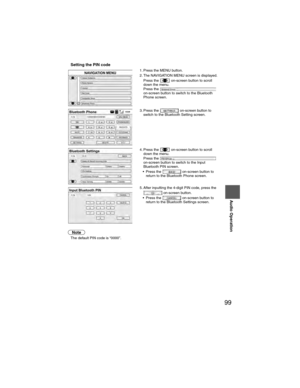 99
99 100
100 101
101 102
102 103
103 104
104 105
105 106
106 107
107 108
108 109
109 110
110 111
111 112
112 113
113 114
114 115
115 116
116 117
117 118
118 119
119 120
120 121
121 122
122 123
123
 30
Before
UseGetting
started
Routing
Destination Entry and Route Search
l
You can set the destination using various methods provided by the system.
Before Steps select
Change
(Change
Search Are")
![MAZDA MODEL 6 2009 Navigation Manual (in English) 32
Before
UseGetting
started
Routing
Destination Entry and Route Search
Address
Open the
[DESTINATION
ENTRY] Menu SelectWhen narrowing
down to city name
Select
:
Cancel the citselection.
:
Display](/manual-img/28/13573/w960_13573-31.png "MAZDA MODEL 6 2009 Navigation Manual (in English) 32
Before
UseGetting
started
Routing
Destination Entry and Route Search
Address
Open the
[DESTINATION
ENTRY] Menu SelectWhen narrowing
down to city name
Select
:
Cancel the citselection.
:
Display")