Page 97 of 124
 97
Audio Operation
Note
lIf “Not supported” is displayed on the Bluetooth Device Setting screen, the device is not
supported for use with a Hands-free mobile phone or Bluetooth audio device.
l I")
97
Audio Operation
Note
lIf “Not supported” is displayed on the Bluetooth Device Setting screen, the device is not
supported for use with a Hands-free mobile phone or Bluetooth audio device.
l If “Disconnected” is displayed on the Bluetooth Device Setting screen, the device is
supported for use with a Hands-free mobile phone or Bluetooth audio device, but cannot be
used because it is not connected. If the on-screen button is pressed, the device
is connected and becomes enabled.
l If “Connected” is displayed, the device is supported for use with a Hands-free mobile phone
or Bluetooth audio device, and is currently being enabled.
nHow to use the Bluetooth Audio system
Switching to Bluetooth audio modeTo listen music or voice audio recorded to a Bluetooth audio device, switch to the Bluetooth audio
mode to operate the audio device using the audio system or navigation system control panels.
Any Bluetooth audio device must be programmed to the vehicle’s Bluetooth unit before it can
be used. Refer to “Bluetooth audio device programming”. ( page 92)
Note
lIf playback is not possible, press the on-screen button after checking the Bluetooth
device settings.
l If the mode is switched from Bluetooth audio mode to another mode (radio mode), audio
playback from the Bluetooth audio device stops.
l If a call is received on a hands-free mobile phone during playback from the Bluetooth audio
device, the playback is stopped. Playback from the Bluetooth audio device resumes after
the call ends.
Playback 1. Press the SOURCE button.
2. Press the on-screen button.
3. The audio recorded to the Bluetooth audio
device begins playback.
1. Press the SOURCE button.
2. To listen to a Bluetooth audio device over the vehicle’s speaker system, switch the mode to
Bluetooth audio mode. ( page 97)
�)�9�C�2�%�:�-�C�)�2���F�S�S�O�����4�E�K�I�����������8�L�Y�V�W�H�E�]�����%�T�V�M�P���������������������������������4�1
Page 98 of 124
 98
Before
UseGetting
started
RoutingAddress
Book
Voice Recognition
Navigation
Set Up
RDM-TMC
Audio Operation
Navigation
Set Up
nSetting the PasscodeThe system cannot be activated unless the previo")
98
Before
UseGetting
started
RoutingAddress
Book
Voice Recognition
Navigation
Set Up
RDM-TMC
Audio Operation
Navigation
Set Up
nSetting the PasscodeThe system cannot be activated unless the previously set passcode is inp\
ut.
Note
l
If the Passcode on-screen button is pressed while Passcode has been
enabled, Passcode is disabled. 3. To stop playback, press the on-screen
button.
Press the button again to resume playback.
1. Press the MENU button.
2. The NAVIGATION MENU screen is displayed. Press the on-screen button to scroll
down the menu.
Press the
on-screen button to switch to the Bluetooth
Phone screen.
3. Press the on-screen button to switch to the Bluetooth Setting screen.
4. Press the on-screen button to scroll down the menu.
Press the Passcode on-screen
button to switch to the Input Bluetooth
Passcode screen.
• Press the on-screen button to return to the Bluetooth Phone screen.
5. After inputting the 4-digit passcode, press the on-screen button.
• Press the on-screen button to return to the Bluetooth Setting screen.
�)�9�C�2�%�:�-�C�)�2���F�S�S�O�����4�E�K�I�����������*�V�M�H�E�]�����%�T�V�M�P���������������������������������4�1
Page 99 of 124
99
Audio Operation
nSetting the PIN code
Note
lThe default PIN code is “0000”. 1. Press the MENU button.
2. The NAVIGATION MENU screen is displayed.
Press the on-screen button to scroll
down the menu.
Press the
on-screen button to switch to the Bluetooth
Phone screen.
3. Press the on-screen button to switch to the Bluetooth Setting screen.
4. Press the on-screen button to scroll down the menu.
Press the
on-screen button to switch to the Input
Bluetooth PIN screen.
• Press the on-screen button to return to the Bluetooth Phone screen.
5. After inputting the 4-digit PIN code, press the on-screen button.
• Press the on-screen button to return to the Bluetooth Settings screen.
�)�9�C�2�%�:�-�C�)�2���F�S�S�O�����4�E�K�I�����������*�V�M�H�E�]�����%�T�V�M�P���������������������������������4�1
Page 100 of 124
 100
Before
UseGetting
started
RoutingAddress
Book
Vo i c e Recognition
Navigation
Set Up
RDM-TMC
Audio Operation
Navigation
Set Up
nInserting the CDThe display must be open (lowered) to insert th")
100
Before
UseGetting
started
RoutingAddress
Book
Vo i c e Recognition
Navigation
Set Up
RDM-TMC
Audio Operation
Navigation
Set Up
nInserting the CDThe display must be open (lowered) to insert the CD.The CD must be label-side up when inserting. The auto-loading mechanism will set the CD and begin
play. There will be a short lapse before play begins while the player reads the digital signals on the CD.
Note"IN" is displayed on the tray number for a CD that is inserted.
nDuring CD playbackThe disc title, the track title, and the artist name will be displayed.
nDuring MP3 CD playbackThe album title, the track title, the folder name, the file number, and the artist name will be displayed.
NoteThe CD will begin playback automatically after insertion. A CD cannot be inserted while the display reads "WAIT".
Operating the In-Dash CD Changer
LOAD /
PUSHPOWERPUSHAUDIO
VOL
SOURCE
SCAN
SEEK
TRACK
MAP
DISP
MENU
VOICE RETURN
TUNE
Disc on-screen button
Track down button Scan button
Track up button
Folder search on-screen button
on-screen button
RPTon-screen buttonRDM on-screen buttonSCAN
�)�9�C�2�%�:�-�C�)�2���F�S�S�O�����4�E�K�I�������������8�L�Y�V�W�H�E�]�����%�T�V�M�P���������������������������������4�1
Page 101 of 124
 101
Audio Operation
nNormal insertion
1.Press the LOAD/ button.
2.Press the on-screen button lightly.The display opens and \"WAIT\" is displayed.
3.Lightly insert the CD after \"IN\" is displayed. The")
101
Audio Operation
nNormal insertion
1.Press the LOAD/ button.
2.Press the on-screen button lightly.The display opens and "WAIT" is displayed.
3.Lightly insert the CD after "IN" is displayed. The CD will be inserted and played automatically after the display is closed.
Note
lA CD cannot be inserted while "WAIT" is displayed. Wait until "IN" is displayed.
l The CD loading operation cancels 15 seconds after "IN" is displayed or if the LOAD/
button is pressed again.
nInserting CDs into desired tray number
1.Press the LOAD/ button.
2.Press the desired tray number on-screen button, then press the on-screen
button lightly.
The display opens and "WAIT" is displayed.
Note
lSelecting the tray number on-screen button twice cancels the indicated tray.
l The CD loading operation cancels if no button is pressed for about 30 seconds after the
desired tray number is pressed, or if the LOAD/ button is pressed again.
3.Lightly insert the CD after "IN" is displayed. The CD will be inserted and played automatically after the display is closed
Note
lThe CD loading operation cancels 15 seconds after the on-screen button is
pressed or the LOAD/ button is pressed again.
l The CD cannot be inserted to the desired tray number if it is already occupied.
nMultiple insertion
1.Press the LOAD/ button.
2.Press the on-screen button for 1.5 seconds or more.
The display opens and "WAIT" is displayed.
3.Lightly insert the CD after "IN" is displayed.
4.When "IN" is displayed again, insert the next CD. Repeat this procedure for the number of CDs to be inserted (maximum of 6 including the
CD in the tray).
The CD will begin playback automatically after insertion and the display closes.
Note
lThe CD loading operation cancels 15 seconds after "IN" is displayed, or the LOAD/
button is pressed again.
l Multiple discs can be loaded in succession by pressing the on-screen button for each
CD you want to load, and then pressing the on-screen button.
�)�9�C�2�%�:�-�C�)�2���F�S�S�O�����4�E�K�I�������������8�L�Y�V�W�H�E�]�����%�T�V�M�P���������������������������������4�1
Page 102 of 124
 102
Before
UseGetting
started
RoutingAddress
Book
Vo i c e Recognition
Navigation
Set Up
RDM-TMC
Audio Operation
Navigation
Set Up
nNormal ejection
1.Press the LOAD/ button.
2.Press the on-scr")
102
Before
UseGetting
started
RoutingAddress
Book
Vo i c e Recognition
Navigation
Set Up
RDM-TMC
Audio Operation
Navigation
Set Up
nNormal ejection
1.Press the LOAD/ button.
2.Press the on-screen button lightly.
3.The CD ejects after the display is opened and the desired tray number flashes.
4.The display closes automatically after the ejection is fully completed.
Note
If the CD is not removed from the slot within 15 seconds, it will be re-inserted. When this
happens, or if the LOAD/ button is pressed again, the CD ejecting operation will be can-
celed.
nEjecting CDs from desired tray number
1.Press the LOAD/ button.
2.Press the desired CD tray number, then press
on-screen button lightly.
Note
The CD ejecting operation cancels if the on-screen button is not pressed for
about 30 seconds after the desired tray number is pressed, or if the LOAD/ button is
pressed again.
3.The CD will be ejected automatically after the display is opened and the desired tray number flashes.
Note
lIf only one CD is inserted in the tray, the display opens and the CD is ejected without
pressing on-screen button.
l If the CD is not removed from the slot within 15 seconds or if the LOAD/ button is
pressed, the CD ejecting operation will be canceled.
4.The display closes after the CD is ejected.
nMultiple ejection
1.Press the LOAD/ button.
2.Press the on-screen button for 1.5 seconds or more.
The CD ejects after the display is opened and the desired tray number flashes.
3.Pull out the CD.
4.The next CD will be ejected automatically. This operation repeats until all the CDs are taken out.
Note
lIf the CD is not removed from the slot within 15 seconds or if the LOAD/ button is
pressed, the CD ejecting operation will be canceled.
l Multiple discs can be ejected in succession by pressing the on-screen button for each
CD you want to eject, and then pressing the on-screen button.
�)�9�C�2�%�:�-�C�)�2���F�S�S�O�����4�E�K�I�������������8�L�Y�V�W�H�E�]�����%�T�V�M�P���������������������������������4�1
Page 103 of 124
 103
Audio Operation
nPlaying
1.Press the SOURCE button.
2.Select the on -screen button.
3.Select the tray number on-screen button for the CD you want to play.
The song information will be displayed")
103
Audio Operation
nPlaying
1.Press the SOURCE button.
2.Select the on -screen button.
3.Select the tray number on-screen button for the CD you want to play.
The song information will be displayed during playback.
Note
Press the tune audio dial if the following screen is not displayed.
Music CD
MP3 CD
Note
l"-------" will be displayed for files without a file, track or other name input.
l This unit can read English (including numerals) one-byte characters.
l The displayable number of characters on each title is a maximum of 64.
(Music CDs)
l Although textual information (Track/artist information) recorded to each track appears in the
display, textual information (Album/artist information) recorded for the entire CD does not
appear in the display.
For details, refer to "CD-TEXT". ( page 71)
Select the on-screen button if the whole title cannot be displayed at one time. The
screen changes to display the rest of the characters.
�)�9�C�2�%�:�-�C�)�2���F�S�S�O�����4�E�K�I�������������8�L�Y�V�W�H�E�]�����%�T�V�M�P���������������������������������4�1
Page 104 of 124
 104
Before
UseGetting
started
RoutingAddress
Book
Vo i c e Recognition
Navigation
Set Up
RDM-TMC
Audio Operation
Navigation
Set Up
nFast-forward/Reverse
Press the SEEK/TRACK up button ( ) to adva")
104
Before
UseGetting
started
RoutingAddress
Book
Vo i c e Recognition
Navigation
Set Up
RDM-TMC
Audio Operation
Navigation
Set Up
nFast-forward/Reverse
Press the SEEK/TRACK up button ( ) to advance through a track at high speed until a
beep sound is heard.
Press the SEEK/TRACK down button ( ) to reverse through a track at high speed until a
beep sound is heard.
nTrack search
Press the SEEK/TRACK up button ( ) once to skip forward to the beginning of the next
track.
Press the SEEK/TRACK down button ( ) once to skip back to the beginning of the current
track.
Press the SEEK/TRACK down button ( ) during track search to skip back to the beginning
of the previous track.
nDisc search
To change the disc, press any DISC on-screen button during playback.
nFolder search (during MP3 CD playback)
To change to the previous folder, select the on-screen button, or select the on-screen
button to advance to the next folder.
nMusic scan
This feature helps to find a program by playing about the first 10 seconds of each track.
Press the on-screen button or the SCAN button during play to start scan play operation
(the track number will flash).
Press the on-screen button or the SCAN button once again to cancel scan play.
Note
If the unit is left in scan, normal play will resume where scan was selected.
�)�9�C�2�%�:�-�C�)�2���F�S�S�O�����4�E�K�I�������������8�L�Y�V�W�H�E�]�����%�T�V�M�P���������������������������������4�1
 1
1 2
2 3
3 4
4 5
5 6
6 7
7 8
8 9
9 10
10 11
11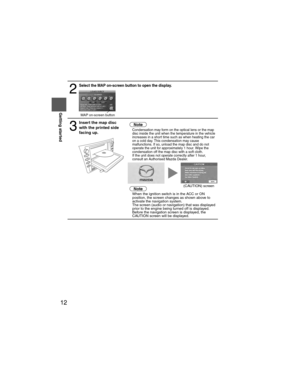 12
12 13
13 14
14 15
15 16
16 17
17 18
18 19
19 20
20 21
21 22
22 23
23 24
24 25
25 26
26 27
27 28
28 29
29 30
30 31
31 32
32 33
33 34
34 35
35 36
36 37
37 38
38 39
39 40
40 41
41 42
42 43
43 44
44 45
45 46
46 47
47 48
48 49
49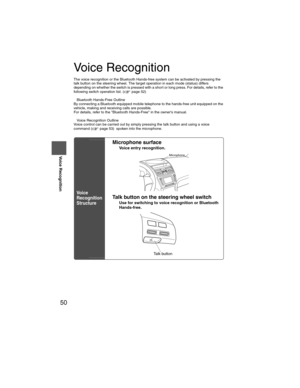 50
50 51
51 52
52 53
53 54
54 55
55 56
56 57
57 58
58 59
59 60
60 61
61 62
62 63
63 64
64 65
65 66
66 67
67 68
68 69
69 70
70 71
71 72
72 73
73 74
74 75
75 76
76 77
77 78
78 79
79 80
80 81
81 82
82 83
83 84
84 85
85 86
86 87
87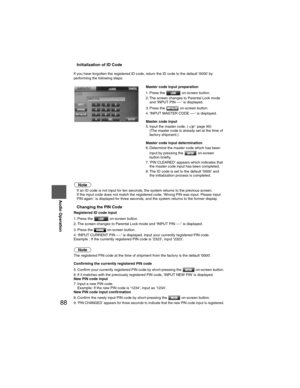 88
88 89
89 90
90 91
91 92
92 93
93 94
94 95
95 96
96 97
97 98
98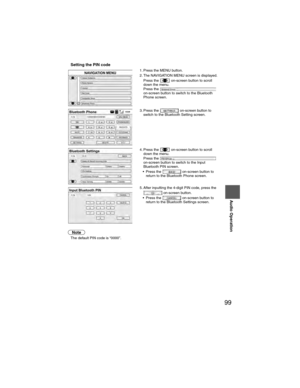 99
99 100
100 101
101 102
102 103
103 104
104 105
105 106
106 107
107 108
108 109
109 110
110 111
111 112
112 113
113 114
114 115
115 116
116 117
117 118
118 119
119 120
120 121
121 122
122 123
123 99
Audio Operation
nSetting the PIN code
Note
lThe default PIN code is “0000”. 1. Press the MENU button.
2. The NAVIGATION MENU screen is displayed.
Press the on-screen button to scroll
down t")