Page 73 of 124
 73
Audio Operation
nPower ON/OFF
Switch the ignition switch to the ACC or ON position.
Press the power/volume dial to turn the audio system on.
Press the power/volume dial again to turn the audio syst")
73
Audio Operation
nPower ON/OFF
Switch the ignition switch to the ACC or ON position.
Press the power/volume dial to turn the audio system on.
Press the power/volume dial again to turn the audio system off.
Note
To prevent the battery from being discharged, do not leave the audio system on for a long
period of time when the engine is not running.
nVolume adjustment
To adjust the volume, turn the power/volume dial.
Turn the power/volume dial to the right to increase volume, to the left to decrease it.
nAudio sound adjustment
1.Press the SOURCE button.
2.Select the desired on-screen button corresponding to one of the following modes.• on-screen button : Audio mode (AM band)
• on-screen button : Audio mode (FM band)
• on-screen button : Satellite radio
• on-screen button : CD mode
• , on-screen button : Image and Sound playback is possible using a portable video player connected to an external input terminal.*
• on-screen button : iPod mode
• on-screen button : BT-Audio mode
Power/Volume/Sound Controls
LOAD /
PUSHPOWERPUSHAUDIO
VOL
SOURCE
SCAN
SEEK
TRACK
MAP
DISP
MENU
VOICE RETURN
TUNE
Power / Volume dial
�)�9�C�2�%�:�-�C�)�2���F�S�S�O�����4�E�K�I�����������8�L�Y�V�W�H�E�]�����%�T�V�M�P���������������������������������4�1
Page 74 of 124
 74
Before
UseGetting
started
RoutingAddress
Book
Vo i c e Recognition
Navigation
Set Up
RDM-TMC
Audio Operation
Navigation
Set Up
*The external input terminal is not equipped on your vehicle beca")
74
Before
UseGetting
started
RoutingAddress
Book
Vo i c e Recognition
Navigation
Set Up
RDM-TMC
Audio Operation
Navigation
Set Up
*The external input terminal is not equipped on your vehicle because it is not standard
equipment.
3.Press the TUNE AUDIO dial to display the sound adjustment screen.
4.Select the on -screen button to display the sound adjustment screen.
nSound quality adjustment
TREB (treble sound)
Select the on-screen button to increase treble, and to decrease.
BASS (low pitch sound)
Select the on-screen button to increase bass, and to decrease.
nVolume balance adjustment
Front/back volume balance
Select the on-screen button to increase the volume at the front, and on-screen
button to increase the volume to the back.
Left/right volume balance
Select the on-screen button to increase the volume to the right, and on-screen button
to increase the volume to the left.
Note
l Pressing an on-screen adjustment button for 0.5 seconds or more progressively changes
the adjustment range towards +/–, up/down, or left/right.
l While an adjustment button is selected in this manner, the level indicator will momentarily
stop at the medium range position and a beep sound will be heard before proceeding.
l Select the on-screen button to reset bass, treble, and balance.
l To return to the previous screen, select the on-screen button.
�)�9�C�2�%�:�-�C�)�2���F�S�S�O�����4�E�K�I�����������8�L�Y�V�W�H�E�]�����%�T�V�M�P���������������������������������4�1
Page 75 of 124
 75
Audio Operation
nAudioPilot®
AudioPilot automatically adjusts audio volume and sound quality in accordance with the level
of noise entering the vehicle interior while driving. When AudioPilot is")
75
Audio Operation
nAudioPilot®
AudioPilot automatically adjusts audio volume and sound quality in accordance with the level
of noise entering the vehicle interior while driving. When AudioPilot is turned ON, the system
automatically calculates the conditions for optimum hearing of sound which may be difficult to
hear depending on exterior noise.
Each time the on-screen button is selected, the Audio Pilot turns on and off.
on-screen button is highlighted when on-screen button is ON, and not
highlighted when OFF.
AudioPilot
® is a registered trademark of Bose Corporation.
nCenterpoint®
Centerpoint offers you the experience of 5.1 channel surround sound in your vehicle even
with your conventional 2 channel sound.
Each time the on-screen button is selected, the Centerpoint turns on and off.
on-screen button is highlighted when on-screen button is ON, and not
highlighted when OFF.
If any source invalid with on-screen button is selected, on-screen button
is displayed in gray and cannot be switched.
Note
l Centerpoint does not work with AM/FM/SIRIUS/AUX1.
l Centerpoint operates only with a 2-channel stereo CD. Poor sound quality in the audio
signal playback could result from playing highly compressed audio such as MP3 with
Centerpoint operating.
Centerpoint
® is a registered trademark of Bose Corporation.
�)�9�C�2�%�:�-�C�)�2���F�S�S�O�����4�E�K�I�����������8�L�Y�V�W�H�E�]�����%�T�V�M�P���������������������������������4�1
Page 76 of 124
 76
Before
UseGetting
started
RoutingAddress
Book
Vo i c e Recognition
Navigation
Set Up
RDM-TMC
Audio Operation
Navigation
Set Up
nRadio ON
1.Press the SOURCE button.
2.Select the or on-scree")
76
Before
UseGetting
started
RoutingAddress
Book
Vo i c e Recognition
Navigation
Set Up
RDM-TMC
Audio Operation
Navigation
Set Up
nRadio ON
1.Press the SOURCE button.
2.Select the or on-screen button to turn the radio on.
nBand selection
Choose AM by pressing the on-screen button and FM by pressing the on-screen
button.
The selected mode will be indicated. If FM stereo is being received, STEREO will be
displayed.
nTu n i n g
The radio has the following tuning methods: Manual, Seek, Scan, Preset channel, and Auto
memory tuning. The easiest way to tune stations is to set them on preset channels.
Note
l
If the FM broadcast signal becomes weak, reception automatically changes from STEREO
to MONO for reduced noise, and the STEREO indicator will go out.
l To clear the information, press the MAP button.
l If the power supply is interrupted (fuse blows or the battery is disconnected), the preset
channels will be canceled.
nManual tuning
Turning the TUNE AUDIO dial will change the frequency higher or lower.
nSeek tuning
Pressing and holding the SEEK/TRACK button ( , ) will cause the tuner to seek a
higher or lower frequency automatically.
Operating the Radio
LOAD /
PUSHPOWERPUSHAUDIO
VOL
SOURCE
SCAN
SEEK
TRACK
MAP
DISP
MENU
VOICE RETURN
TUNE
Channel preset on-screen button
Scan button
Source buttonTune audio dial
AUTO-M on-screen button
�)�9�C�2�%�:�-�C�)�2���F�S�S�O�����4�E�K�I�����������8�L�Y�V�W�H�E�]�����%�T�V�M�P���������������������������������4�1
Page 77 of 124
 77
Audio Operation
Note
If you continue to press and hold the button, the frequency will continue changing without
stopping.
nScan tuning
Press the SCAN button to automatically sample strong stations")
77
Audio Operation
Note
If you continue to press and hold the button, the frequency will continue changing without
stopping.
nScan tuning
Press the SCAN button to automatically sample strong stations.
Scanning stops at each station for about 5 seconds. To hold a station, press the SCAN
button again during this interval.
nPreset channel tuning
The 8 preset channels can be used to store 8 AM and 16 FM stations.
1.To set a channel first select AM, FM1, or FM2. Tune to the desired station.
2.Press the TUNE AUDIO dial.
3.Select any channel preset on-screen button for about 2 seconds until a beep sound is heard. The selected preset channel number and station frequency will be displayed. The
station is now held in the memory.
4.Repeat this operation for the other stations and bands you want to store. To tune one in the memory, select AM, FM1, or FM2 and then press its channel preset button. The station
frequency and the channel number will be displayed.
Note
If the power supply is interrupted (fuse blows or the battery is disconnected), the preset
channels will be canceled.
nAuto memory tuning
This is especially useful when driving in an area where the local stations are not known. Addi-
tional AM stations can be stored without disturbing the previously set channels.
Select and hold the on-screen button for about 2 seconds until a beep sound is heard;
the system will automatically scan and temporarily store up to 8 stations with the strongest
frequencies in each selected band in that area.
nAudio Sound Adjustment
Refer to “Power/Volume/Sound Controls” ( page 73).
�)�9�C�2�%�:�-�C�)�2���F�S�S�O�����4�E�K�I�����������8�L�Y�V�W�H�E�]�����%�T�V�M�P���������������������������������4�1
Page 78 of 124
 78
Before
UseGetting
started
RoutingAddress
Book
Vo i c e Recognition
Navigation
Set Up
RDM-TMC
Audio Operation
Navigation
Set Up
nSatellite Radio (SAT)
Vehicles equipped with the separately purc")
78
Before
UseGetting
started
RoutingAddress
Book
Vo i c e Recognition
Navigation
Set Up
RDM-TMC
Audio Operation
Navigation
Set Up
nSatellite Radio (SAT)
Vehicles equipped with the separately purchased SIRIUS digital satellite radio unit have the
ability to receive channels of digital quality programming coast to coast via satellite. For infor-
mation on use, read the Satellite Radio Kit manual accompanying the SIRIUS digital satellite
radio unit. A subscription to SIRIUS digital satellite radio service is required (available in the
U.S. - Except Alaska and Hawaii) to enable this feature once the separately purchased SIR-
IUS digital satellite radio unit has been installed. For subscription and channel information, or
for digital satellite radio technical issues, contact SIRIUS directly at:
-Web: www.siriusradio.com
-Phone (24 hrs/day, 7 days/week): 888-539-SIRI (7474)
-E-mail: [email protected]
-Mailing Address: Sirius Satellite Radio
1221 Avenue Of The Americas
New York, NY 10020
Attention: Customer Care
Include your Sirius Radio ESN (Electronic Serial Number) when subscribing or requesting
technical assistance. See the Satellite Radio Kit manual accompanying the SIRIUS unit for
complete satellite radio activation procedures and information on how to display the ESN#.
�)�9�C�2�%�:�-�C�)�2���F�S�S�O�����4�E�K�I�����������8�L�Y�V�W�H�E�]�����%�T�V�M�P���������������������������������4�1
Page 79 of 124
 79
Audio Operation
Used on vehicles equipped with the DLP* unit.
* DLP: Down Link Processor (SATELLITE RADIO Module)
nWhat is satellite radio?
Sirius is radio the way it was meant to be: Up to 100 new")
79
Audio Operation
Used on vehicles equipped with the DLP* unit.
* DLP: Down Link Processor (SATELLITE RADIO Module)
nWhat is satellite radio?
Sirius is radio the way it was meant to be: Up to 100 new channels of digital quality
programming delivered to listeners coast to coast via satellite. That means 50 channels of
completely commercial-free music. Plus up to 50 more channels of news, sports, and
entertainment from names like CNBC, Discovery, SCI-FI Channel, A&E, House of Blues, E!,
NPR, Speed vision and ESPN.
Sirius is live, dynamic entertainment, completely focused on listeners. Every minute of every
day of every week will be different. All 50 commercial-free music channels are created in-
house and hosted by DJs who know and love the music. Do you like Reggae? How about
Classic Rock or New Rock? Sirius has an array of choices spanning a vast range of musical
tastes including the hits of the 50's, 60's, 70's, & 80's as well as Jazz, Country, Blues, Pop,
Rap, R&B, Bluegrass, Alternative, Classical, Heavy Metal, Dance and many others.
From its state-of-the-art, digital broadcasting facility in Rockefeller Center, New York City,
Sirius will deliver the broadest, deepest mix of radio entertainment from coast to coast.
Sirius will bring you music and entertainment programming that is simply not available on
traditional radio in any market across the country. It's radio like you've never heard before.
Sign up for Sirius Radio today! For more information, visit siriusradio.com.
Satellite radio can be subscribed to and received in the United States. (Except Alaska,
Hawaii, and Canada.)
Operating the Satellite Radio
LOAD /
PUSHPOWERPUSHAUDIO
VOL
SOURCE
SCAN
SEEK
TRACK
MAP
DISP
MENU
VOICE RETURN
TUNE
Scan button
Source button
Tune audio dial
Track up button
Track down button
�)�9�C�2�%�:�-�C�)�2���F�S�S�O�����4�E�K�I�����������8�L�Y�V�W�H�E�]�����%�T�V�M�P���������������������������������4�1
Page 80 of 124
 80
Before
UseGetting
started
RoutingAddress
Book
Vo i c e Recognition
Navigation
Set Up
RDM-TMC
Audio Operation
Navigation
Set Up
nHow to subscribe to satellite radio
Once the system is installed")
80
Before
UseGetting
started
RoutingAddress
Book
Vo i c e Recognition
Navigation
Set Up
RDM-TMC
Audio Operation
Navigation
Set Up
nHow to subscribe to satellite radio
Once the system is installed you must first subscribe to the Sirius Radio service to activate
the system.
The Sirius Radio service uses an ID code to identify your radio. This code is needed to
subscribe to Sirius Radio, and if needed, is also used to report any problems should there be
any in the future. Listeners can subscribe using any of the following methods:
• Visiting SIRIUS on the web at www sirius.com
• Subscribing to Sirius customer care, available 24 hours a day, 7 days a week.
• Calling (888) 539-7474
• E-mail at: [email protected]
• Writing to: SIRIUS SATELLITE RADIO1221 Avenue of the Americas
New York, NY 10020
Attention: Customer Care
Customers should have their Sirius Radio ID Electronic Serial Number (ESN#) ready.
Note
Your ESN# should have been recorded at the time of installation. If not, refer to ‘Displaying
the SIRIUS ID (ESN)’ to retrieve your ESN#. ( page 87)
nSatellite Radio Activation
For activation and subscription information call toll-free at 1-888-539-SIRI (7474). A SIRIUS
Customer Care representative will take the necessary information and walk you through the
activation process. Or you can visit Sirius online at WWW.siriusradio.com and click on the
‘INSTALL & ACTIVATE’ button.
When you call the SIRIUS Customers Care number you have two options available.
(1) The full package which allows you access to all SIRIUS content except pay- per-view.
(2) The family package which allows access to certain channels. Please see the website: www.sirius.com for details.
Please have the following information ready when attempting to activate your service: • SIRIUS ID (ESN*)
• Valid credit card information (type, number, expiration date)
When you are ready to receive the on-air activation signals, you will be instructed (for
activation via phone) to turn on your tuner, have the antenna pointed skyward, and to set the
channel to channel 184.
Once the signal is sent from the national studio it may take up to 10 minutes to be received by
your unit.
*ESN: Electronic Serial Number.
Note
On-air activation is completed after the procedure, in most cases from 10 seconds to 10
minutes.
�)�9�C�2�%�:�-�C�)�2���F�S�S�O�����4�E�K�I�����������8�L�Y�V�W�H�E�]�����%�T�V�M�P���������������������������������4�1
 1
1 2
2 3
3 4
4 5
5 6
6 7
7 8
8 9
9 10
10 11
11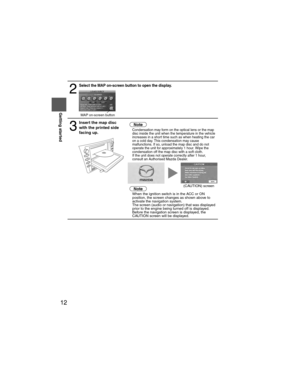 12
12 13
13 14
14 15
15 16
16 17
17 18
18 19
19 20
20 21
21 22
22 23
23 24
24 25
25 26
26 27
27 28
28 29
29 30
30 31
31 32
32 33
33 34
34 35
35 36
36 37
37 38
38 39
39 40
40 41
41 42
42 43
43 44
44 45
45 46
46 47
47 48
48 49
49 50
50 51
51 52
52 53
53 54
54 55
55 56
56 57
57 58
58 59
59 60
60 61
61 62
62 63
63 64
64 65
65 66
66 67
67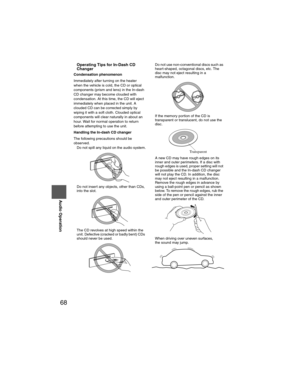 68
68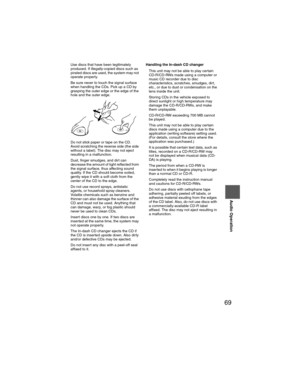 69
69 70
70 71
71 72
72 73
73 74
74 75
75 76
76 77
77 78
78 79
79 80
80 81
81 82
82 83
83 84
84 85
85 86
86 87
87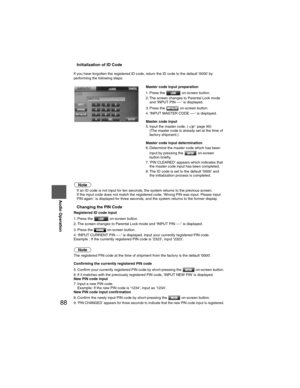 88
88 89
89 90
90 91
91 92
92 93
93 94
94 95
95 96
96 97
97 98
98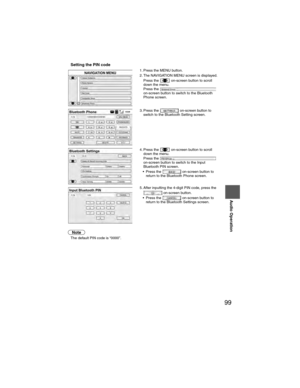 99
99 100
100 101
101 102
102 103
103 104
104 105
105 106
106 107
107 108
108 109
109 110
110 111
111 112
112 113
113 114
114 115
115 116
116 117
117 118
118 119
119 120
120 121
121 122
122 123
123