Page 81 of 124
81
Audio Operation
nSelecting Sirius Radio Mode
System initializing
When information on all channel maps is obtained and the system is ready, channel '184' is
received.
When switching to a source other than Sirius radio mode, the last active channel is stored and
will be the first channel accessed upon activating Sirius radio mode again.1. Press the SOURCE button.
2. Press the on-screen button
When the on-screen button is pressed, it
will play the last selected SIRIUS channel.
3. Each time the on-screen button is pressed, the satellite selection changes in the
order shown below.
It may take 30 to 120 seconds for the system to
start up while it is initializing or after the SIRIUS
channel map has been changed.
During start up, the following will be displayed.
‘UPDATING CHANNELS XX% COMPLETE’ or
‘UPDATING CHANNELS’ appears.
SIRIUS1 SIRIUS2 SIRIUS3
�)�9�C�2�%�:�-�C�)�2���F�S�S�O�����4�E�K�I�����������8�L�Y�V�W�H�E�]�����%�T�V�M�P���������������������������������4�1
Page 82 of 124
 82
Before
UseGetting
started
RoutingAddress
Book
Vo i c e Recognition
Navigation
Set Up
RDM-TMC
Audio Operation
Navigation
Set Up
nChannel Selection
Using the tune audio dial
Turn the tune audio")
82
Before
UseGetting
started
RoutingAddress
Book
Vo i c e Recognition
Navigation
Set Up
RDM-TMC
Audio Operation
Navigation
Set Up
nChannel Selection
Using the tune audio dial
Turn the tune audio dial to select the desired channel number.
l
Turn the knob clockwise to step-up the channel number.
l Turn the knob counterclockwise to step-down the channel number.
Using the track button
Press the track button with a short press to step-up (down) the channel.
When the TRACK button (UP or DOWN) is held pressed, the system will continue to step-up
(down) the channel until the button is released.
nScanning for Subscribed Channels
Press the SCAN button to begin searching through your subscribed channels.
When the system reaches a subscribed channel it plays the channel for 5 seconds before
going to the next subscribed channel. After reaching the subscribed channel with the highest
number, the search resumes from the subscribed channel with the lowest number and scans
forward.
Note
To search for channels in the category currently displayed, press the SCAN button when in
the category mode.
nUnsubscribed Channels
When a selected station has not been subscribed to, the system displays ‘UNSUBSCRIBED’.
Navigation system display: ‘CALL 888-539-SIRIUS TO SUBSCRIBE’ is displayed.
Information display: ‘CALL + 888’ and ‘539 + SIRI’ (Flashes alternately)
Note
When the subscription contract is canceled, all of the channels including channel 184, appear
as unsubscribed.
nInvalid Channels
When a selected channel is not broadcasting, the display indicates the following:
Navigation system display: ‘INVALID CHANNEL’ is displayed
Information display: ‘SR + (bank number) + INVALID’ and ‘SR + (bank number) + CHANNEL’ (Flashes alternately)
The display then returns to the previous valid channel.
Note
If the last channel selected has become unavailable because of a channel update, the above
indication is displayed until any button is pressed.
�)�9�C�2�%�:�-�C�)�2���F�S�S�O�����4�E�K�I�����������8�L�Y�V�W�H�E�]�����%�T�V�M�P���������������������������������4�1
Page 83 of 124
 83
Audio Operation
nPreset Channel Programming
1. Select the desired channel to be stored.
2. Hold down the channel preset on-screen button (1-6) for about 1.5 secondsYou will hear a beep sound to in")
83
Audio Operation
nPreset Channel Programming
1. Select the desired channel to be stored.
2. Hold down the channel preset on-screen button (1-6) for about 1.5 secondsYou will hear a beep sound to indicate that the channel has been stored.
3. The channel number for the channel preset on-screen button changes.
Note
Six stations can be stored in each of the SR banks 1, 2, and 3 for convenient access to your
favorite stations.
nPreset Channel Call-up
Press the channel preset on-screen button (1-6) for about 1.5 seconds.
Note
In the initial setting, all channels are preset to 184.
nCategory Mode On/Off
ON
(When doing a TUNE/SEEK within the selected category)
When the on-screen button is pressed, 'TUNE/SEEK WITHIN SELECTED
CATEGORY ONLY' appears for six seconds. ‘CATEGORY’ is displayed on the left side of the
channel number.
OFF
(When doing a TUNE/SEEK outside of the category mode)
While in category mode, press the on-screen button. (The on-screen button display
changes to .)
‘TUNE/SEEK AMONG ALL AVAILABLE SIRIUS CHANNELS.’ appears for 6 seconds, and
‘CATEGORY’ is no longer displayed.
Note
Pressing the channel preset on-screen button (1-6) during category mode will exit the
category mode and play the selected channel.
Channel preset on-screen b
�)�9�C�2�%�:�-�C�)�2���F�S�S�O�����4�E�K�I�����������8�L�Y�V�W�H�E�]�����%�T�V�M�P���������������������������������4�1
Page 84 of 124
 84
Before
UseGetting
started
RoutingAddress
Book
Vo i c e Recognition
Navigation
Set Up
RDM-TMC
Audio Operation
Navigation
Set Up
nCategory Change
Press the category select on-screen button ( or")
84
Before
UseGetting
started
RoutingAddress
Book
Vo i c e Recognition
Navigation
Set Up
RDM-TMC
Audio Operation
Navigation
Set Up
nCategory Change
Press the category select on-screen button ( or ) and select the desired category.
l
Press the button to scroll the categories upward.
l Press the : to scroll the categories downward.
The channel with the lowest number within the category indicated is received.
When the channel with the highest number within the category is reached, scrolling will
resume from the channel with the lowest number in the category.
nChannel Selection Within a Category
Pressing the TRACK button (UP or DOWN) moves the channel number up/down in the
present category.
When the channel preset on-screen button is pressed in the category mode
When a channel preset button (1-6) is pressed while in the 'CATEGORY ON' mode, the
service channel will be changed. When the button is pressed the mode switches to
‘CATEGORY OFF’ mode. (The same applies when pressing the on-screen button.)
Press the on-screen button
All the channels (programs) in the category are
displayed.
Press the on-screen button.
All the categories are displayed.
�)�9�C�2�%�:�-�C�)�2���F�S�S�O�����4�E�K�I�����������8�L�Y�V�W�H�E�]�����%�T�V�M�P���������������������������������4�1
Page 85 of 124
 85
Audio Operation
nChannel Number, Channel Name, Category, Artist, Song
Titles and Info Display
nProgramming Your Favorites into Memory
Press the on-screen button.
Channel name, song title, artist")
85
Audio Operation
nChannel Number, Channel Name, Category, Artist, Song
Titles and Info Display
nProgramming Your Favorites into Memory
Press the on-screen button.
Channel name, song title, artist name and INFO
are displayed.
Song title, Artist name, INFO display
• Press the on-screen button to display the last characters of the name.
To return to the display of the preset channels,
press the on-screen button.
1. Press the on-screen button.
2. ‘SELECT TITLE OR ARTIST’ or ‘SELECT TEAM’ is displayed, and the items to be
registered will appear below it.
3. When one of the items is selected from the list, ‘TITLE/ARTIST/TEAM STORED’ will be
displayed for three seconds, and the program
registration is completed.
• If program registration information is not included in the program during reception, the
MEMORY, TITLE, and ARTIST buttons remain
grayed out.
Memory contents confirmation and setting
1. When the on-screen button is pressed, ‘TITLE/ARTIST/TEAM MEMORY
LIST’ is displayed to confirm the program
registered in the memory.
• If there are four or more items registered, scroll up or down using the or on-
screen button to select the desired item.
• To delete an item, select it from the list and
press the on-screen button.
• Switch the SONG SEEK / on-screen buttons according to whether the seek alert
function is used.
�)�9�C�2�%�:�-�C�)�2���F�S�S�O�����4�E�K�I�����������8�L�Y�V�W�H�E�]�����%�T�V�M�P���������������������������������4�1
Page 86 of 124
 86
Before
UseGetting
started
RoutingAddress
Book
Vo i c e Recognition
Navigation
Set Up
RDM-TMC
Audio Operation
Navigation
Set Up
Note
l
Ten items can be registered in each of the three memory li")
86
Before
UseGetting
started
RoutingAddress
Book
Vo i c e Recognition
Navigation
Set Up
RDM-TMC
Audio Operation
Navigation
Set Up
Note
l
Ten items can be registered in each of the three memory lists (TITLE/ARTIST/TEAM). If ten
items are exceeded, 'TITLE/ARTIST/TEAM MEMORY FULL' is displayed and the
confirmation screen will appear to inform you that the chronologically oldest program is to
be overwritten.
l Ten different types of sports programs are available (NFL, NHL, NBA, MLB, Soccer, Auto
Racing, College Football, College Basketball, Other). Your favorite teams can be registered
in each.
nSeek Alert
This function informs you that the registered program goes on the air except when it has
already been received. (The above screen is displayed when the previously registered
program ID, artist ID, or sport ID is identified.)
If there are 4 or more items in the list (4 or more registered programs are on the air
simultaneously), the previous/next page is displayed by pressing the or on-screen
button.
If a program name is too long to be displayed in whole, the remaining part is displayed by
pressing the button.
When a desired program is selected from the list, the channel is changed to start the selected
program.
When you do not select from the list, press the on-screen button to return to its original
display.
�)�9�C�2�%�:�-�C�)�2���F�S�S�O�����4�E�K�I�����������8�L�Y�V�W�H�E�]�����%�T�V�M�P���������������������������������4�1
Page 87 of 124
 87
Audio Operation
nInstant Replay
This function allows you to rewind and replay the program that you were previously or are
currently listening to.
Note
The instant replay mode cannot be cancelled")
87
Audio Operation
nInstant Replay
This function allows you to rewind and replay the program that you were previously or are
currently listening to.
Note
The instant replay mode cannot be cancelled without pressing the on-screen button
even when the display of the song playback time returns to '0:00:00'.
nDisplaying the SIRIUS ID (ESN)
If the SIRIUS ID (ESN) has not been input
If 'ESN FAIL' is displayed, contact an Authorized Mazda Dealer.Press the on-screen button.
When the on-screen button is briefly
pressed (about 0.5 seconds), playback starts
from the beginning of the current program.
When the on-screen button is pressed
twice, playback starts from the beginning of the
previous program.
When the on-screen button is held
down, the program rewinds in 5 second intervals
while the button is being pressed.
When the on-screen button is briefly
pressed (about 0.5 seconds), playback starts
from the beginning of the next program.
When the on-screen button is held
down, the program is fast-forwarded in 5 second
intervals while the button is being pressed.
When the on-screen button is briefly
pressed, playback is temporarily stopped, or
playback starts if it has been temporarily
stopped.
When the on-screen button is pressed,
the instant replay mode is cancelled and returns
to the current program.
1. Press the on-screen button.
2. A 12-digit Electronic Serial Number (ESN) for
the SIRIUS tuner is displayed
Song pla
�)�9�C�2�%�:�-�C�)�2���F�S�S�O�����4�E�K�I�����������8�L�Y�V�W�H�E�]�����%�T�V�M�P���������������������������������4�1
Page 88 of 124
 88
Before
UseGetting
started
RoutingAddress
Book
Vo i c e Recognition
Navigation
Set Up
RDM-TMC
Audio Operation
Navigation
Set Up
nInitialization of ID Code
If you have forgotten the registered I")
88
Before
UseGetting
started
RoutingAddress
Book
Vo i c e Recognition
Navigation
Set Up
RDM-TMC
Audio Operation
Navigation
Set Up
nInitialization of ID Code
If you have forgotten the registered ID code, return the ID code to the default '0000' by
performing the following steps:
Note
l
If an ID code is not input for ten seconds, the system returns to the previous screen.
l If the input code does not match the registered code, ‘Wrong PIN was input. Please input
PIN again.’ is displayed for three seconds, and the system returns to the former display.
nChanging the PIN Code
Registered ID code input
1. Press the on-screen button.
2. The screen changes to Parental Lock mode and ‘INPUT PIN ----’ is displayed.
3. Press the on-screen button.
4. ‘INPUT CURRENT PIN ----’ is displayed. Input your currently registered PIN code.
Example : If the currently registered PIN code is ‘2323’, input ‘\
2323’.
Note
The registered PIN code at the time of shipment from the factory is the default '0000'.
Confirming the currently registered PIN code
5. Confirm your currently registered PIN code by short-pressing the on-screen button.
6. If it matches with the previously registered PIN code, 'INPUT NEW PIN' is displayed.
New PIN code input
7. Input a new PIN code.
Example: If the new PIN code is ‘1234’, input as ‘1234’.
New PIN code input confirmation
8. Confirm the newly input PIN code by short-pressing the on-screen button.
9. ‘
PIN CHANGED’ appears for three seconds to indicate that the new PIN code input is registered.
Master code input preparation
1. Press the on-screen button.
2. The screen changes to Parental Lock mode and ‘INPUT PIN ----’ is displayed.
3. Press the on-screen button.
4. ‘INPUT MASTER CODE ----’ is displayed.
Master code input
5. Input the master code. ( page 90) (The master code is already set at the time of
factory shipment.)
Master code input determination
6. Determine the master code which has been input by pressing the on-screen
button briefly.
7. ‘PIN CLEARED’ appears which indicates that the master code input has been completed.
8. The ID code is set to the default ‘0000’ and the initialization process is completed.
�)�9�C�2�%�:�-�C�)�2���F�S�S�O�����4�E�K�I�����������8�L�Y�V�W�H�E�]�����%�T�V�M�P���������������������������������4�1
 1
1 2
2 3
3 4
4 5
5 6
6 7
7 8
8 9
9 10
10 11
11 12
12 13
13 14
14 15
15 16
16 17
17 18
18 19
19 20
20 21
21 22
22 23
23 24
24 25
25 26
26 27
27 28
28 29
29 30
30 31
31 32
32 33
33 34
34 35
35 36
36 37
37 38
38 39
39 40
40 41
41 42
42 43
43 44
44 45
45 46
46 47
47 48
48 49
49 50
50 51
51 52
52 53
53 54
54 55
55 56
56 57
57 58
58 59
59 60
60 61
61 62
62 63
63 64
64 65
65 66
66 67
67 68
68 69
69 70
70 71
71 72
72 73
73 74
74 75
75 76
76 77
77 78
78 79
79 80
80 81
81 82
82 83
83 84
84 85
85 86
86 87
87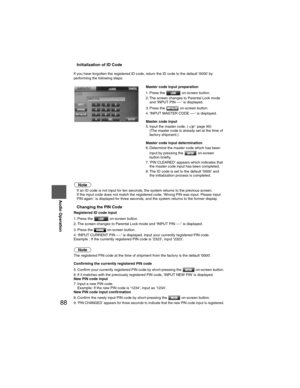 88
88 89
89 90
90 91
91 92
92 93
93 94
94 95
95 96
96 97
97 98
98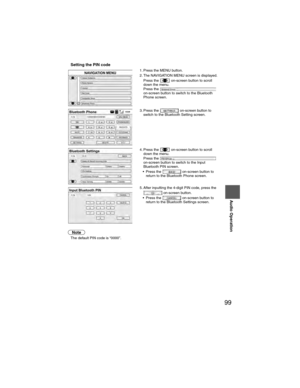 99
99 100
100 101
101 102
102 103
103 104
104 105
105 106
106 107
107 108
108 109
109 110
110 111
111 112
112 113
113 114
114 115
115 116
116 117
117 118
118 119
119 120
120 121
121 122
122 123
123 81
Audio Operation
nSelecting Sirius Radio Mode
System initializing
When information on all channel maps is obtained and the system is ready, channel 184 is
received.
When switching to a source ot")