2009 MAZDA MODEL 6 Navigation Manual (in English)
-
 1
1 -
 2
2 -
 3
3 -
 4
4 -
 5
5 -
 6
6 -
 7
7 -
 8
8 -
 9
9 -
 10
10 -
 11
11 -
 12
12 -
 13
13 -
 14
14 -
 15
15 -
 16
16 -
 17
17 -
 18
18 -
 19
19 -
 20
20 -
 21
21 -
 22
22 -
 23
23 -
 24
24 -
 25
25 -
 26
26 -
 27
27 -
 28
28 -
 29
29 -
 30
30 -
 31
31 -
 32
32 -
 33
33 -
 34
34 -
 35
35 -
 36
36 -
 37
37 -
 38
38 -
 39
39 -
 40
40 -
 41
41 -
 42
42 -
 43
43 -
 44
44 -
 45
45 -
 46
46 -
 47
47 -
 48
48 -
 49
49 -
 50
50 -
 51
51 -
 52
52 -
 53
53 -
 54
54 -
 55
55 -
 56
56 -
 57
57 -
 58
58 -
 59
59 -
 60
60 -
 61
61 -
 62
62 -
 63
63 -
 64
64 -
 65
65 -
 66
66 -
 67
67 -
 68
68 -
 69
69 -
 70
70 -
 71
71 -
 72
72 -
 73
73 -
 74
74 -
 75
75 -
 76
76 -
 77
77 -
 78
78 -
 79
79 -
 80
80 -
 81
81 -
 82
82 -
 83
83 -
 84
84 -
 85
85 -
 86
86 -
 87
87 -
 88
88 -
 89
89 -
 90
90 -
 91
91 -
 92
92 -
 93
93 -
 94
94 -
 95
95 -
 96
96 -
 97
97 -
 98
98 -
 99
99 -
 100
100 -
 101
101 -
 102
102 -
 103
103 -
 104
104 -
 105
105 -
 106
106 -
 107
107 -
 108
108 -
 109
109 -
 110
110 -
 111
111 -
 112
112 -
 113
113 -
 114
114 -
 115
115 -
 116
116 -
 117
117 -
 118
118 -
 119
119 -
 120
120 -
 121
121 -
 122
122 -
 123
123
 9
Before Use
Ifnecessary
Rear View
Monitor
Names and Functions
The navigation system can be operated by pressing a button on the panel (panel button) or
selecting a button displayed on the screen (o")
 10
Before Use
Navigation
Set Up
RDM-TMCIf
necessary
Rear View
Monitor
7. TUNE AUDIO dial: The audio display screen can be switched on or off by pressing
the dial.
Turning the dial changes the radio")
 11
Getting started
Activation
Insert the map disc into the unit to start the Mobile Navigation System.
nData coverage area of map disc
Regarding the data coverage area, refer to the case of the naviga")
 12
RoutingAddress
Book
Getting started
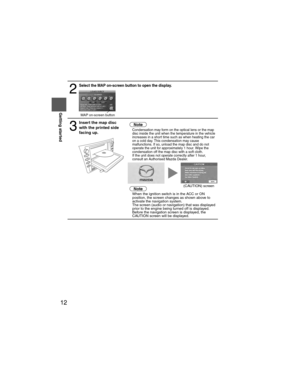
2
Select the MAP on-screen button to open the display.
3
Insert the map disc
with the printed side
facing up.NotelCondensation may form on the optical lens or")
 13
Getting started
lThe Current Position screen appears.
Note
lYou can select the language by selecting the on-screen button. You can also
change the selected language using Language Selection. ( p")
 14
RoutingAddress
Book
Getting started
Menu
Menu appears when pressing . MENU
Destination Entry and Route Search ( page 30)
Address Book ( page 46)
Cancel Guidance ( page 41)
Route Options ( page 42")
![MAZDA MODEL 6 2009 Navigation Manual (in English) 15
Getting started
Set Clock
The current time is set using this function. Since time notification is provided by a GPS
satellite.
Before Steps select MENU
Open the [SET CLOCK] screen
Select if you](/manual-img/28/13573/w960_13573-14.png "MAZDA MODEL 6 2009 Navigation Manual (in English) 15
Getting started
Set Clock
The current time is set using this function. Since time notification is provided by a GPS
satellite.
Before Steps select MENU
Open the [SET CLOCK] screen
Select if you")
 16
RoutingAddress
Book
Getting started
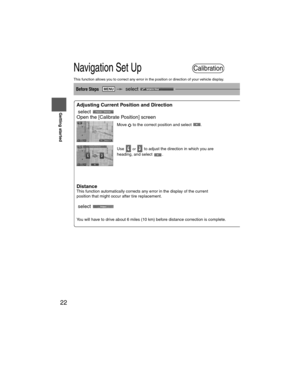
Navigation Set Up
l
You can alter the map display conditions, the route guidance conditions and show the
system information.
nStop your vehicle before the foll")