Page 329 of 426

_____________________________________ F_ u_ e _ l _s _u -= p_ p '--' ly=--- a_ n_ d _ f_ i_ll _in -= g_y=-- o_u _ r_ f_ u_ e_l _t _a _n _ k _ ____._
The labe l on the inside of the fuel filler flap tel ls you the correct fuel
fo r your vehicle . For mo re information about fuel specifications, see
=> page 325.
Your vehicle fuel tank has an on -board refuelling vapor recovery
sys tem. Th is feature helps to prevent fue l vapors from escapin g
from the tank and polluting the environment wh ile you refue l your
veh ic le . I n order to fill the tank properly while protecti ng the envi
ronment, please follow this refuel ing procedure carefully .
& WARNING
Under normal operating conditions , never carry additional fuel
c ontainers in your car . Ga s canister s and other containers used to
transport fuel can be dangerous . Such conta iners , full or empty,
may leak and could cause a fire in a collision . If you mu st transport
fuel to use for your lawn mower , snow blower , etc. , be very c areful
and always ob serve local and state laws regarding the u se , tran s
port ation and storage of su ch fuel containers . Make certain the
c ontainer meets industry standard s (ANSI/ASTM F852 · 86 1.
0 Note
Neve r d rive your vehicle until the fuel tank is completely emp ty . The
irregular supp ly of fuel can cause misfiring . Gasoline could enter
t he e xhaus t system and damage the cataly tic converter. •
Refuelling
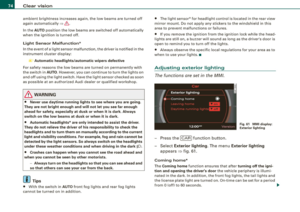
Fig. 27 7 Dri ver 's do or :
Unlo cking fuel filler
flap
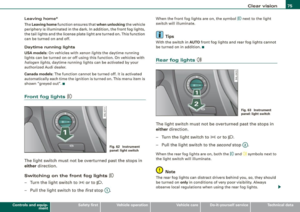
Fig . 2 78 Right re ar
v ehi cle sid e: Open ing
the fuel filler flap
Wh en a ddin g fu el, th e i gni tion and any cellul ar ph ones in
t h e v ehicl e mus t be sw itch ed
off.
Taking the fuel cap off
Vehicles with a button in t he driver's doo r: To o pen the
f u el fill er fla p, p ress t he b utto n
~ fig. 277 .
Vehicles
without a button in the driver 's door: To open
the fue l fi lle r flap, press on t he le ft side of the flap
~ fig. 278 -arrow -.
Unsc rew f uel filler cap co unter-c lockwise and hang it on
t h e fue l fi ller flap. .,._
Vehicle care I I irechnical data
Page 330 of 426

Fuel supply and filling your fuel tank Refuelling procedure
- Insert the fuel nozzle from the gasoline pump into the
fuel filler neck as far as it will go.
- Select a medium refuelling rate so that the nozzle switches off automatically when the tank is full.
Putting the fuel cap back on
- After filling your tank, twist the fuel filler cap clockwise as
far as it will go.
Close the fuel filler flap.
To avoid fuel spilling or evaporating from the fuel tank always close
fuel filler cap properly and completely. An improperly closed fuel
filler cap may also cause the MIL lamp=>
page 29 to come on.
& WARNING
Improper refueling or handling of fuel can cause fire, explosion
and severe burns.
• Fuel is highly flammable and can cause severe burns and other
injuries.
• Failure to shut the engine off while refueling and/or to insert
the pump nozzle fully into the fuel filler neck could cause fuel to spray out of filler neck or to overflow. Fuel spray and overflowing
fuel can cause a fire.
• Never use a cellular telephone while refueling . The electromag
netic radiation can cause sparks that can ignite fuel vapors and
cause a fire.
• Never get back into your vehicle while refueling. If in excep
tional circumstances you must get back in your vehicle while refu
eling, make certain that you close the door and touch metal to
discharge static electricity before touching the filler nozzle again.
Static electricity can cause sparks that can ignite fuel vapors
released during refueling .
& WARNING (continued)
• Never smoke or have an open flame anywhere in or near your
vehicle when refueling or filling a portable fuel container.
• For your safety, we strongly recommend that you do not travel
with a portable fuel container in your vehicle. The container, full or
empty may leak and could cause a fire, especially in a crash.
• If, under exceptional circumstances, you must transport a
portable fuel container, please observe the following:
-Never fill a portable fuel container while it is anywhere in or
on the vehicle (for example, in the luggage compartment, or on
the trunk). Static electricity can build up while filling and can
ignite fuel vapors causing a fire.
- Always place a portable fuel container on the ground before
filling.
- Always keep the filler nozzle completely inside the portable
container before and during filling.
- If filling a portable container made of metal, the filler nozzle
must always be in contact with the container. This will help
prevent static electricity from discharging and cause a fire.
- Never spill fuel inside the vehicle or luggage compartment. Fuel vapors are highly flammable .
- Always observe local and state/provincial laws regarding the
use, storage and transportation of fuel containers.
- Make certain the fuel container meets industry standards
(ANSI / ASTM F852-86l.
0 Note
If any fuel has spilled onto the car, it should be removed immedi -
ately to prevent damage to the paint. _.,
Page 331 of 426

<£> For the sake of the environment
As soon as the correctly operated nozzle switches off automatically
for the first time, the tank is full. Do not try to add more fuel because
fuel may spill out. In addition, the expansion space in the fuel tank
will be filled -causing the fuel to overflow when it becomes warm
and pollute the environment.
[ i] Tips
• Running your engine while refuelling may cause vapors to
escape or even cause fuel to spill out of the tank. This would then
shut off the fuel nozzle before the tank is full.
• Do not refuel your vehicle with the ignition turned on . The fuel
gauge may otherwise not indicate the correct fuel level after
refuelling. •
Unlocking the fuel filler flap by hand
You can open the fuel filler flap by hand if the power
locking system should fail .
•
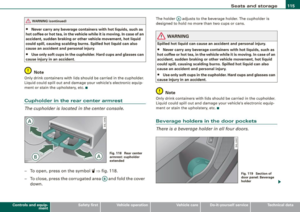
Fig. 279 Luggage
compartment : Prying
cover open
Fuel supply and filling your fuel tank
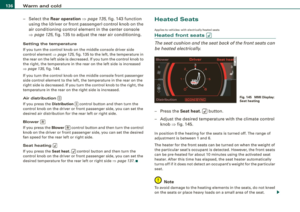
Fig. 280 Luggage
compartment : Emer
gency opening of fuel
filler flap
- Remove the right-side trim panel with the aid of a screw
driver => fig. 279.
- Pull the loop down in the direction of the arrow to unlock
the fuel filler flap=> fig. 280. •
Vehic le care I I irechnical data
Page 332 of 426

___ C_h_ e_ c_k _in --== g'-- a_n _d_ f_il _li _n ..:::g:::..- ___________________________________________ _
Checking and filling
Engine hood
Releasing the engine hood
The engine hood is released from inside the vehicle.
-Open the driver's door.
Fig . 281 Driver's side
footwell: engine hood
release lever
-Pull the release lever on the left under the instrument
panel
=> fig. 281 in the direction of the arrow.
The hood pops up slightly under spring pressure. •
Opening the engine hood
Fig. 282 Release lever
under the engine hood
Before opening the engine hood, make sure that the wind
shield wipers are flat against the windshield. Otherwise,
they could damage the paint on the hood.
Lift the hood slightly =>&, .
- Pull up on the release under the hood => fig. 282. This
releases the catch.
- Open the hood all the way.
The hood is kept in the open position by two gas struts.
& WARNING
Hot engine coolant can burn you.
• To reduce the risk of being burned, never open the hood if you
see or hear steam or coolant escaping from the engine compart
ment. Wait until no steam or coolant can be seen or heard before
carefully opening the hood. •
Page 333 of 426

_____________________________________________ C_ h_ e .=....= c..:..k :..:.in :....:..:= g:.....= a..:..n .:....:d::......:. f.:..:il .:..:li ..:..n ::.:g:!....- __
•
Closing the engine hood
- Pull the hood down until the pressure from the struts is
reduced .
- Let the hood
drop down and latch in place. Do not try to
push it shut;
it may fail to engage => &.
& WARNING
A hood that is not completely latched could fly up and block your
view while driving.
• When you close the engine hood, check it to make sure the
safety catch has properly engaged. The hood should be flush with
the surrounding vehicle body parts.
• If you notice while driving that the hood is not secured prop
erly, stop at once and close it. •
Working in the engine compartment
Be especially careful whenever you work in the engine
compartment.
Whenever you must perform any work in the engine compartment,
for example checking and filling different fluids, there is a risk of injury, burns and accidents. To prevent personal injury always
observe the following WARNINGS. The engine compartment of any
vehicle is a hazardous area
~ & .
& WARNING
To help avoid injury, before you check anything under the hood :
• Turn off the engine.
• Remove the ignition key.
• Apply the parking brake .
& WARNING (continued)
• Move selector lever to "P" (Park).
• Always let the engine cool down. Hot components will burn
skin on contact.
• To reduce the risk of being burned, never open the hood if you
see or hear steam or coolant escaping from the engine compart
ment. Wait until no steam or coolant can be seen or heard before
carefully opening the hood.
• Keep children away from the engine compartment .
• Never spill fluids on hot engine components. They can cause a
fire.
• Never touch the radiator fan. The auxiliary electric fan is
temperature controlled and can switch on suddenly.
• Never open the coolant reservoir cap when the engine is still
warm . The coolant system is pressurized and hot coolant could
spray out.
• Protect your face, hands and arm from steam or hot engine
coolant by placing a thick rag over the cap when you open the
coolant reservoir.
• If work on the fuel system or the electrical system is necessary :
- Always disconnect the battery.
- Never smoke or work near heaters or open flames . Fluids in
the engine compartment could start a fire.
- Keep an approved fire extinguisher immediately available.
• To avoid electrical shock and personal injury while the engine
is running or being started, never touch:
- Ignition cables
- Other components of the high voltage electronic ignition system.
• If you must perform a check or repair with the engine running: -First, fully apply the parking brake, move selector lever to "P"
(Park). .,
Vehicle care
I t •
Page 334 of 426

-Checking and filling PW---=---------------
& WARNING (continued )
-Always u se extreme caution to prevent cloth ing , jewelry, or
long hair from getting caught in the radiator fan , V-belt s or
other moving parts , or from contacting hot parts . Tie back hair
before starting , and do not wear clothing that will hang or
droop into the engine .
• Minimize exposure to emis sion and chemical hazards
::::> & .
& WARNING
California Proposition 65 W arn ing :
• Engine exhaust , some of its constituents , and certain vehicle
c omponents cont ain or emit chemicals known to the State of Cali
fornia to cause cancer and birth defects and reproductive harm. In addition , certain fluids contained in vehi cles and certa in products
of component wear contain or emit chemicals known to the State
of California to cause cancer and birth defect s or other reprodu c
tive harm.
• Battery posts , terminals and related ac cessories conta in lead
and lead compounds , chemicals known to the State of California
to cause cancer and reproductive harms. Wash hands after
handling.
0 Note
When adding f luids, always make sure that they are poured into the
proper container or filler ope ning, otherwise serious damage to
vehic le systems wi ll occur.
ci> For the sake of the environment
To detect leaks in time, inspect the vehicle floor pan from under
n eath regu larly. If you see spots fro m oil o r o th e r v eh icle flu ids, hav e
your vehicle inspected by an author ized Audi dea ler. •
Engine compartment
These are th e m ost im porta nt items th at you can ch ec k.
Fig. 283 Typical layout for containe rs, engine oi l d ipstick and engine oil filler
cap
0 W indsh ield/headligh t was her conta iner ( 9 ) . . . . . . . . 346
0 Coolant e xpansion tank (- L l . . . . . . . . . . . . . . . . . . . . . . 338
G) Engin e oil fi ller cap ("l::r.) . . . . • . . . . . . • • • • . . . • . . • . . 336
© Engine oil d ips tick (orange) . . . . . . . . . . . . . . . . . . . . . . 335
© Brake fluid reservo ir ( ) . . . . . . . . . . . . . . . . . . . . . . . . 341
© Pow er steer ing r eser voir . . . . . . . . . . . . . . . . . . . . . . . . . 2 93
0 Jump sta rt connector( +) u nder a cover,( -) w ith hex
head screw .... ... ..... .... ... .... ... ..... .... . 344 , 387
The positi on of t he e ngin e oil fi lling hole and t he engine oil dipstick
=> fig . 283 (position G) and ©l can vary according to the type of
eng ine. .,_
Page 335 of 426

Checkin g and fillin g -
-----------------=---------
•
& WARNING
Befo re you c heck anythin g in th e engine comp artme nt, a lways
r e ad and heed all WARNING S
~ & in "Workin g in the en gine
co mp art m ent " o n page 331 . •
Engine oil
Engine oil specifications
The engine oil used in your Audi needs the right kind of
oil.
The engine in your Audi is a sophisticated powerplant that was built
to exacting specifications. This engine needs the right kind of
engine oil that meets specifications regarding quality and viscosity
so that it can run smoothly and reliably . Choos ing the right oil and
changing oil within the time and mileage intervals printed in your
vehic le's Warranty
& Maintenance booklet matters a lot more today
than it did years ago. Audi has developed a special quality standard for engine oil that will help assure that your vehicle's engine will get
t he lubr ication it needs for proper operation .
Modern engine lubrication has taken a quantum leap in the last few
years . Many synthetic oi ls availab le today provide better engine
lubrication that can outlast traditional petroleum-based oils,
making them a smart choice for use throughout the life of your Audi.
Whether you use synthetic or petroleum -based engine oi l, the oi l
that you use must conform to Audi's oi l quality standard VW 502 00
t o help keep your vehic le's engine running smoo th ly and help
prevent the formation of harmful deposits, sometimes called
"s ludge," that over time can lead to expensive repairs.
At the time of printing, engine oi ls avai lable in the U.S. and Canada
that meet the exacting specifications of Audi oil standard VW 502 00
are synthetic engine oils . This does not mean, however, that every synthetic engine oil will meet Audi oil standard VW 502 00
. So
a lways be sure tha t you use an approved o il.
To help prevent the formation of harmful deposits use only oil with
the fo llowing specifications printed on the oil container:
Audi oil standard VW 50 2 00
Oil container labels may carry the specification singly or in combi
nation with other designa tions and oil quality standards .
Viscosity
Engine oils are graded according to their viscosity. The proper
viscosity grade oi l for your engine depends on c limactic or seasona l
conditions where you drive. You can use oil with a viscosity grade of
SAE 5W40 across all temperature ranges for normal driving condi
tions .
However, if engine oil viscosity grade SAE 5W40 is not available, you
can a lso use viscos ity grade SAE 5W-30 or SAE 0W -40 as long as it
meets Audi oil qua lity standard VW 502 00 specifications .
Because engine o il that meets the Audi o il standard may not be
avai lable everywhere when you need it, we strongly recommend
that you a lways carry with you an extra quart (l iter) of oil that
express ly conforms to the VW 502 00 specification, in case you have
to top off the oil while on the road .
Only if the level of the o il is at or be low the minimum mark on the
oi l dipstick - and no oil that expressly conforms to Audi oi l standard
VW 502 00 specifica tions is avai lable -may you top off wit h a high
quality engine oi l, preferably synthetic-based, that meets ACEA A3,
ACEA A5 or ACEA 85, AP I SL or ILSAC GF -3 spec ifications, but even
then, only in viscosity grades SAE 5W-40 , SAE 5W -30, or SAE 0W -40 .
However, during the enti re time between oi l cha nge interva ls, never
top off with more than a total of 0.5 qt/ liter engine oi l that does not
conform to Audi oil specification VW 502 00.
For more information about engine oi l that has bee n approved for
your vehicle, p lease contact either your authorized Audi dea ler or
Audi C ustomer Relations at 1 (800) 822 -2834 or visit our web site at
www.audiusa.com or www.audicanada.ca . Here you will a lso find a .._
Vehicle care I t •
Page 336 of 426

-~_C_ h_e _c _ k_ i_n ...:::g::;...._ a_n_ d_ f_ i_ll _in -'g:::;.._ ___________________________________________ _
current list of oils (manufacturers, brand names etc.) that conform
t o Audi oi l standard VW 502 00 .
Changin g the engine oil
The engine oil and oil filter must be changed according to the
mi leage (ki lometers) and time intervals specified in your vehicle's
Warranty
& Maintenance booklet. Do not exceed these interva ls -
harmful deposits from old engine oil can reduce engine perfor
mance and can lead to expensive engine repairs.
Changing the oi l at the recommended intervals is so very important
because the lubricating prope rties of oi l decrease gradual ly during
normal vehicle use . If you are not sure when you have your oil
changed, ask your author ized Audi Serv ice Advisor.
Under some circumstances the engine oil should even be changed
more frequently. Change oil more often if you dr ive mostly short
distances, operate the vehicle in dusty areas or mostly under stop
and -go t raffic conditions, or when you use your vehicle where
temperatures stay be low freezing point for long per iods.
Detergent additives in the oil will make fresh oil look dark after the
engine has been running for a short time . This is normal and is not
a reason to change the oil more often than recommended.
Damag e or malfunctions due to lack o f mainten anc e
It is essentia l that you change your oi l at the recommended interva ls
using on ly engine oil that complies with Audi oil standard
VW 502 00. Your Limited New Vehicle Warranty does not cover damage or ma lfunctions due to failure to follow recommended
main tenance and use requirements as set forth in the Aud i Owner's
Manual and Warranty
& Maintenance booklet. Your dealer wi ll have
t o deny warranty cove rage unless you present to the dealer p ro o f in
the form of Service or Repair Orders that all schedu led maintenance
was pe rformed in a timely manner. •
Engine oil consumption
The engine in your vehicle depends on an adeq uate
amount of oil t o lubric ate and c ool all of its m oving parts.
In order to provide effective lubrication and coo ling of interna l
engine components, al l interna l combustio n eng ines consume a
certain amount of oil. Oil consumption varies from engine to engine
and may change significant ly over the life of the engine . Typ ically,
engines with a specified break-in period (see=>
page 2971 consume
more oil du ring the break-in period than they consume after oil
consumption has stabi lized .
Unde r normal conditions, the rate of oil consumption depends on
the quality and v iscosity of the oil, the RPM (revolutions per minute)
at which the engine is operated, the ambient temperature and road
cond itions. Fur ther factors are the amount of oil di lu tion from wate r
condensation or fue l residue and the oxidation leve l of the oi l. As
any engine is subject to wear as mileage bu ilds up, t he oil consump
tion may increase over time until replacement of worn components
may become necessa ry .
With all these variables coming into play, no standard rate o f oi l
consumption can be established or specified . There is no alternative
t o regula r and frequent checking of the oil level, see
Note .
If the yel low engine oil level warning symbo l in the instrument
clus ter lights up, yo u should check the oil level as soon as
possible
with the oil dipstick=> page 335. Top off the oil at your
ea rliest convenience =>
page 336.
& WARNING
Before you check anything in the engine compartment , always
read and heed all WARNING S
=> & in "Working in the engine
compartment " on
page 331.