Page 113 of 426

Seats and storage 1111
-----------------=-----'
- If it has not already been done, fold both seatbacks up
and hang the partition net=>&.
Securing strap
-Set the holder for the securing strap in the opening of the
track system.
Push the holder down=> page
110, fig. 113 G) and at the
same time, slide it into the desired position
0-
- Check that the holder has latched into place.
- Lay the object to be secured behind the securing strap.
- Push the knob on the front side of the holder® to
tighten the strap .
- If it has not already been done, fold both seatbacks up and hang the partition net=>& .
The securing strap can also be secured on the left and right of the
track system,
if needed.
& WARNING
• The backrest must be securely latched in position so that no
items contained in the luggage compartment can slide forward
upon sudden braking.
• Loose items inside the passenger compartment, can fly
forward in a crash or sudden maneuver and injure occupants. •
Con tro ls and eq uip
ment
A pp lies to vehi cles: with ski sa ck
Ski sack
The ski sack allows a maximum of 4 pairs of skis or 2
snowboards to be carried inside the vehicle.
Loading
Fig. 114 Securing the
ski sack at the center
rear seat belt buckle
-Fold the center seatback forward=> page 104.
- Remove the sack from the luggage compartment and
unfold it.
- Place the empty sack over the lowered seatback so that
the end with the zip fastener is in the luggage compart
ment.
- Load objects from the luggage compartment into the ski
sack=> &.
Securing
-Insert the ski sack strap©=> fig. 114 into the center seat
belt buckle
@.
- Pull the securing strap tight by the free end of the belt
© ~
Vehicle care I I irechnical data
Page 114 of 426

_L-_S::..:: e..:a :..:t:.:s :....:: a:.:.n .:.. d::....: s:.. t.:.. o::..:.. ra= g:..:e :...._ _____________________________________________ _
- Vehicles with 6 seats*: The ski sack has two straps with
hooks on the underside. Hang the hooks into the luggage
compartment by the rear fastening eyes and pull the
securing strap tight by the free end@.
Storage
- Release the securing strap for the sack.
- Pull the sack to the rear over the folded down seatback .
- Raise the seatback until it is securely latched.
- Fold up the empty sack.
- Stow the ski sack in the luggage compartment so that it
cannot slide around .
& WARNING
• The ski sack is intended only for the transportation of skis,
snowboards and other light objects. To reduce the risk of serious
personal injury never transport heavy or pointed objects in the ski
sack.
• When braking rapidly or during an accident the load could be
displaced and cause injury to occupants.
• Sharp edges on the load must be covered for protection.
Always fasten the belt tightly around the sack and its contents
=> page 111, fig . 114.
[ i] Tips
Never stow the ski sack away if it 's wet or damp (for example, snow
melting from skis). Let it dry completely before you stow it away. •
Roof rack
First things first
A roof rack can be fitted to carry additional luggage on
the roof.
Always read and follow the instructions provided by the
roof rack manufacturer when the roof rack system must
be installed.
If you are transporting luggage or other objects on the roof, please
note the following :
• Your vehicle has specially designed aerodynamic roof rails. Only
install a roof rack specifically designed for your model. Contact the
nearest authorized Audi dealer for information on approved
modular roof racks for your vehicle.
• These approved roof racks are the basis for a complete roof rack
system. Additional attachments for the basic roof rack are neces
sary to safely transport luggage, bicycles, surf boards, skis or small
boats . All necessary hardware for these systems is available at your
authori zed Audi dealer .
• We recommend that you keep the installation instructions for
your roof rack system together with your Owner's literature in the
vehicle.
When should the roof rack be removed?
• Before going through an automatic car wash (it is best to ask the
car wash operator for advice).
• When not in use , to reduce fuel consump tion, wind noise and to
guard against theft. _.,,
Page 115 of 426

Seats and storage -
-----------------=-----'
& WARNING
• Use of an un appr oved roof ra ck or in correct mounting of an
approved roof ra ck can c aus e the roof ra ck or the item s attached
to it to fall off the r oof ont o the ro ad .
• Object s falling fr om the roof of a vehi cle can c ause a crash and
p ers onal inju ry.
• Only mount the sy ste m between the marking s shown
in
=> fig. 115 .
• The roof rack sy ste m mu st b e in sta lled e xactly a ccording to the
instructions prov ided .
0 Note
• Your vehicle warranty does not cover any damages to the vehicle
caused by using roof racks or moun ting structures no t approved by
Audi for your vehicle . T he same app lies to damage resulting from
incorrect roof rack installation .
• Always check the roof rack mountings and hardware before each
t rip and during a trip to make sure everything is securely tightened.
If necessary, retighten the mountings and check the entire system
from time to time.
• After mounting a roof rack system, or when you transport
objects on the roof of your vehicle, the height of the vehicle is natu
ra lly increased . Be carefu l when driving under low bridges or in
parking garages for exa mple . This cou ld cause damage to the load
and even the vehicle itself .•
Con tro ls and eq uip
ment
Roof rack mounting locations
Roof racks must be installed only at the locati ons marked
on t he roof rails .
Fig . 115 Ro of r ails:
fr ont a nd r ear
mountin g locations
Mount the front and rear cross bars between the punched markings
on the inside of the roof railings => fig . 115. The markings are
located on the inside of the rail ings .•
Loading the roof rack
Always di stribute loads evenly. Make sure anything on the
ro of ra ck is securel y tied down.
Always d istr ibute the loads o n the roof rack even ly .
Always attach items to the roof rack secure ly before you
drive off .
The maximum permissible roof weight is 220 lb 1100 kg ). The roof
we ight is made up of the weight of the roof rack system and the
weight of the object being transported .
When using a roof rack system which has a lower load carrying capacity, you must not use up the tota l maximum permissible load
carrying capacity specified above. Instead, you should load the roof
~
Vehicle care I I irechnical data
Page 116 of 426

• ..__S_ e_a _ t_ s_ a_ n_ d_ s_t _o _r_ a-' g==- e ________________________________________________ _
rack syst em only to the maximum capaci ty spec ified by the manu
f actu rer of the roo f ra ck sy stem.
& WARNING
Weak , damaged or improper straps used to secure items to the
roof rack can fail during hard brak ing or in a collision and cause
serious personal injury.
• Make sure the roof rack is installed exactly as spe cified above
~ page 113 .
• Always use suitable mounting straps for securing items to the
roof rack to help prevent items from shifting or flying forward .
• Items on the roof rack must always be securely mounted .
• The use of a roof rack can negatively affect the way a vehicle
handles. Cargo that is large, heavy , bulky, long or flat will have a
greater negative influence on the vehicle's aerodynamics , center
of gravity and overall handling . Always drive slowly, avoid sudden
braking and maneuvers when t ransporting cargo on the roof of
your vehicle.
• Never exceed the maximum permissible load carrying capacity
of the roof of your vehicle , the permissible axle weights and the
perm issible total weight of your vehicle~
page 397, "Weights ".
• Always drive slowly , avoid sudden braking and maneuvers
when transporting cargo on the roof of your vehicle.
0 Note
M ake sure that the opened rear lid does not come in contact with
the ca rgo on the roof.
~ For the sake of the environment
Sometimes it may be easier to leave a roof rack installed eve n
th ough you a re not usi ng it. Due to th e increased a ir resis tanc e your
veh ic le wi ll unnecessarily u se more fue l. Remove the roof rack if you
are no t go in g to us e it.•
Cupholder
Front cupholders
The cupho/d ers ar e l oca ted in the c en te r a rm res t.
Fig . 116 Center
armrest : Beverage
holde r
F ig . 117 Convenience
center arm rest:
Bever age h older
O pen th e cove r at t he recess o n the side ~ fig . 11 7.
A maximum of two beverages can be accomodated in the center
ar m re st ~ fig. 116 . W ith t he c on ve nie nce cent er a rm res t*
~ fig. 117 , the second beverage ho lder is located under a cover.
& WARNING
Spilled hot liquid can cause an accident and personal injury .
Page 117 of 426

Seats and storage 1111
-----------------=-----'
& WARNING !continued)
• Never carry any beverage containers with hot liquids, such as
hot coffee or hot tea, in the vehicle while it is moving. In case of an
accident, sudden braking or other vehicle movement, hot liquid
could spill, causing scalding burns. Spilled hot liquid can also
cause an accident and personal injury.
• Use only soft cups in the cupholder. Hard cups and glasses can
cause injury in an accident.
0 Note
Only drink containers with lids should be carried in the cupholder.
Liquid could spill out and damage your vehicle's electronic equip
ment or stain the upholstery, etc. •
Cupholder in the rear center armrest
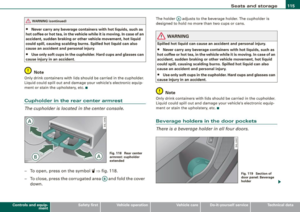
The cupholder is located in the center console.
Fig . 118 Rear center
armrest: cupholder
extended
- To open, press on the symbol 'i ~ fig. 118.
- To close, press the corrugated area ® and fold the cover
down.
Con tro ls and eq uip
ment The holder
@adjusts to the beverage holder . The cupholder is
designed to hold no more than two cups or cans.
& WARNING
Spilled hot liquid can cause an accident and personal injury.
• Never carry any beverage containers with hot liquids, such as
hot coffee or hot tea, in the vehicle while it is moving. In case of an
accident, sudden braking or other vehicle movement, hot liquid
could spill, causing scalding burns. Spilled hot liquid can also
cause an accident and personal injury.
• Use only soft cups in the cupholder. Hard cups and glasses can
cause injury in an accident.
0 Note
Only drink containers with lids should be carried in the cupholder.
Liquid could spill out and damage your vehicle's electronic equip
ment or stain the upholstery, etc. •
Beverage holders in the door pockets
There is a beverage holder in all four doors.
Vehicle care I I
Fig. 119 Section of
door panel: Beverage
holder
~
irechnical data
Page 118 of 426

• ..__S_ e_a _ t_ s_ a_ n_ d_ s_t _o _r_ a-' g==- e ________________________________________________ _
The beverage holders in the door pockets are suitable for 1 to 1 .5 -
lite r bo ttles .
& WARNING
Spilled hot liquid can cause an accident and personal injury.
• Never carry any beverage containers with hot liqu ids , such as
hot coffee or hot tea , in the vehicle while it is moving. In case of an
accident , sudden braking or other vehicle movement , hot liquid
could spill , causing scalding burns. Spilled hot liquid can also
cause an accident and personal injury .
• Use only soft cups in the cupholder . Hard cups and glasses can
c ause injury in an accident .
0 Note
Only drink containers with lids should be carried in the cupholder.
Liqu id cou ld spill ou t and dam age y our vehicle's electronic equ ip
ment or stain the upholstery, etc. •
Ashtray
Applies to veh icles: with ashtray
Front ashtray
Fig. 120 Center
c o n sole : front a shtray
To open ashtray
- Tap the edge of t he ashtra y~ & .
To close ashtray
-Tap th e lid to clos e th e ashtra y autom atic ally.
Removing ashtray insert
- Push the lever i n the di rect ion of the a rro w ~ fig . 12 0 -
t he ashtray inse rt p ops o ut sli ghtly .
Li ft the as htra y inse rt up and out.
To reinstall ashtray
- Pre ss th e ashtra y insert back into it s hol der.
& WARNING
Never put waste paper in the ashtray . Hot a shes or other hot
objects in the ashtray could set waste paper on fire . •
App lies to veh icles: w ith ash tray
Rear ashtray
F ig . 121 Re ar ashtray II),
Page 119 of 426

________________________________________________ S_e_ a_ ts_ a_ n_d _ s_t _o _r_ a ....; g::;. e _ __._
To open ashtray
- Touch the l id to open the ashtray.
Removing ashtray insert
Press the front of the open lid downward in the direction
of the arrow=>
page 116, fig. 121 - the ashtray insert
pops out slightly.
- Lift the ashtray insert up and out.
Reinstalling ashtray insert
-Open the lid on the ashtray insert and press the insert
into the housing as far it can go.
& WARNING
Never put waste paper in the ashtray . Hot ashes or other hot
objects in the ashtray could set waste paper on fire. •
Cigarette lighter/socket
Ap plies t o ve hicles: w it h c ig arette ligh ter
Cig are tt e lighte r
Contro ls and eq uip
ment
Fig . 122 Open front
beverage storage
compartment with
cigarette lighter
Using the cigarette lighter
-Push the knob in.
- Wait until the cigarette lighter knob pops out.
- Remove the cigarette lighter immediately and use it.
- Reinsert cigarette lighter into the socket after use.
Connecting an appliance
- Remove cigarette lighter.
- Plug in appliance to be used.
The socket of the cigarette lighter may be used for 12-volt appli
ances with maximum consumption of up to 100 watts, such as a
flash light, small vacuum cleaner, etc .
Before you purchase any accessories, always read and follow the
information in~
page 403, "Additional accessories and parts
replacement" .
& WARNING
Improper use of the cigarette lighter can cause serious injury or
start a fire.
• Be careful when using the cigarette lighter . If you do not pay
attention to what you are doing when you are using the cigarette
lighter you can burn yourself .
• The cigarette lighter and socket remain functional even if the
ignition is switched off or the ignition key is removed . Never leave
children inside the vehicle without supervision.
0 Note
• To avoid damaging the socket , only use plugs that fit properly. _.,
Vehicle care I I Technical data
Page 120 of 426

• ..__S_ e_a _ t_ s_ a_ n_ d_ s_t _o _r_ a-' g==- e ________________________________________________ _
• Only use the cigare tte lighte r socket as a power source for elec
t rical accessories for short dura tions. Use the sockets in the vehicle
when a power source is needed for longer durations .
[ i ) Tip s
When the engine is off and accessor ies are s till plugged in and are
on, the vehicle battery can still be drained. •
Outlet
An electrical accessory can be connected to the 12-volt
power outlet.
Fig . 123 S ection from
ce nter co nso le : 1 2-vo lt
outl ets
F ig .
12 4 Sec tion from
righ t side o f luggage
co mp artm ent : 12-vo lt
o utle t
Remove the cover from the outlet~ fig. 123 . Lift up the cover
for the outlet ~ fig. 1 24.
- Plug in appliance to be used .
The outlet may be used for 12 -volt appliances with maximum
consumption of up to 100 watts, such as a flash light , small vacuum
cleaner, etc .
There are two additional 12 -volt out lets in the rear center console .
Before you purchase any accessories, always read and fo llow the
information in
~ page 403, "Additional accessories and parts
r ep lacement".
& WARNING
The outlet plu s any appliance s plugged into it remain fun ctional
even if the ignitio n is swit ched off o r the igniti on key is r emo ved .
Ne ver le ave childr en in sid e the vehicle without supervi sion.
0 Note
To avoid damaging the socket , only use pl ugs t hat fit properly .
[ i J Tips
When the engine is off and accessories are sti ll plugged in and are
on , the vehic le battery can stil l be drained .•