Page 193 of 426

___________________________________________ A_ d_ v_ a_n _ c_ e_ d_ P_a _ r_ k_ i_n -=g=-- S_ yc..,_ s_t _ e _m _ __._
Advanced Parking System
Advanced Parking System with rear
view camera
Applies to veh icles : with Advanced Pa rking System with rear view camera
General information
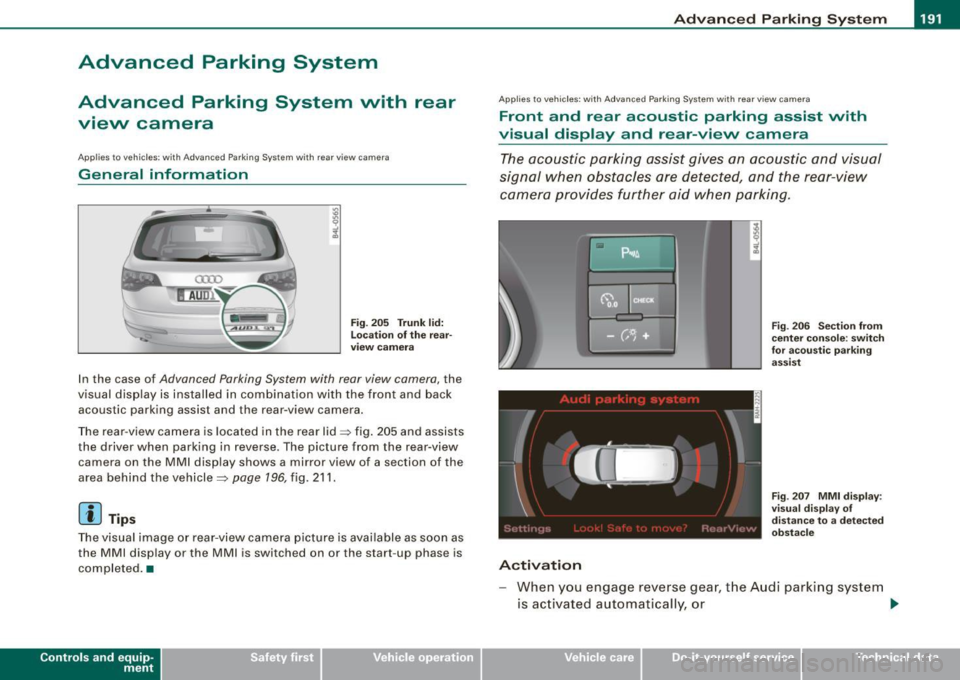
Fig. 205 Trunk lid:
Location of the rear
view camera
In the case of Advanced Parking System with rear view camera, the
visual display is installed in combination with the front and back acoustic parking assist and the rear-view camera.
The rear -view camera is located in the rear lid~ fig. 205 and assists
the driver when parking in reverse . The picture from the rear-view
camera on the MMI display shows a mirror view of a section of the
area behind the vehicle~
page 196, fig. 211.
[ i J Tips
The visual image or rear-view camera picture is available as soon as
the MMI display or the MMI is switched on or the start -up phase is
completed. •
Contro ls and eq uip
ment
App lies to vehicles: with Advanced Parking System w ith re ar view came ra
Front and rear acoustic parking assist with
visual display and rear-view camera
The acoustic parking assist gives an acoustic and visual
signal when obstacles are detected, and the rear-view
camera provides further aid when parking.
Activation
Fig. 206 Section from
center console: switch
for acoustic parking
assist
Fig . 207 MMI display :
visual display of
distance to a detected
obstacle
When you engage reverse gear, the Audi parking system
is activated automatically, or .,.
Vehicle care I I irechnical data
Page 194 of 426

• .___A_ d_v_ a_ n_c_ e_ d_ P _a_r_k _i_ n -=g,_ S-=y"- s_ t_ e_ m __________________________________________ _
-Press the sw itch PJJJ! in the cente r console ~ page 191,
fig. 206 t o activate the A udi pa rking system m anually .
Activation of the acoustic parking system is confirmed by
a brief acknowledgement sound . The indicator light in
the switch lights up.
D ea ctivation
If you drive forwards faster tha n approx. 6 mph (10 km/h),
or
- if you switch the ign ition off, the entire acoustic parking
assist is automatically deactivated, or
- you can press the sw itch
P111! i n the center console
=> page 191, fig. 206 to deact ivate the Audi parking
system. The indicator light in the switch goes out.
You have to turn on the acoustic parking assist m anuall y if you wish
to park the vehicle forwards or if you w ish to approach an obstacle
forwards and want a distance warning .
The range at which the sensors start to measu re is
about:
Front
Rear
W arning ton es side
cen
te r
side
cen ter 3 ft (0
.90 ml
4ft (1.20 ml
2 ft (0.60 ml
5 .2 ft (1.60 ml
Distance warning is given by chimes which are generated by a
signal generator . The volume and the pitch of the chimes can be
adjusted in the MMI => page 201.
Mute In the case of vehic les with automa tic transmission, an acoustic
distance warning is discontinued when the transmission selector lever is moved to the P position. However, the system remains
active
. As soon as the selector lever is moved from the
P posi tion
and the vehicle approaches an obstacle, the acoustic distance
warning resumes .
Dri ving fo rward/ba ckvv ard
Distance warning when driving forward/backward is based o n
detection of an obstacle in the range of the parking assist . As the
distance dec reases, the time interval between the audible tones
becomes shorter.
When the distance is less than approx . 1 ft (0.30 m), the tone
becomes continuous. At this point you shou ld s top backing up or
driving forward .
If the distance to an obstac le remains the same, the vo lume of the
distance warning is gradually reduced after about
4 seconds (does
not app ly to the zone for the cont inuous tone). If you sta rt to
approach the detected obstacle again, the distance warning will
sound at the normal volume again .
P a rk ing
When you selec t ano ther gear when parki ng (e .g . reverse/forward),
the warning tones are temporarily suppressed, but the visual display remains on the MMI display . If you start approaching a
detected obstacle again, the distance warning wi ll sound at the
normal vo lume again .
Vi sual disp lay
T he segments on the MMI display indicate a change in the distance
between the vehicle and an obstacle . The number of segments
displayed depends on the obstacles in front of or behind the
vehic le. The c loser the vehic le comes to the obstacle, the closer the
segments approach the vehic le => page 191, fig. 207. When the
segment before last is disp layed, the veh icle has reached the colli
sion zone. At this point you should stop backing up or driving
forward =>
&,. ..,.
Page 195 of 426

____________________________________________ A_d_ v_ a_n_ c_ e_d _ P_a_ r_ k_ i_ n ..::g==-- S_ y=- s_t _e _m __ lllll
T he image in the visua l display can be switched off on the MMI
display ::::> page
203. The acoustic distance warning remains active.
If you press a function button on the MMI termina l, the visual
display disappears . Manually switching the parking assist on again
via the
p ,y 1 switch shows the visual image on the MM I display aga in.
Further information regarding the MMI terminal is included in the
MMI user's manual.
R ear-view camera (rear view )
The rear-view camera picture::::> page 196, fig. 2 12 appears on the
MM I display as a mirror image. The rear -view camera picture has
orientation lines and marked s urfaces projected into it as an aid to
the parking process ::::> page
194. The red line in the picture
::::> pag e
194, fig. 208 or ::::, page 194, fig. 209 indicates th e collis ion
area . You shou ld stop backing up, preferably before you reach this
point ::::>
&.
If your vehicle is close to an obstacle, the visual distance display
a lso appears in the picture from the rear -view camera . This superim
posed display is intended to help d isplay the relevan t critica l vehicle
area.
I f the visual d isplay is shown on the MMI display and you press the
control button with the Rear view function::::> page
191, fig. 207, the
pictu re from the rear -v iew came ra is displayed.
If the picture from the rear -view camera is s hown a nd you press the
control button w ith the Graphic function ::::, page
196, fig. 212, the
visual display is shown.
T he picture from the rear -view camera can be switched off on the
M MI display ::::, page
203 . The acoustic distance warn ing re mains
active.
I f you press a function button on the MMI te rmina l, the rear-view
camera p icture disappears. The rear -v iew came ra picture reappears
the next time you park. But the picture from the rear -view camera
can also be shown aga in on the MM I display by manually switching
off and on with the
P •1A switch . Further information regarding the
MMI terminal is included in the MM I user's ma nual.
Controls and equip
ment
& WARNING
• Sensor s have dead space s in which obje cts cannot be
detected. Be e spe cially careful to check for small children and
an imals before ba cking up . Small children and animals will not
always be detected by the sensors.
• The Audi parking system is not a substitute for being careful
and alert when backing up. Be e spe cially careful during parking
and similar maneuver s. A lways watch where you are dri ving and
make sure that nothing is in the way.
• Remember that low ob sta cles which have already been
s ignaled may pass below the system' s sen sing zone when the
v ehi cle is ba cking up . The fa ct that the signal stop s doe s not mean
that you have cleared the obstacle . When the signal stops , impact
is imminent . Obje cts su ch as trailer hit che s, chain s, narrow posts
or fences covered by a thin l ayer of paint may not always be
detected by the sy stem. They can still damage your vehicle
without warning .
• Alway s make sure that the volume and frequency of the chime s
is adjusted so that you can eas ily hear the acoustic distance signal
even if the radio is playing , the air -conditioner blower is on High or
there is a high level of out side noise .
- Check the setting s whenever someone else has dri ven the
vehicle before you.
• Improper relian ce on the Aud i parking sy stem can cau se colli
sions and serious per sonal injury .
- Never rely only on parking assi st when ba cking up .
- Always check rear view mirrors to make sure it is safe to back
up .
[ i ] Tips
• The rear -view camera picture is available as soon as the MMI
Disp lay or the MMI is swi tch ed o n, or the start -up phase is
completed.
I • •
Page 196 of 426

• ..__A_ d_v _ a_ n_c _e _ d_ P_ a_r _k _in ---== g'-- S...:y _ s_ t_ e_ m ___________________________________________ _
• Keep the sensors in the rear bumper and the rear-view camera
lens clean and free of snow and ice, so that the Audi parking system
can work properly. P lease follow the additional notes on
=>
page 204 . •
Ap plie s to v ehic les: wit h Advance d Par kin g Syst em wit h re ar v ie w c am era
Rear -view camera (Rear View)
The rear -vie w camera picture, appearing in the MM/
Dis play, sh ows the area behind the vehicle .
Fig . 20 8 Top view:
Par king mode 1
Fig. 209 To p view:
P arki ng m od e 2
Parking m od e
Two different parking modes are available for parking with the rear
view camera . The two different parking modes are denotes as
"parking mode 1" => page 196 and " parking mode Z' => page 198.
"Parking mode 1" => fig . 208, for example, can be used to park in a
parking space or a parking garage=>
page 196.
"Parking mode 2" => fig . 209, for example, can be used to (parallel)
park on the side of the road=>
page 198.
"Parking mode 1" appears by defau lt in the MM I Disp lay if the rear
view camera is activated=>
page 191. You can switch to "parking
mode
2" by pressing the control button with the mode ©
=> page 196, fig . 213 function. By repeated ly pressing the control
bu tton with the
mode function, you can switch back and forth
between "parking mode
1" and "parking mode 2" .
Or ientat ion lines and marked surface s
Orientation lines and colored marked surfaces(=> page 196, fig. 212
or=> page 198, fig . 214) a re projected into the rear -view camera
pictures , subject to the two different parking modes . These orienta
t ion lines and surfaces offer aid when parking or maneuvering . The
orientation lines and surfaces refer to the height of a level driving
surface.
When the indicated orientat ion lines and indicated blue surfaces
superimpose vehicles or objects, at the latest, the respective
distance to the vehicles or objects has become too short
=>
page 200 .
If the trunk lid is open, or if an electrical connection to the factory
installed trailer socket*, or one installed according to factory speci
fications, is established=>
page 201, the orientation lines and
marked surfaces are
not displayed.
In the MMI you can preset which system is to be shown on the MMI
display =>
page 203:
• Visual display ,
• Rear -view camera pic ture,
• An automatic switch between visual display and rear -view
camera, or
• No picture.
Page 197 of 426

__________________________________________ A___;_ d_v _a_ n___;_ c __ e _d _ P_a_ r_ k_ i_n -=g ~ S_,y:... s_ t_ e_ m ___ llll
T he rear -v iew cam era can be turned on and off in the MMI
~ page 203 . The acous tic dista nce wa rning rem ains ac tive .
& WARNING
• The rear -view camera has blind spots, in which objects cannot
be detected . Be especially careful to check for small children and
animals before backing up. Small children and animals will not
always be detected by the sensors .
• The Audi parking system is not a substitute for being careful
and alert when backing up. Be especially careful during parking
and similar maneuvers . Always watch where you are driving and
make sure that nothing is in the way .
• Remember that low obstacles which have already been
signaled may pass below the system's sensing zone when the
vehicle is backing up . The fact that the signal stops does not mean
that you have cleared the obstacle. When the signal stops , impact
is imminent . Objects such as trailer hitches, chains , narrow posts
or fences covered by a thin layer of paint may not always be
detected by the system. They can still damage your vehicle
without warning .
• Always make sure that the volume and frequency of the chimes
is adjusted so that you can easily hear the acoustic distan ce signal
even if the radio is playing , the air-conditioner blower is on High or
there is a high level of outs ide noise .
- Check the settings whenever someone else has driven the
vehicle before you.
• Improper reliance on the Audi parking system can cause colli
sions and serious personal injury .
- Never rely only on parking assist when changing backing up.
- Always check rear view mirrors to make sure it is safe to back
up.
Controls and equip
ment
[ i ] Tips
• B efore par king w it h the rea r-view camera, the Adapti ve Ai r
S uspen sion * co mfort or automatic mode m ust be switched on
~ page 2 1.
• The rea r-vie w camera p ict ure i s avai la ble as soon as the M MI
Di sp lay or t he MMI is sw itched o n, o r the sta rt- up p hase is
completed.
• I n order for th e rear -view camera to function properly, the
came ra lens ~
page 191, fig. 205 mus t be ke pt clean, and free of
s n ow and ice . P lease fo llo w th e ad ditional notes on
~ p age 204.
• The camera c ove rage a ngle c hange s w hen the trun k lid is ope n.
Therefore, the rear -view camera picture is disp layed without orien
tati on lines an d without b lue s urfaces .
• Observe and fol low th e not es on towing mode * on~
page 201 . •
A pplies to vehic les : w it h Ad va nced Par kin g Sys te m with re ar view camer a
Rear-view camera coverage area
I • •
Fig. 210 Top view:
Rear-view camera
coverage area
Page 198 of 426

• ..__A_ d_v _ a_ n_c _e _ d_ P_ a_r _k _in ---== g'-- S...:y _ s_ t_ e_ m ___________________________________________ _
®
Fig. 211 Side view:
Covered area
G) and
uncovered area
0 of
the rear -view camera
The rear-view camera section appearing in th e MMI Display is
approximately the same as the coverage area represented in
=>
page 195, fig. 210 or G) in=> fig. 211 . Objects located in the rear
view camera's uncovered area®=> fig. 211 or in the close vicinity
of the bumper are not recognized.
& WARNING
Please note that objects not touching the ground can appear to be
further away than they really are (for example, the bumper of a
parked vehicle, a trailer hitch, or the rear of a truck). In this case,
you should not use the guide help lines to measure distance -
danger of accident!•
App lies to vehic les: with Advanced Par king System with rea r view camera
Parking mode 1
"Parking mode 1" can aid when parking in a garage or
parking space, for example .
Fig. 212 MMI Display :
Aiming at the parking
spot by adjusting the
steering wheel angle
Fig . 213 MMI Display:
Orienting the vehicle
with aid of the blue
surface
- Before parking, sw itch on the Adaptive Air Suspension *
==>
page 21 comfort or automatic mode .
Activate the Audi parking system==>
page 191. "Parking
mode 1"
==> fig. 212 is displayed by default. Dynam ic
orange orientation lines
0 and a blue static surface G)
are projected into the rear -view camera picture. _..
Page 199 of 426

__________________________________________ A___;_ d_v _a_ n___;_ c __ e _d _ P_a_ r_ k_ i_n -=g ~ S_,y:... s_ t_ e_ m ___ !II
- With the ve hicle stationary, select the proper s teering
whee l ang le for the parking spo t wit h the aid of t he
orange o rienta tion l ines.
- Wh ile driving in reve rse gear, ad just the stee ring wheel
angle to fit t he parking space with the a id of t he orange
ori entati on lines ~
0.
- Align your vehicle correspo nding to t he blue surface. The
blue su rfa ce s hould be parallel to the par kin g spot lines
~ page 196, fig . 213 .
G) Blue surfa ce
The surface beh ind the vehicle, identified by various shades of blue,
represents an ex tension of the outer vehic le outline by approxi
mately 16 ft (5 ml to the rear. The transitions of the blue surfaces are
distanced approxima te ly 3 ft (1 ml, 6 ft (2 m), and 16 ft (5 m) away
from the vehicle .
@ and 0 Orange orientation lines
The orientation lines change direction with the steering wheel
ang le . These lines identi fy t he direction of travel the rear o f the
vehicle would be taking, driving in reverse gear with the current
steering whee l ang le .
The dynamic orientation lines are provided with markers@. These
markers are each placed at a distance of approx. 3 ft ( 1 ml from one
another. Through these markers, the distance to an obstacle can be
estimated .
©Redline
The distance between your rear bumper© and the red line is
approximately 16 inches (40 cm):::::,&. Here, at the latest, you
should stop backing up:::::,
page 200.
© Rear bumper
The rear bumper of your vehic le also appears in the MMI Display, for
better orientation .
Controls and equip
ment
& WARNING
Plea se note that objects not to uching the grou nd can appe ar to be
further away than they really are (for ex ample , the bumper of a
par ked veh icle, a trailer h itch , or the rear of a tru ck). In this ca se ,
you should not u se the guide h elp lines to mea sure distan ce -
d anger of accident !
0 Note
In the MM I Disp lay, the direct ion of travel of the vehicle rear is
shown depending on the steering whee l angle . The vehicle front
sw ings out more than the vehic le rear.
[ i ] Tips
• I n order for the rear -view camera to funct ion properly, the
camera lens:::::,
page 191, fig. 205 must be kept clean, and free of
snow and ice. Please foll ow the additional no tes on :::::,
page 204 .
• The positions of the orientation lines/ surfaces are displaced up
or down if the parking process is carried out with the rear -view
camera in Adaptive Air Suspension*:::::,
page 21 dynamic, offroad, or
lift mode. Therefore, the accuracy is reduced .•
I • •
Page 200 of 426

• ..__A_ d_v _ a_ n_c _e _ d_ P_ a_r _k _in ---== g'-- S...:y _ s_ t_ e_ m ___________________________________________ _
Applies to vehicles: with Advanced Parking System with rear view camera
Parking mode 2
"Parking mode 2" can be used as aid when (parallel)
parking on the side of the road, for example.
Fig . 214 MMI Display:
Blue surface aligned
with targeted parking
spot
Fig . 215 MMI Display:
Contact of the blue
curved line with the
curb
- Find a parking spot on the right side of the road, for
example.
- Switch on the Adaptive Air Suspension*=:>
page 21
comfort or automatic mode.
- Position your vehicle parallel to the edge of the road, approximately 3
ft (1 m) away from a parked vehicle
=:> page 194, fig. 209. When parking next to obstacles,
please note
=> page 199.
- Activate the Audi parking system=:> page 191. "Parking
mode 1" is displayed by default.
- Press the control button with the
mode @=> page 196,
fig. 213 function. "Parking mode 2" => fig. 214 appears in
the MMI Display.
Back up in reverse gear and adjust the posit ion of your
vehicle in such a way, that the dark blue surface indicated in the MMI Display@=> fig. 214 borders on the vehicle
behind, or the parking spot line. If you are
not parking
next to any obstacles=>
page 199, the long side of the
dark blue surface should border on the curb. The entire
dark blue surface has to fit into the parking spot
=> page 194, fig. 209.
- While the vehicle is stationary, turn your steering wheel
to the righ t as far as it will go.
- Back up into the parking spot. If you are
not parking next
to any obstacles=>
page 199, the dark blue bend©
should touch the curb=> fig. 215. Stop your vehicle.
- While the veh icle is stationary, turn your steering wheel
in the opposite direction (left) as far as it will go.
- Continue to back up into the parking spot until the
vehicle is parked parallel to the curb. When backing up, also keep an eye on the vehicle front=>
0.
With "parking mode 2", you can park on the left and right side of the
road. For this reason, the blue surfaces and curved lines are
displayed in different shades of blue. The dark blue surface
0 and
the dark blue curved line© can be used to park on the right side of
the road . The light blue surface G)and the light blue curved line©
can be used to park on the left side of the road. _.,