2008 NISSAN TEANA check oil
[x] Cancel search: check oilPage 1938 of 5121
TIMING CHAIN
EM-63
< ON-VEHICLE REPAIR >
C
D
E
F
G
H
I
J
K
L
MA
EM
N
P O
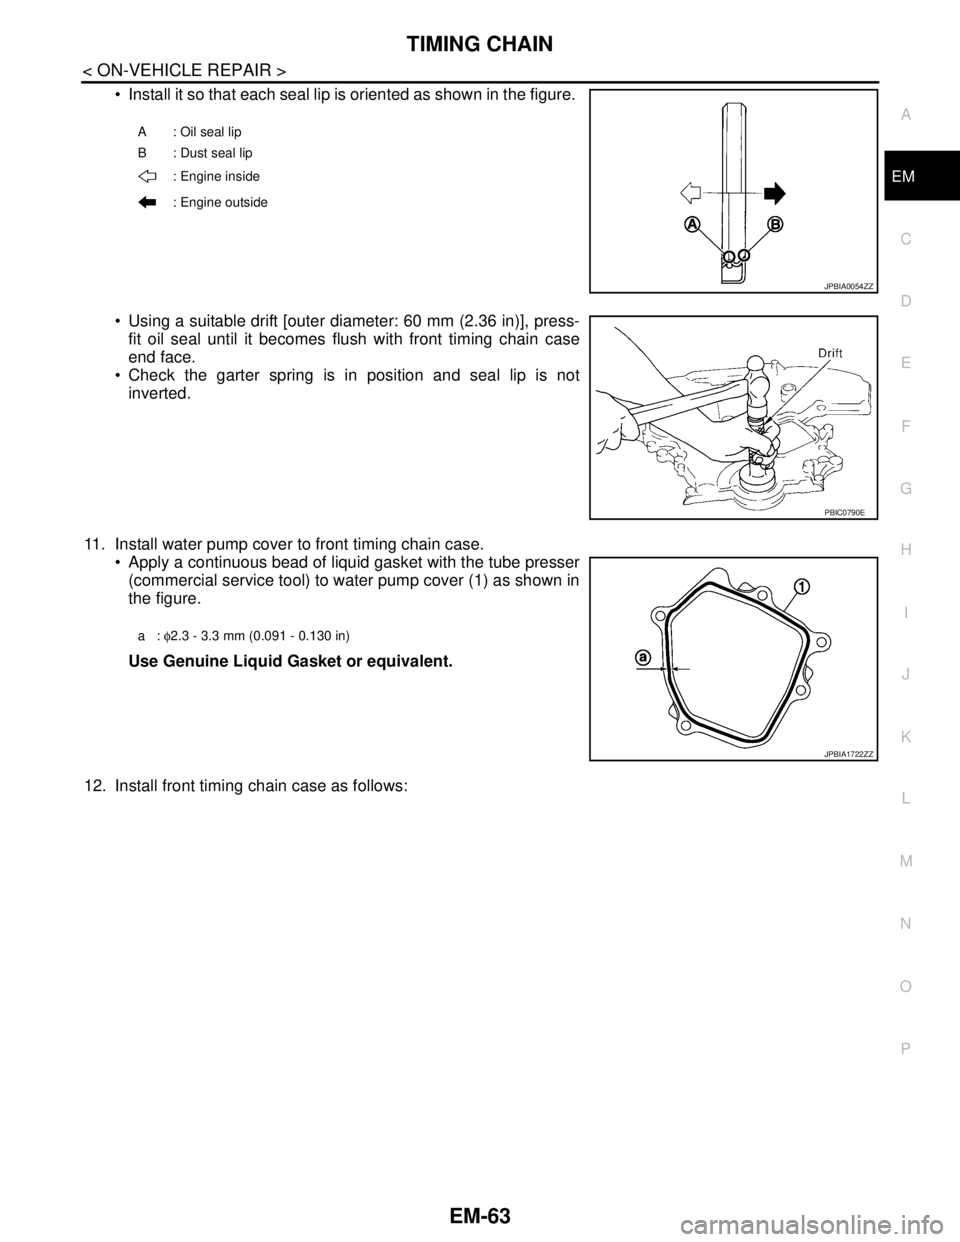
Install it so that each seal lip is oriented as shown in the figure.
Using a suitable drift [outer diameter: 60 mm (2.36 in)], press-
fit oil seal until it becomes flush with front timing chain case
end face.
Check the garter spring is in position and seal lip is not
inverted.
11. Install water pump cover to front timing chain case.
Apply a continuous bead of liquid gasket with the tube presser
(commercial service tool) to water pump cover (1) as shown in
the figure.
Use Genuine Liquid Gasket or equivalent.
12. Install front timing chain case as follows:
A: Oil seal lip
B : Dust seal lip
: Engine inside
: Engine outside
JPBIA0054ZZ
PBIC0790E
a: φ2.3 - 3.3 mm (0.091 - 0.130 in)
JPBIA1722ZZ
Page 1939 of 5121
EM-64
< ON-VEHICLE REPAIR >
TIMING CHAIN
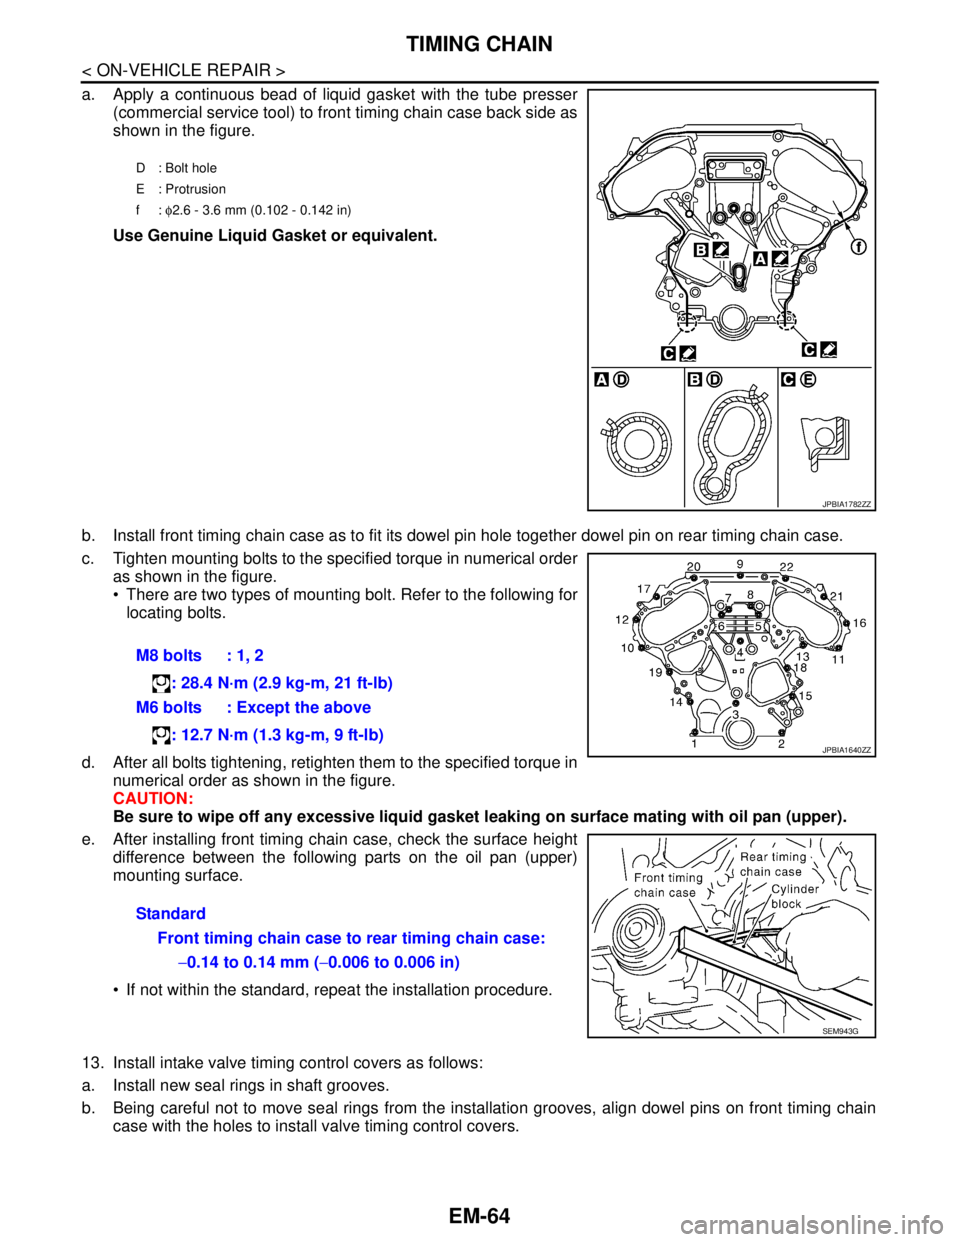
a. Apply a continuous bead of liquid gasket with the tube presser
(commercial service tool) to front timing chain case back side as
shown in the figure.
Use Genuine Liquid Gasket or equivalent.
b. Install front timing chain case as to fit its dowel pin hole together dowel pin on rear timing chain case.
c. Tighten mounting bolts to the specified torque in numerical order
as shown in the figure.
There are two types of mounting bolt. Refer to the following for
locating bolts.
d. After all bolts tightening, retighten them to the specified torque in
numerical order as shown in the figure.
CAUTION:
Be sure to wipe off any excessive liquid gasket leaking on surface mating with oil pan (upper).
e. After installing front timing chain case, check the surface height
difference between the following parts on the oil pan (upper)
mounting surface.
If not within the standard, repeat the installation procedure.
13. Install intake valve timing control covers as follows:
a. Install new seal rings in shaft grooves.
b. Being careful not to move seal rings from the installation grooves, align dowel pins on front timing chain
case with the holes to install valve timing control covers.
D: Bolt hole
E : Protrusion
f: φ2.6 - 3.6 mm (0.102 - 0.142 in)
JPBIA1782ZZ
M8 bolts : 1, 2
: 28.4 N·m (2.9 kg-m, 21 ft-lb)
M6 bolts : Except the above
: 12.7 N·m (1.3 kg-m, 9 ft-lb)
Standard
Front timing chain case to rear timing chain case:
−0.14 to 0.14 mm (−0.006 to 0.006 in)
JPBIA1640ZZ
SEM943G
Page 1940 of 5121
TIMING CHAIN
EM-65
< ON-VEHICLE REPAIR >
C
D
E
F
G
H
I
J
K
L
MA
EM
N
P O
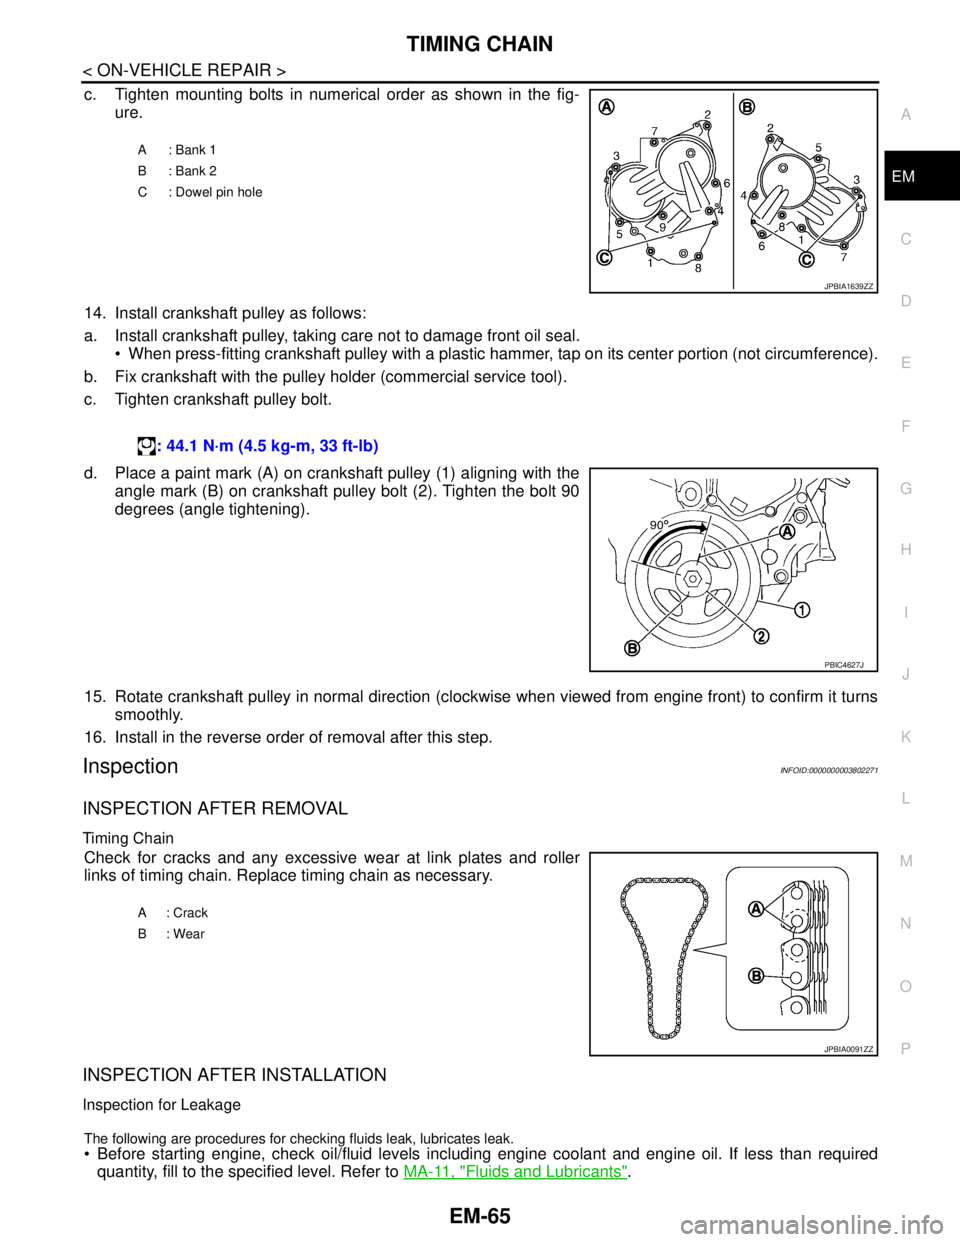
c. Tighten mounting bolts in numerical order as shown in the fig-
ure.
14. Install crankshaft pulley as follows:
a. Install crankshaft pulley, taking care not to damage front oil seal.
When press-fitting crankshaft pulley with a plastic hammer, tap on its center portion (not circumference).
b. Fix crankshaft with the pulley holder (commercial service tool).
c. Tighten crankshaft pulley bolt.
d. Place a paint mark (A) on crankshaft pulley (1) aligning with the
angle mark (B) on crankshaft pulley bolt (2). Tighten the bolt 90
degrees (angle tightening).
15. Rotate crankshaft pulley in normal direction (clockwise when viewed from engine front) to confirm it turns
smoothly.
16. Install in the reverse order of removal after this step.
InspectionINFOID:0000000003802271
INSPECTION AFTER REMOVAL
Timing Chain
Check for cracks and any excessive wear at link plates and roller
links of timing chain. Replace timing chain as necessary.
INSPECTION AFTER INSTALLATION
Inspection for Leakage
The following are procedures for checking fluids leak, lubricates leak.
Before starting engine, check oil/fluid levels including engine coolant and engine oil. If less than required
quantity, fill to the specified level. Refer to MA-11, "
Fluids and Lubricants".
A: Bank 1
B: Bank 2
C : Dowel pin hole
JPBIA1639ZZ
: 44.1 N·m (4.5 kg-m, 33 ft-lb)
PBIC4627J
A: Crack
B: Wear
JPBIA0091ZZ
Page 1941 of 5121

EM-66
< ON-VEHICLE REPAIR >
TIMING CHAIN
Use procedure below to check for fuel leakage.
- Turn ignition switch “ON” (with engine stopped). With fuel pressure applied to fuel piping, check for fuel leak-
age at connection points.
- Start engine. With engine speed increased, check again for fuel leakage at connection points.
Run engine to check for unusual noise and vibration.
NOTE:
If hydraulic pressure inside chain tensioner drops after removal/installation, slack in guide may generate a
pounding noise during and just after the engine start. However, this does not indicate an unusualness. Noise
will stop after hydraulic pressure rises.
Warm up engine thoroughly to check there is no leakage of fuel, or any oil/fluids including engine oil and
engine coolant.
Bleed air from lines and hoses of applicable lines, such as in cooling system.
After cooling down engine, again check oil/fluid levels including engine oil and engine coolant. Refill to the
specified level, if necessary.
Summary of the inspection items:
*: Transmission/transaxle/CVT fluid, power steering fluid, brake fluid, etc.Items Before starting engine Engine running After engine stopped
Engine coolant Level Leakage Level
Engine oil Level Leakage Level
Other oils and fluid* Level Leakage Level
Fuel Leakage Leakage Leakage
Page 1944 of 5121
ENGINE ASSEMBLY
EM-69
< REMOVAL AND INSTALLATION >
C
D
E
F
G
H
I
J
K
L
MA
EM
N
P O
10. Remove starter motor. Refer to STR-15, "VQ25DE : Exploded View" (VQ25DE) or STR-20, "VQ35DE :
Exploded View" (VQ35DE).
Vehicle Underbody
1. Remove front drive shafts (RH and LH). Refer to FAX-16, "Exploded View".
2. Remove exhaust front tube. Refer to EX-5, "
Exploded View".
3. Remove heat insulator.
4. Disconnect steering lower joint at power steering gear assembly side, and release steering lower shaft.
Refer to ST-16, "
Exploded View".
5. Disconnect front stabilizer connecting rod. Refer to FSU-14, "
Exploded View".
6. Remove strut assembly and steering knuckle fixing nuts and bolts. Refer to FSU-9, "
Exploded View" and
FA X - 8 , "
Exploded View".
7. Remove front wheel sensor (RH and LH) for ABS from steering knuckle. Refer to BRC-57, "
FRONT
WHEEL SENSOR : Exploded View".
8. Remove front brake caliper assembly with piping connected, and temporarily secure it to aside for vehicle
side. Refer to BR-34, "
BRAKE CALIPER ASSEMBLY : Exploded View".
9. Disconnect power steering piping at a point between vehicle and engine. Refer to ST-34, "
Exploded
View".
Install plug to avoid leakage of power steering fluid.
10. Remove rear plate cover from oil pan (upper). Then remove bolts fixing drive plate to torque converter.
Refer to EM-38, "
Exploded View" and TM-332, "Removal and Installation" (VQ25DE) or TM-168,
"Removal and Installation" (VQ35DE).
11. Remove transaxle joint bolts which pierce at oil pan (upper) lower rear side. Refer to EM-38, "
Exploded
View".
12. Remove crankshaft position sensor (POS). Refer to EM-38, "
Exploded View".
CAUTION:
Handle carefully to avoid dropping and shocks.
Never disassemble.
Never allow metal powder to adhere to magnetic part at sensor tip.
Never place sensors in a location where they are exposed to magnetism.
Removal
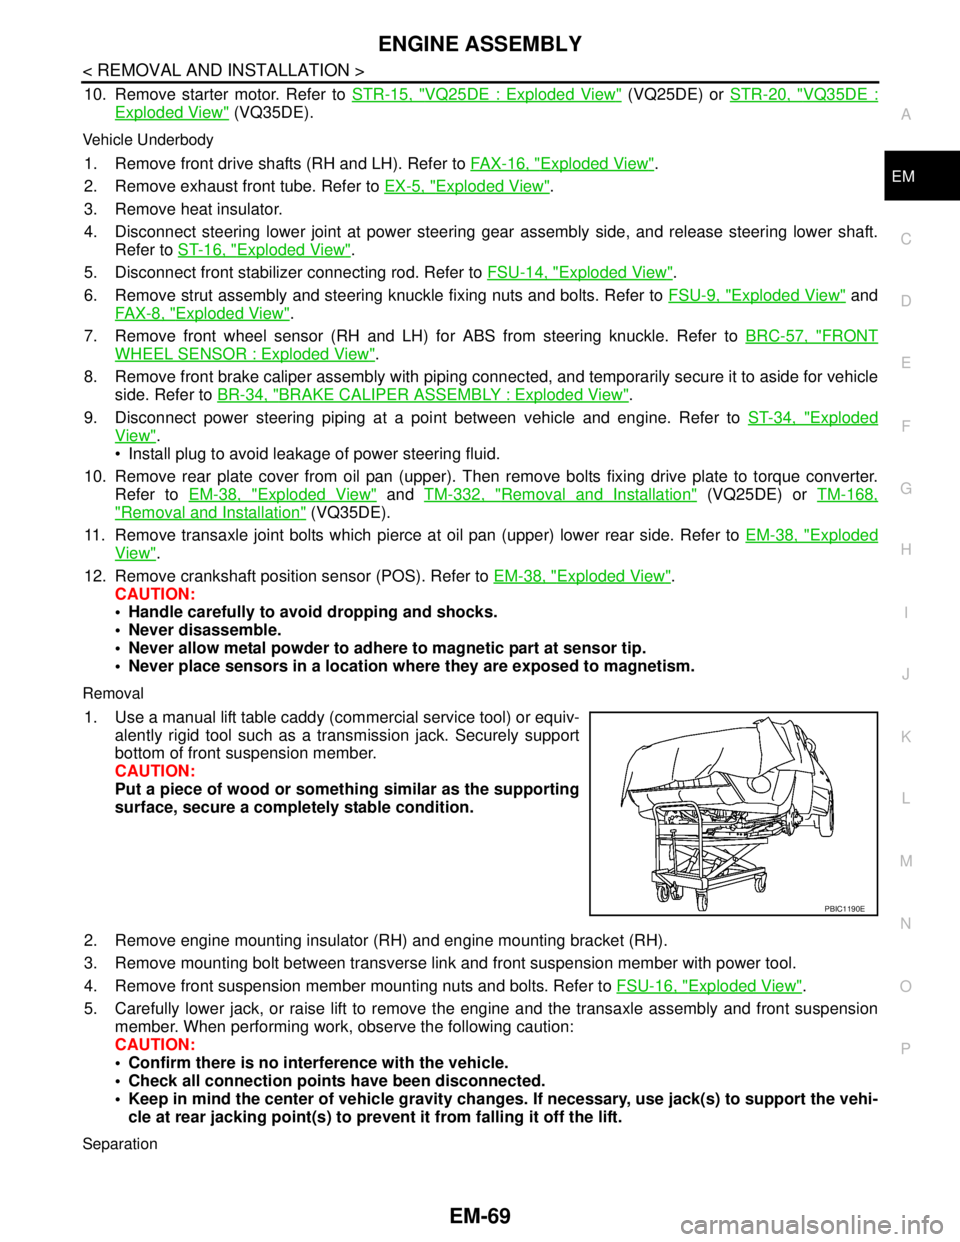
1. Use a manual lift table caddy (commercial service tool) or equiv-
alently rigid tool such as a transmission jack. Securely support
bottom of front suspension member.
CAUTION:
Put a piece of wood or something similar as the supporting
surface, secure a completely stable condition.
2. Remove engine mounting insulator (RH) and engine mounting bracket (RH).
3. Remove mounting bolt between transverse link and front suspension member with power tool.
4. Remove front suspension member mounting nuts and bolts. Refer to FSU-16, "
Exploded View".
5. Carefully lower jack, or raise lift to remove the engine and the transaxle assembly and front suspension
member. When performing work, observe the following caution:
CAUTION:
Confirm there is no interference with the vehicle.
Check all connection points have been disconnected.
Keep in mind the center of vehicle gravity changes. If necessary, use jack(s) to support the vehi-
cle at rear jacking point(s) to prevent it from falling it off the lift.
Separation
PBIC1190E
Page 1945 of 5121
EM-70
< REMOVAL AND INSTALLATION >
ENGINE ASSEMBLY
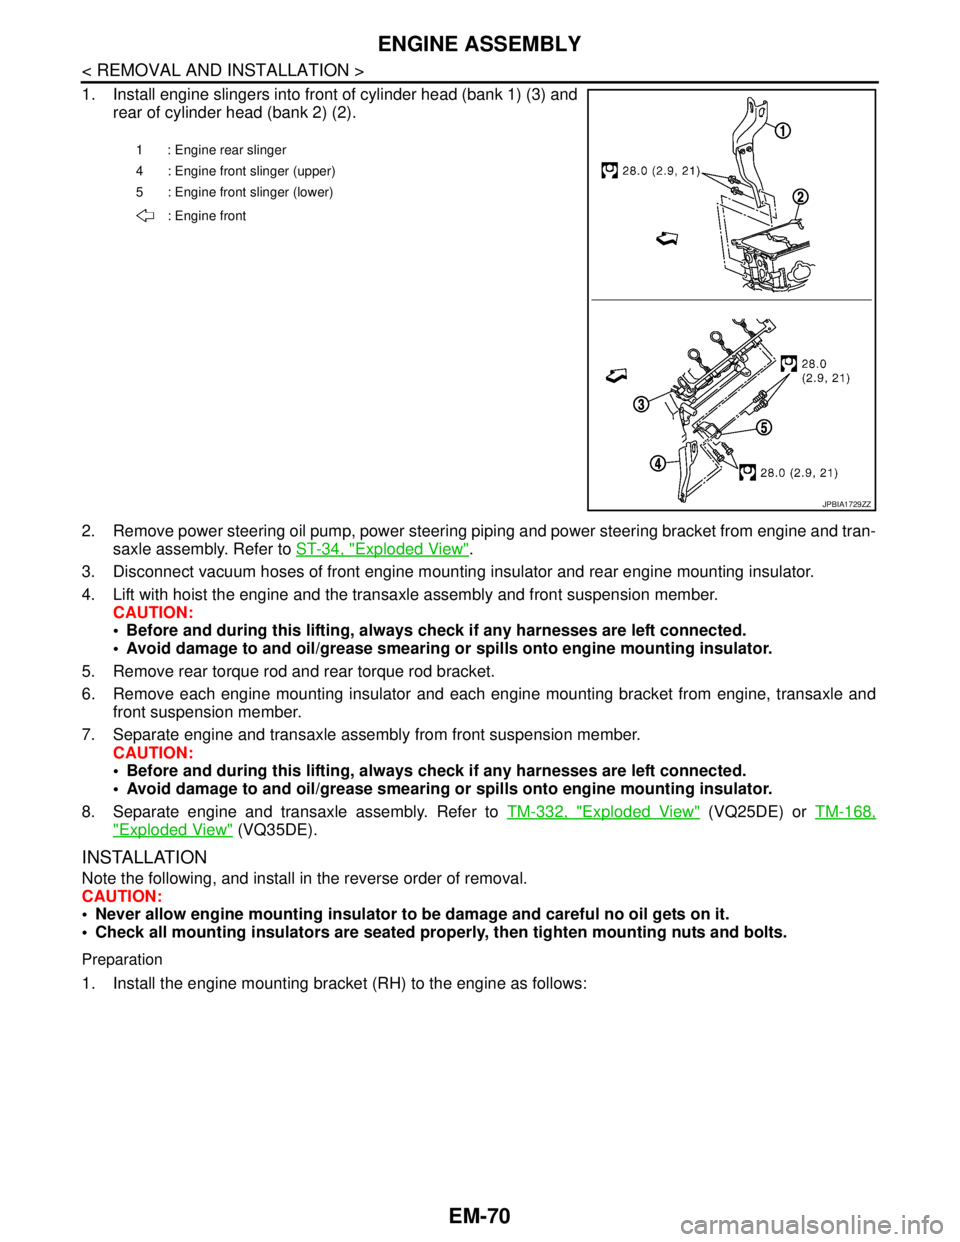
1. Install engine slingers into front of cylinder head (bank 1) (3) and
rear of cylinder head (bank 2) (2).
2. Remove power steering oil pump, power steering piping and power steering bracket from engine and tran-
saxle assembly. Refer to ST-34, "
Exploded View".
3. Disconnect vacuum hoses of front engine mounting insulator and rear engine mounting insulator.
4. Lift with hoist the engine and the transaxle assembly and front suspension member.
CAUTION:
Before and during this lifting, always check if any harnesses are left connected.
Avoid damage to and oil/grease smearing or spills onto engine mounting insulator.
5. Remove rear torque rod and rear torque rod bracket.
6. Remove each engine mounting insulator and each engine mounting bracket from engine, transaxle and
front suspension member.
7. Separate engine and transaxle assembly from front suspension member.
CAUTION:
Before and during this lifting, always check if any harnesses are left connected.
Avoid damage to and oil/grease smearing or spills onto engine mounting insulator.
8. Separate engine and transaxle assembly. Refer to TM-332, "
Exploded View" (VQ25DE) or TM-168,
"Exploded View" (VQ35DE).
INSTALLATION
Note the following, and install in the reverse order of removal.
CAUTION:
Never allow engine mounting insulator to be damage and careful no oil gets on it.
Check all mounting insulators are seated properly, then tighten mounting nuts and bolts.
Preparation
1. Install the engine mounting bracket (RH) to the engine as follows:
1 : Engine rear slinger
4 : Engine front slinger (upper)
5 : Engine front slinger (lower)
: Engine front
JPBIA1729ZZ
Page 1950 of 5121
ENGINE ASSEMBLY
EM-75
< REMOVAL AND INSTALLATION >
C
D
E
F
G
H
I
J
K
L
MA
EM
N
P O
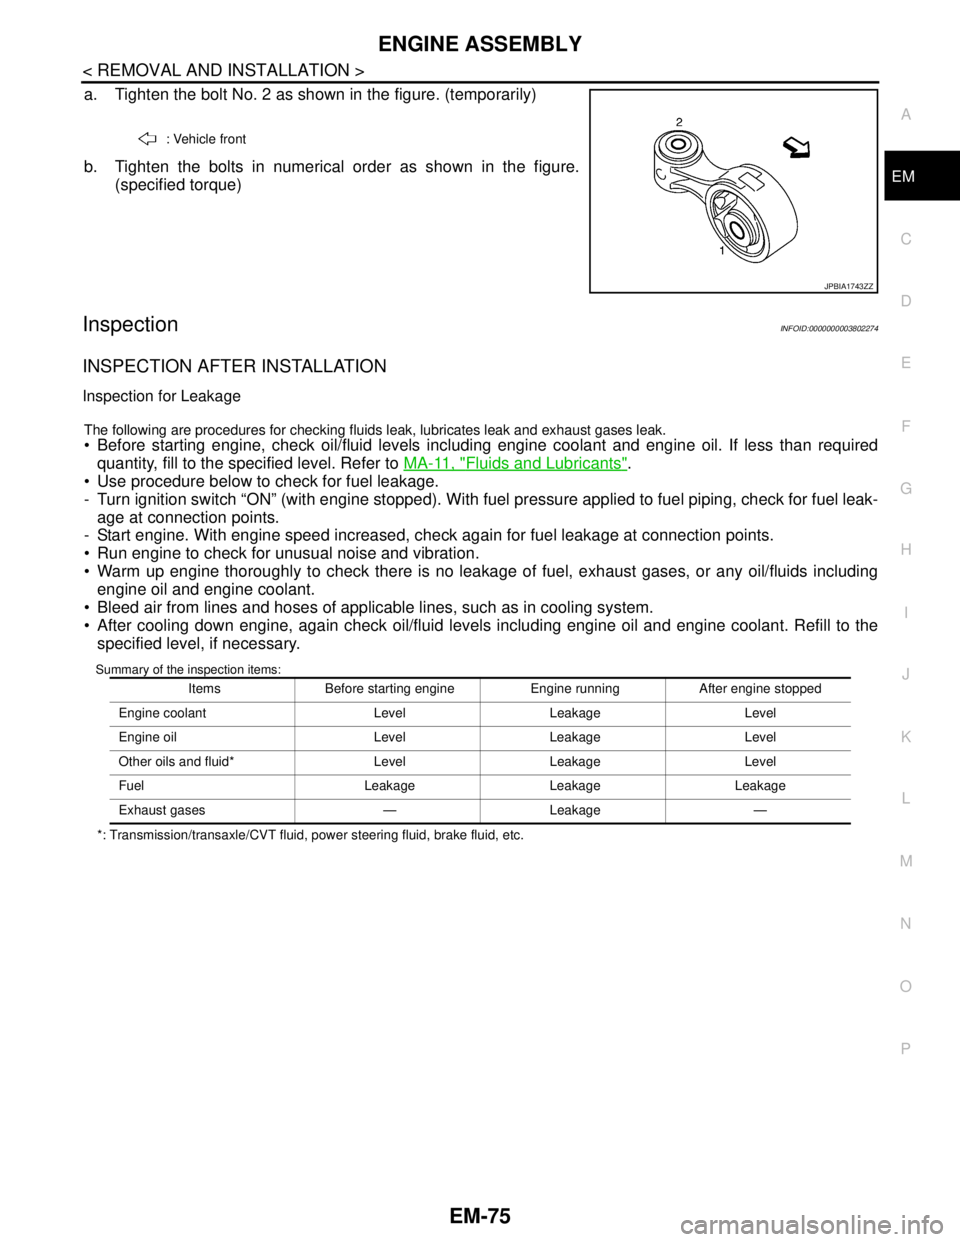
a. Tighten the bolt No. 2 as shown in the figure. (temporarily)
b. Tighten the bolts in numerical order as shown in the figure.
(specified torque)
InspectionINFOID:0000000003802274
INSPECTION AFTER INSTALLATION
Inspection for Leakage
The following are procedures for checking fluids leak, lubricates leak and exhaust gases leak.
Before starting engine, check oil/fluid levels including engine coolant and engine oil. If less than required
quantity, fill to the specified level. Refer to MA-11, "
Fluids and Lubricants".
Use procedure below to check for fuel leakage.
- Turn ignition switch “ON” (with engine stopped). With fuel pressure applied to fuel piping, check for fuel leak-
age at connection points.
- Start engine. With engine speed increased, check again for fuel leakage at connection points.
Run engine to check for unusual noise and vibration.
Warm up engine thoroughly to check there is no leakage of fuel, exhaust gases, or any oil/fluids including
engine oil and engine coolant.
Bleed air from lines and hoses of applicable lines, such as in cooling system.
After cooling down engine, again check oil/fluid levels including engine oil and engine coolant. Refill to the
specified level, if necessary.
Summary of the inspection items:
*: Transmission/transaxle/CVT fluid, power steering fluid, brake fluid, etc.: Vehicle front
JPBIA1743ZZ
Items Before starting engine Engine running After engine stopped
Engine coolant Level Leakage Level
Engine oil Level Leakage Level
Other oils and fluid* Level Leakage Level
Fuel Leakage Leakage Leakage
Exhaust gases — Leakage —
Page 1951 of 5121
EM-76
< DISASSEMBLY AND ASSEMBLY >
ENGINE STAND SETTING
DISASSEMBLY AND ASSEMBLY
ENGINE STAND SETTING
SettingINFOID:0000000003802278
NOTE:
Explained here is how to disassemble with engine stand supporting transaxle surface. When using different
type of engine stand, note with difference in steps and etc.
1. Remove the engine assembly from the vehicle. Refer to EM-67, "
Exploded View".
2. Remove the parts that may restrict installation of engine to widely use engine stand.
NOTE:
The procedure is described assuming that you use a widely use engine stand holding the surface, to
which transmission is installed.
Remove drive plate. Fix crankshaft pulley with the pulley holder (commercial service tool), and remove
mounting bolts.
Loosen mounting bolts in diagonal order.
Check for deformation or damage drive plate.
CAUTION:
Never disassemble drive plate.
Never place drive plate with signal plate facing down.
When handling signal plate, take care not to damage or scratch it.
Handle signal plate in a manner that prevents it from becoming magnetized.
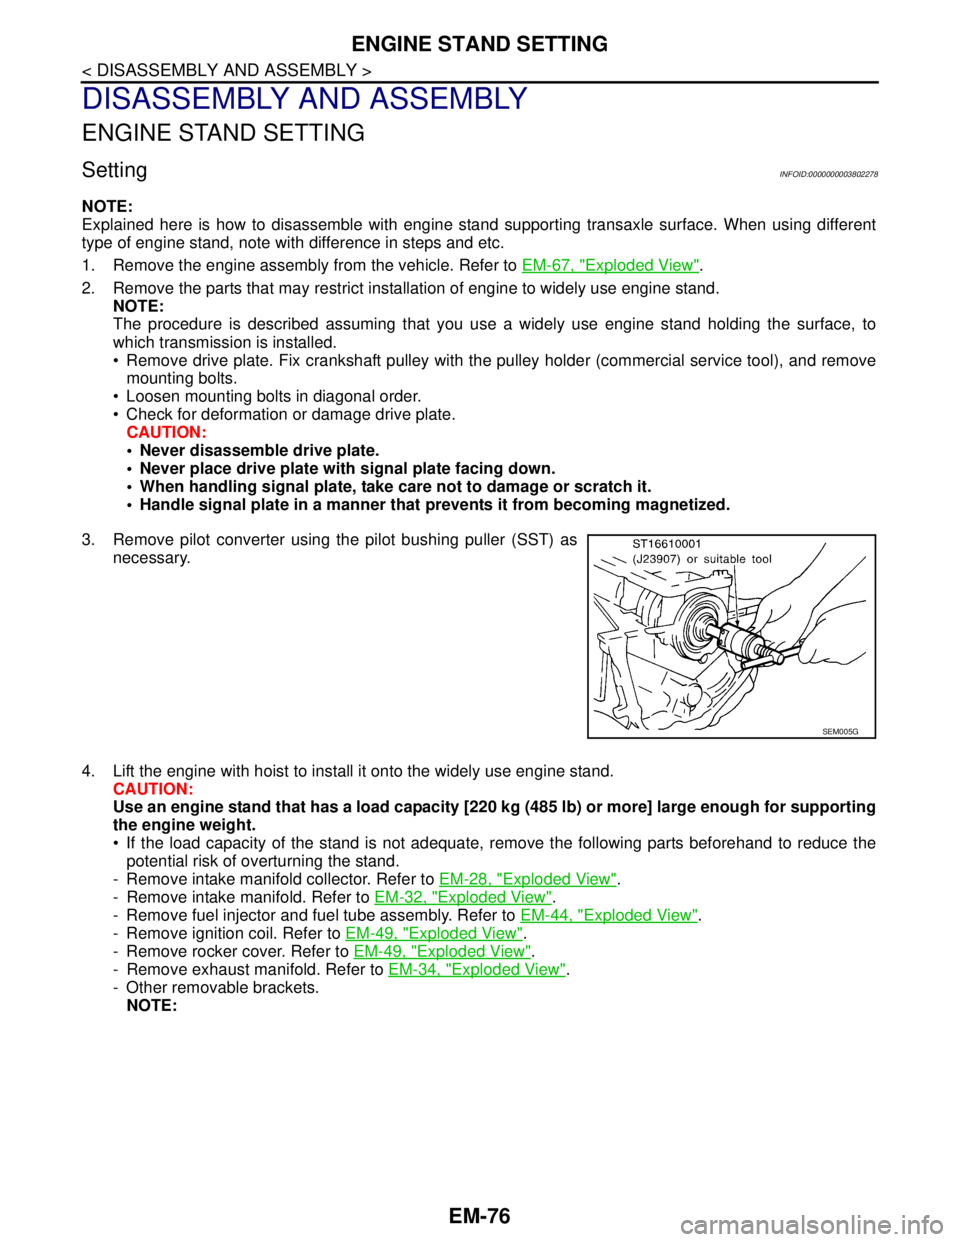
3. Remove pilot converter using the pilot bushing puller (SST) as
necessary.
4. Lift the engine with hoist to install it onto the widely use engine stand.
CAUTION:
Use an engine stand that has a load capacity [220 kg (485 lb) or more] large enough for supporting
the engine weight.
If the load capacity of the stand is not adequate, remove the following parts beforehand to reduce the
potential risk of overturning the stand.
- Remove intake manifold collector. Refer to EM-28, "
Exploded View".
- Remove intake manifold. Refer to EM-32, "
Exploded View".
- Remove fuel injector and fuel tube assembly. Refer to EM-44, "
Exploded View".
- Remove ignition coil. Refer to EM-49, "
Exploded View".
- Remove rocker cover. Refer to EM-49, "
Exploded View".
- Remove exhaust manifold. Refer to EM-34, "
Exploded View".
- Other removable brackets.
NOTE:
SEM005G