2008 NISSAN TEANA check oil
[x] Cancel search: check oilPage 1977 of 5121
EM-102
< DISASSEMBLY AND ASSEMBLY >
CYLINDER HEAD
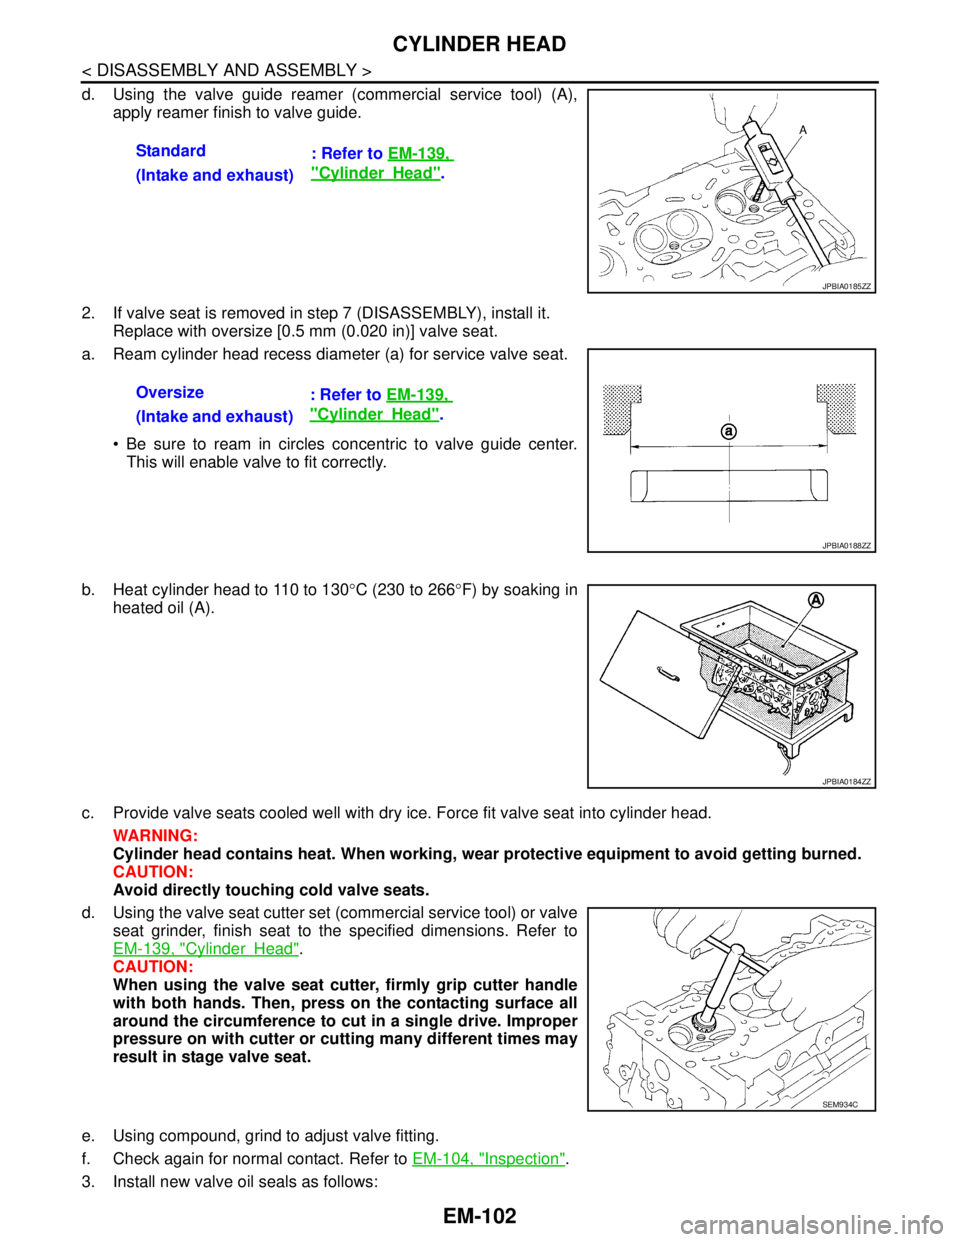
d. Using the valve guide reamer (commercial service tool) (A),
apply reamer finish to valve guide.
2. If valve seat is removed in step 7 (DISASSEMBLY), install it.
Replace with oversize [0.5 mm (0.020 in)] valve seat.
a. Ream cylinder head recess diameter (a) for service valve seat.
Be sure to ream in circles concentric to valve guide center.
This will enable valve to fit correctly.
b. Heat cylinder head to 110 to 130°C (230 to 266°F) by soaking in
heated oil (A).
c. Provide valve seats cooled well with dry ice. Force fit valve seat into cylinder head.
WARNING:
Cylinder head contains heat. When working, wear protective equipment to avoid getting burned.
CAUTION:
Avoid directly touching cold valve seats.
d. Using the valve seat cutter set (commercial service tool) or valve
seat grinder, finish seat to the specified dimensions. Refer to
EM-139, "
CylinderHead".
CAUTION:
When using the valve seat cutter, firmly grip cutter handle
with both hands. Then, press on the contacting surface all
around the circumference to cut in a single drive. Improper
pressure on with cutter or cutting many different times may
result in stage valve seat.
e. Using compound, grind to adjust valve fitting.
f. Check again for normal contact. Refer to EM-104, "
Inspection".
3. Install new valve oil seals as follows:Standard
: Refer to EM-139,
"CylinderHead".
(Intake and exhaust)
JPBIA0185ZZ
Oversize
: Refer to EM-139,
"CylinderHead".
(Intake and exhaust)
JPBIA0188ZZ
JPBIA0184ZZ
SEM934C
Page 1978 of 5121
CYLINDER HEAD
EM-103
< DISASSEMBLY AND ASSEMBLY >
C
D
E
F
G
H
I
J
K
L
MA
EM
N
P O
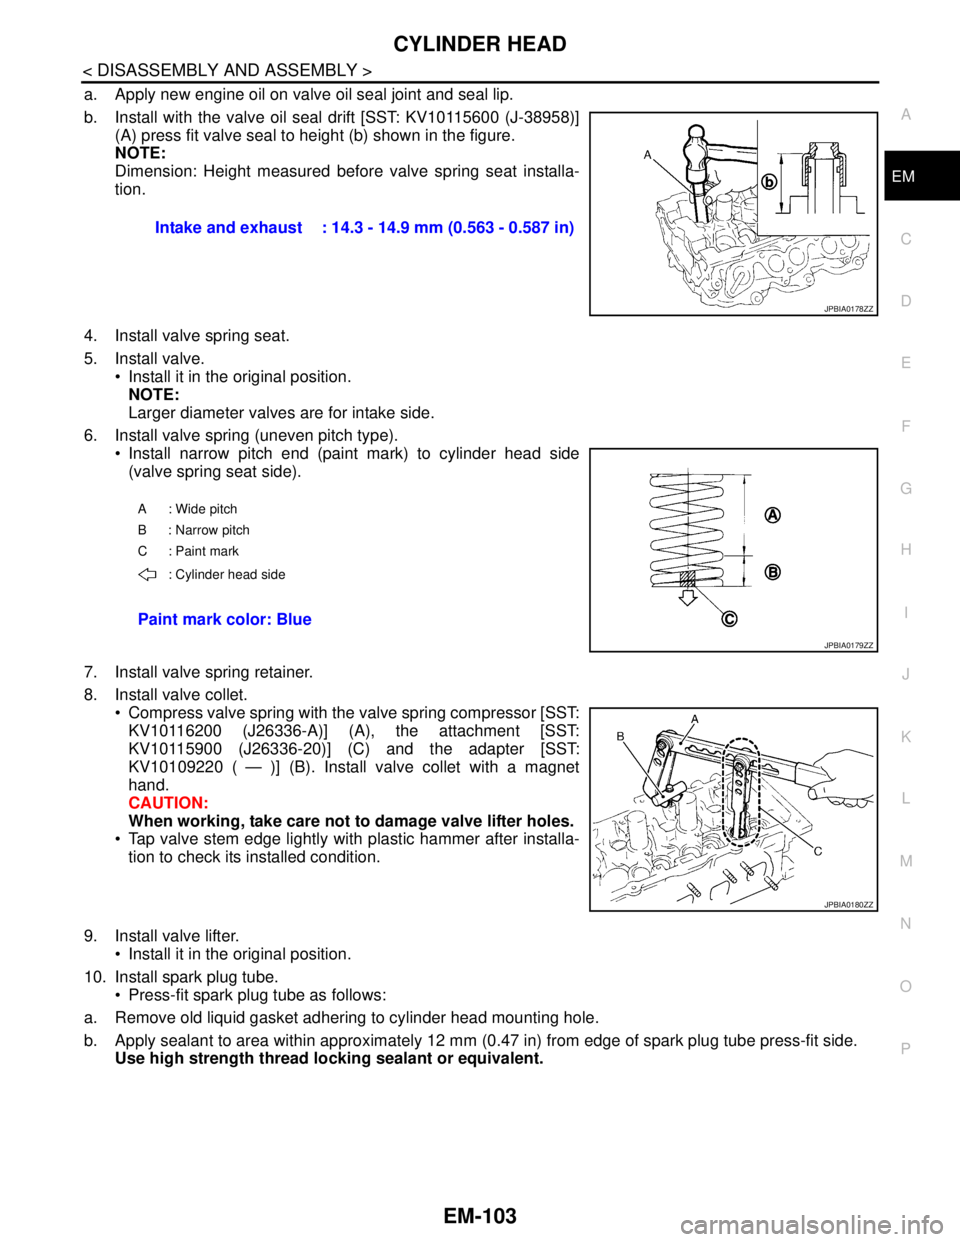
a. Apply new engine oil on valve oil seal joint and seal lip.
b. Install with the valve oil seal drift [SST: KV10115600 (J-38958)]
(A) press fit valve seal to height (b) shown in the figure.
NOTE:
Dimension: Height measured before valve spring seat installa-
tion.
4. Install valve spring seat.
5. Install valve.
Install it in the original position.
NOTE:
Larger diameter valves are for intake side.
6. Install valve spring (uneven pitch type).
Install narrow pitch end (paint mark) to cylinder head side
(valve spring seat side).
7. Install valve spring retainer.
8. Install valve collet.
Compress valve spring with the valve spring compressor [SST:
KV10116200 (J26336-A)] (A), the attachment [SST:
KV10115900 (J26336-20)] (C) and the adapter [SST:
KV10109220 ( — )] (B). Install valve collet with a magnet
hand.
CAUTION:
When working, take care not to damage valve lifter holes.
Tap valve stem edge lightly with plastic hammer after installa-
tion to check its installed condition.
9. Install valve lifter.
Install it in the original position.
10. Install spark plug tube.
Press-fit spark plug tube as follows:
a. Remove old liquid gasket adhering to cylinder head mounting hole.
b. Apply sealant to area within approximately 12 mm (0.47 in) from edge of spark plug tube press-fit side.
Use high strength thread locking sealant or equivalent. Intake and exhaust : 14.3 - 14.9 mm (0.563 - 0.587 in)
JPBIA0178ZZ
A : Wide pitch
B : Narrow pitch
C : Paint mark
: Cylinder head side
Paint mark color: Blue
JPBIA0179ZZ
JPBIA0180ZZ
Page 1979 of 5121
EM-104
< DISASSEMBLY AND ASSEMBLY >
CYLINDER HEAD
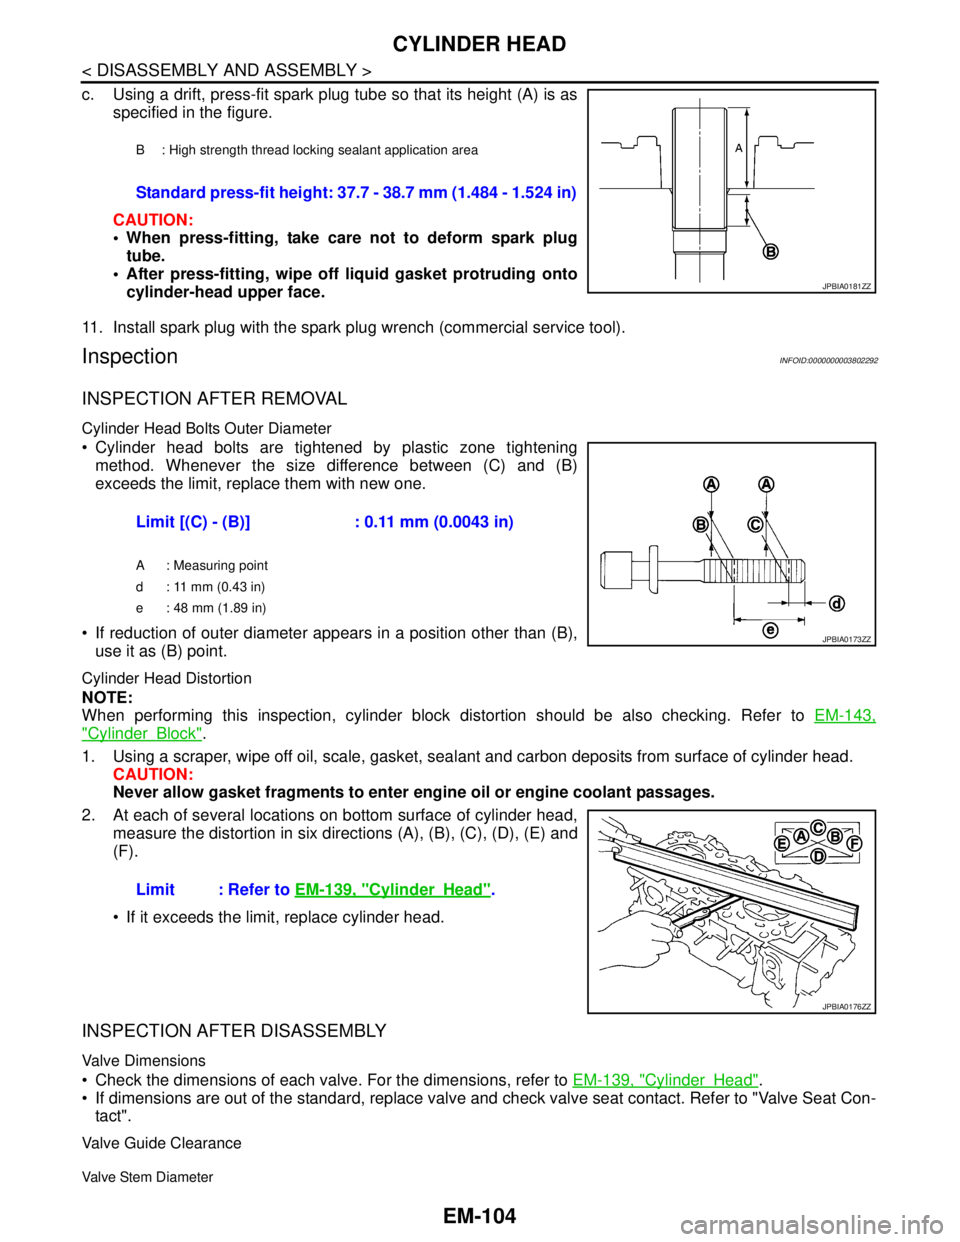
c. Using a drift, press-fit spark plug tube so that its height (A) is as
specified in the figure.
CAUTION:
When press-fitting, take care not to deform spark plug
tube.
After press-fitting, wipe off liquid gasket protruding onto
cylinder-head upper face.
11. Install spark plug with the spark plug wrench (commercial service tool).
InspectionINFOID:0000000003802292
INSPECTION AFTER REMOVAL
Cylinder Head Bolts Outer Diameter
Cylinder head bolts are tightened by plastic zone tightening
method. Whenever the size difference between (C) and (B)
exceeds the limit, replace them with new one.
If reduction of outer diameter appears in a position other than (B),
use it as (B) point.
Cylinder Head Distortion
NOTE:
When performing this inspection, cylinder block distortion should be also checking. Refer to EM-143,
"CylinderBlock".
1. Using a scraper, wipe off oil, scale, gasket, sealant and carbon deposits from surface of cylinder head.
CAUTION:
Never allow gasket fragments to enter engine oil or engine coolant passages.
2. At each of several locations on bottom surface of cylinder head,
measure the distortion in six directions (A), (B), (C), (D), (E) and
(F).
If it exceeds the limit, replace cylinder head.
INSPECTION AFTER DISASSEMBLY
Valve Dimensions
Check the dimensions of each valve. For the dimensions, refer to EM-139, "CylinderHead".
If dimensions are out of the standard, replace valve and check valve seat contact. Refer to "Valve Seat Con-
tact".
Valve Guide Clearance
Valve Stem Diameter
B : High strength thread locking sealant application area
Standard press-fit height: 37.7 - 38.7 mm (1.484 - 1.524 in)
JPBIA0181ZZ
Limit [(C) - (B)] : 0.11 mm (0.0043 in)
A : Measuring point
d : 11 mm (0.43 in)
e : 48 mm (1.89 in)
JPBIA0173ZZ
Limit : Refer to EM-139, "CylinderHead".
JPBIA0176ZZ
Page 1981 of 5121
EM-106
< DISASSEMBLY AND ASSEMBLY >
CYLINDER HEAD
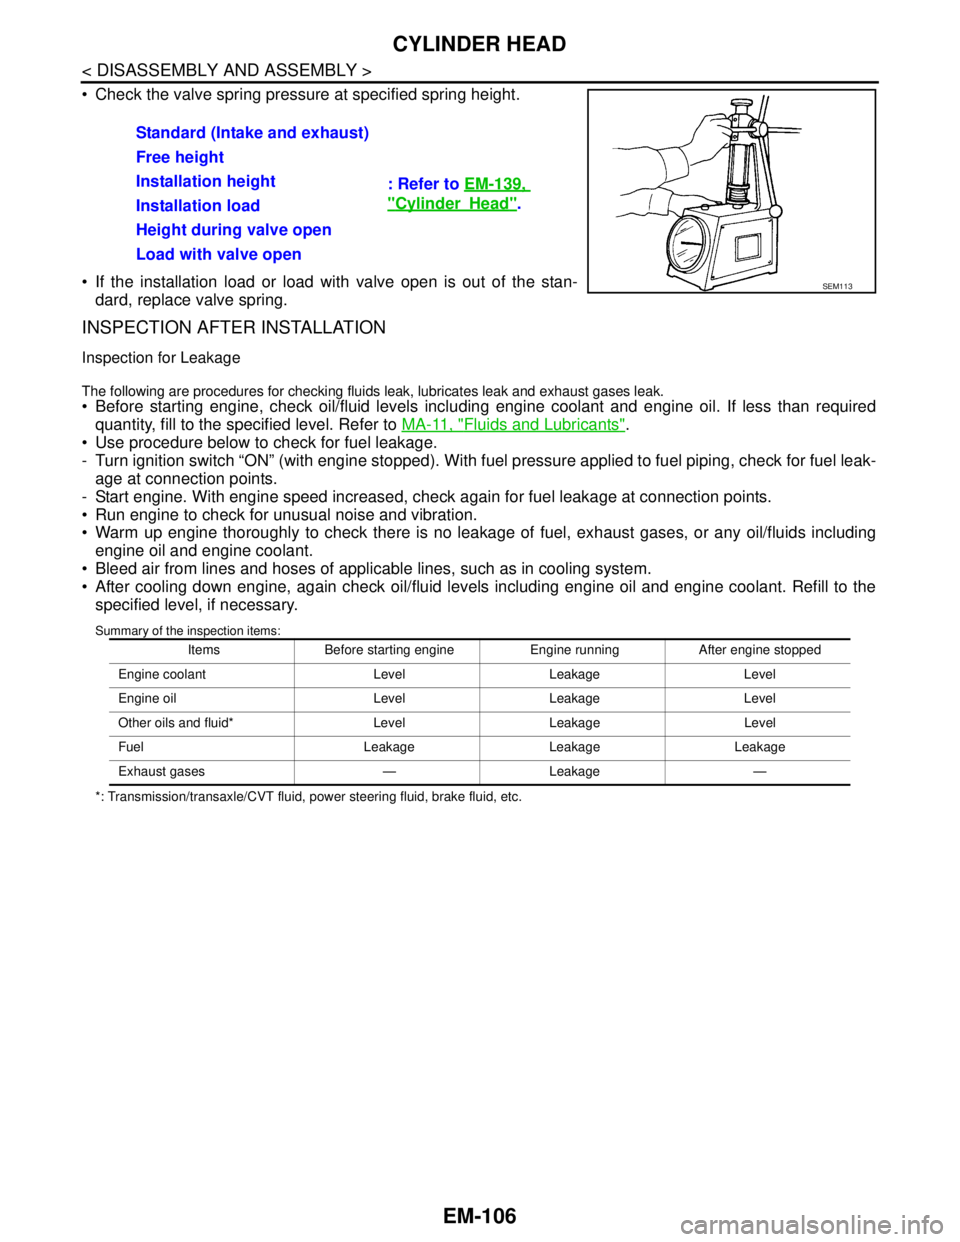
Check the valve spring pressure at specified spring height.
If the installation load or load with valve open is out of the stan-
dard, replace valve spring.
INSPECTION AFTER INSTALLATION
Inspection for Leakage
The following are procedures for checking fluids leak, lubricates leak and exhaust gases leak.
Before starting engine, check oil/fluid levels including engine coolant and engine oil. If less than required
quantity, fill to the specified level. Refer to MA-11, "
Fluids and Lubricants".
Use procedure below to check for fuel leakage.
- Turn ignition switch “ON” (with engine stopped). With fuel pressure applied to fuel piping, check for fuel leak-
age at connection points.
- Start engine. With engine speed increased, check again for fuel leakage at connection points.
Run engine to check for unusual noise and vibration.
Warm up engine thoroughly to check there is no leakage of fuel, exhaust gases, or any oil/fluids including
engine oil and engine coolant.
Bleed air from lines and hoses of applicable lines, such as in cooling system.
After cooling down engine, again check oil/fluid levels including engine oil and engine coolant. Refill to the
specified level, if necessary.
Summary of the inspection items:
*: Transmission/transaxle/CVT fluid, power steering fluid, brake fluid, etc.
Standard (Intake and exhaust)
: Refer to EM-139,
"CylinderHead". Free height
Installation height
Installation load
Height during valve open
Load with valve open
SEM113
Items Before starting engine Engine running After engine stopped
Engine coolant Level Leakage Level
Engine oil Level Leakage Level
Other oils and fluid* Level Leakage Level
Fuel Leakage Leakage Leakage
Exhaust gases — Leakage —
Page 1985 of 5121
EM-110
< DISASSEMBLY AND ASSEMBLY >
CYLINDER BLOCK
Disassembly and Assembly
INFOID:0000000003802294
DISASSEMBLY
1. Remove the following parts:
Intake manifold collector: Refer to EM-28, "
Exploded View".
Intake manifold: Refer to EM-32, "
Exploded View".
Oil pans (lower and upper): Refer to EM-38, "
Exploded View".
Front and rear timing chain case: Refer to EM-79, "
Exploded View".
Cylinder head: Refer to EM-96, "
Exploded View".
2. Remove knock sensor.
CAUTION:
Carefully handle sensor avoiding shocks.
3. Remove rear oil seal retainer.
Remove by inserting screwdriver between main bearing cap and rear oil seal retainer.
CAUTION:
If rear oil seal retainer is removed, replace it with new one.
NOTE:
Regard both rear oil seal and retainer as an assembly.
4. Remove baffle plate from main bearing beam.
5. Remove piston and connecting rod assembly with the following procedure:
Before removing piston and connecting rod assembly, check the connecting rod side clearance. Refer to
EM-119, "
Inspection".
CAUTION:
Be careful not to drop connecting rod bearing, and to scratch the surface.
a. Position crankshaft pin corresponding to connecting rod to be removed onto the bottom dead center.
b. Remove connecting rod bearing cap.
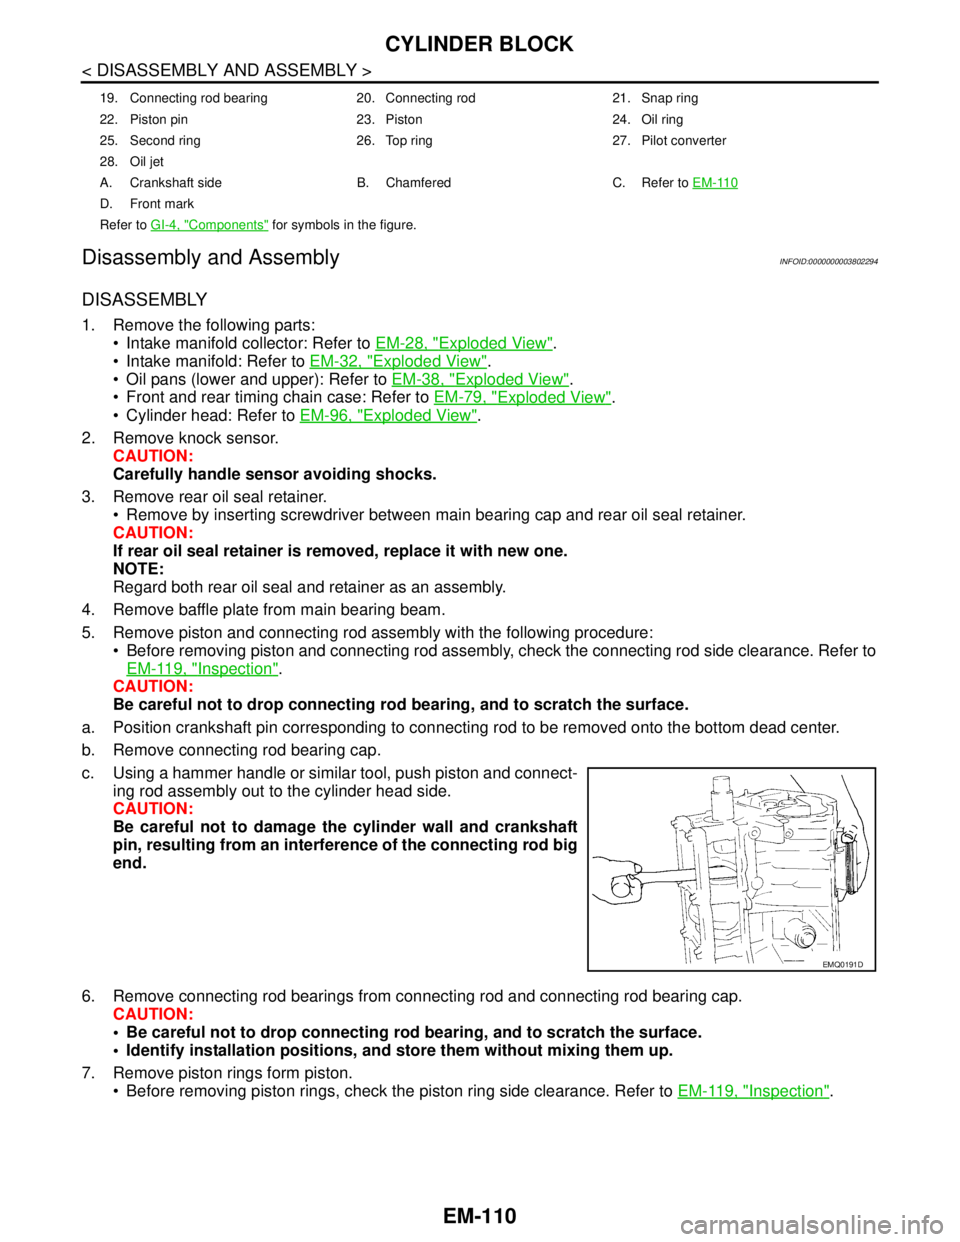
c. Using a hammer handle or similar tool, push piston and connect-
ing rod assembly out to the cylinder head side.
CAUTION:
Be careful not to damage the cylinder wall and crankshaft
pin, resulting from an interference of the connecting rod big
end.
6. Remove connecting rod bearings from connecting rod and connecting rod bearing cap.
CAUTION:
Be careful not to drop connecting rod bearing, and to scratch the surface.
Identify installation positions, and store them without mixing them up.
7. Remove piston rings form piston.
Before removing piston rings, check the piston ring side clearance. Refer to EM-119, "
Inspection".
19. Connecting rod bearing 20. Connecting rod 21. Snap ring
22. Piston pin 23. Piston 24. Oil ring
25. Second ring 26. Top ring 27. Pilot converter
28. Oil jet
A. Crankshaft side B. Chamfered C. Refer to EM-110
D. Front mark
Refer to GI-4, "
Components" for symbols in the figure.
EMQ0191D
Page 1989 of 5121
EM-114
< DISASSEMBLY AND ASSEMBLY >
CYLINDER BLOCK
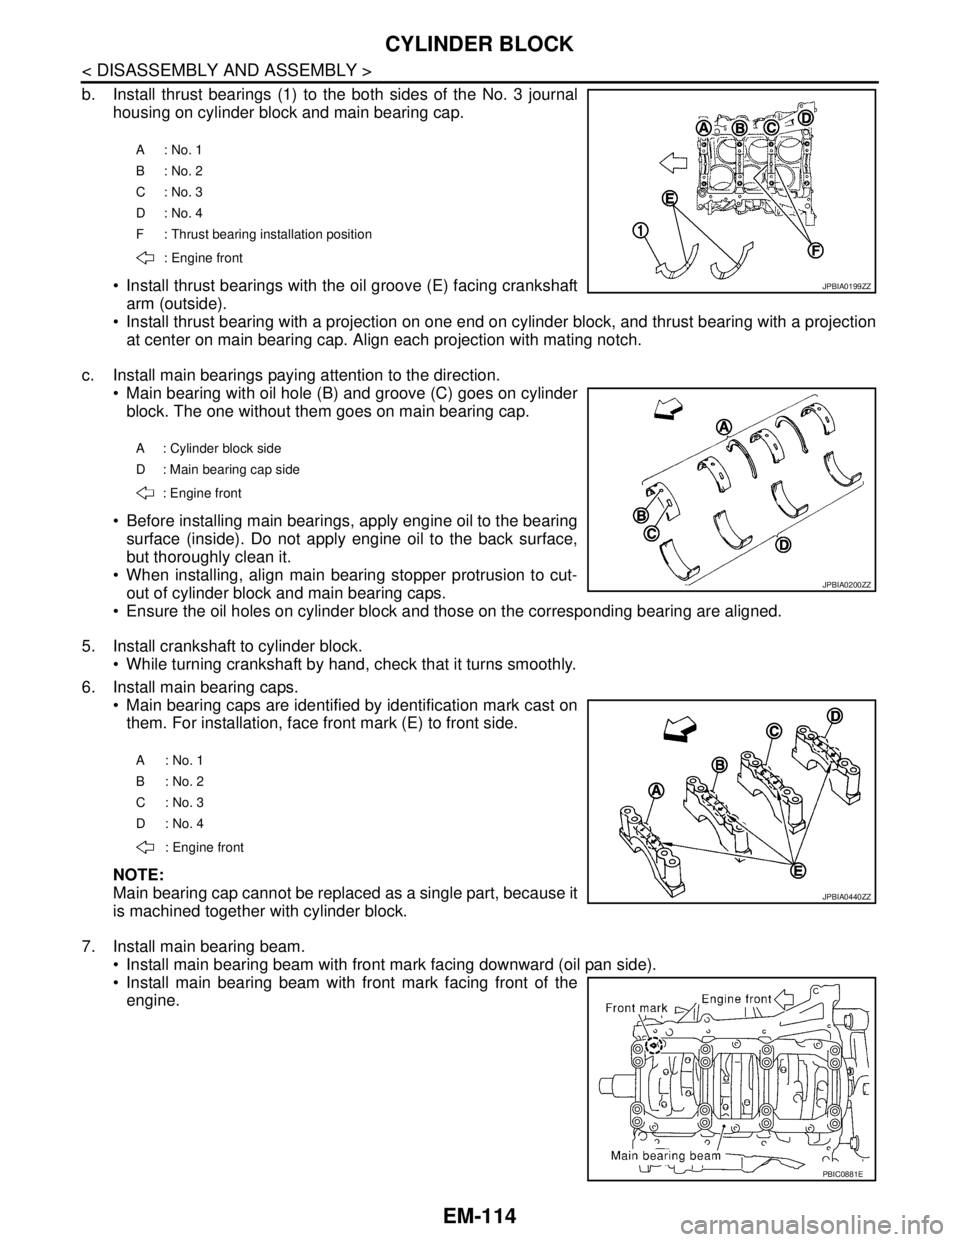
b. Install thrust bearings (1) to the both sides of the No. 3 journal
housing on cylinder block and main bearing cap.
Install thrust bearings with the oil groove (E) facing crankshaft
arm (outside).
Install thrust bearing with a projection on one end on cylinder block, and thrust bearing with a projection
at center on main bearing cap. Align each projection with mating notch.
c. Install main bearings paying attention to the direction.
Main bearing with oil hole (B) and groove (C) goes on cylinder
block. The one without them goes on main bearing cap.
Before installing main bearings, apply engine oil to the bearing
surface (inside). Do not apply engine oil to the back surface,
but thoroughly clean it.
When installing, align main bearing stopper protrusion to cut-
out of cylinder block and main bearing caps.
Ensure the oil holes on cylinder block and those on the corresponding bearing are aligned.
5. Install crankshaft to cylinder block.
While turning crankshaft by hand, check that it turns smoothly.
6. Install main bearing caps.
Main bearing caps are identified by identification mark cast on
them. For installation, face front mark (E) to front side.
NOTE:
Main bearing cap cannot be replaced as a single part, because it
is machined together with cylinder block.
7. Install main bearing beam.
Install main bearing beam with front mark facing downward (oil pan side).
Install main bearing beam with front mark facing front of the
engine.
A : No. 1
B : No. 2
C : No. 3
D : No. 4
F : Thrust bearing installation position
: Engine front
JPBIA0199ZZ
A : Cylinder block side
D : Main bearing cap side
: Engine front
JPBIA0200ZZ
A : No. 1
B : No. 2
C : No. 3
D : No. 4
: Engine front
JPBIA0440ZZ
PBIC0881E
Page 1990 of 5121
CYLINDER BLOCK
EM-115
< DISASSEMBLY AND ASSEMBLY >
C
D
E
F
G
H
I
J
K
L
MA
EM
N
P O
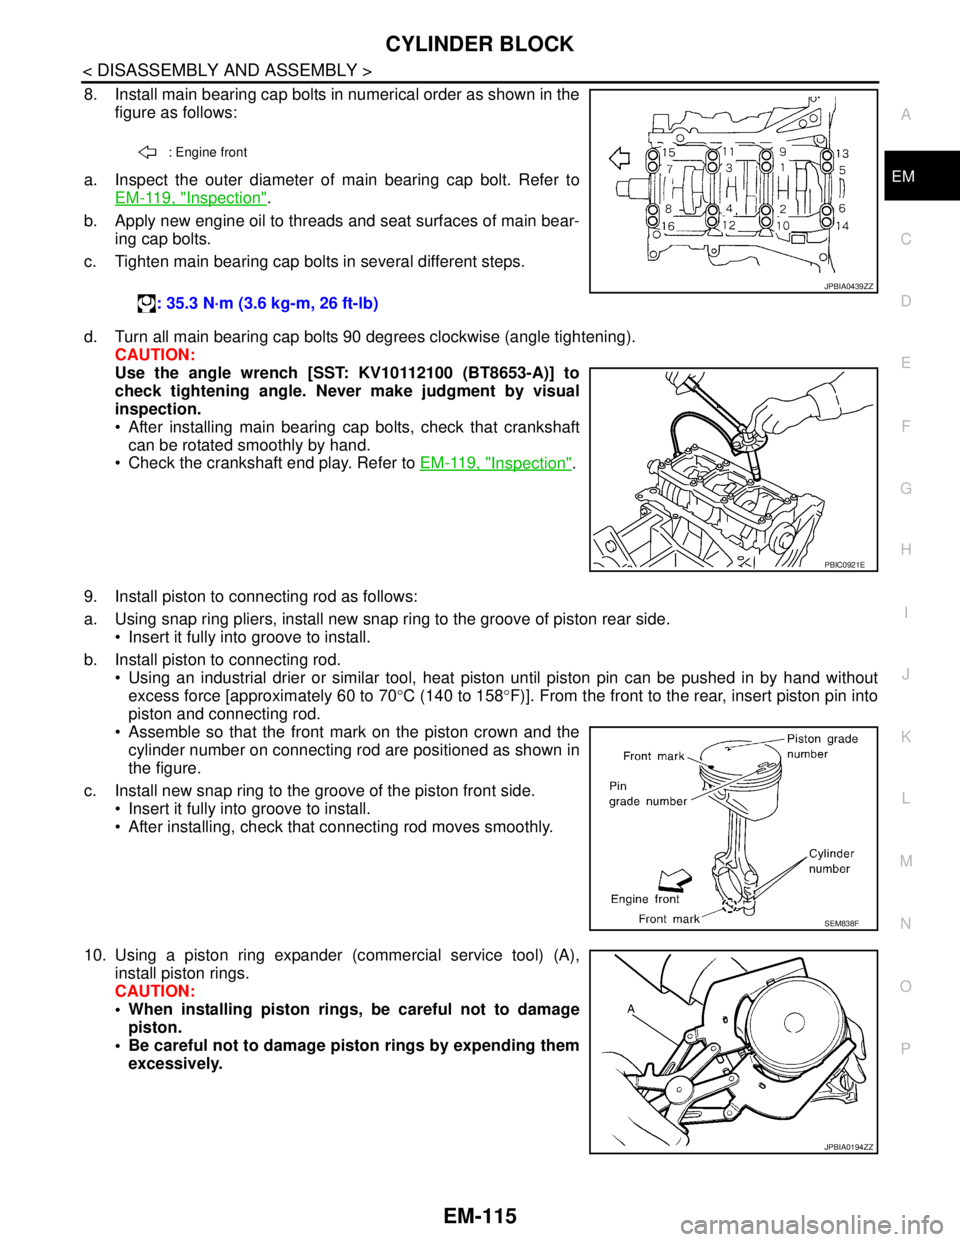
8. Install main bearing cap bolts in numerical order as shown in the
figure as follows:
a. Inspect the outer diameter of main bearing cap bolt. Refer to
EM-119, "
Inspection".
b. Apply new engine oil to threads and seat surfaces of main bear-
ing cap bolts.
c. Tighten main bearing cap bolts in several different steps.
d. Turn all main bearing cap bolts 90 degrees clockwise (angle tightening).
CAUTION:
Use the angle wrench [SST: KV10112100 (BT8653-A)] to
check tightening angle. Never make judgment by visual
inspection.
After installing main bearing cap bolts, check that crankshaft
can be rotated smoothly by hand.
Check the crankshaft end play. Refer to EM-119, "
Inspection".
9. Install piston to connecting rod as follows:
a. Using snap ring pliers, install new snap ring to the groove of piston rear side.
Insert it fully into groove to install.
b. Install piston to connecting rod.
Using an industrial drier or similar tool, heat piston until piston pin can be pushed in by hand without
excess force [approximately 60 to 70°C (140 to 158°F)]. From the front to the rear, insert piston pin into
piston and connecting rod.
Assemble so that the front mark on the piston crown and the
cylinder number on connecting rod are positioned as shown in
the figure.
c. Install new snap ring to the groove of the piston front side.
Insert it fully into groove to install.
After installing, check that connecting rod moves smoothly.
10. Using a piston ring expander (commercial service tool) (A),
install piston rings.
CAUTION:
When installing piston rings, be careful not to damage
piston.
Be careful not to damage piston rings by expending them
excessively.
: Engine front
: 35.3 N·m (3.6 kg-m, 26 ft-lb)
JPBIA0439ZZ
PBIC0921E
SEM838F
JPBIA0194ZZ
Page 1991 of 5121
EM-116
< DISASSEMBLY AND ASSEMBLY >
CYLINDER BLOCK
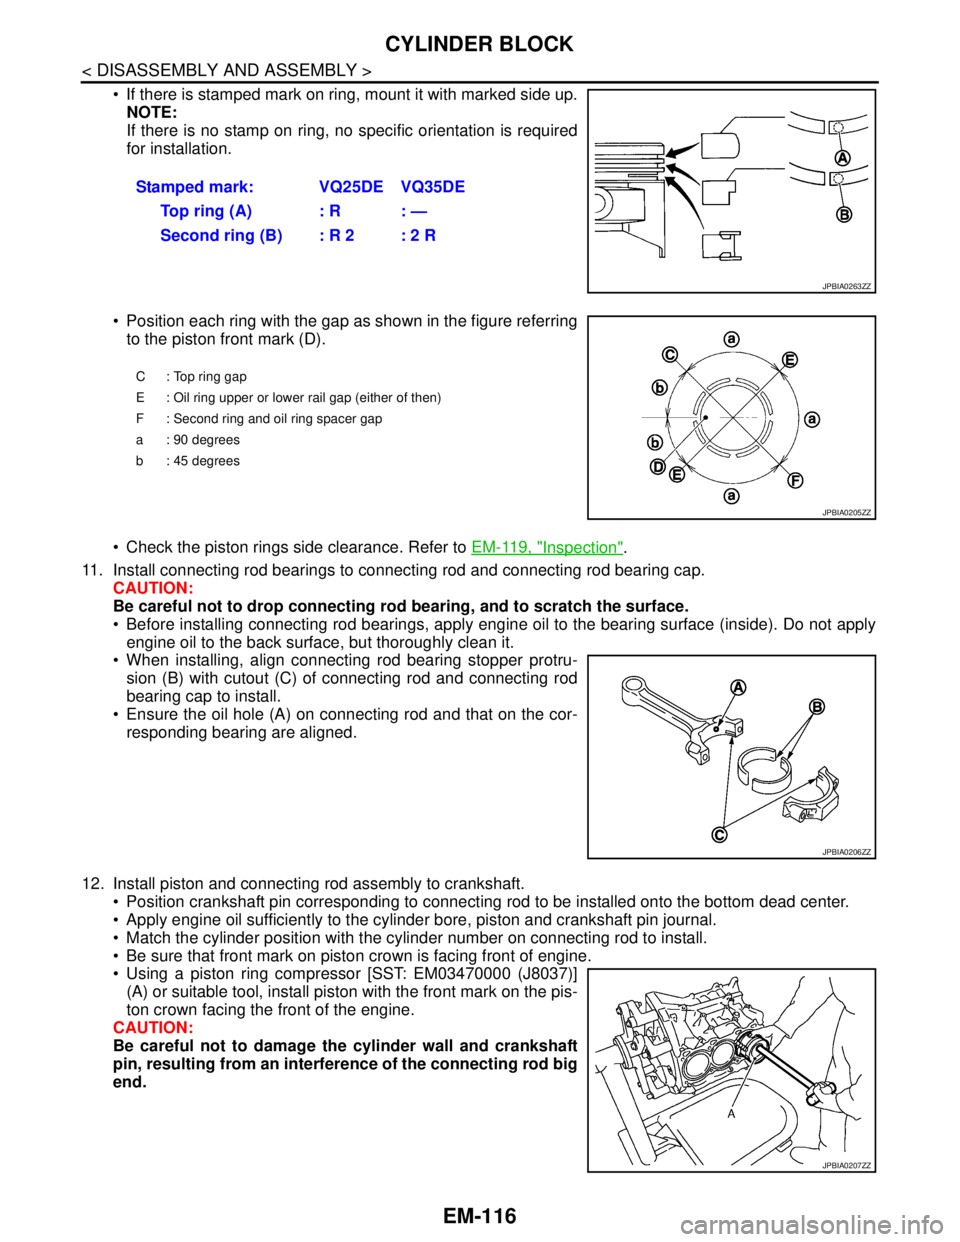
If there is stamped mark on ring, mount it with marked side up.
NOTE:
If there is no stamp on ring, no specific orientation is required
for installation.
Position each ring with the gap as shown in the figure referring
to the piston front mark (D).
Check the piston rings side clearance. Refer to EM-119, "
Inspection".
11. Install connecting rod bearings to connecting rod and connecting rod bearing cap.
CAUTION:
Be careful not to drop connecting rod bearing, and to scratch the surface.
Before installing connecting rod bearings, apply engine oil to the bearing surface (inside). Do not apply
engine oil to the back surface, but thoroughly clean it.
When installing, align connecting rod bearing stopper protru-
sion (B) with cutout (C) of connecting rod and connecting rod
bearing cap to install.
Ensure the oil hole (A) on connecting rod and that on the cor-
responding bearing are aligned.
12. Install piston and connecting rod assembly to crankshaft.
Position crankshaft pin corresponding to connecting rod to be installed onto the bottom dead center.
Apply engine oil sufficiently to the cylinder bore, piston and crankshaft pin journal.
Match the cylinder position with the cylinder number on connecting rod to install.
Be sure that front mark on piston crown is facing front of engine.
Using a piston ring compressor [SST: EM03470000 (J8037)]
(A) or suitable tool, install piston with the front mark on the pis-
ton crown facing the front of the engine.
CAUTION:
Be careful not to damage the cylinder wall and crankshaft
pin, resulting from an interference of the connecting rod big
end.Stamped mark: VQ25DE VQ35DE
To p r i n g ( A ) : R : —
Second ring (B) : R 2 : 2 R
JPBIA0263ZZ
C : Top ring gap
E : Oil ring upper or lower rail gap (either of then)
F : Second ring and oil ring spacer gap
a : 90 degrees
b : 45 degrees
JPBIA0205ZZ
JPBIA0206ZZ
JPBIA0207ZZ