2008 NISSAN TEANA charging
[x] Cancel search: chargingPage 2622 of 5121

EVAPORATOR
HA-53
< ON-VEHICLE REPAIR >
C
D
E
F
G
H
J
K
L
MA
B
HA
N
O
P
Removal and InstallationINFOID:0000000003795855
REMOVAL
1. Remove evaporator pipe assembly. Refer to HA-54, "Exploded View".
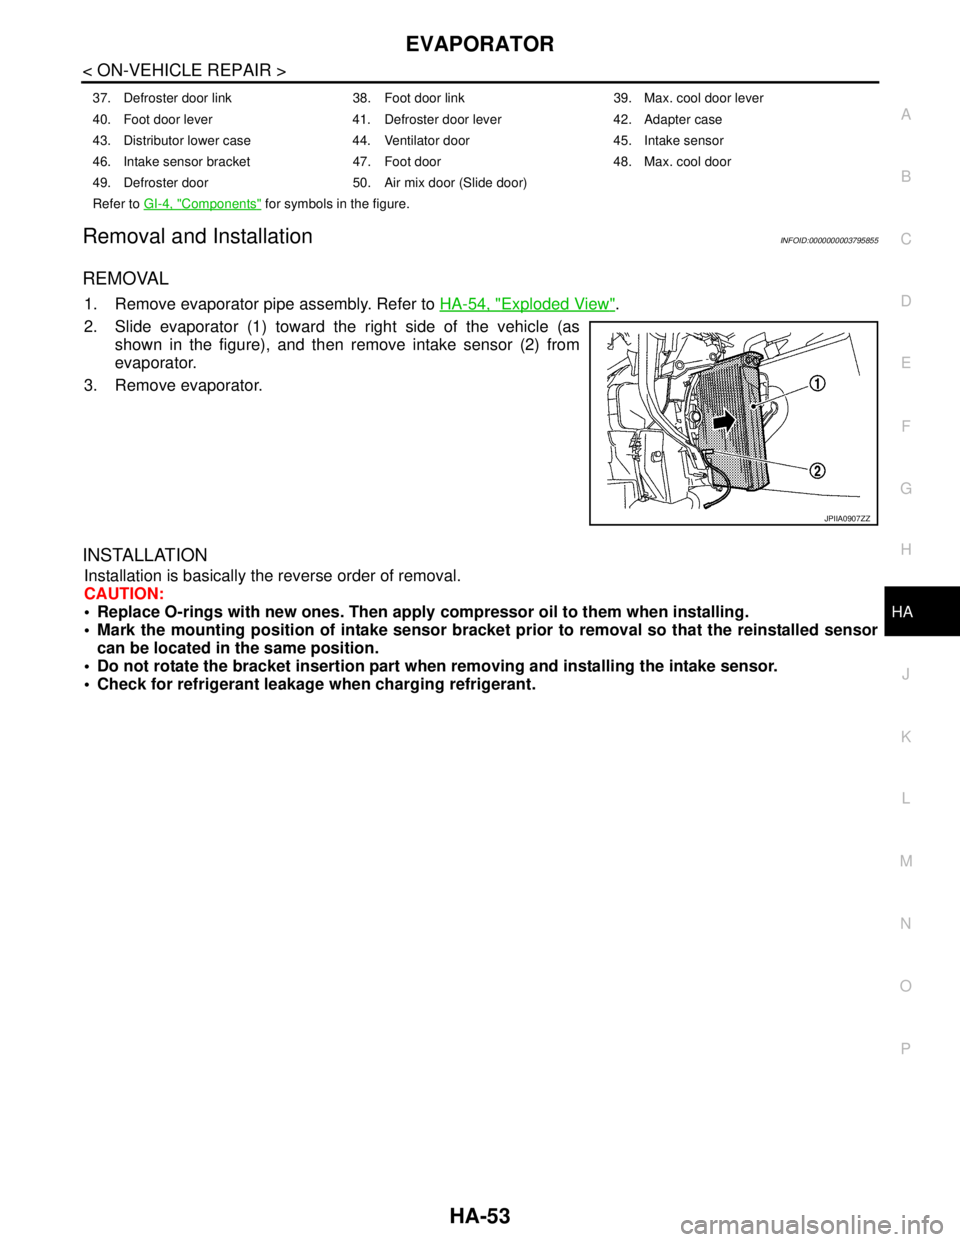
2. Slide evaporator (1) toward the right side of the vehicle (as
shown in the figure), and then remove intake sensor (2) from
evaporator.
3. Remove evaporator.
INSTALLATION
Installation is basically the reverse order of removal.
CAUTION:
Replace O-rings with new ones. Then apply compressor oil to them when installing.
Mark the mounting position of intake sensor bracket prior to removal so that the reinstalled sensor
can be located in the same position.
Do not rotate the bracket insertion part when removing and installing the intake sensor.
Check for refrigerant leakage when charging refrigerant.
37. Defroster door link 38. Foot door link 39. Max. cool door lever
40. Foot door lever 41. Defroster door lever 42. Adapter case
43. Distributor lower case 44. Ventilator door 45. Intake sensor
46. Intake sensor bracket 47. Foot door 48. Max. cool door
49. Defroster door 50. Air mix door (Slide door)
Refer to GI-4, "
Components" for symbols in the figure.
JPIIA0907ZZ
Page 2625 of 5121

HA-56
< ON-VEHICLE REPAIR >
EVAPORATOR PIPE ASSEMBLY
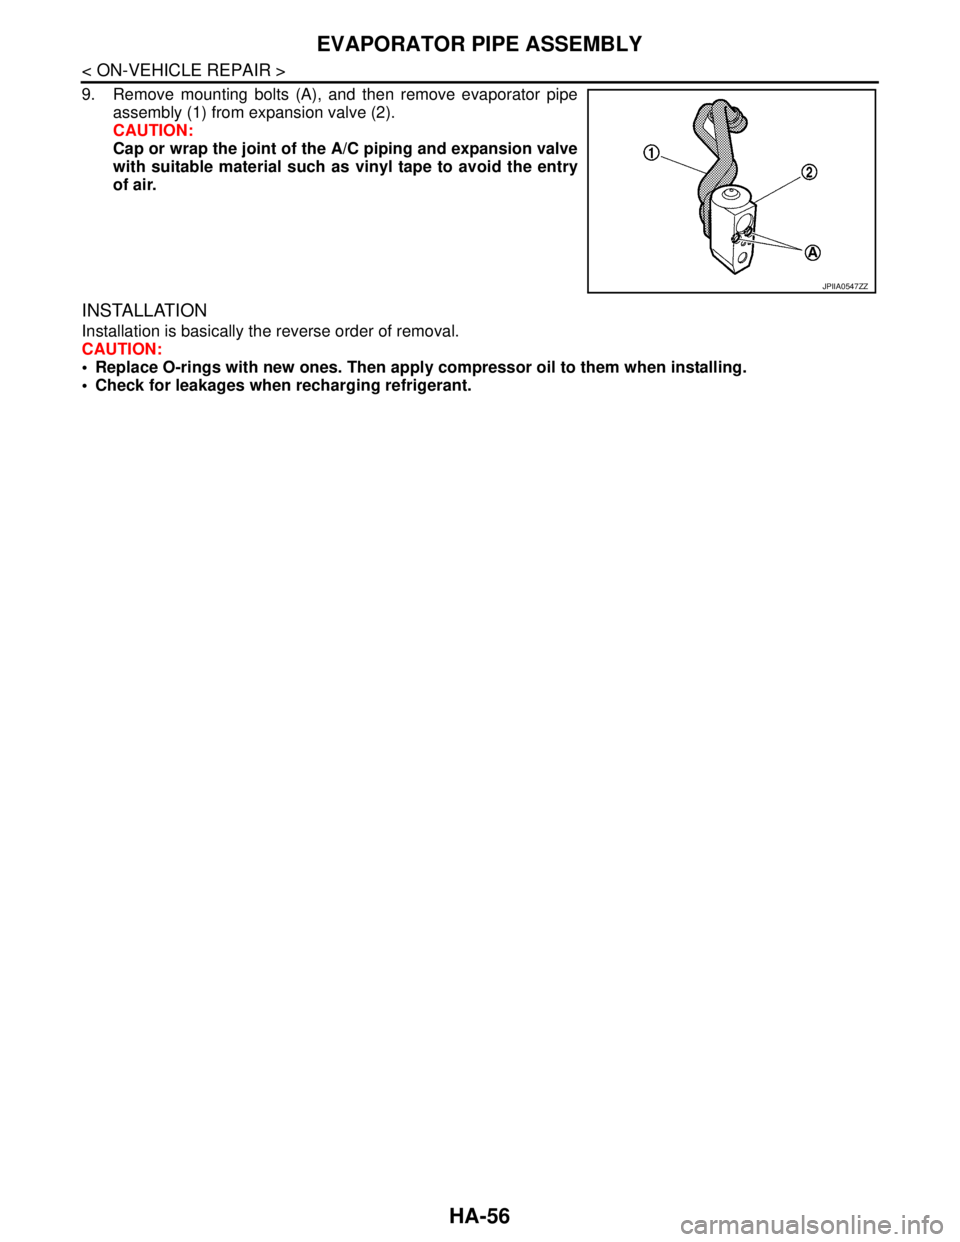
9. Remove mounting bolts (A), and then remove evaporator pipe
assembly (1) from expansion valve (2).
CAUTION:
Cap or wrap the joint of the A/C piping and expansion valve
with suitable material such as vinyl tape to avoid the entry
of air.
INSTALLATION
Installation is basically the reverse order of removal.
CAUTION:
Replace O-rings with new ones. Then apply compressor oil to them when installing.
Check for leakages when recharging refrigerant.
JPIIA0547ZZ
Page 2627 of 5121

HA-58
< ON-VEHICLE REPAIR >
EXPANSION VALVE
Removal and Installation
INFOID:0000000003795857
REMOVAL
1. Use refrigerant collecting equipment (for HFC-134a) to discharge the refrigerant.
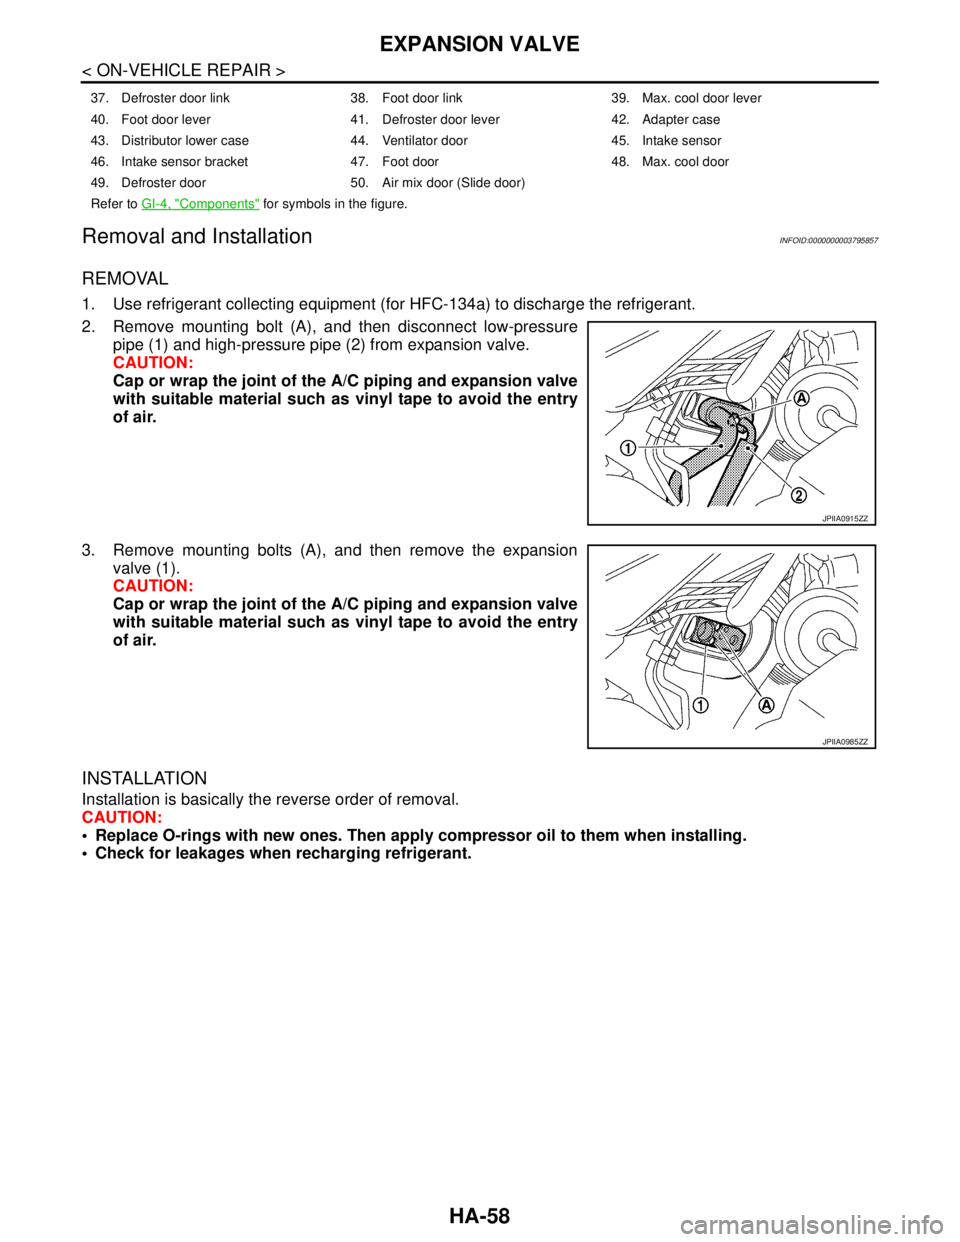
2. Remove mounting bolt (A), and then disconnect low-pressure
pipe (1) and high-pressure pipe (2) from expansion valve.
CAUTION:
Cap or wrap the joint of the A/C piping and expansion valve
with suitable material such as vinyl tape to avoid the entry
of air.
3. Remove mounting bolts (A), and then remove the expansion
valve (1).
CAUTION:
Cap or wrap the joint of the A/C piping and expansion valve
with suitable material such as vinyl tape to avoid the entry
of air.
INSTALLATION
Installation is basically the reverse order of removal.
CAUTION:
Replace O-rings with new ones. Then apply compressor oil to them when installing.
Check for leakages when recharging refrigerant.
37. Defroster door link 38. Foot door link 39. Max. cool door lever
40. Foot door lever 41. Defroster door lever 42. Adapter case
43. Distributor lower case 44. Ventilator door 45. Intake sensor
46. Intake sensor bracket 47. Foot door 48. Max. cool door
49. Defroster door 50. Air mix door (Slide door)
Refer to GI-4, "
Components" for symbols in the figure.
JPIIA0915ZZ
JPIIA0985ZZ
Page 2628 of 5121

SERVICE DATA AND SPECIFICATIONS (SDS)
HA-59
< SERVICE DATA AND SPECIFICATIONS (SDS)
C
D
E
F
G
H
J
K
L
MA
B
HA
N
O
P
SERVICE DATA AND SPECIFICATIONS (SDS)
SERVICE DATA AND SPECIFICATIONS (SDS)
CompressorINFOID:0000000003795858
LubricantINFOID:0000000003795859
RefrigerantINFOID:0000000003795860
Engine Idling SpeedINFOID:0000000003795861
Refer to EC-414, "Idle Speed".
Belt TensionINFOID:0000000003795862
Refer to EM-136, "Drive Belt".
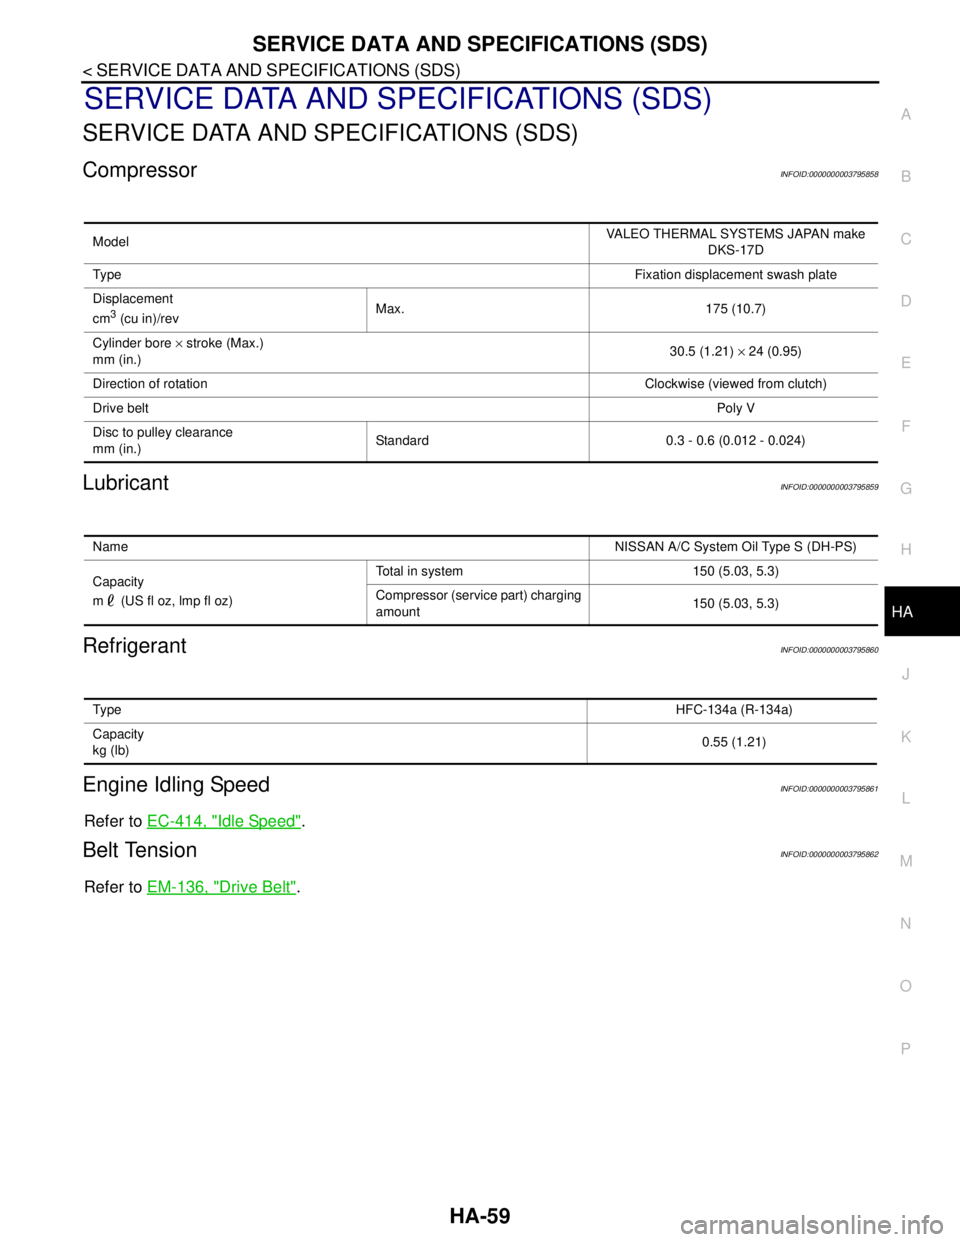
ModelVALEO THERMAL SYSTEMS JAPAN make
DKS-17D
Ty p eFixation displacement swash plate
Displacement
cm
3 (cu in)/revMax. 175 (10.7)
Cylinder bore × stroke (Max.)
mm (in.)30.5 (1.21) × 24 (0.95)
Direction of rotationClockwise (viewed from clutch)
Drive beltPoly V
Disc to pulley clearance
mm (in.)Standard 0.3 - 0.6 (0.012 - 0.024)
NameNISSAN A/C System Oil Type S (DH-PS)
Capacity
m (US fl oz, lmp fl oz)Total in system 150 (5.03, 5.3)
Compressor (service part) charging
amount150 (5.03, 5.3)
Ty p eHFC-134a (R-134a)
Capacity
kg (lb)0.55 (1.21)
Page 2716 of 5121
![NISSAN TEANA 2008 Service Manual HAC-88
< SYMPTOM DIAGNOSIS >[WITHOUT 7 INCH DISPLAY]
INSUFFICIENT COOLING
INSUFFICIENT COOLING
DescriptionINFOID:0000000003846386
Symptom
Insufficient cooling
No cool air comes out. (Air flow volu NISSAN TEANA 2008 Service Manual HAC-88
< SYMPTOM DIAGNOSIS >[WITHOUT 7 INCH DISPLAY]
INSUFFICIENT COOLING
INSUFFICIENT COOLING
DescriptionINFOID:0000000003846386
Symptom
Insufficient cooling
No cool air comes out. (Air flow volu](/manual-img/5/57391/w960_57391-2715.png)
HAC-88
< SYMPTOM DIAGNOSIS >[WITHOUT 7 INCH DISPLAY]
INSUFFICIENT COOLING
INSUFFICIENT COOLING
DescriptionINFOID:0000000003846386
Symptom
Insufficient cooling
No cool air comes out. (Air flow volume is normal.)
Inspection procedureINFOID:0000000003846387
1.CHECK WITH A GAUGE OF RECOVERY/RECYCLING RECHARGING EQUIPMENT
Connect the recovery/recycling recharging equipment to the vehicle and perform the pressure inspection with
the gauge.
Is there refrigerant?
YES >> GO TO 2.
NO-1 >> Check for refrigerant leakages with the refrigerant leakage detecting fluorescent leak detector.
Refer to HA-32, "
Inspection".
NO-2 >> GO TO 2 after repairing or replacing the parts according to the inspection results.
2.CHECK CHARGED REFRIGERANT AMOUNT
1. Connect recovery/recycling recharging equipment to the vehicle and discharge the refrigerant.
2. Recharge with the proper amount of refrigerant and perform the inspection with the refrigerant leakage
detecting fluorescent leak detector. Refer to HA-32, "
Inspection".
Is the inspection result normal?
YES >> GO TO 3.
NO >> Refill the refrigerant and repair or replace the parts according to the inspection results.
3.CHECK REFRIGERANT CYCLE PRESSURE
Connect recovery/recycling recharging equipment to the vehicle and perform the performance test. Refer to
HA-30, "
Performance Chart".
Is the inspection result normal?
YES >> GO TO 4.
NO >> Perform the diagnosis with the gauge pressure. Refer to HA-8, "
Trouble Diagnosis For Unusual
Pressure".
4.CHECK SETTING OF TEMPERATURE SETTING TRIMMER
Using CONSULT-III, check the setting of “TEMP SET CORRECT” on “WORK SUPPORT” of HVAC. Refer to
HAC-10, "
Temperature Setting Trimmer".
1. Check that the temperature setting trimmer is set to “+ direction”.
NOTE:
The control temperature can be set with the setting of the temperature setting trimmer.
2. Set temperature control switch to “0”.
Are the malfunction solved?
YES >> Perform the setting separately if necessary. END.
NO >> GO TO 5.
5.CHECK WITH SELF-DIAGNOSIS FUNCTION OF CONSULT-III
1. Using CONSULT-III, perform “SELF-DIAGNOSIS RESULTS” of HVAC.
2. Check if any DTC is displayed in the trouble diagnosis results.
NOTE:
If DTC is displayed along with DTC U1000 or U1010, first diagnose the DTC U1000 or U1010. Refer to
HAC-42, "
DTC Logic" or HAC-43, "DTC Logic".
Is any DTC displayed?
YES >> Perform the diagnosis that is applicable to the sensor and the door motor. Refer to HAC-85, "DTC
Index".
NO >> GO TO 6.
6.CHECK WITH ACTIVE TEST OF CONSULT-III
Page 2722 of 5121
![NISSAN TEANA 2008 Service Manual HAC-94
< SYMPTOM DIAGNOSIS >[WITHOUT 7 INCH DISPLAY]
NOISE
NOISE
DescriptionINFOID:0000000003846390
Symptom
Noise
Noise is heard when the A/C system operates.
Inspection procedureINFOID:00000000038 NISSAN TEANA 2008 Service Manual HAC-94
< SYMPTOM DIAGNOSIS >[WITHOUT 7 INCH DISPLAY]
NOISE
NOISE
DescriptionINFOID:0000000003846390
Symptom
Noise
Noise is heard when the A/C system operates.
Inspection procedureINFOID:00000000038](/manual-img/5/57391/w960_57391-2721.png)
HAC-94
< SYMPTOM DIAGNOSIS >[WITHOUT 7 INCH DISPLAY]
NOISE
NOISE
DescriptionINFOID:0000000003846390
Symptom
Noise
Noise is heard when the A/C system operates.
Inspection procedureINFOID:0000000003846391
1.CHECK OPERATION
1. Operate the A/C system and check the operation. Refer to HAC-8, "
Description & Inspection".
2. Check the parts where noise is occurring.
Can the parts where noise is occurring be checked?
YES-1 >> Noise from blower motor: GO TO 2.
YES-2 >> Noise from compressor: GO TO 3.
YES-3 >> Noise from expansion valve: GO TO 4.
YES-4 >> Noise from A/C piping (pipe, flexible hose): GO TO 6.
YES-5 >> Noise from drive belt: GO TO 7.
NO >> END.
2.CHECK BLOWER MOTOR
1. Remove blower motor.
2. Remove foreign materials that are in the blower unit.
3. Check the noise from blower motor again.
Is the inspection result normal?
YES >> END.
NO >> Replace blower motor.
3.CHECK COMPRESSOR
Perform trouble diagnosis for the compressor and check the compressor. Refer to HA-11, "
Symptom Table".
Is the inspection result normal?
YES >> END.
NO >> Refill the refrigerant or replace the compressor according to the inspection results.
4.CHECK WITH GAUGE PRESSURE
Perform the diagnosis with the gauge pressure. Refer to HA-8, "
Trouble Diagnosis For Unusual Pressure".
Is the inspection result normal?
YES >> GO TO 5.
NO >> Repair or replace parts according to the inspection results.
5.CHECK EXPANSION VALVE
1. Correct the refrigerant with recovery/recycling recharging equipment.
2. Recharge with the proper amount of the collected refrigerant after recycling or new refrigerant.
3. Check for the noise from expansion valve again.
Are the malfunction solved?
YES >> END.
NO >> Replace expansion valve.
6.CHECK A/C PIPING (PIPE, FLEXIBLE HOSE)
1. Check the A/C piping (pipes, flexible hoses) (for deformation and damage, etc.).
2. Check the installation condition of clips and brackets, etc, of the A/C piping (pipes, flexible hoses).
Is the inspection result normal?
YES >> Fix the line with rubber or come vibration absorbing material.
NO >> Repair or replace parts according to the inspection results.
7.CHECK DRIVE BELT
Page 2726 of 5121
![NISSAN TEANA 2008 Service Manual HAC-98
< PRECAUTION >[WITHOUT 7 INCH DISPLAY]
PRECAUTIONS
Precaution for Procedure without Cowl Top Cover
INFOID:0000000003846397
When performing the procedure after removing cowl top cover, cover
the NISSAN TEANA 2008 Service Manual HAC-98
< PRECAUTION >[WITHOUT 7 INCH DISPLAY]
PRECAUTIONS
Precaution for Procedure without Cowl Top Cover
INFOID:0000000003846397
When performing the procedure after removing cowl top cover, cover
the](/manual-img/5/57391/w960_57391-2725.png)
HAC-98
< PRECAUTION >[WITHOUT 7 INCH DISPLAY]
PRECAUTIONS
Precaution for Procedure without Cowl Top Cover
INFOID:0000000003846397
When performing the procedure after removing cowl top cover, cover
the lower end of windshield with urethane, etc.
Precautions For Xenon Headlamp ServiceINFOID:0000000003846398
WARNING:
Comply with the following warnings to prevent any serious accident.
Disconnect the battery cable (negative terminal) or the power supply fuse before installing, remov-
ing, or touching the xenon headlamp (bulb included). The xenon headlamp contains high-voltage
generated parts.
Never work with wet hands.
Check the xenon headlamp ON-OFF status after assembling it to the vehicle. Never turn the xenon
headlamp ON in other conditions. Connect the power supply to the vehicle-side connector.
(Turning it ON outside the lamp case may cause fire or visual impairments.)
Never touch the bulb glass immediately after turning it OFF. It is extremely hot.
CAUTION:
Comply with the following cautions to prevent any error and malfunction.
Install the xenon bulb securely. (Insufficient bulb socket installation may melt the bulb, the connec-
tor, the housing, etc. by high-voltage leakage or corona discharge.)
Never perform HID circuit inspection with a tester.
Never touch the xenon bulb glass with hands. Never put oil and grease on it.
Dispose of the used xenon bulb after packing it in thick vinyl without breaking it.
Never wipe out dirt and contamination with organic solvent (thinner, gasoline, etc.).
Working with HFC-134a (R-134a)INFOID:0000000003846399
CAUTION:
CFC-12 (R-12) refrigerant and HFC-134a (R-134a) refrigerant are not compatible. Compressor mal-
function is likely to occur if the refrigerants are mixed, refer to “CONTAMINATED REFRIGERANT”
below. To determine the purity of HFC-134a (R-134a) in the vehicle and recovery tank, use Refriger-
ant Recovery/Recycling Recharging equipment and Refrigerant Identifier.
Use only specified lubricant for the HFC-134a (R-134a) A/C system and HFC-134a (R-134a) compo-
nents. Compressor malfunction is likely to occur if lubricant other than that specified is used.
The specified HFC-134a (R-134a) lubricant rapidly absorbs moisture from the atmosphere. The fol-
lowing handling precautions must be observed:
- Immediately cap (seal) the component to minimize the entry of moisture from the atmosphere when
removing refrigerant components from a vehicle.
- Never remove the caps (unseal) until just before connecting the components when installing refrig-
erant components to a vehicle. Connect all refrigerant loop components as quickly as possible to
minimize the entry of moisture into system.
- Use only the specified lubricant from a sealed container. Immediately reseal containers of lubricant.
Lubricant becomes moisture saturated and should not be used without proper sealing.
- Never allow lubricant (NISSAN A/C System Oil Type S) to come in to contact with styrene foam parts.
Damage may result.
CONTAMINATED REFRIGERANT
Take the appropriate steps shown below if a refrigerant other than pure HFC-134a (R-134a) is identified
in a vehicle:
Explain to the customer that environmental regulations prohibit the release of contaminated refrigerant into
the atmosphere.
PIIB3706J
Page 2729 of 5121
![NISSAN TEANA 2008 Service Manual PRECAUTIONS
HAC-101
< PRECAUTION >[WITHOUT 7 INCH DISPLAY]
C
D
E
F
G
H
J
K
L
MA
B
HAC
N
O
P
WARNING:
Check that all refrigerant is discharged into the recycling equipment and the pressure in the syste NISSAN TEANA 2008 Service Manual PRECAUTIONS
HAC-101
< PRECAUTION >[WITHOUT 7 INCH DISPLAY]
C
D
E
F
G
H
J
K
L
MA
B
HAC
N
O
P
WARNING:
Check that all refrigerant is discharged into the recycling equipment and the pressure in the syste](/manual-img/5/57391/w960_57391-2728.png)
PRECAUTIONS
HAC-101
< PRECAUTION >[WITHOUT 7 INCH DISPLAY]
C
D
E
F
G
H
J
K
L
MA
B
HAC
N
O
P
WARNING:
Check that all refrigerant is discharged into the recycling equipment and the pressure in the system is
less than atmospheric pressure. Then gradually loosen the discharge side hose fitting and remove it.
CAUTION:
Observe the following when replacing or cleaning refrigerant cycle components.
Store it in the same way at it is when mounted on the car when the compressor is removed. Failure
to do so will cause lubricant to enter the low-pressure chamber.
Always use a torque wrench and a back-up wrench when connecting tubes.
Immediately plug all openings to prevent entry of dust and moisture after disconnecting tubes.
Connect the pipes at the final stage of the operation when installing an air conditioner in the vehicle.
Never remove the seal caps of pipes and other components until just before required for connection.
Allow components stored in cool areas to warm to working area temperature before removing seal
caps. This prevents condensation from forming inside A/C components.
Thoroughly remove moisture from the refrigeration system before charging the refrigerant.
Replace always used O-rings.
Apply lubricant to circle of the O-rings shown in illustration when connecting tube. Be careful not to
apply lubricant to threaded portion.
O-ring must be closely attached to the groove portion of tube.
Be careful not to damage O-ring and tube when replacing the O-ring.
Connect tube until a click can be heard. Then tighten the nut or bolt by hand. Check that the O-ring is
installed to tube correctly.
Perform leakage test and make sure that there is no leakage from connections after connecting line.
Disconnect the line and replace the O-ring when the refrigerant leaking point is found. Then tighten
the connections of seal seat to the specified torque.
Service EquipmentINFOID:0000000003846402
RECOVERY/RECYCLING EQUIPMENT
Be certain to follow the manufacturer instructions for machine operation and machine maintenance. Never
introduce any refrigerant other than that specified into the machine.
ELECTRICAL LEAK DETECTOR
Be certain to follow the manufacturer instructions for tester operation and tester maintenance.
VACUUM PUMP
Name : NISSAN A/C System Oil Type S
RHA861F