2008 MERCEDES-BENZ SL ROADSTER wheel
[x] Cancel search: wheelPage 154 of 317
Air conditioning
151Setting th
eairflow
X Mak esuret hatthe keyisi nposition 2in
th ei gnition lock.
X To increase/reduce: turnthumbwheel
a clockwise or anti-clockwise
(Y page 145). Demisting th
ewindscreen
i You should only select th e"demisting"
function until th ewindscree nisclear again.
X Mak esuret hatthe keyisi nposition 2in
th ei gnition lock.
X To activate: press theybutton.
The indicator lamp in the ybutton
comes on.
The system automatically switches to the
following functions:
R coolin gwitha ir dehumidification on
R hig ha irflow 18
R hig htem perature 18
R air distribution to th ewindscree nand
fron tside windows
R air-recirculation mode off X
To deactivate: press theybutton.
The indicator lamp in the ybuttongoes
out .The previously selecte dsetting scome
into effec tagain .The coolin gwitha ir dehu-
midification function remain son.Air-recir-
culation mode remain sdeactivated.
or
X Press the Ubutton.
The indicator lamp in the ybuttongoes
out .Airflo wand air distribution are set to
automatic mode.
or
X Tur nthumbwheel 7orc clockwise or
anti-clockwise (Y page 145).
or
X Tur nthumbwheel aclockwise or anti-
clockwise (Y page 145). Demisting th
ewindows
Windows misted up on th einside X
Activat ethe "coolin gfunction wit hair-
dehumidification "function.
X Activat ethe automatic mode.
X If th ewindows continue to mis tup, activate
th e" demisting" function.
Windows misted up on th eoutside X
Activat ethe windscree nwipers.
X Press on eoftheÑ buttons repeatedly
until the a,ÚorY symbol is dis-
played.
i You should only selec tthiss etting until
th ew indscree nisclear again.
18 Dependin gontheoutsid etem perature. Cont
rols
230_AKB; 5; 4, en-GB
bjanott,
Version: 2.9.6
2008-04-08T15:09:54+02:00
-Seite 151 ZDateiname: 6515_3089_02_buchblock.pdf; preflight
Page 170 of 317
Features
167relating to th
epossibl ehealt hriskp osed by
electromagnetic fields.
i In order to ensur eoptimum signal quality
fo rm obile phone sand to minimis emutual
interferenc ebetween th evehicl eelectron-
ics and mobile phones, Mercedes-Ben zrec-
ommends th euse of an approve dexter ior
aerial. An exterio raerial conduct sthe elec-
tromagnetic fields generated by awireless
device to th eexter ioroft hevehicle; the
field strengt hwithin th evehicl einterior is
lower than in avehicl ethatd oes no thave
an exterio raerial.
i There are various mobile phone brackets
that may be fitte dtoy our vehicle; in some
cases these are country-specific. You can
obtain these mobile phone brackets from a
qualified specialist workshop ,e.g.a
Mercedes-Ben zServi ce Centre. The func-
tion sand services available when you use
th ep hone depend on your mobile phone
model and servic eprovider.
The mobile phone bracke tisinthearmrest.
X Ope nthe telephon ecom partment
(Y page 162). Inserting th
emobile phone int othe
mobile phone bracket If th
emobile phone is inserte dintot he mobile
phone bracket, you can only speak to th eper-
son you are callin gusingthe hands-free sys-
tem.
! Do no tattemp ttoremove th emobile
phone and th etelephon ebracke ttog ether.
You could otherwise damage th emobile
phone bracket.
X Remove th ecover of th eaerial plug from
th eb ackoft hemobile phone and keep it in
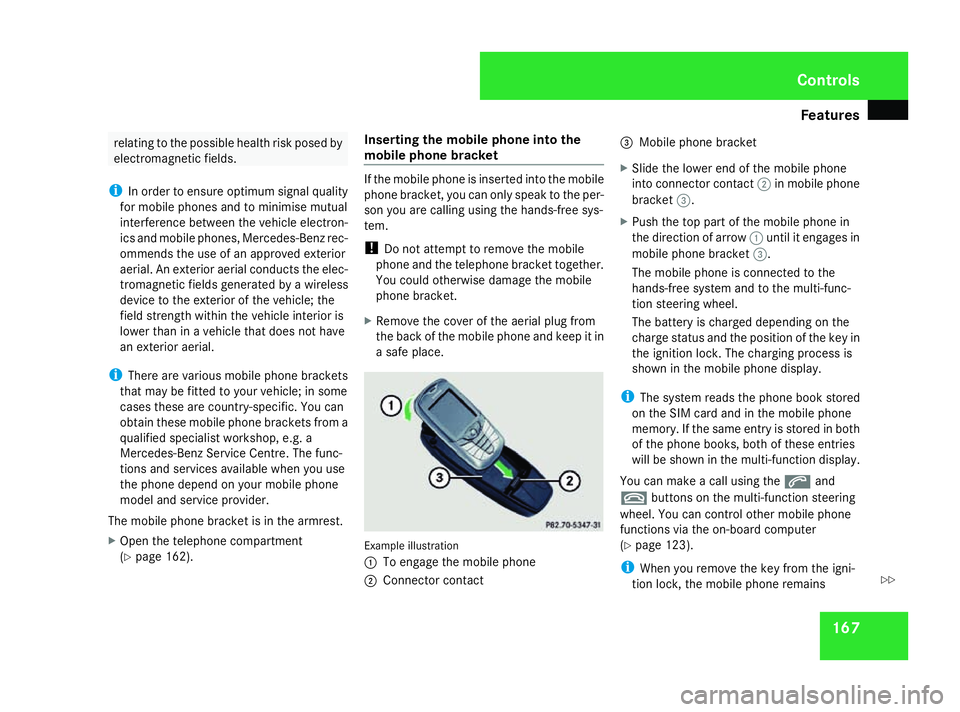
as afep lace. Exampl
eillustration
1 To engage th emobile phone
2 Connector contact 3
Mobile phone bracket
X Slide th elower en dofthemobile phone
into connecto rcontact 2in mobile phone
bracket 3.
X Push th etop part of th emobile phone in
th ed irection of arrow 1until it engage sin
mobile phone bracket 3.
The mobile phone is connecte dtothe
hands-free system and to th emulti-func-
tion steerin gwheel.
The battery is charged dependin gonthe
charg estatu sa nd th eposition of th ekeyin
th ei gnition lock. The chargin gprocess is
shown in th emobile phone display.
i The system read sthe phone boo kstored
on th eSIMcardand in th emobile phone
memory. If th esam eentry is store dinboth
of th ephone books ,bothoft hese entries
will be shown in th emulti-function display.
You can mak eacallu sin gthe s and
t buttons on th emulti-function steering
wheel. You can control other mobile phone
function svia th eon-bo ardc om puter
(Y page 123).
i Whe nyou remove th ekeyfrom th eigni-
tion lock, th emobile phone remains Cont
rols
230_AKB; 5; 4, en-GB
bjanott,
Version: 2.9.6
2008-04-08T15:09:54+02:00
-Seite 167 ZDateiname: 6515_3089_02_buchblock.pdf; preflight
Page 176 of 317
173
Th
ef irst 1,500 km ............................ 174
Running-in notes for SL 65 AMG
an dA MG vehicles wit hadifferen-
tia llock .............................................. 174
Refuelling ........................................... 175
Engin ecompart ment........................ 176
Tyre sand wheels .............................. 182
Winter driving ................................... 189
Driving tips ........................................ 190
Driving abroad ................................... 193
Service ............................................... 193
Care .................................................... 194 Operation
230_AKB
;5;4,en-GB
bjanott ,V ersion:2.9.6
2008-04-08T15:09:54+02:00
-Seite 173 Dateiname: 6515_3089_02_buchblock.pdf; preflight
Page 182 of 317
Engine compartment
179
You will see th
efollowin gmessage if you did
no to bserv ethe required waiting time:
Observ ewaitin gperiod
X Repeat th emeasuremen tafter about five
minute siftheengin eisatn ormaloperating
temperature.
X Repeat th emeasuremen tafter about
30 minute siftheengin eisnotat normal
operating temperature (if th eenginew as
only started briefly).
The followin gmessage appear siftheengine
is running:
Engine oil level Not whe nengine on
X Switch off th eenginea nd wait for five
minute siftheengin eisatn ormaloperating
temperature, or for about 30 minute sifthe
engin eisnotat normal operating temper-
atur e(if th eenginew as only started
briefly), before measuring.
i If you wish to cancel th emeasurement,
press the korj buttonont hemulti-
function steering wheel. Using th
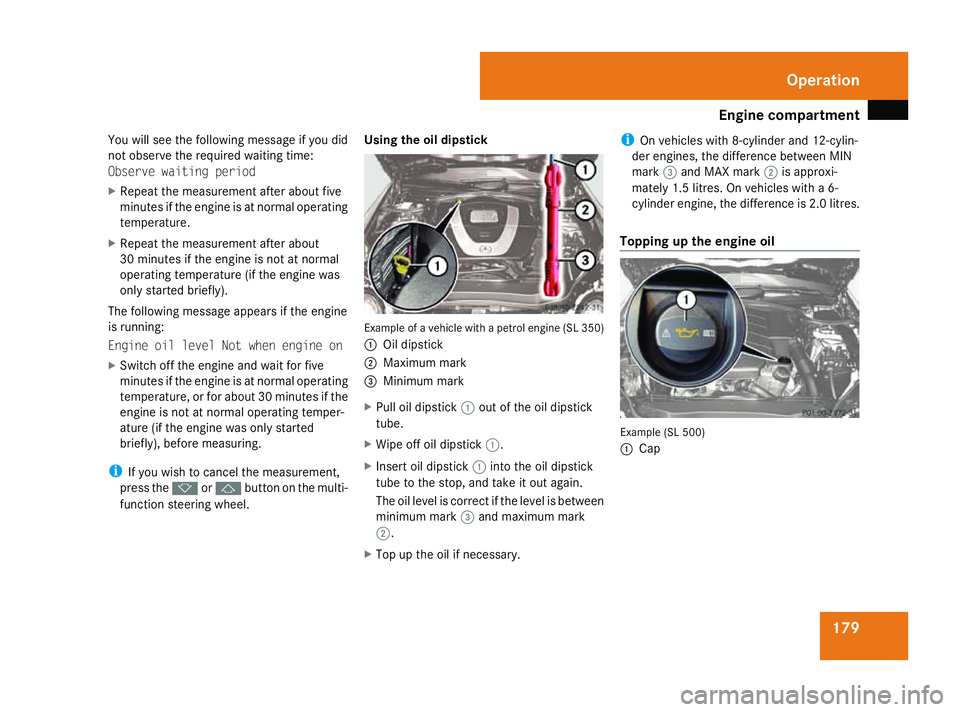
eoil dipstick Example of
avehicle with apetrol engine (SL 350)
1 Oil dipstick
2 Maximum mark
3 Minimum mark
X Pull oil dipstick 1out of th eoil dipstick
tube.
X Wipe off oil dipstick 1.
X Insert oil dipstick 1intot he oil dipstick
tube to th estop, and tak eitout again.
The oil level is correc tifthelevel is between
minimum mark 3and maximum mark
2.
X Top up th eoil if necessary. i
On vehicles with 8-cylinder and 12-cylin-
der engines ,the difference between MIN
mark 3and MAX mark 2is approxi-
mately 1. 5litres. On vehicles with a6-
cylinder engine, th edifference is 2. 0litres.
Topping up th eengine oil Example (SL 500)
1
Cap Operation
230_AKB; 5; 4, en-GB
bjanott
,V ersion: 2.9.6
2008-04-08T15:09:54+02:00
-Seite 179 ZDateiname: 6515_3089_02_buchblock.pdf; preflight
Page 185 of 317
Tyre
sand wheels 182 Tyre
sand wheels Points to remember
! For safety reasons, Mercedes-Benz rec-
ommend sthaty ou onlyusetyres and
wheels which have been approved by
Mercedes-Benz specifically for your vehi-
cle .These tyres have been specially adap-
ted for us ewitht he control systems, such
as ABS or ESP ®
,a nd ar emarked as follows:
R MO =Mercedes-Benz Original
R MOE =Mercedes-Benz Original Extended
(with run-flat characteristics)*
*Mercedes-Benz Original Extended tyres
shoul donlybeu sedonw heelsthath ave
been specifically approved by Mercedes-
Benz.
If yo uuseother tyres and wheels,
Mercedes-Benz cannot accep tany respon-
sibility for damage tha tmayresul tfrom
this. Furthe rinformation abou ttyres,
wheels and approved combinations can be
obtained fro many Mercedes-Benz Service
Centre.
If yo uusetyres other tha nthose tested and
recommended for Mercedes-Benz vehi-
cles, characteristics such as handling ,vehi-
cle noise emissions and fuel consumption ma
ybea dversely affected .Inaddition, the
wheels ma ycom einto contact with the
body or axl ecomponents when heavil yloa-
de dorw hend riving with sno wchains .This
could resul tindamag etothe tyres or the
vehicle.
! Retreade dtyres ar eneithe rtested nor
recommended by Mercedes-Benz, since
previou sdamag ecann ot always be detec-
ted on retreade dtyres .Asa result,
Mercedes-Benz cannot guarante evehicle
safety if retreade dtyres ar efitted .Don ot
fi tu sedt yres if yo uhavenoi nformation
abou ttheir previou susage. G
Ris
kofa ccident
If wheels or tyres other tha nthose which
have been tested ar efitted:
R the brakes or chassi scomponents could
be damaged
R whee land tyr eclearances ca nnolonger
be guaranteed
This could caus eanaccident.
Modificatio nworkont he brake syste mand
wheels is not permitted ,nor is the us eof
spacer plate sorbrake dust shields .Thisi nva-
lidates the Genera lOperating Permi tfor the
vehicle. Note
sons electing,fittin ga nd replacing
tyres R
Onl yfittyres and wheels of the same type
and make.
R Onl yfittyres of the correc tsizeo nto the
wheels.
R After fitting new tyres ,run the minatm od-
erate speeds for the first 100 km as they
onl yreach their full performance after this
distance.
R Fit new tyres on the front wheels first if
tyres of the same size ar erequired on the
front and rea rwheels.
R Replac ethe tyres after si xyears at the lat-
est, regardles sofwear.This also applie sto
the spar ewheel *.
R Do not drive with tyres which have too little
trea ddepth as thi ssignificantly reduces
the tractio nonwetroads (aquaplaning).
! Store tyres tha tare not being used in a
cool, dry and preferably dark place .Protect
the tyres against oil, grease, petrol and die-
sel. Operation
*optional
230_AKB; 5; 4, en-GB
bjanott,
Version: 2.9.6 2008-04-08T15:09:54+02:00-Seite 182 Dateiname: 6515_3089_02_buchblock.pdf; preflight
Page 186 of 317
Tyre
sand wheels 183
Note
sonr egularly inspecting wheels
and tyres R
Regularl ycheck the wheels and tyres of
your vehicl efor damage (e.g. cuts, punctu-
res ,tears, bumps on tyres and deforma-
tion, cracks or sever ecorrosio nonwheels),
at leas tevery 14 days ,aswellasa fter driv-
ing off-roa doronrough roads .Damaged
wheels could cause alos soft yrep ressure.
R Regularl ycheck the tyr etrea ddepth and
the condition of the trea dacros sthe whole
width of the tyr e(Ypage 184) .Ifneces-
sary ,tur nt he front wheels to full lock in
order to inspect the inne rsideoft he tyre
surface.
R All wheels must have avalve cap to protect
the valv eagain st dirt and moisture.
R Regularl ycheck the pressure of al lyour
tyres including the spar etyre* ,particularly
prior to long trips ,and correc tthe pressure
as necessary (Y page 184).
Note sond riving R
Whil edriving, pa yattentio ntovibrations,
noise sand unusual handling characteris-
tics ,e.g.p ulli ng to one side .Thism ayindi- cate tha
tthe wheels or tyres ar edamaged.
If yo ususpe ct tha tatyreisd efective,
reduc eyours peed and sto pthe vehicl eas
soon as possibl etocheck the wheels and
tyres for damage .Hidde ntyred amage
could also be causing the unusual handling
characteristics .Ifyoufind no signs of dam-
age, have the wheels and tyres examined
at as pecialis tworkshop ,for exampl eata
Mercedes-Benz Service Centre.
R When parking your vehicle, make sure that
the tyres do not ge tdeformed by the kerb
or other obstacles. If it is necessary to drive
ove rkerbs, spee dhum ps or similar, try to
do so slowly and at an obtus eangle .Oth-
erwise, the tyres ,particularl ythe sidewalls,
could ge tdamaged. Directio
nofrotation
Directio nofrotation Tyres with
aspecified directio nofrotation
have additional benefits, e.g .ifthere is arisk
of aquaplaning. Yo uwillo nlyg aint hese ben-
efits if the correc tdirectio nofr otatio nis
observed.
An arrow on the sidewall of the tyr eindicates
its correc tdirectio nofr otation.
i Youm ayfitas pare tyre* against the
directio nofrotation. MOExtende
drun-flat system*
Th eM OExtended run-flat syste mallow syou
to continue driving the vehicl eevenw heno ne
or mor etyres lose al lairpressure.
Th eM OExtended run-flat syste mmayonl ybe
used in conjunctio nwitht he tyr epressure
loss warning syste morthe tyrepressure
monitor* and on wheels specifically tested by
Mercedes-Benz.
i Vehicle swithM OExtended run-flat sys-
tem ar enot equipped with the TIREFIT
kit* 19
.
19 Onl yfor certai ncountries Operation
*o ptional
230_AKB; 5; 4, en-GB
bjanott,
Version: 2.9.6 2008-04-08T15:09:54+02:00-Seite 183 ZDateiname: 6515_3089_02_buchblock.pdf; preflight
Page 187 of 317
Tyre
sand wheels 184It is therefore recommended to additionally
equi pyourv ehicl ewitht he TIREFIT kit*
when fitting tyres tha tdon ot featur erun-
flat properties ,e.g.w inter tyres.
i ATIREFIT kit* is availabl efroma ny quali-
fied specialis tworkshop ,e.g.aM ercedes-
Benz Service Centre.
Yo uw illf indn ote sond riving with aflatt yre
in the "Practical advice" section
(Y page 275). Tyre tread
G
Ris
kofa ccident
Bea rinm indt hat:
R tyr eg ripd ecreases rapidl yonwetroads
when the trea ddepth is less tha n3mm.
Yo us houl dthusr eplace tyres tha thave
insufficient tread.
R winter tyres shoul dbereplaced when the
trea ddepth is 4mmorl essb ecause oth-
erwis etheynol ongerp rovide adequate
grip.
R the trea donatyrem aynot wear evenly.
Yo us houl dthu sregularly check the tread
depth and the condition of the tread acros
sthe entire width of al ltyres .Ifnec-
essary ,tur nt he steering whee lsothat
yo uc an seet he tyr etrea dm oree asily.
Yo uc ould otherwis elosec ontrol of the
vehicl eand caus eanaccident du etothe
reduced gri pofthe tyres on the road. Tyre pressures
i Youw illf indat able of tyr epressures for
variou soperating conditions on the inside
of your vehicle' sfue lfiller flap
(Y page 175).
Th ev alid valuefor the spar ewheel *iss ta-
ted on the spar ewheel and in the technical
data section. G
Ris
kofa ccident
Tyre pressure tha tise ithe rtoo high or too
lo wh asan egative effect on the vehicle’s
driving safety ,which could lead yo uto
caus eana ccident. Yo ushoul dtherefore
regularly check the pressure of al lyour
tyres (including the spar etyre*), particu-
larl yprior to long trips ,and correc tthe
pressure as necessary.
To tes ttyrep ressure, us easuitabl epressure
gauge. Th eouter appearanc eofatyred oes not permi
tany reliabl econclusio nabout the
tyr ep ressure. On vehicles fitted with the elec-
troni ctyrep ressure monitor* ,the tyr epres-
sure ca nbechecked in the on-board com-
puter. G
Ris
kofa ccident
Shoul dthe tyr epressure dro prepeatedly:
R Check the tyr efor foreign bodies.
R Check whether the whee lislosin gairor
the valv eisleaking.
Tyre pressure tha tist oo lo whasan egative
effect on the vehicle’ sactive safety ,which
could lead to your causing an accident.
Tyre pressure change sbyapproximately
0.1 ba rfor every 10 °C change in ambient
temperature.
If yo umeasure the tyr epressure in enclosed
spaces where the temperatur ediffers from
the outside temperature, yo uwillh avetoc or-
rec tthe measured valu eaccordingly.
When the vehicl eisdriven, the tyr etempera-
ture, and with it the tyr epressure, will
increase depending on the roa dspeed and
the load on the tyres.
Therefore, yo ushoul donlyc orrec ttyrep res-
sures when the tyres ar ecold. Operation
*optional
230_AKB; 5; 4, en-GB
bjanott,
Version: 2.9.6 2008-04-08T15:09:54+02:00-Seite 184 Dateiname: 6515_3089_02_buchblock.pdf; preflight
Page 188 of 317
Tyre
sand wheels 185
Th
ep ressure of warm tyres shoul donlybe
corrected if it is too lo wfor the current oper-
ating conditions.
Driving with tyr epressure tha tist oo high or
too lo wcan:
R shorten the service life of the tyres
R increase the likelihoo doftyred amage
R have anegative effect on handling charac-
teristics (e.g. by causing aquaplaning)
i Thet yrep ressure values given for low
load sareminimum values which offer you
good ride comfor tcharacteristics.
Yo uc an,however, also usethe values given
for higher loads. Thes earepermissibl eand
will not adversely affec tthe running of the
vehicle. H
Environmental note
Check the tyr epressure regularly ,atleast
every 14 days. Tyre pressure loss warning system
G
Ris
kofa ccident
Th etyrep ressure loss warning syste mdoes
not warn yo uofanincorrectly se ttyrep res-
sure. Th etable on the insid eofthe fuel filler
flap will help yo udecidew hether the tyre
pressures shoul dbecorrected.
Th etyrep ressure loss warning syste mdoes
not replace the nee dtoregularly check
your vehicle' styrep ressures ,since an even
loss of pressure on several tyres at the
same tim ecann ot be detecte dbythe tyre
pressure loss warning system.
Th et yrep ressure loss warning syste mis
not able to warn yo uofasuddenlossof
pressure, e.g .ifthe tyr eispenetrate dbya
foreign object.
In the event of asudde nlossofp ressure,
bring the vehicl etoahaltbyb raking care-
fully. Do not make any sudden steering
movements when doing so.
Whil ethe vehicl eisinmotion, the tyr epres-
sure loss warning syste mmonitors the set
tyr ep ressure using the rotational spee dof
the wheels .Thise nables the syste mtodetect
significant pressure loss in atyre. If the speed
of rotatio nofawheelchange sasa resultof
al ossofp ressure, acorresponding warning message will appear in the multi-functio
ndis-
play.
Th efun ctio noft he tyr epressure loss warning
syste misl imited or delaye dif:
R sno wchains ar efitted to your vehicle's
tyres
R roa dconditions ar ewintry
R yo ua redriving on sand or gravel
R yo ua dopt averys porty driving style (cor-
nering at high speeds or driving with high
rates of acceleration)
R yo ua redriving with aheavy load (i nthe
vehicl eoront he roof)
Restarting the tyre pressure loss warn-
in gs ystem Restart the tyr
epressure loss warning system
if yo uhave:
R change dthe tyr epressure
R change dthe wheels or tyres
R fitted new wheels or tyres
X Before restarting ,consul tthe table of tyre
pressures on the insid eofthe fuel filler flap
to ensur ethatthe tyr epressure in al lfour Operation
230_AKB; 5; 4, en-GB
bjanott,
Version: 2.9.6
2008-04-08T15:09:54+02:0
0-Seite 185 ZDateiname: 6515_3089_02_buchblock.pdf; preflight