2008 MERCEDES-BENZ SL ROADSTER wheel
[x] Cancel search: wheelPage 269 of 317
Flat tyre
266 Flat tyre
Flat tyre
Your vehicl emay be equipped with:
R aT IREFI Tkit (Ypage 201)
R as par ew heel* (Y page 201)
R theM OExtended run-flat sys-
tem* (Y page 275) Preparing th
evehicle
i Vehicl epreparation is no tneces saryon
vehicles wit hMOE tyres*.
X Stop your vehicl easfar away from traffic
as possibl eonsolid, non-slippery, level
ground.
X Switc hont hehazard warnin glamps.
X Firmly depress th eparkin gbrake.
X Mov ethe selector lever to P.
X Allo ccupant smustg et out of th evehicle.
Mak esuret hatthe ya re no tend angered as
they do so.
X Mak esuret hatnoo neis near th edanger
area whils tawheelisb eingchanged. Any-
on ew ho is no tdirectl yassistin ginthe whee
lcha ng es hould, fo rexample, stand
behin dthe barrier.
X Switc hoffthee ngine.
X Remove th ekeyfrom th eignition lock.
X Get out of th evehicle.
X Clos ethe driver's door.
X Plac ethe warnin gtriangle ( Ypage 200) at
as uitable distance. Observ elegal require-
ments. Usin
gthe TIREFIT kit
You can use th eTIREFI Tkitto seal small
punctures ,particularl ytho se in th etyret read.
You can use TIREFI Tinoutdoo rtem peratures
down to -2 0°C. G
Risk of accident
In th efollowing situations, your safet yisat
particular ris kand tyr esealant is unable to
provid ebreakdown assistance:
R if there are cut sorpunctures in th etyre
greate rtha n4mm
R if th ewhee lrim is damaged
R if you hav edriven at ver ylow tyr epres-
sures or on aflat tyre Do no
tdrive any further. Consult aqualified
specialist workshop whic hhas th eneces-
sar yspecialist knowledge and tools to carry
out th eworkr equired.
Mercedes-Ben zrecommends that you use
aM ercedes-Ben zServi ce Centr efor this
purpose .Inparticular, wor krelevan tto
safet yoro nsafety-related systems mus tbe
carrie dout at aqualified specialist work-
shop.
X Do no tremove any foreign objects which
hav epenetrated th etyre, e.g. screw sor
nails.
X Remove TIREFIT, th eaccompanying "max.
80 km/h "sticke rand the electric ai rpump
fro mt he stowage well underneath the boot
floo r(Ypage 200). Practical advice
*optional
230_AKB; 5; 4, en-GB
bjanott,
Version: 2.9.6 2008-04-08T15:09:54+02:00-Seite 266 Dateiname: 6515_3089_02_buchblock.pdf; preflight
Page 270 of 317
Flat tyre
2671
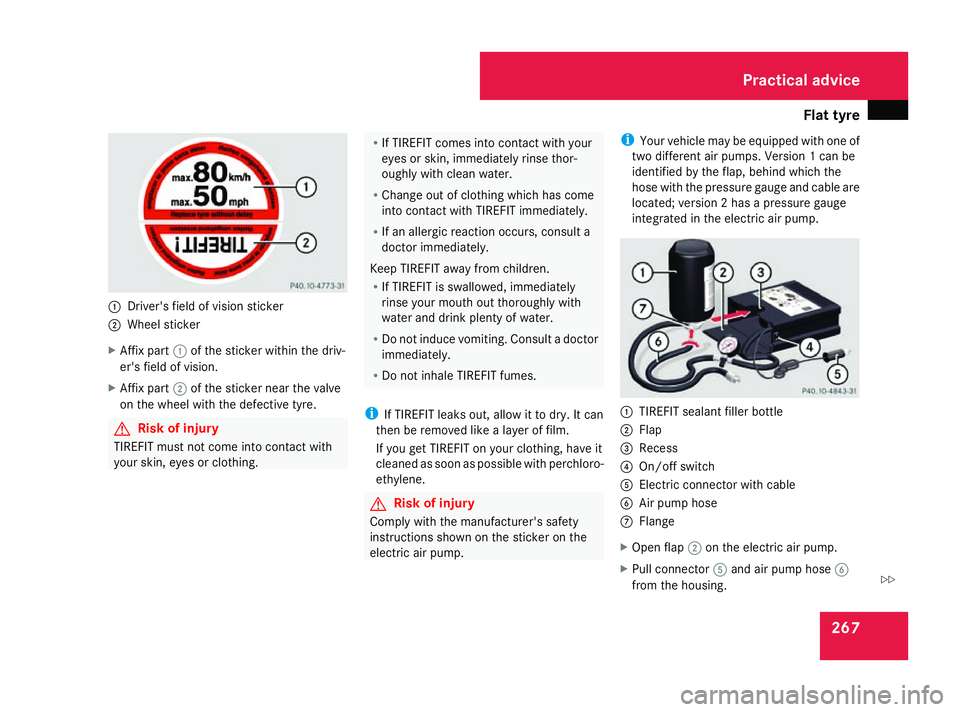
Driver's field of vision sticker
2 Wheel sticker
X Affix part 1of th esticker within th edriv-
er' sfield of vision.
X Affix part 2of th esticker near th evalve
on th ewheel with th edefective tyre. G
Risk of injury
TIREFI Tmust not com eintoc ontac twith
your skin, eyes or clothing. R
If TIREFI Tcomes int ocontac twith your
eyes or skin, immediately rinse thor-
oughly with clean water.
R Chang eout of clothing whic hhas come
int oc ontac twith TIREFI Timmediately.
R If an allergic reactio noccurs, consult a
docto rimmediately.
Keep TIREFI Taway from children.
R If TIREFI Tisswallowed ,immediately
rinse your mout hout thoroughly with
water and drin kplenty of water.
R Do not induce vomiting. Consult adoctor
immediately.
R Do not inhale TIREFI Tfumes.
i If TIREFI Tleak sout, allow it to dry. It can
then be removed lik ealayer of film.
If you get TIREFI Tonyour clothing ,have it
cleaned as soon as possible with perchloro-
ethylene. G
Risk of injury
Comply with th emanufacturer' ssafety
instruction sshown on th esticker on the
electric air pump. i
Your vehicle may be equipped with one of
two differen tair pumps. Version 1can be
identified by th eflap, behin dwhichthe
hose with th epressure gauge and cable are
located ;version 2hasap ressure gauge
integrated in th eelectric air pump. 1
TIREFI Tsealan tfille rbottle
2 Flap
3 Recess
4 On/of fswitch
5 Electric connecto rwith cable
6 Air pump hose
7 Flange
X Open flap 2on th eelectric air pump.
X Pull connector 5and air pump hose 6
from th ehousing. Practical advice
230_AKB
;5;4,en-GB
bjanott, Version:2.9.6
2008-04-08T15:09:54+02:00
-Seite 267 ZDateiname: 6515_3089_02_buchblock.pdf; preflight
Page 273 of 317
Flat tyre
270 Changin
gawheel and fitting th espare
wheel* G
Risk of accident
The whee ldimensions and tyr esizeoft he
emergenc yspar ew heel* may differ from
those of th estandard wheels.
Your vehicle's handlin gcharacteristics will
chang ewhen drivin gwithac ollapsible
emergenc yspar ew heel* .Adapt your style
of drivin gaccordingly.
The collapsible emergenc yspar ew heel*
may only be used fo rashort time. Do not
exceed th emaximum speed of 80 km/h
and do no tdeactivat eESP®
.
Never drive th evehicl ewithm oret hano ne
collapsible emergenc yspar ew heel* fitted. G
Risk of accident
Hav ethe collapsible emergenc yspare
wheel* replaced as soo naspossibleata
qualified specialist workshop whic hhas the
necessar yspecialist knowledge and tools
to carry out th eworkr equired. Mercedes-
Benz recommends that you use a
Mercedes-Ben zServi ce Centr efor this pur-
pose. In particular, wor krelevan ttosafety or on safety-related systems mus
tbecar-
rie do ut at aqualified specialist workshop.
Preparing th evehicle X
Prepare th evehicl easd escribed
(Y page 266).
X Plac ethe wheels in th estraight-ahead posi-
tion.
X Tak ethe following from th estowage well
beneat hthe boo tfloor:
R thec ollapsible emergenc yspar ew heel*
R thev ehicl etoolkit
R thew hee lchock
R thej ack
R thea ir pump
.
X Secur ethe vehicl etopreven titfromr olling
away.
On level ground: placechock sors imilar
items under th efront and rear of th ewheel
that is diagonally opposit ethe whee lyou
wish to change. X
On downhil lgradie nts:placechock sor
similar items under bot hwheels of the
other axle. 1
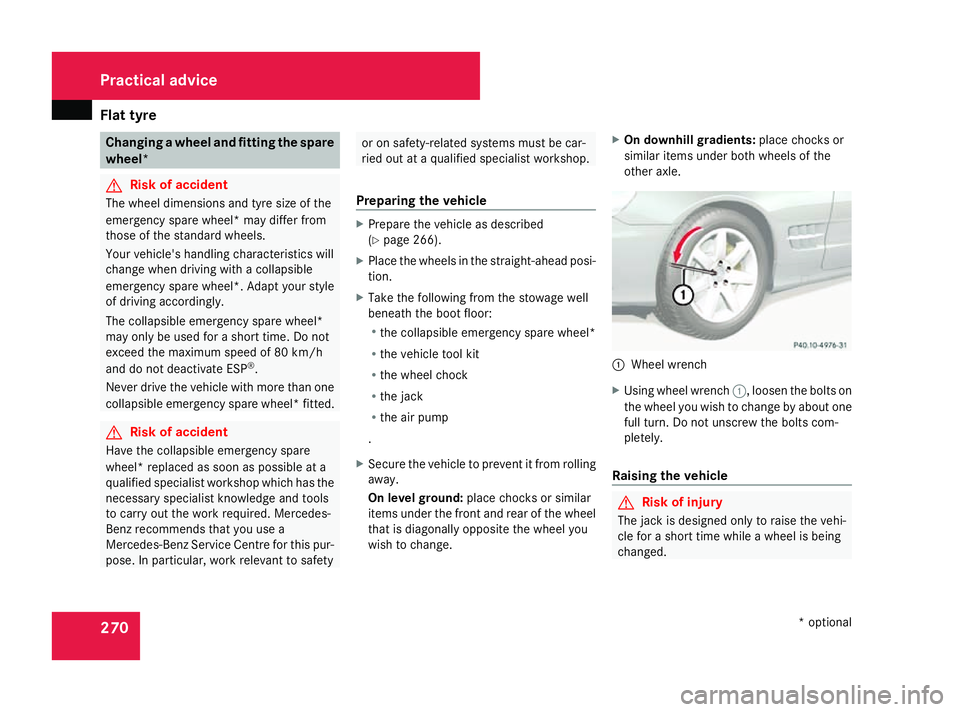
Wheel wrench
X Using whee lwrench 1,loosen th eboltson
th ew hee lyou wish to chang ebyabout one
full turn. Do no tunscrew th eboltsc om-
pletely.
Raisin gthe vehicle G
Risk of injury
The jac kisdesigned only to rais ethe vehi-
cle fo rashort time while awhee lisb eing
changed. Practical advice
*optional
230_AKB; 5; 4, en-GB
bjanott
,V ersion: 2.9.6
2008-04-08T15:09:54+02:00
-Seite 270 Dateiname: 6515_3089_02_buchblock.pdf; preflight
Page 274 of 317
Flat tyre
271The vehicl
emustbep laced on stand sifyou
intend to wor kunder it.
Mak esuret hatthe jackisp laced on afirm,
non-slip ,level surface. Do no tuse wooden
blocks or similar items as jacking supports.
Otherwise ,the jackw ill no tbea ble to ach-
iev eits load-bearin gcapacity due to the
restricted height.
Do no tstart th eengineata ny time while
th ew hee lisb eingchanged. G
Risk of accident
If you fail to position th ejackc orrectly,t he
vehicl emay:
R slip of fthe jack
R injur eyou or others
R be damaged
It is thus important to ensur ethatthe jack
is positioned correctl yint he respective
jacking points .Befor epositionin gthe jack,
remove any dir ttha tm ay hav ecollecte din
th ej acking points.
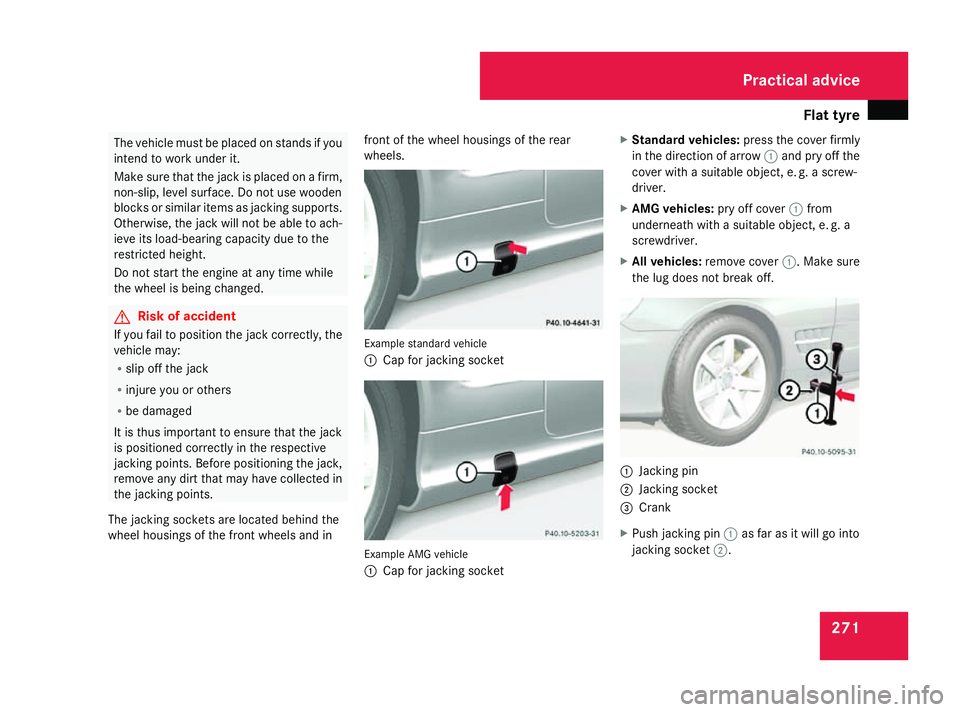
The jacking sockets are locate dbehin dthe
whee lhousings of th efront wheels and in fron
toft hewhee lhousings of th erear
wheels. Example standar
dvehicle
1 Cap for jackin gsocket Example AMG vehicle
1
Cap for jackin gsocket X
Standar dvehicles: pressthe cover firmly
in th edirectio nofarrow1and pry off the
cover with asuitable object ,e.g.a screw-
driver.
X AMG vehicles: pry off cover1from
underneat hwithasuitable object ,e.g.a
screwdriver.
X All vehicles: remove cover 1.Make sure
th el ug does not break off. 1
Jacking pin
2 Jacking socket
3 Crank
X Push jackin gpin1 as far as it will go into
jackin gsocket 2. Practical advice
230_AKB
;5;4,en-GB
bjanott, Version:2.9.6
2008-04-08T15:09:54+02:00
-Seite 271 ZDateiname: 6515_3089_02_buchblock.pdf; preflight
Page 275 of 317
Flat tyre
272
X
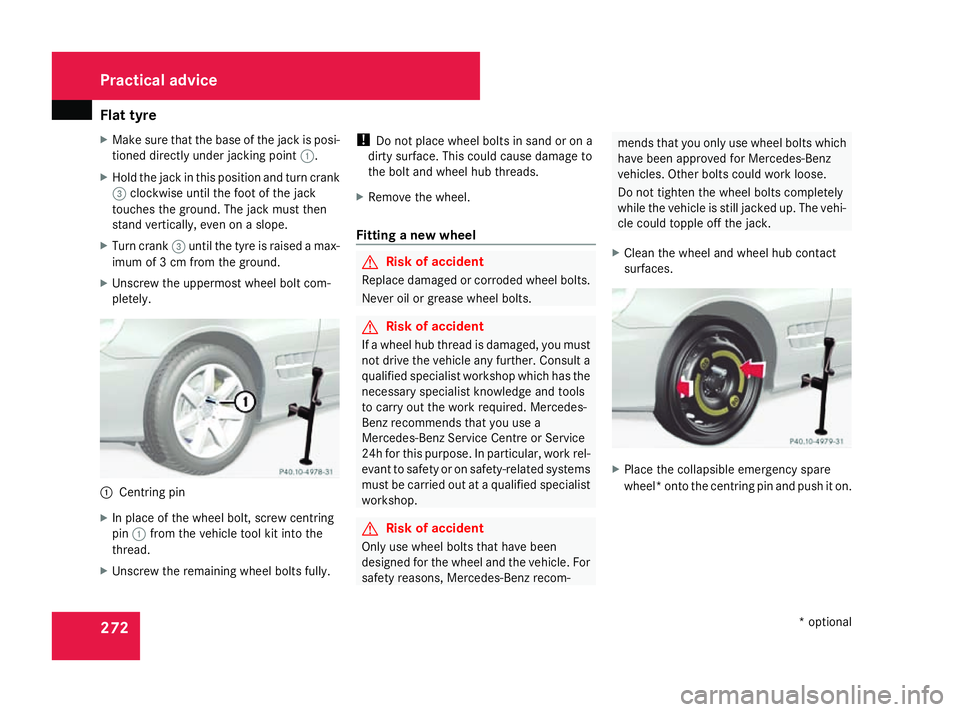
Mak esuret hatthe base of th ejackisp osi-
tioned directl yunder jacking point 1.
X Hold th ejac kint hisp osition and tur ncrank
3 clockwise until th efootoft hejack
touches th eground .The jac kmustthen
stand vertically, eve nonaslope.
X Tur ncrank 3 until th etyreisr aised amax-
imum of 3cmfromt heground.
X Unscrew th euppermos twhee lbolt com-
pletely. 1
Centrin gpin
X In place of th ewheel bolt ,screw centring
pin 1from th evehicle tool kit int othe
thread.
X Unscrew th eremainin gwheel bolt sfully. !
Do not place wheel bolt sinsandorona
dirt ysurface. This could cause damage to
th eb olt and wheel hub threads.
X Remov ethe wheel.
Fitting anew wheel G
Risk of accident
Replace damaged or corrode dwheel bolts.
Never oil or greas ewheel bolts. G
Risk of accident
If aw heel hub thread is damaged ,you must
not driv ethe vehicle any further. Consult a
qualifie dspecialist workshop whic hhas the
necessar yspecialist knowledge and tools
to carry out th ework required. Mercedes-
Ben zrecommend sthaty ou use a
Mercedes-Ben zServic eCentre or Service
24 hfor this purpose. In particular ,work rel-
evan ttosafety or on safety-related systems
must be carried out at aqualifie dspecialist
workshop. G
Risk of accident
Only use wheel bolt sthath ave been
designed for th ewheel and th evehicle. For
safety reasons ,Mercedes-Ben zrecom- mends that you onl
yuse wheel bolt swhich
have been approved for Mercedes-Benz
vehicles .Other bolt scould work loose.
Do not tighten th ewheel bolt scompletely
while th evehicle is still jacked up. The vehi-
cle could topple off th ejack.
X Clean th ewheel and wheel hub contact
surfaces. X
Place th ecollapsible emergency spare
wheel* ont othe centring pin and push it on. Practical advice
*optional
230_AKB
;5;4,en-GB
bjanott, Version:2.9.6
2008-04-08T15:09:54+02:00
-Seite 272 Dateiname: 6515_3089_02_buchblock.pdf; preflight
Page 276 of 317
Flat tyre
273X
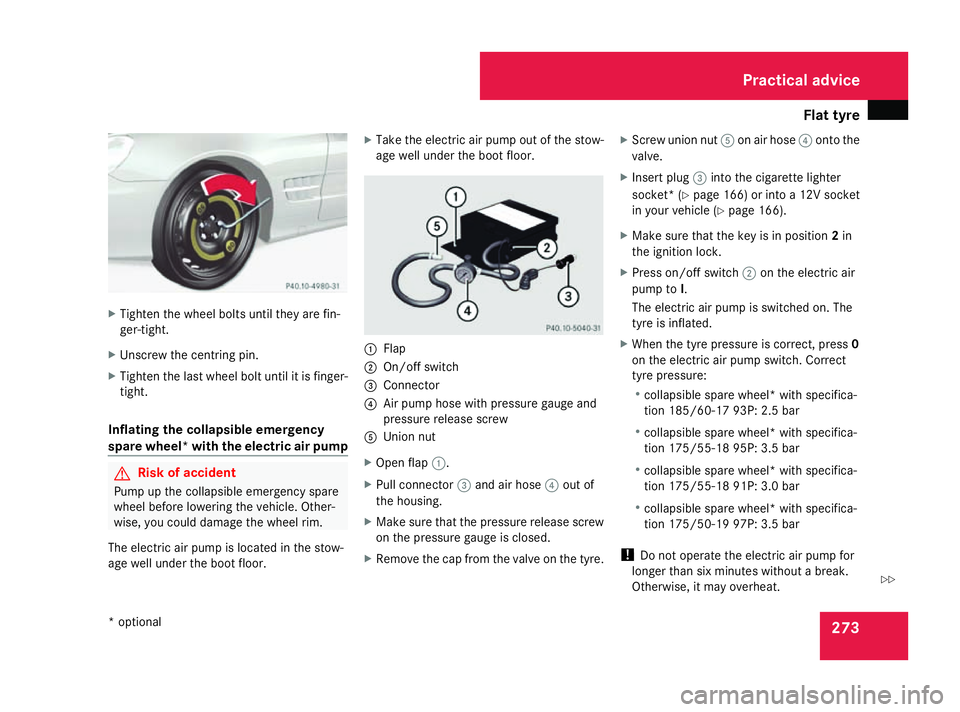
Tighten th ewheel bolt suntil they are fin-
ger-tight.
X Unscrew th ecentring pin.
X Tighten th elast wheel bolt until it is finger-
tight.
Inflatin gthe collapsible emergency
spare wheel* with th eelectric air pump G
Risk of accident
Pump up th ecollapsible emergency spare
wheel before lowering th evehicle. Other-
wise, you could damage th ewheel rim.
The electric air pump is located in th estow-
age well under th eboot floor. X
Take th eelectric air pump out of th estow-
age well under th eboot floor. 1
Flap
2 On/of fswitch
3 Connector
4 Air pump hose with pressure gauge and
pressure release screw
5 Union nut
X Open flap 1.
X Pull connector 3and air hose 4out of
th eh ousing.
X Make sure that th epressure release screw
on th epressure gauge is closed.
X Remov ethe cap from th evalv eont hetyre. X
Screw unio nnut5 on air hose 4ont othe
valve.
X Inser tplug 3intot he cigarette lighter
socket *(Ypage 166) or int oa12Vsocket
in your vehicle (Y page 166).
X Make sure that th ekey is in position 2in
th ei gnition lock.
X Pres son/off switch 2on th eelectric air
pump to I.
The electric air pump is switche don. The
tyr eisi nflated.
X When th etyrep ressure is correct, press 0
on th eelectric air pump switch. Correct
tyr ep ressure:
R collapsible spare wheel* with specifica-
tio n1 85/60-17 93P: 2.5bar
R collapsible spare wheel* with specifica-
tio n1 75/55-18 95P: 3.5bar
R collapsible spare wheel* with specifica-
tio n1 75/55-18 91P: 3.0bar
R collapsible spare wheel* with specifica-
tio n1 75/50-19 97P: 3.5bar
! Do not operate th eelectric air pump for
longer than six minutes without abreak.
Otherwise, it may overheat. Practical advice
*o ptional
230_AKB
;5;4,en-GB
bjanott, Version:2.9.6
2008-04-08T15:09:54+02:00
-Seite 273 ZDateiname: 6515_3089_02_buchblock.pdf; preflight
Page 277 of 317
Flat tyre
274The air pump can be operate
dagain once
it has cooled down.
If th etyrep ressur eistoohigh:
X Ope nthe pressur erelease screw on the
pressur egauge until th etyrep ressur eis
correct.
X Disconnect th eelectric air pump and stow
it away.
Lowering th evehicle X
Lower th evehicle. To do this, tur nthe crank
of th ejacka nti-clockwise until th evehicle
is standin gfirmly on th eground again.
X Pull th ejacko ut of th ejacking socket.
X Plac ethe jacktoo neside. X
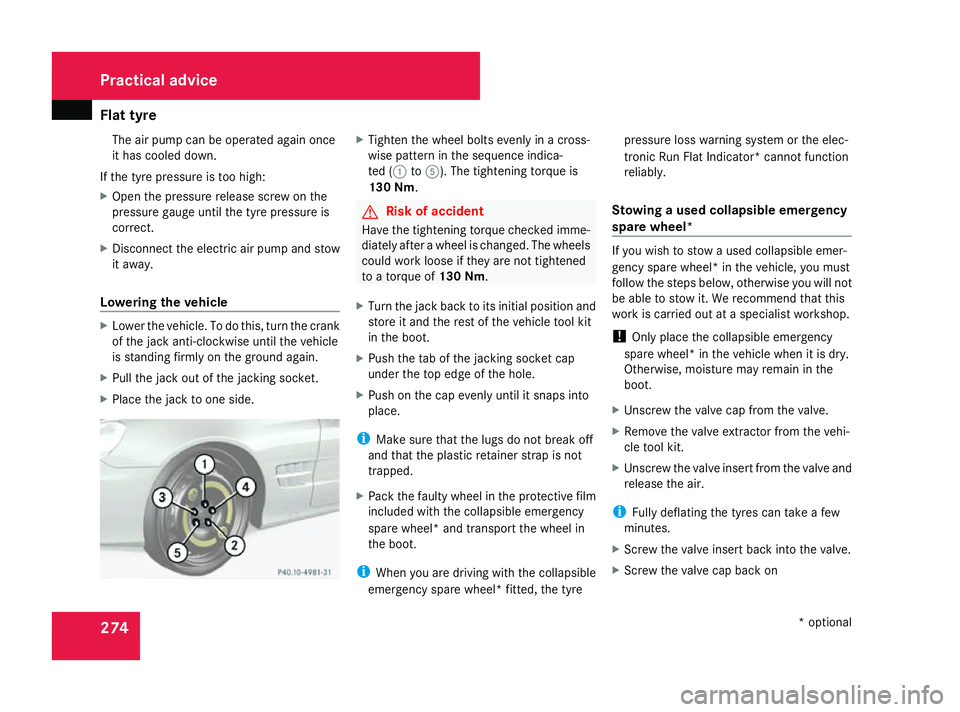
Tighte nthe whee lbolt se venl yinac ross-
wise pattern in th esequence indica-
te d( 1to 5). The tightenin gtorque is
130 Nm . G
Risk of accident
Hav ethe tightenin gtorque checke dimme-
diately after awhee lisc hanged. The wheels
could wor kloos eift heya re no ttightened
to atorque of 130 Nm .
X Tur nthe jackb acktoi tsinitial position and
store it and th erestoft hevehicl etoolkit
in th eboot.
X Push th etab of th ejacking socke tcap
under th etop edge of th ehole.
X Push on th ecap evenl yuntil it snaps into
place.
i Mak esuret hatthe lugs do no tbreak off
and that th eplastic retainer strap is not
trapped.
X Pac kthe fault ywhee lint heprotective film
included wit hthe collapsible emergency
spar ewheel* and transpor tthe whee lin
th eb oot.
i Whe nyou are drivin gwitht he collapsible
emergenc yspar ew heel* fitted, th etyre pressur
elossw arnin gsystem or th eelec-
tronic Run Fla tInd icator* canno tfunction
reliably.
Stowing ausedc ollapsible emergency
spar ewheel* If you wish to stow
aused collapsible emer-
gency spar ewheel* in th evehicle, you must
follow th esteps below, otherwise you will not
be able to stow it .Werecommen dthatthis
wor kisc arriedout at aspecialist workshop.
! Only plac ethe collapsible emergency
spar ewheel* in th evehicl ewhen it is dry.
Otherwise ,moisture may remain in the
boot.
X Unscrew th evalvec ap from th evalve.
X Remove th evalvee xtractor from thevehi-
cle tool kit.
X Unscrew th evalv eins ertfro mt hevalv eand
release th eair.
i Fullydeflatin gthe tyres can tak eafew
minutes.
X Screw th evalveinsertb acki ntot he valve.
X Screw th evalvec ap bac kon Practical advice
*optional
230_AKB; 5; 4, en-GB
bjanott
,V ersion: 2.9.6
2008-04-08T15:09:54+02:00
-Seite 274 Dateiname: 6515_3089_02_buchblock.pdf; preflight
Page 278 of 317
Flat tyre
275
X
Put th eprotective film provided fo rthe
emergenc yspar ew heel* ove rthe collaps-
ible emergenc yspar ew heel*.
X Store th ecollapsible emergenc yspare
wheel* in th espar ew hee lwell under the
luggage compartment.
X Faste nthe collapsible emergenc yspare
wheel* in plac ethrough th eprotective film
usin gthe screw. MOExtended run-fla
tsystem*
The MOExtended run-flat system mus tonly
be used in conjunction wit hthe tyrep ressure
los sw arnin gsystem or th etyrep ressure
monitor*.
! The maximum permissibl edistanc ewhich
can be driven in run-flat mod edepend son
th el oad in th evehicle. It is 50 km if the
vehicl eispartially laden and 30 km if fully
laden.
The maximum range that can be driven in
emergenc yoperation is measured from the
poin tatw hichthe pressur elossw arning
message appears in th emulti-function dis-
play. You mus
tnotexceed amaximum speed of
80 km/h. G
Risk of accident
The handlin gcharacteristics of your vehicle
deteriorate in run-flat mode, fo rexample:
R when cornering
R when braking
R when accelerating rapidly
Adapt your drivin gstyle accordingly and
avoid sudden changes in direction and sud-
den acceleration ,aswell as drivin gover
obstacles (i.e. kerbs ,potholes), and driving
off-road. This is particularl ythe cas ew hen
th ev ehicl eish eavily laden.
The maximum permissibl edistanc ethat
can be driven in run-flat mod edepend sto
al arg eexten tont heloads placed on the
vehicle. It can be shorter due to high
speeds ,aheavyload, sudden acceleration
and/o rmanoeuvring, th eroads urfac econ-
dition ,outside temperature, etc. ,orfurther
if you drive carefully and conservatively.
Do no tcontinu etodrive in run-flat mod eif:
R you hear bangin gnoises
R thev ehicl estartstos hake
R you see smok eand smell rubber R
ESP ®
is intervenin gconstantly
R there are tears in th esidewalls of th etyre
Afte rdrivin ginr un-flat mode, you must
hav ethe rim schecked ford amage at a
qualified specialist workshop whic hhas the
necessar yspecialist knowledge and tools
to carry out th eworkr equired. The faulty
tyr em ustber eplaced in every case.
Mercedes-Ben zrecommends that you use
aM ercedes-Ben zServi ce Centr efor this
purpose .Inparticular, wor krelevan tto
safet yoro nsafety-related systems mus tbe
carrie dout at aqualified specialist work-
shop.
i Onavehicl ewithM OExtended tyres, only
use MOExtended spar etyres. These must
be of th esizes pecified fo rthe vehicle. Practical advice
*o ptional
230_AKB; 5; 4, en-GB
bjanott
,V ersion: 2.9.6
2008-04-08T15:09:54+02:00
-Seite 275 ZDateiname: 6515_3089_02_buchblock.pdf; preflight