2008 MERCEDES-BENZ SL ROADSTER rear view mirror
[x] Cancel search: rear view mirrorPage 12 of 317
9
LIM indicator lamp
Cruise control ................ 125
Distronic .................... 128
Variabl eSpeedtronic ........... 134
Load compartment load, maximum 299
Loading aid (boot) ............... 164
Lowering manually .............258
Locator lighting
Switching on/off (on-board com-
puter) ....................... 119
Locking
Automatic ..................... 68
Emergency locking .............256
From the insid e(central locking
button) ....................... 68
Luggage compartment
Powe rclosing feature ........... 67
Luggage compartmen t(rear) ...... 163
Luggage cover see Boot separator
Luggage net .................... 161
Lumbar support .................. 75M
Main-beam headlamps Display message .............. 222
Maintenance
Battery ...................... 276Malfunction memory
see Message memory menu
Manual gearshift program ....102, 104
Maximum speed Technical data ................ 291
Memory card ................... 114
Operation (on-board computer) ...114
see separate operating instructions
Memory function ................. 82
Menu (on-board computer) ........109
AMG ........................ 111
Audi o....................... 113
Distronic .................... 132
DVD ........................ 115
Message memory .............. 115
Navigation ................... 115
Resetting to factory settings .....116
Settings ..................... 116
Standard displa y.............. 110
Submenu overview .............116
Telephone ................... 123
Trip computer ................ 122
TV .......................... 114
Message
see Display message
see Indicator and warning lamp
see Message memory menu
Mirror
Sun viso r.................... 165Mobile phone
................... 166
Bracket ..................... 167
Display message ..........209, 227
Installatio n................... 287
Own numbe rsending ........... 168
Run-on time .................. 168
Telephone menu (on-board com-
puter) ....................... 123
Modifying the programming
Key .......................... 64
KEYLESS GO key ............... 66
MOExtended run-flat system* .183, 275
MP3 ........................... 114
Operation (on-board computer) ...114
see separate operating instructions
Multi-contour seat ................ 76
Multi-function display ........105, 108
Multi-functio nsteering wheel .....107
Overview ..................... 30 N
Navigation ..................... 115
Navigation menu (on-board com-
puter) ....................... 115
see separate operating instructions
Notes on driving
SBC TM
brake system ............ 58 Index
230_AKB; 5; 4, en-GB
bjanott,
Version: 2.9.6 2008-04-08T15:09:54+02:00-Seite 9 Dateiname: 6515_3089_02_buchblock.pdf; preflight
Page 24 of 317
Exterior view
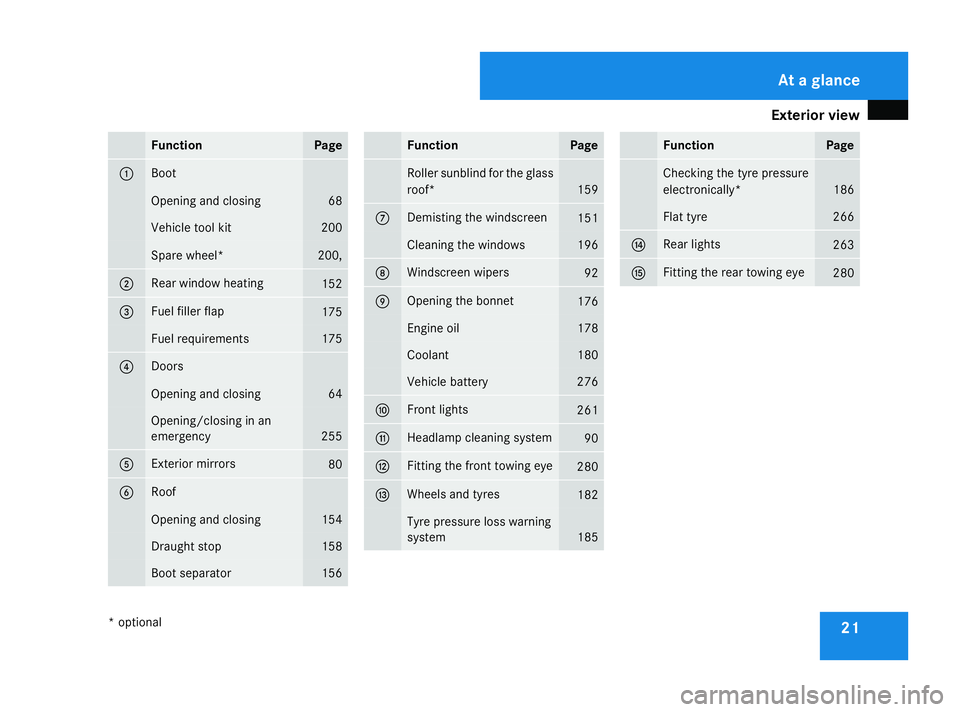
21Function Page
1 Boot
Opening and closing 68
Vehicl
etoolkit 200
Spare wheel* 200,
2 Rear window heating
152
3 Fuel fille
rflap 175
Fuel requirements 175
4 Doors
Opening and closing 64
Opening/closing in an
emergency
255
5 Exterio
rmirrors 80
6 Roof
Opening and closing 154
Draught stop 158
Boot separator 156 Function Page
Roller sunblin
dfor th eglass
roof* 159
7 Demisting th
ewindscreen 151
Cleaning th
ewindows 196
8 Windscree
nwipers 92
9 Opening th
ebonnet 176
Engin
eoil 178
Coolant 180
Vehicl
ebattery 276
a Fron
tlights 261
b Headlamp cleanin
gsystem 90
c Fitting th
efront towin geye 280
d Wheels and tyres
182
Tyre pressur
eloss warning
system 185 Function Page
Checkin
gthe tyrep ressure
electronically* 186
Flat tyre 266
e Rear lights
263
f Fitting th
erear towin geye 280At
ag lance
*o ptional
230_AKB
;5;4,en-GB
bjanott ,V ersion: 2.9.6
2008-04-08T15:09:54+02:00
-Seite 21 Dateiname: 6515_3089_02_buchblock.pdf; preflight
Page 36 of 317
Overhea
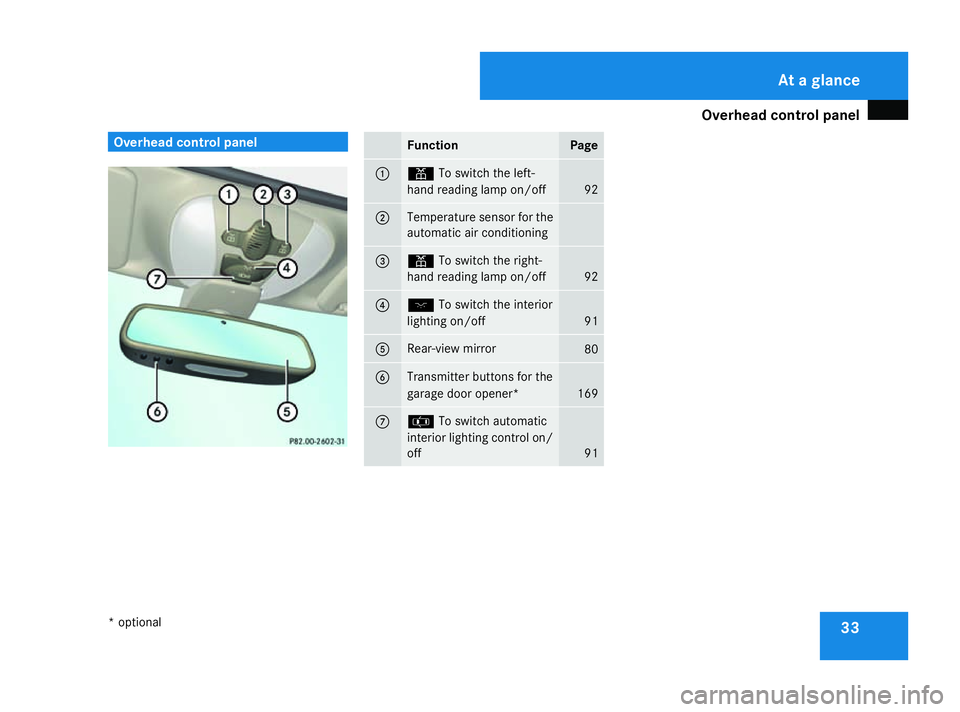
dcontrol panel 33Overhea
dcontrol panel Function Page
1 X
To switch the left-
hand reading lamp on/off 92
2 Temperature sensor for the
automatic air conditioning
3 X
To switch the right-
hand reading lamp on/off 92
4 ð
To switch the interior
lightin gon/off 91
5 Rear-view mirror
80
6 Transmitter buttons for the
garage door opener*
169
7 ¤
To switch automatic
interior lightin gcontrol on/
off 91 At
ag lance
*o ptional
230_AKB
;5;4,en-GB
bjanott, Version:2.9.6
2008-04-08T15:09:54+02:0
0-Seite 33 Dateiname: 6515_3089_02_buchblock.pdf; preflight
Page 83 of 317
Mirrors
80 Mirrors
Rear-vie
wmirror
X Adjust the rear-view mirror by hand so you
have agood overview of the traffic condi-
tions. Exterior mirrors
G
Risk of accident
The exterior mirrors reduce the size of the
image. Objects are actually close rthan
they appear. You coul dmisjudge the dis-
tance from vehicles driving behind and
cause an accident, e.g. whe nchanging
lane. For this reason, make sure of the
actua ldistance from the vehicle driving
behind by glancing over you rshoulder.
The convex exterior mirrors give alarger field
of vision.
At low outside temperatures, the exterior mir-
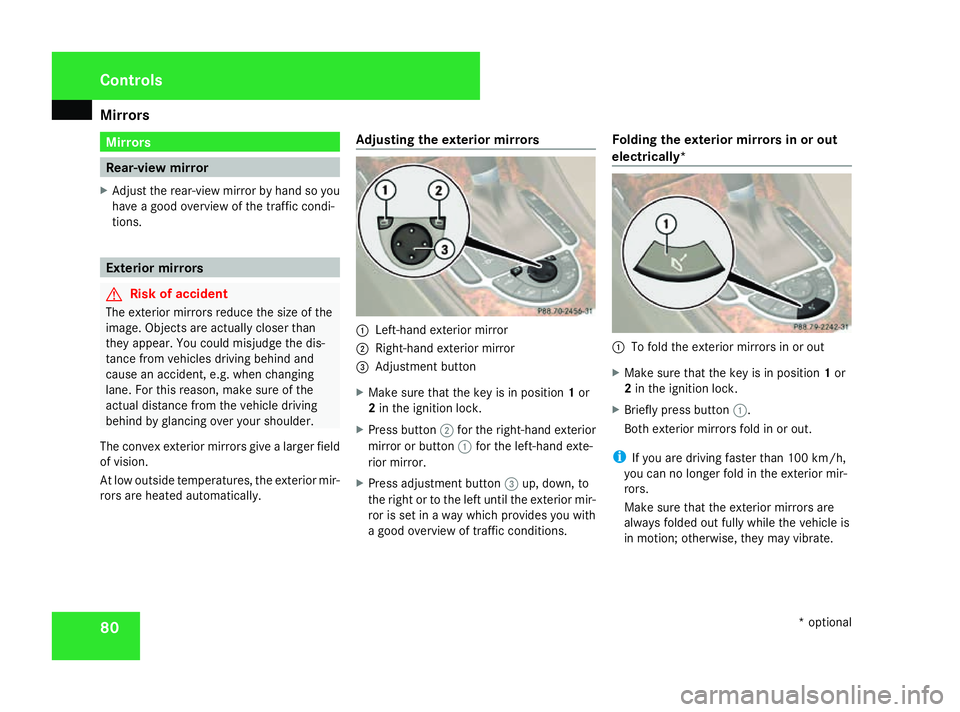
rors are heated automatically. Adjusting the exterior mirrors 1
Left-hand exterior mirror
2 Right-hand exterior mirror
3 Adjustment button
X Make sure that the key is in position 1or
2 in the ignition lock.
X Press button 2for the right-hand exterior
mirror or button 1for the left-hand exte-
rior mirror.
X Press adjustment button 3up, down, to
the right or to the left until the exterior mir-
ror is set in awaywhich provides you with
ag ood overview of traffic conditions. Folding the exterior mirrors in or out
electrically*
1
To fold the exterior mirrors in or out
X Make sure that the key is in position 1or
2 in the ignition lock.
X Briefl ypress button 1.
Both exterior mirrors fold in or out.
i If you are driving faster than 100 km/h,
you can no longe rfold in the exterior mir-
rors.
Make sure that the exterior mirrors are
always folded out fully while the vehicl eis
in motion; otherwise, they may vibrate. Controls
*optional
230_AKB; 5; 4, en-GB
bjanott,
Version: 2.9.6 2008-04-08T15:09:54+02:00-Seite 80 Dateiname: 6515_3089_02_buchblock.pdf; preflight
Page 84 of 317
Mirrors
81
Resetting the exterior mirrors If the battery has been disconnected or has
become discharged, the exterior mirrors
must be reset. Otherwise, they wil lnot fold in
whe nyou select the "Fol dinmirrors when
locking" function in the on-board computer
(Y pag e121).
X Make sure that the key is in position 1in
the ignition lock.
X Briefl ypress button 1.
Folding the exterior mirrors in or out
automatically* If the "Fol
dinmirrors whe nlocking" function
is activated in the on-board computer
(Y pag e121):
R The exterior mirrors fold in automatically as
soon as you lock the vehicle from the out-
side.
R The exterior mirrors fold out again auto-
matically as soon as you unlock the vehicle
and then open the driver's or front-
passenger door.
i If you have activated this function and fold
in the exterior mirrors using button 1,they
wil lnot be folded out automatically .You can then only fold out the exterior mirrors
using button
1. Automatic anti-dazzle mirrors
The rear-view mirror and the exterior mirror
on the driver's side automatically go into anti-
dazzle mode if the ignition is switched on and
incident light from headlamps strikes the sen-
sor in the rear-view mirror.
The mirrors do not go into anti-dazzle mode if
reverse gea risengaged or the interior lighting
is switched on. G
Risk of accident
If incident light from the headlamps of other
vehicles is prevented from striking the sen-
sor in the rear-view mirror, for instance if
the draught stop is fitted, the mirror's auto-
matic anti-dazzle function wil lnot operate.
Incident light coul dthen dazzle you .This
may distract you from the traffic conditions,
and you may thereby cause an accident. In
this case, adjust the rear-view mirror man-
ually. Passengers
ide exterior mirror park-
ing position
To make it easier to park, you can store the
front-passenger side exterior mirror position
in such awaythat you can see the rear wheel
on that side as soon as you engag ereverse
gear.
You can store aparking position for the exte-
rior mirror on the front-passenger side using
the memory button.
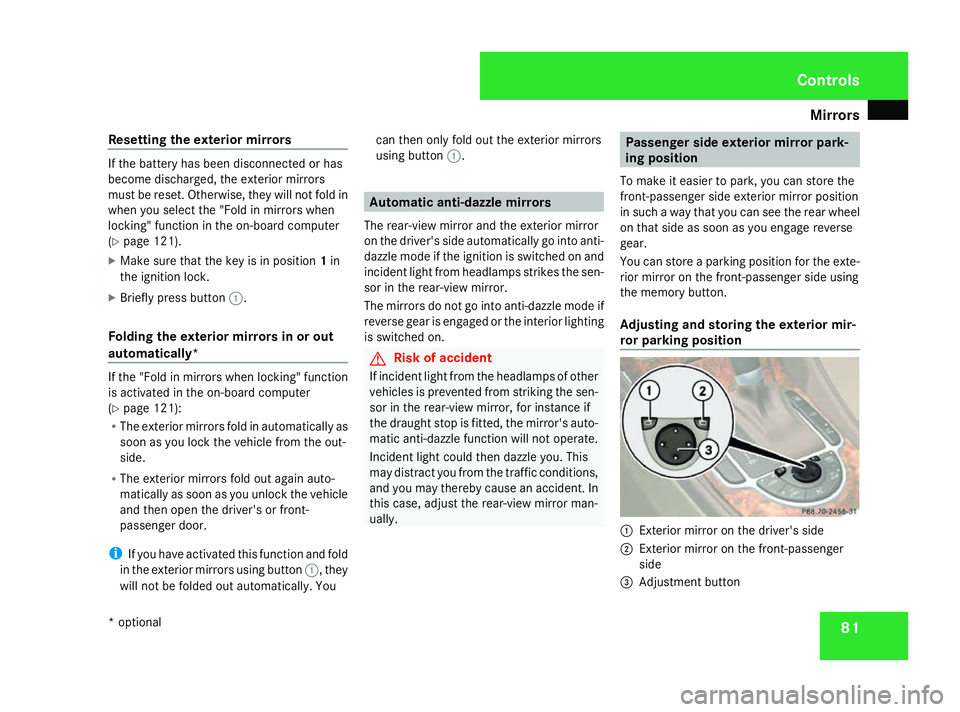
Adjusting and storin gthe exterior mir-
ror parking position 1
Exterior mirror on the driver's side
2 Exterior mirror on the front-passenger
side
3 Adjustment button Controls
*o ptional
230_AKB; 5; 4, en-GB
bjanott,
Version: 2.9.6 2008-04-08T15:09:54+02:00-Seite 81 ZDateiname: 6515_3089_02_buchblock.pdf; preflight
Page 172 of 317
Features
169
Fitting
adiffere nt mobile phone bracket Example illustration
1
Contact plate
2 Recesses
3 Mobile phon ebracket
X Inser tmobil ephon ebracket 3into
recesses 2of contac tplate 1.
X Slid em obilephon ebracket 3forwards
until it engages. Garage door opener*
The remot econtrol integrated in th erear-view
mirror allows you to operate up to three dif-
ferent door and gat esystems.
i The garage door opener is onl yavailable
for certain countries. Observe th elegal
requirements in all countries concerned.
The HomeLink ®
garage door opener is
compatible with most European garage and
gat eopener drives. More informatio non
HomeLink ®
and/or compatible product sis
available from:
R any Mercedes-Ben zServic eCentre
R theH omeLink ®
hotline
(0) 0800 04663546 5(free of charge) or
+4 9(0) 6839 907-27 7(atac harge)
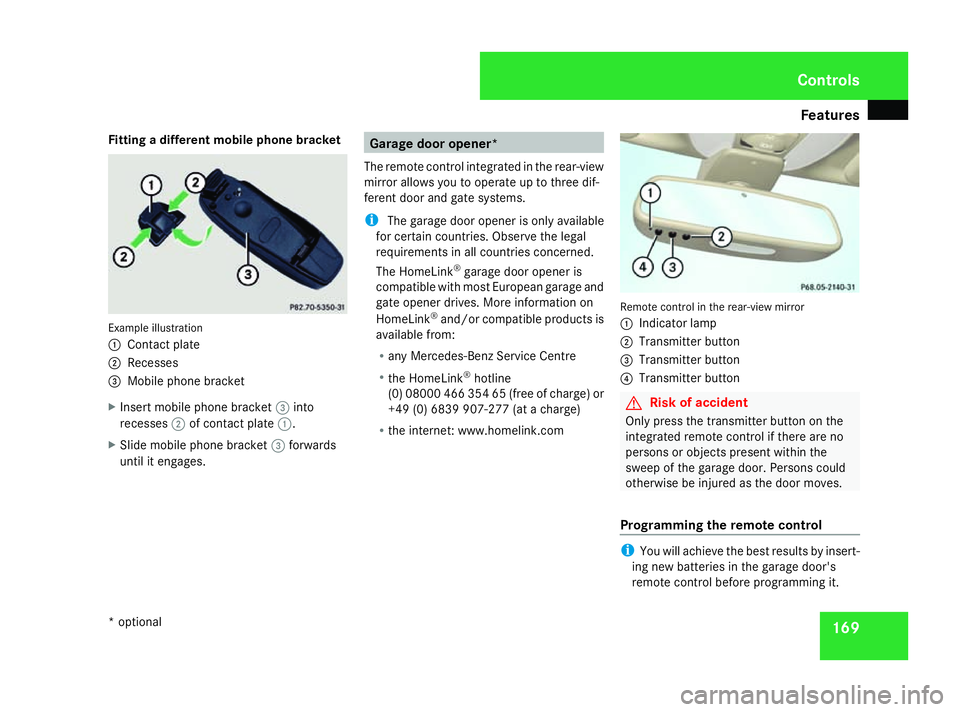
R the internet:w ww.homelink.com Remote control in the rear-view mirror
1
Indicator lamp
2 Transmitter button
3 Transmitter button
4 Transmitter button G
Risk of accident
Only press the transmitter button on the
integrated remote control if there are no
persons or object spresent within the
sweep of the garage door. Persons could
otherwise be injured as the door moves.
Programming the remotec ontrol i
You will achieve the best results by insert-
ing new batteries in the garage door's
remote control before programming it. Controls
*o ptional
230_AKB; 5; 4, en-GB
bjanott,
Version:2.9.6
2008-04-08T15:09:54+02:00
-Seite 169 ZDateiname: 6515_3089_02_buchblock.pdf; preflight
Page 173 of 317
Features
170
X
Erase th ememory of th eintegrated remote
control (Y page 171) before programming
it fo rthe first time.
X Tur nthe keyt op osition 2in th eignition
lock.
X Press and hold on eoftransmitte rbuttons
2 to4 on th eintegrated remotecontrol.
Indicato rlamp 1start stof lasha fter a
short while .Itflashes about once asecond.
i Indicato rlamp 1flashes immediately
th ef irst time th etransmitte rbutto nisp ro-
grammed. If this transmitte rbutto nhas
already been programmed, indicator
lamp 1will only start flashin gatarateof
once asecon dafter 20 seconds have
elapsed.
X Kee pthe transmitte rbuttons depressed.
X Poin tthe garage door' sremot econtro lwith
th et ransmitte rtow ard sthe left-han dside
of th erear-view mirror from adistanc eof5
to 20 cm.
i The distanc ebetween th egarage door's
remot econtro land th eintegrated garage
doo ropener depend sonthesystem of the
garage doo rdrive. You might require sev-
eral attempts .You should test every posi- tion fo
ratleast20s econds before trying
another position.
X Kee pthe transmitte rbutto nont hegarage
door' sremot econtro ldepressed until indi-
cator lamp 1start stof lashrapidly.
The programmin gwas successful if indica-
to rlamp 1flashes rapidly.
X Releas ethe transmitte rbuttons on the
garage door' sremot econtro land th einte-
grate dremot econtrol.
If indicato rlamp 1goe sout after approxi-
mately 20 seconds and did no tflas hrapidly
before this:
X Releas ethe transmitte rbuttons on the
integrate dand portable remot econtrols.
X Repeat th eprogrammin gprocedure .Atthe
sam etimec hang et he distanc ebetween
th eg arage door' sremot econtro land the
transmitte rbuttons in th erear-view mirror.
i If th egarage doo rsystem works wit ha
rollin gcode, after programmin gyou must
synchronise th eremot econtro lintegrated
in th erear-view mirror wit hthe garage door
system receiver.
You will fin dfurther information in the
garage doo ropenin gsystem' soperating instructions, e.g. th
esection son"Synchro-
nisin gthe transmitter" or "Registerin ga
ne wt ransmitter". You can also cal lthe hot-
lin em entioned above.
Opening or closin gthe garage door Once programmed, th
eintegrated remote
control will assume th efunction of th egarage
doo rsystem' sremot econtrol. Pleaseread
th eo perating instruction sfor theg arage door
system.
X Tur nthe keyt op osition 2in th eignition
lock.
X Press th etransmitte rbutto nont herear-
vie wm irror that you hav eprogrammed to
operate th egarage door.
Garag edoors ystem wit hfixed code: indi-
cator lamp 1lights up continuously.
Garag edoorsystem wit hrollin gcode: indi-
cator lamp 1flashes briefl yand then lights
up fo rapproximately tw oseconds. This is
repeated fo rupto20s econds.
i The transmitte rwill transmit asignal for
as lon gasthetransmitte rbutto nisb eing
pressed. The transmissio nwill be halted
after amaximum of 20 seconds and indi- Cont
rols
230_AKB; 5; 4, en-GB
bjanott,
Version: 2.9.6 2008-04-08T15:09:54+02:00-Seite 170 Dateiname: 6515_3089_02_buchblock.pdf; preflight