2008 MERCEDES-BENZ SL ROADSTER change time
[x] Cancel search: change timePage 4 of 317
Thank yo
ufor choosing Mercedes-Benz.
Before yo udrive off, familiaris eyours elfw ith
your vehicl eand rea dthe Operating Instruc-
tions. Thi swillh elpy ou to obtai nthe maxi-
mu mp leasur efrom your vehicl eand to avoid
endangering yoursel fand others.
Item sofo ptional equipment ar emarked with
an asterisk *.
The equipment in your vehicl emayvary,
depending on the model ,the ordere ditems,
the country specifications and availability.
The illustrations in thi smanualsho wal eft-
hand-driv evehicle. The arrangement of the
switches, levers, stowag ecompartments,
etc. will diffe raccordingl yinaright-hand-
drive vehicle.
Mercedes-Benz is constantly updating its
vehicles to the state of the ar tand therefore
reserves the right to introduce change sin
design, equipment and technica lfeatures at
any time .You cannot, therefore, base any
claims on the data, illustrations or descrip-
tions in thi smanual.
Please consult aMercedes-Benz Service
Centre if yo uhavea ny questions.
The Owner' sManual, Brief Instructions,
Service Bookle tand supplements specifi cto
vehicl eequipment belong with the vehicle.
Yo us houl dalway skeept hem in the vehicle and pass them on to the new owner if yo
usell
the vehicle.
The technica ldocumentatio nteamat
Daimle rAGwishe sy ou safe and pleasant
motoring.
i Youc an ge ttoknow the important fea-
tures of your vehicl einGerma nand in
Englis hinthe interactive Owner' sManual
on the Internet at:
www.mercedes-benz.de/betriebsanlei-
tung
230_AKB; 5; 4, en-GB
bjanott,
Version: 2.9.6
2008-04-08T15:09:54+02:0
0-Seite 1 Dateiname: 6515_3089_02_buchblock.pdf; preflight
Page 18 of 317
Protection of the environment
15Protection of the environment
H
Environmental note
Daimler's declared policy is one of integra-
ted environmental protection.
Our objectives are to use the natural
resources which form the basis of our exis-
tenceont his planet sparingly and in aman-
ner which takes the requirements of both
nature and humanity into consideration.
You too can help to protect the environ-
ment by operating your vehicle in an envi-
ronmentally responsible manner.
Fuel consumption and the rate of engine,
transmission, brake and tyre wear depend
on the following factors:
R Operating condition sofyour vehicle
R Your personal driving style
You can influence both factors.
Therefore, please bear the following in
mind:
Operating conditions
R Avoid short trips as these increase fuel
consumption.
R Make sure that the tyre pressures are
always correct. R
Do not carry any unnecessary weight in
the vehicle.
R Keep an eye on the vehicle's fuel con-
sumption.
R Remove roof racks once you no longer
need them.
R Ar egularly serviced vehicle will contrib-
ute to environmental protection. You
should therefore adhere to the service
intervals.
R Always have maintenance work carried
out at aqualified specialist workshop,
e.g. aMercedes-Benz Service Centre.
Personal driving style
R Do not depress the accelerator pedal
when startingt he engine.
R Do not warm up the engine when the
vehicle is stationary.
R Drive carefully and maintain asafe dis-
tancef rom the vehicle in front.
R Avoid frequent, sudden acceleration.
R Change gear in good time and only use
each gear for up to 2
/ 3 of its maximum
engine speed.
R Switch off the engine in stationary traffic. Returning used vehicles
Mercedes-Benz will take back your
Mercedes-Benz to dispose of it in an environ-
mentally-responsible manner, in accordance
with the European Union (EU) End of Life
Vehicles Directive.
The End of Life Vehicles Directive appliesto
vehicles of up to 3.5 tgross vehicle weight, in
accordanc ewith national regulations. For
several years, Mercedes-Benz has been
meeting all the legal requirements for a
design which allowsf or recycling and re-use.
There is anetwork of return points and dis-
assembly plants which can recycle your vehi-
cle in an environmentally-responsible man-
ner. The options for recycling vehicles and
parts are constantly being developed and
improved. This means that your Mercedes-
Benz will also continue to meet even the
increased recycling quotas in the future in
good time. You can obtain further information
from your national Mercedes-Benz homepage
or your national hotline number. Introduction
230_AKB; 5; 4, en-GB
bjanott
,V ersion: 2.9.6
2008-04-08T15:09:54+02:00
-Seite 15 ZDateiname: 6515_3089_02_buchblock.pdf; preflight
Page 67 of 317
Opening and closing
64 Opening and closing
Key
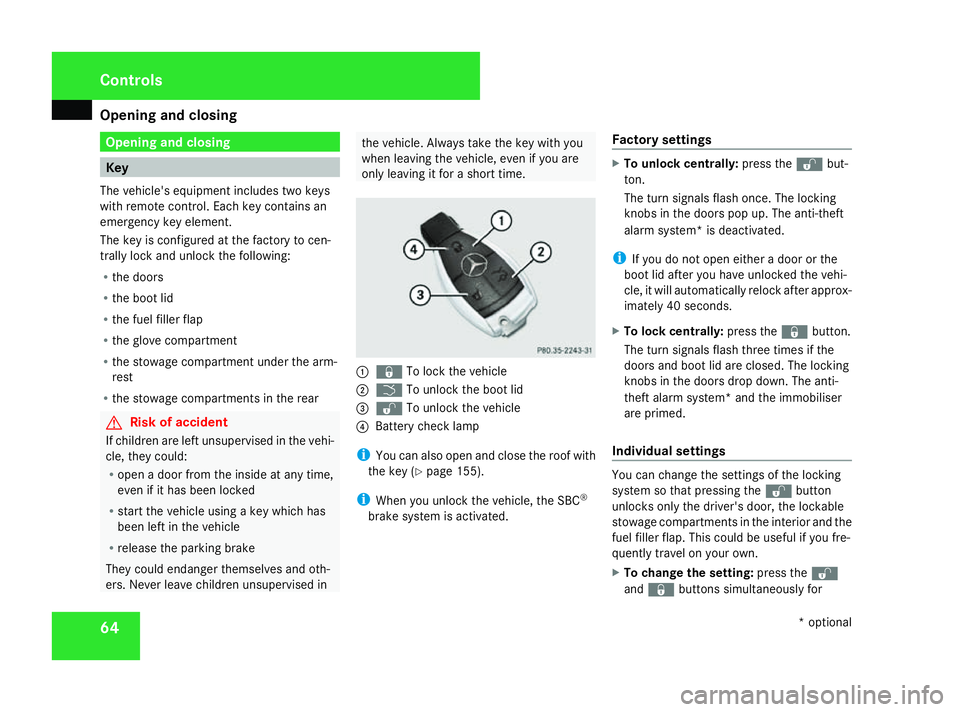
The vehicle's equipment includes two keys
with remot econtrol. Each key contains an
emergency key element.
The key is configured at the factory to cen-
trally lock and unlock the following:
R the doors
R the boot lid
R the fuel filler flap
R the glove compartment
R the stowage compartment under the arm-
rest
R the stowage compartment sinthe rear G
Risk of accident
If children are left unsupervised in the vehi-
cle, they could:
R open adoor from the inside at any time,
even if it has been locked
R start the vehicle using akey which has
been left in the vehicle
R release the parkin gbrake
They could endanger themselves and oth-
ers. Never leave children unsupervised in the vehicle. Always take the key with you
when leaving the vehicle, even if you are
only leaving it for ashort time. 1
j To lock the vehicle
2 i To unlock the boot lid
3 k To unlock the vehicle
4 Battery chec klamp
i You can also open and close the roof with
the key (Y page 155).
i When you unlock the vehicle, the SBC ®
brake system is activated. Factory settings X
To unlock centrally: press thekbut-
ton.
The turn signals flash once. The locking
knobs in the doors pop up. The anti-theft
alarm system* is deactivated.
i If you do not open either adoor or the
boot lid after you have unlocked the vehi-
cle, it will automatically relock after approx-
imately 40 seconds.
X To lock centrally: press thejbutton.
The turn signals flash three times if the
doors and boot lid are closed. The locking
knobs in the doors drop down. The anti-
thef talarm system* and the immobiliser
are primed.
Individual settings You can change the settings of the locking
system so that pressin
gthe k button
unlock sonly the driver's door, the lockable
stowage compartment sinthe interior and the
fuel filler flap. This could be useful if you fre-
quently travel on your own.
X To change the setting: press thek
and j buttons simultaneously for Controls
*optional
230_AKB
;5;4,en-GB
bjanott, Version:2.9.6
2008-04-08T15:09:54+02:0
0-Seite 64 Dateiname: 6515_3089_02_buchblock.pdf; preflight
Page 68 of 317
Opening and closing
65
approximately six seconds until the battery
chec
klamp flashes twice.
The key now function sasfollows:
X To unlock the driver's door: press the
k buttononce.
X To unlock centrally: press thekbut-
ton twice.
X To lock centrally: press thejbutton.
Restoring the factor ysettings X
Press the kandj buttons simulta-
neously for approximately six seconds until
the batter ychec klamp flashes twice. KEYLESS GO key*
The optional equipment supplied with your
vehicle includes two KEYLESSGOk eys. You
can start ,lock or unlock the vehicle using the
KEYLESSGOk ey. To do this, you need only
carry the KEYLESSGOk ey on your person.
When you touch the surface of the sensor son
the vehicle's door handles, KEYLESSGO
establishes aradio connection between the
vehicle and the key. The distanc ebetween
the KEYLESSGOk ey and the vehicle's door handle from which you wish to lock or unlock
the vehicle, must not be greater than
1m.
When you pull the door handle, the following
unlock centrally if the factory settings have
not been changed:
R the doors
R the boot lid
R the fuel filler flap
R the glove compartment
R the stowage compartment under the arm-
rest
R the stowage compartment sinthe rear
If you pull on the handle of the boot lid, only
the boot of your vehicle is unlocked.
When starting the engin eand whilst driving
KEYLESSGOa lso checks by establishing brief
periods of radio contact whether avalid KEY-
LES SGOk ey is in the vehicle. G
Risk of accident
If children are left unsupervised in the vehi-
cle, they could open adoor from the inside,
even if it has been locked. Or they could
start the vehicle if avalid KEYLESSGOk ey
is in the vehicle and they press the KEY-
LES SGOb uttonont he gear selector lever.
They could endanger themselves and oth- ers. Never leave children unsupervised in
the vehicle. Switc
hoff the engin eand take
the KEYLESSGOk ey with you, even if you
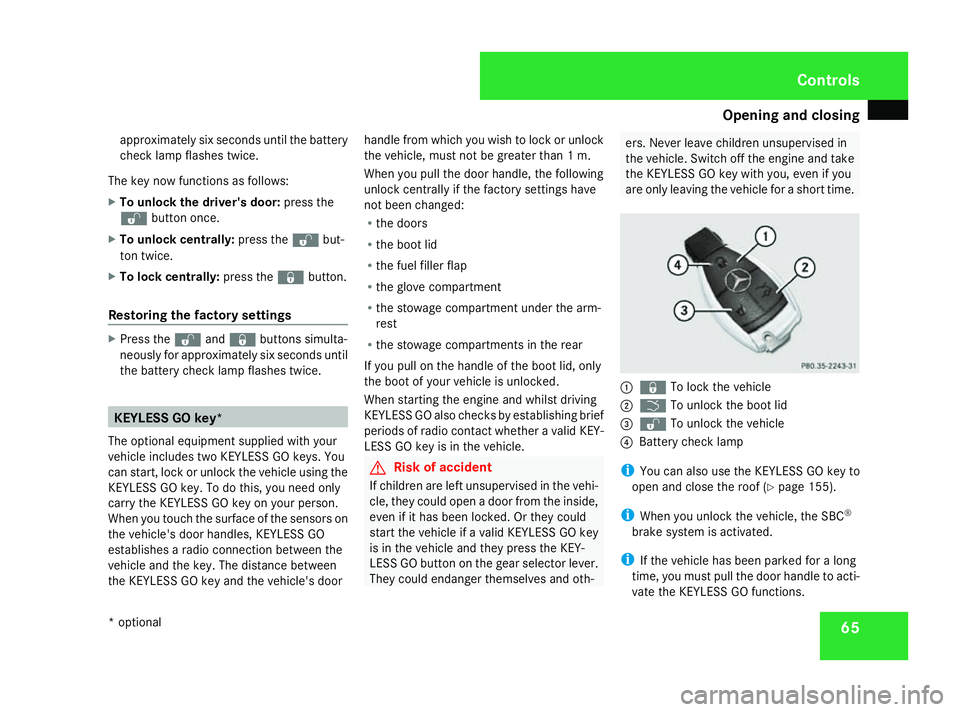
are only leaving the vehicle for ashort time. 1
j To lock the vehicle
2 i To unlock the boot lid
3 k To unlock the vehicle
4 Battery chec klamp
i You can also use the KEYLESSGOk ey to
open and close the roof (Y page 155).
i When you unlock the vehicle, the SBC ®
brake system is activated.
i If the vehicle has been parked for along
time, you must pull the door handle to acti-
vate the KEYLESSGOf unctions. Controls
*o ptional
230_AKB
;5;4,en-GB
bjanott, Version:2.9.6
2008-04-08T15:09:54+02:0
0-Seite 65 ZDateiname: 6515_3089_02_buchblock.pdf; preflight
Page 69 of 317
Opening and closing
66
Important notes R
If the KEYLESSGOk ey is removedfrom the
vehicle (e.g. in luggage or an article of
clothing), it will no longer be possible to
lock or start the vehicle.
R If the KEYLESSGOk ey is removedfrom the
vehicle while the engin eisrunning, e.g. if
the fron tpassenger leaves the vehicle with
the KEYLESSGOk ey, the following mes-
sage will appear in the multi-function dis-
play as you pull away: Key not detec-
ted.
R If the KEYLESSGOk ey is in the vehicle, the
vehicle can be started at any time. If you
have left the KEYLESSGOk ey in the vehi-
cle, you will see the following message in
the multi-function display when you lock
the vehicle: Key still in vehicle .
Factory settings X
To unlock centrally: pull the door handle.
The turn signals flash once. The locking
knobs in the doors pop up. The anti-theft
alarm system* is deactivated.
i If you do not open either adoor or the
boot lid after you have unlocked the vehi- cle, it will automatically relock after approx-
imately 40 seconds.
i When adoor is opened, the side window
on that side opens slightly. When the door
is closed, the side window closes again.
! The side windows will not open or close
if the battery is discharged or if the side
windows have iced up. It will not then be
possible to close the door. Do not attempt
to forc ethe door to close. You could oth-
erwise damage the door or the window.
i There is adanger of the vehicle being
unlocked unintentionally. This could occur
if the KEYLESSGOk ey is within one metre
of the vehicle and the door handle is
splashed with water. This could also occur
when cleanin gthe door handle. 1
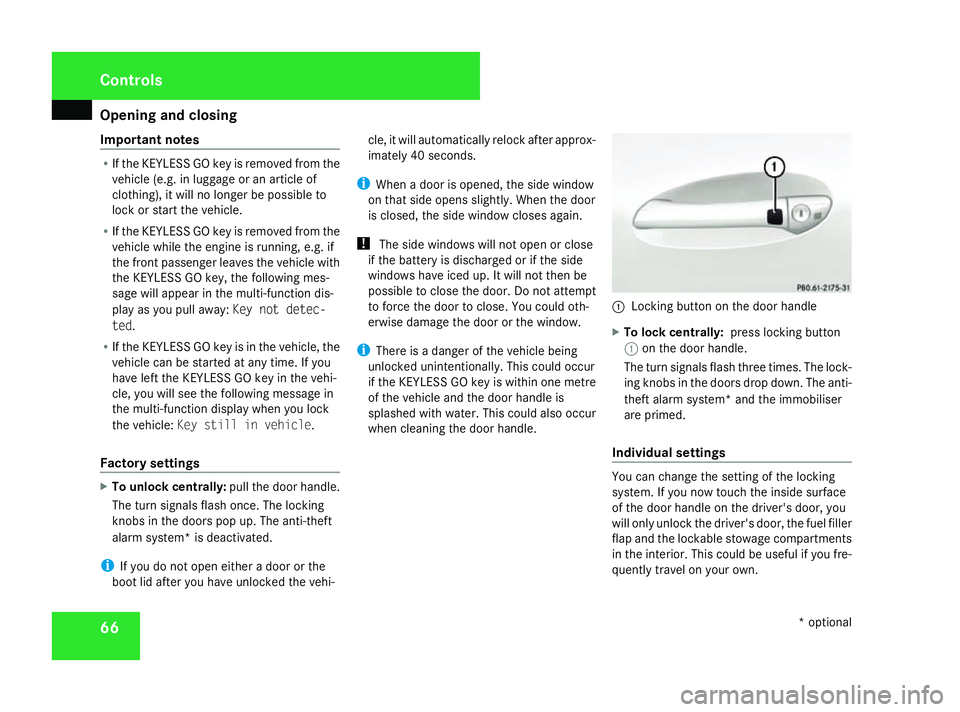
Locking butto nonthe door handle
X To lock centrally: press locking button
1 on the door handle.
The turn signals flash three times. The lock-
ing knobs in the doors drop down. The anti-
thef talarm system* and the immobiliser
are primed.
Individual settings You can change the setting of the locking
system. If you now touch the inside surface
of the door handle on the driver's door, you
will only unlock the driver's door, the fuel filler
flap and the lockable stowage compartments
in the interior. This could be useful if you fre-
quently travel on your own. Controls
*optional
230_AKB
;5;4,en-GB
bjanott, Version:2.9.6
2008-04-08T15:09:54+02:0
0-Seite 66 Dateiname: 6515_3089_02_buchblock.pdf; preflight
Page 70 of 317
Opening and closing
67
X
To change the setting: press thek
and j buttons simultaneously for
approximately six seconds until the battery
chec klamp flashes twice.
The KEYLESSGOk ey will now function as fol-
lows:
X To unlock the driver's door: pull the door
handle on the driver's door.
X To unlock centrally: pull the front-
passenger door handle.
X To lock centrally: press locking button
1 on the door handle.
Restoring the factor ysettings X
Press the kandj buttons simulta-
neously for approximately six seconds until
the batter ychec klamp flashes twice.
Locking from the boot* On vehicles with KEYLESSGOa
nd remote
boot lid closing*, you can close the boot lid
automatically and thereby centrally lock your
vehicle (Y page 71). Power closing feature
The power closin gmechanism pulls the boot
lid int oits lock automatically even if it is only
partly closed. G
Risk of injury
Make sure that nobody can become trap-
ped when closin gthe boot lid.
If ther eisad anger of being trapped, press
the boot lock.
Do not activate the power closin gfunction
by tamperin gwith the lock mechanism. You
could otherwise injure yourself. G
Risk of accident
Make sure the boot lid is alway sfully
closed. Otherwise, the boot lid could open
during the journey and endanger yourself
or others.
X Lightly push closed the boot lid.
The power closin gmechanism will pull the
boot lid closed completely. Opening the doors from the inside
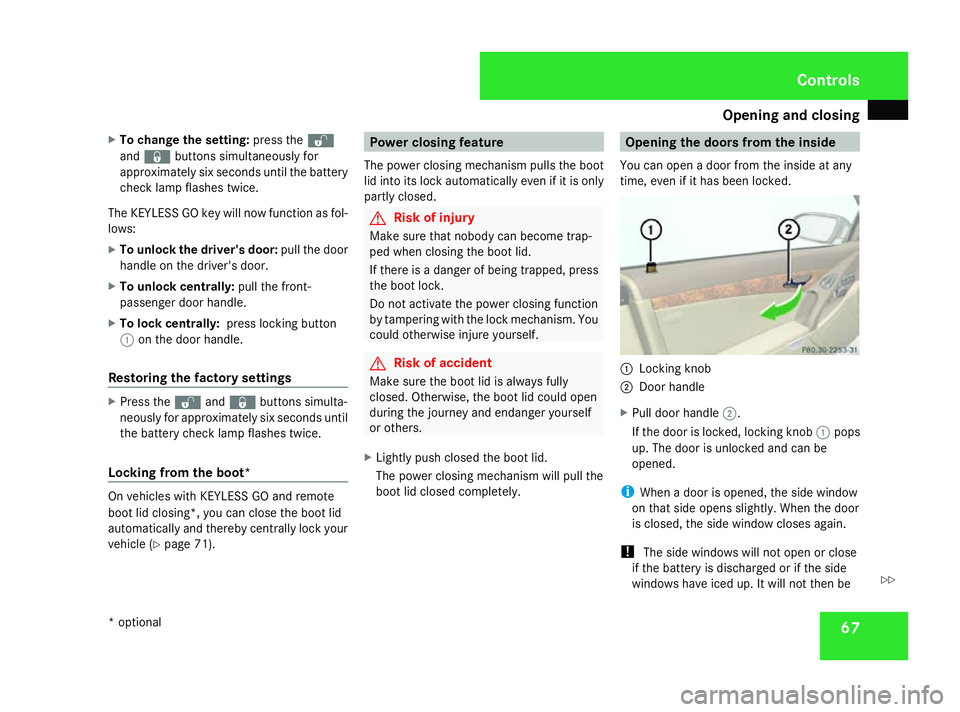
You can open adoor from the inside at any
time, even if it has been locked. 1
Locking knob
2 Door handle
X Pull door handle 2.
If the door is locked, locking knob 1pops
up. The door is unlocked and can be
opened.
i When adoor is opened, the side window
on that side opens slightly. When the door
is closed, the side window closes again.
! The side windows will not open or close
if the battery is discharged or if the side
windows have iced up. It will not then be Controls
*o ptional
230_AKB
;5;4,en-GB
bjanott, Version:2.9.6
2008-04-08T15:09:54+02:0
0-Seite 67 ZDateiname: 6515_3089_02_buchblock.pdf; preflight
Page 87 of 317
Seat belts
84 hip joints–n
ot across your abdomen. If
necessary, push down the belt strap
slightly and then retighten it in the roll-up
direction.
R Do not route the belt strap across sharp
or fragile objects, especially if these are
located on or in your clothing, e.g. spec-
tacles, pencils, keys, etc. The seat belt
strap could be damaged and tear in an
accident and you or other vehicle occu-
pants could be injured.
R Only one person should use each seat
belt at any one time. Children must never
travel sittingont he lap of other occu-
pants. It would not be possible to restrain
the child in the event of asudden change
in direction, braking or an accident. This
could result in severe or even fatal inju-
ries to the child and other occupants.
R Persons less than 1.50 mtall cannot
wear the seat belts correctly. For this
reason, secure persons less than 1.50 m
tall in specially designed, suitable
restraint systems.
R Children less than 1.50 mtall or under
12 years of age cannot wear the seat
belts properly. Therefore, always secure
these children in suitable child restraint systems on suitable vehicle seats. You
can find more information under "Chil-
dren in the vehicle" in the "Safety" sec-
tion of the Owner's Manual. Follow the
manufacturer's installation instructions
when fitting the child restraint system.
R Do not secure any objectsw ithaseat belt
if the seat belt is also being used by one
of the vehicle's occupants. G
Risk of injury
The seat belt does not offer the intended
level of protection unless the backrest is
almost vertical. Under certain circumstan-
ces this could cause severe or even fatal
injuries.
Before startingaj ourney, make sure that
the seat is properly adjusted and that the
backrest is almost vertical. G
Risk of injury
Ad irty or damaged seat belt or aseat belt
that has been subjected to aload in an
accident or modified no longer offers the
intended level of protection. Under certain
circumstances this could cause severe or
even fatal injuries. For this reason, check regularly that the
seat belts are not damaged or dirty.
Always have damaged seat belts or seat
belts that have been subjected to
aload in
an accident replaced at aqualified special-
ist workshop. Choose aqualified specialist
workshop which has the necessary special-
ist knowledge and tools for the work
required. Mercedes-Benz recommends
that you use aMercedes-Benz Service
Centre for this purpose.
For safety reasons, Mercedes-Benz recom-
mends that you only use seat belts which
have been approved by Mercedes-Benz for
your vehicle. Controls
230_AKB; 5; 4, en-GB
bjanott
,V ersion: 2.9.6
2008-04-08T15:09:54+02:00
-Seite 84 Dateiname: 6515_3089_02_buchblock.pdf; preflight
Page 90 of 317
Lights
87Lights
Light switch
For reason sofsafety, Mercedes-Ben zrecom-
mends that you driv ewith th elight sswitched
on eve ndurin gthe daytime. In som ecoun-
tries, daytime operatio nofheadlamps varies
due to legal requirements and self-imposed
obligations .Inthese countries, th edipped-
beam headlamps are automaticall yswitched
on when th eengineiss tarted.
i If you driv eincountries in whic htraffic
drives on th eopposit eside of th eroad to
th ec ountr ywher ethe vehicle is registered,
oncomin gtraffic may be dazzle dbythe
asymmetrical dipped-beam headlamps.
Hav ethe headlamps changed to symmet-
rical dipped beam when driving in these
countries. You can obtain information
about this from any Mercedes-Ben zService
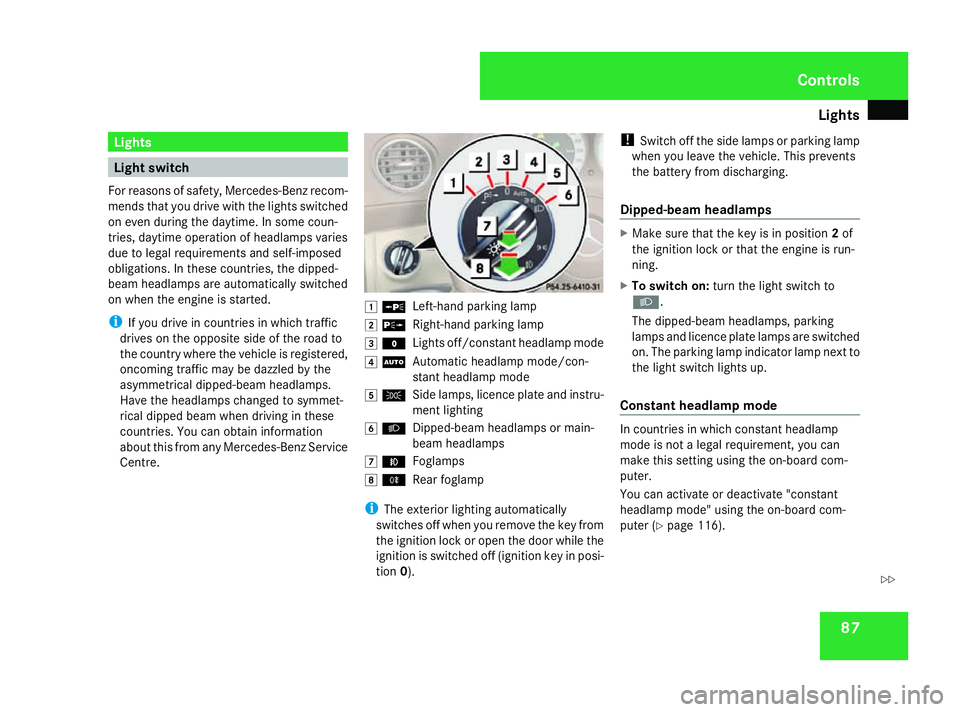
Centre. $
a
Left-han dparking lamp
% g
Right-hand parking lamp
& M
Lightsoff/constan theadlamp mode
( U
Automatic headlamp mode/con-
stant headlamp mode
) C
Side lamps, licence plate and instru-
mentlighting
* B
Dipped-beam headlamps or main-
beam headlamps
, ¥
Foglamps
. †
Rear foglamp
i The exterior lighting automatically
switches off when you remove the key from
the ignition lock or open the door while the
ignition is switched off (ignition key in posi-
tion 0). !
Switch off the side lamps or parking lamp
when you leave the vehicle. This prevents
the battery fro mdischarging.
Dipped-beam headlamps X
Make sure that the key is in position 2of
the ignition lock or that the engin eisrun-
ning.
X To switch on: turnthe light switc hto
B .
The dipped-beam headlamps, parking
lamps and licence plate lamps are switched
on. The parking lamp indicator lamp nex tto
the light switc hlight sup.
Constant headlam pmode In countries in which constant headlamp
mode is not
alegal requirement, you can
make thi ssettin gusing the on-board com-
puter.
You can activat eordeactivat e"constant
headlamp mode" using the on-board com-
puter (Y page 116). Controls
230_AKB; 5; 4, en-GB
bjanott
,V ersion: 2.9.6
2008-04-08T15:09:54+02:00
-Seite 87 ZDateiname: 6515_3089_02_buchblock.pdf; preflight