2008 MERCEDES-BENZ SL ROADSTER roof rack
[x] Cancel search: roof rackPage 14 of 317
11
Rear window heating
............152
Malfunction indicator lamp ......231
Refuelling ...................... 175
Remote control Garage door opene r............ 169
Programming (garage door
opener) ...................... 169
Replacing the wiper blades .......264
Reserve Display message .............. 227
Reserve fuel .................... 300
Display message .............. 227
Fuel tank .................... 300
Warning lamp ................. 239
Rese tbutton ................... 194
Restrain tsystem
see SRS (Supplemental Restraint
System)
Restrain tSystem
see SRS
Restrain tsystems
For children ................... 47
Rev counter .................... 106
Reverse gear Engaging (automatic transmission) .99
Reversin glamp
Displa ymessag e.............. 224
Roller sunblind ................. 159Roll-ove
rbar..................... 46
Display message .............. 228
Warning lamp ................. 237
Roof ........................... 154
Closing (key )................ .155
Closing (switch) ............... 155
Display message .............. 228
Malfunction .................. 249
Opening (key )................. 155
Opening (switch) .............. 155
Relocking .................... 156
Roof rack ...................... 160
Roof switch .................... 154
Run-on time (mobile phone) .......168 S
SBC Hold ....................... 137
Display message .............. 212
SBC TM
brake system .............. 57
Activation/Deactivatio n.......... 58
Malfunctio n.................. 242
Notes on driving ................ 58
Seat
Adjusting ..................... 74
Correct driver's seat position ......86
Storing settings ................ 82
Seat belt
Fastening ..................... 83
Warning lamp .............. 85, 238Seat heating
..................... 77
Seat ventilation .................. 77
Malfunctio nindicator lamp ......230
Selector lever
Display message .............. 209
Positions ..................... 99
Sensotronic Brake Control
see SBC TM
brak esystem
Service indicator
see Service indicator
Service products ................ 300
Brake fluid ................... 306
Coolant ..................... 304
Windscreen washer fluid ........306
Settings
Calling up astored setting ........83
Factory (key ).............. .64, 65
Factory (KEYLESS GO) ...........66
Factory (on-board computer) .....116
Settin gthe clock
see COMAND operating instructions
Settin gthe date
see COMAND operating instructions
Settin gthe time
see COMAND operating instructions
Settin gthe unit (on-board computer)
Speedometer ................. 117
SETUP (on-board computer) .......111 Index
230_AKB; 5; 4, en-GB
bjanott,
Version: 2.9.6
2008-04-08T15:09:54+02:00
-Seite 11 Dateiname: 6515_3089_02_buchblock.pdf; preflight
Page 18 of 317
Protection of the environment
15Protection of the environment
H
Environmental note
Daimler's declared policy is one of integra-
ted environmental protection.
Our objectives are to use the natural
resources which form the basis of our exis-
tenceont his planet sparingly and in aman-
ner which takes the requirements of both
nature and humanity into consideration.
You too can help to protect the environ-
ment by operating your vehicle in an envi-
ronmentally responsible manner.
Fuel consumption and the rate of engine,
transmission, brake and tyre wear depend
on the following factors:
R Operating condition sofyour vehicle
R Your personal driving style
You can influence both factors.
Therefore, please bear the following in
mind:
Operating conditions
R Avoid short trips as these increase fuel
consumption.
R Make sure that the tyre pressures are
always correct. R
Do not carry any unnecessary weight in
the vehicle.
R Keep an eye on the vehicle's fuel con-
sumption.
R Remove roof racks once you no longer
need them.
R Ar egularly serviced vehicle will contrib-
ute to environmental protection. You
should therefore adhere to the service
intervals.
R Always have maintenance work carried
out at aqualified specialist workshop,
e.g. aMercedes-Benz Service Centre.
Personal driving style
R Do not depress the accelerator pedal
when startingt he engine.
R Do not warm up the engine when the
vehicle is stationary.
R Drive carefully and maintain asafe dis-
tancef rom the vehicle in front.
R Avoid frequent, sudden acceleration.
R Change gear in good time and only use
each gear for up to 2
/ 3 of its maximum
engine speed.
R Switch off the engine in stationary traffic. Returning used vehicles
Mercedes-Benz will take back your
Mercedes-Benz to dispose of it in an environ-
mentally-responsible manner, in accordance
with the European Union (EU) End of Life
Vehicles Directive.
The End of Life Vehicles Directive appliesto
vehicles of up to 3.5 tgross vehicle weight, in
accordanc ewith national regulations. For
several years, Mercedes-Benz has been
meeting all the legal requirements for a
design which allowsf or recycling and re-use.
There is anetwork of return points and dis-
assembly plants which can recycle your vehi-
cle in an environmentally-responsible man-
ner. The options for recycling vehicles and
parts are constantly being developed and
improved. This means that your Mercedes-
Benz will also continue to meet even the
increased recycling quotas in the future in
good time. You can obtain further information
from your national Mercedes-Benz homepage
or your national hotline number. Introduction
230_AKB; 5; 4, en-GB
bjanott
,V ersion: 2.9.6
2008-04-08T15:09:54+02:00
-Seite 15 ZDateiname: 6515_3089_02_buchblock.pdf; preflight
Page 157 of 317
Opening/closing the roof
154 Opening/closing the roof
For safety reasons ,the roof can only be
opened and closed when the vehicle is sta-
tionary. G
Risk of accident and injury
Always open or close the roof fully before
driving.
If the roof does not open or close fully, the
roof hydraulic system is depressurised and
the roof is lowered:
R after about seven minutes if the ignition
is switched on
R after about 15 seconds if the ignition is
switched off
Aw arning ton esounds shortly beforehand.
The K and the being lowered message
appear in the multi-function display.
Lock the roof again before driving on. Oth-
erwise the unlocked roof could open during
the journey and cause you to lose control
of your vehicle. You or other person scould
be injured as aresult.
! Never sit on the rear shelf or stor eheavy
objects there. You will otherwise damage
the roof and the rear shelf of your vehicle. !
When openin gand closin gthe roof, make
sure that:
R ther eiss ufficien tupward clearance, as
the roof swings upwards
R ther eiss ufficien tclearanc ebehind the
vehicle as the boot lid swings backwards
beyond the bumper
R the boot is only loaded to below the boot
separator
R the boot separator is not pushed up by
the load
R the boot separator is closed
R the boot lid is closed
R no roof rack is fitted
R the outside temperature is above -15 †
R the roof is not dirty or wet
You will otherwise damage the roof and the
boot of your vehicle. Using the roof switch
G
Risk of injury
When openin gorclosingthe roof, make
sure that nobody is trapped or injured by
movin gparts such as the boot lid, the
hinged roof or the roof linkage.
If ther eisar isk of entrapment ,release the
roof switch immediately. The roof folding
mechanism stops immediately.
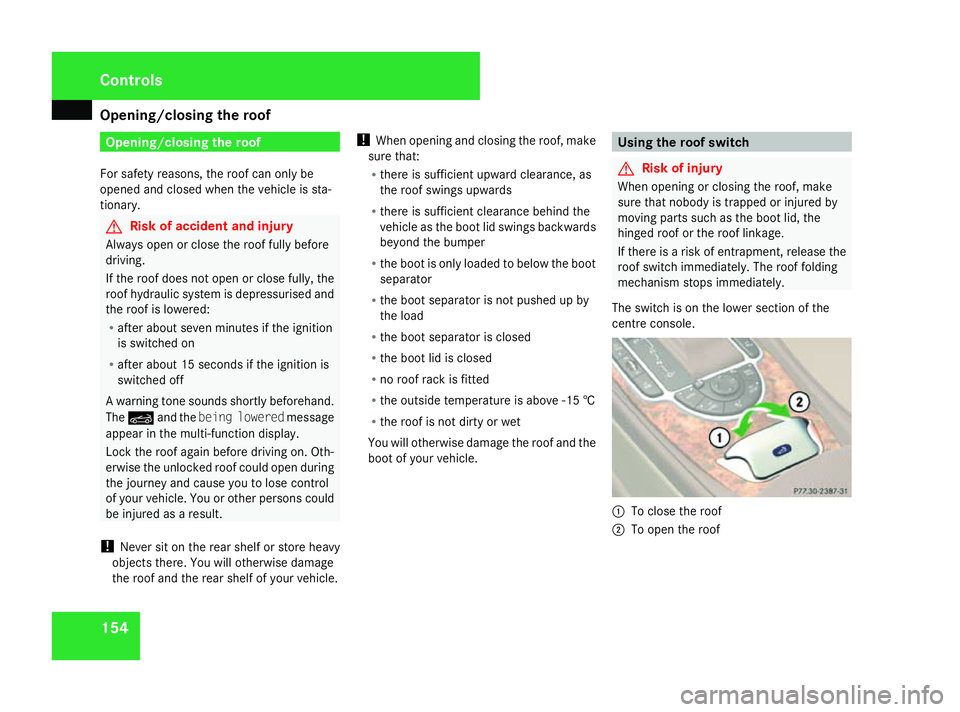
The switch is on the lower section of the
centre console. 1
To close the roof
2 To open the roof Controls
230_AKB; 5; 4, en-GB
bjanott
,V ersion: 2.9.6
2008-04-08T15:09:54+02:00
-Seite 154 Dateiname: 6515_3089_02_buchblock.pdf; preflight
Page 160 of 317
Opening/closing the roof
157
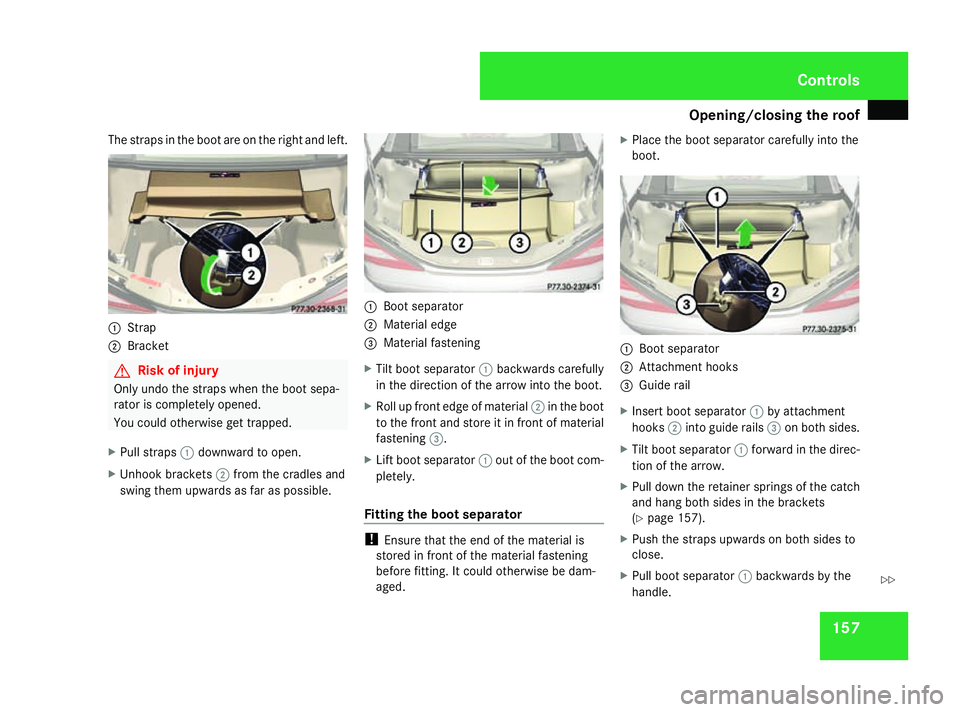
The straps in the boot are on the right and left.
1
Strap
2 Bracket G
Risk of injury
Only undo the straps when the boot sepa-
rator is completely opened.
You could otherwise get trapped.
X Pull straps 1downward to open.
X Unhook brackets 2from the cradles and
swing them upwards as far as possible. 1
Boot separator
2 Material edge
3 Material fastening
X Tilt boot separator 1backwards carefully
in the direction of the arrow into the boot.
X Roll up front edge of material 2in the boot
to the front and store it in front of material
fastening 3.
X Lift boot separator 1out of the boot com-
pletely.
Fitting the boot separator !
Ensure that the end of the material is
stored in front of the material fastening
before fitting. It could otherwise be dam-
aged. X
Place the boot separator carefully into the
boot. 1
Boot separator
2 Attachment hooks
3 Guider ail
X Insert boot separator 1by attachment
hooks 2into guide rails 3on both sides.
X Tilt boot separator 1forward in the direc-
tion of the arrow.
X Pull down the retainer springs of the catch
and hang both sides in the brackets
(Y page 157).
X Push the straps upwards on both sides to
close.
X Pull boot separator 1backwards by the
handle. Controls
230_AKB; 5; 4, en-GB
bjanott
,V ersion: 2.9.6
2008-04-08T15:09:54+02:00
-Seite 157 ZDateiname: 6515_3089_02_buchblock.pdf; preflight
Page 163 of 317
Loading and stowing
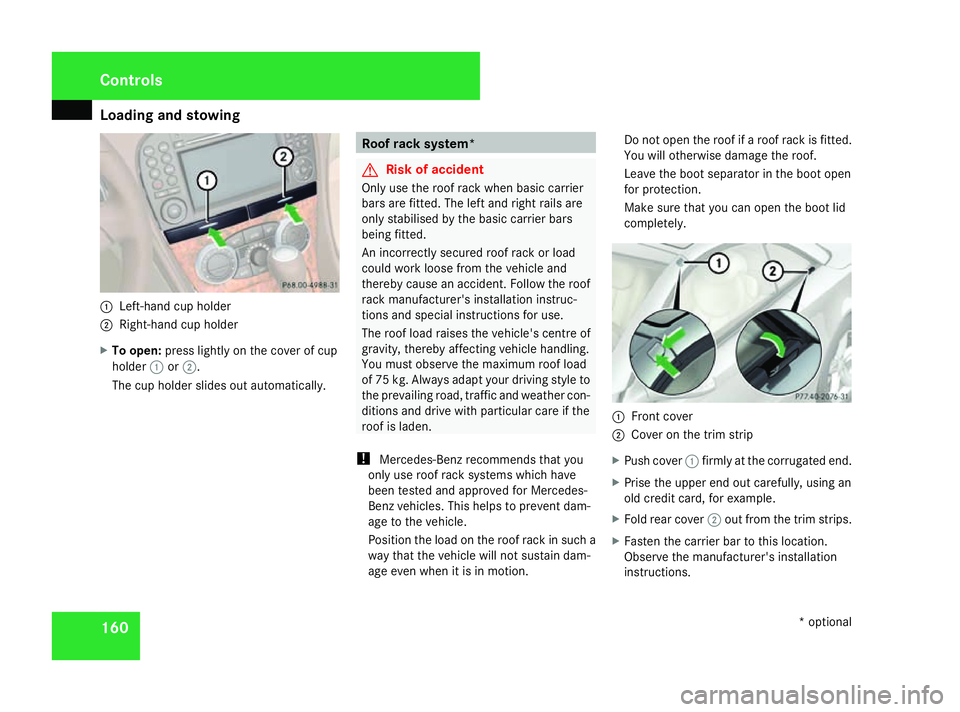
1601
Left-han dcup holder
2 Right-hand cup holder
X To open: press lightly on the cover of cup
holder 1or2.
The cup holder slides out automatically. Roof rack system*
G
Risk of accident
Only use the roof rack when basic carrier
bars are fitted. The left and right rails are
only stabilised by the basic carrier bars
being fitted.
An incorrectly secured roof rack or load
could work loose fro mthe vehicle and
thereby cause an accident .Follow the roof
rack manufacturer' sinstallation instruc-
tion sand special instructions for use.
The roof load raises the vehicle's centr eof
gravity, thereby affectin gvehicle handling.
You must observe the maximum roof load
of 75 kg. Always adapt your driving style to
the prevailing road, traffic and weather con-
ditions and drive with particular care if the
roof is laden.
! Mercedes-Ben zrecommends that you
only use roof rack systems which have
been tested and approved for Mercedes-
Ben zvehicles. This helps to prevent dam-
age to the vehicle.
Position the load on the roof rack in such a
way that the vehicle will not sustain dam-
age even when it is in motion. Do not open the roof if
aroof rack is fitted.
You will otherwise damage the roof.
Leave the boot separator in the boot open
for protection.
Make sure that you can open the boot lid
completely. 1
Front cover
2 Cover on the trim strip
X Push cover 1firmly at the corrugated end.
X Prise the upper end out carefully, using an
old credit card, for example.
X Fold rear cover 2out fro mthe trim strips.
X Fasten the carrier bar to thi slocation.
Observe the manufacturer' sinstallation
instructions. Controls
*optional
230_AKB; 5; 4, en-GB
bjanott ,V ersion: 2.9.6
2008-04-08T15:09:54+02:00
-Seite 160 Dateiname: 6515_3089_02_buchblock.pdf; preflight
Page 231 of 317
Displa
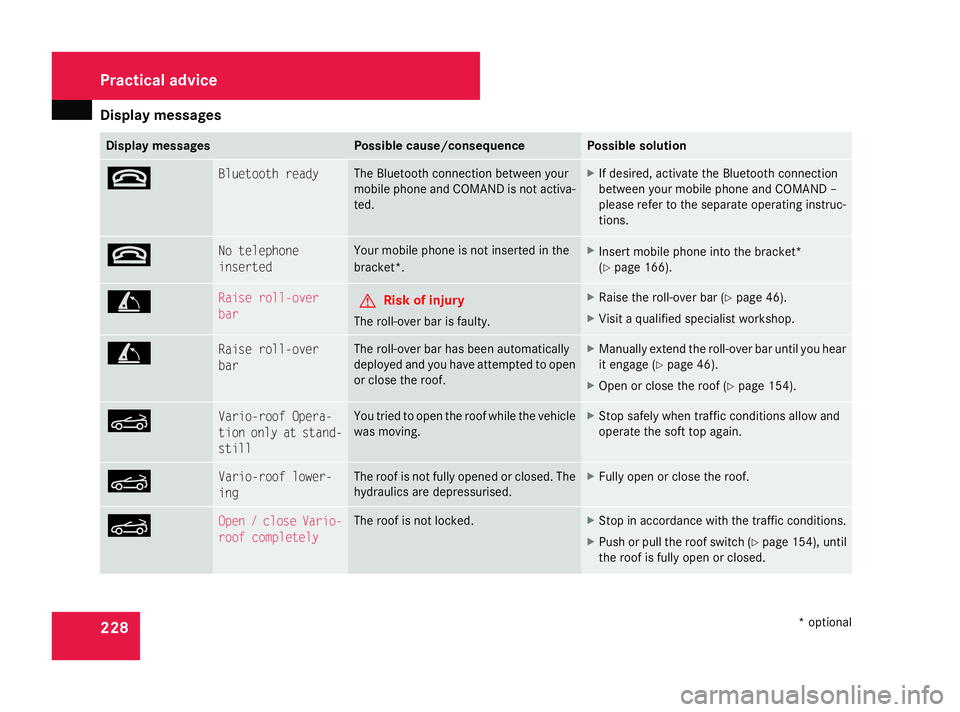
ymessages 228 Display messages Possible cause/consequence Possible solution
t Bluetoot
hready Th
eB luetooth connection between your
mobil ephone an dCOM ANDisn ot activa-
ted. X
If desired, activate the Bluetooth connection
between your mobil ephone an dCOM AND–
please refe rtothe separate operating instruc-
tions. t No telephone
inserted Your mobil
ephone is not inserted in the
bracket*. X
Inser tmobil ephone into the bracket*
(Y page 166). \ Rais
eroll-over
bar G
Ris
kofi njury
Th er oll-ove rbaris faulty. X
Rais ethe roll-ove rbar ( Ypage 46).
X Visi taq ualified specialis tworkshop. \ Rais
eroll-over
bar Th
er oll-ove rbarhasb eena utomatically
deployed an dyou have attempte dtoopen
or clos ethe roof. X
Manually extend the roll-ove rbaruntil yo uhear
it engag e(Ypage 46).
X Open or clos ethe roo f(Ypage 154). K Vario-roof Opera-
tion only at stand-
still Yo
utried to open the roo fwhile the vehicle
wa sm oving. X
Stop safely when traffi cconditions allo wand
operate the soft top again. K Vario-roof lower-
ing Th
er oofisn ot full yopenedorc losed. The
hydraulics ar edepressurised. X
Full yopenorc losethe roof. K Open
/close Vario-
roof completely Th
er oofisn ot locked. X
Stop in accordance with the traffi cconditions.
X Push or pull the roo fswitch( Ypage 154) ,until
the roo fisfullyopen or closed. Practical advi
ce
*optional
230_AKB; 5; 4, en-GB
bjanott,
Version: 2.9.6
2008-04-08T15:09:54+02:0
0-Seite228 Dateiname: 6515_3089_02_buchblock.pdf; preflight