2008 MERCEDES-BENZ SL ROADSTER wheel
[x] Cancel search: wheelPage 189 of 317
Tyre
sand wheels 186tyres is se
tcorrectly for the operating con-
ditions concerned.
X Als oo bser ve the note sinthe sectio non
tyr ep ressures (Y page 184). G
Ris
kofa ccident
Th et yrep ressure loss warning syste mcan
onl ygiver eliabl ewarnings if yo uhaves et
the correc ttyrep ressure.
If an incorrect tyr epressure is set, these
incorrect values will be monitored.
At yrew ithi nsufficient pressure results in
vehicl einstability when driving, thus
increasing the risk of an accident.
X Make sure tha tthe key is in position 2in
the ignition lock.
Th es tandard displa yappears in the multi-
functio ndisplay ( Ypage 110).
X Press korj to select the tyr epres-
sure function:
Run Fla tIndicator active
Menu: R-Button æ
X Press the reset button on the left of the
instrumen tcluster.
Th ef ollowing message appear sinthe
multi-functio ndisplay:
Restar tRun Fla tIndicator? Yes Cancel
If yo uwishtoc onfirmthe restart:
X Press the æbutton.
Th ef ollowing message appear sinthe
multi-functio ndisplay:
Run Fla tIndicator restarted
After ateach-i nperiod, the tyr epressure
loss warning syste mwillm onitor the set
tyr ep ressures of al lfou rtyres.
If yo uwishtoc ancel the restart:
X Press the çbutton.
or
X Wait unti lthe message
Restar tRun Fla tIndicator?
Yes Cancel disappears.
Th et yrep ressure values stored at the last
restar twillc ontinue to be monitored. Checking the tyre pressure electroni-
cally*
Th et yrep ressure monitor onl yfun ctions if
the correc twheel electronics ar efitted to all
wheels .These monitor the pressure in al lfour
tyres ,which yo uhaves etwhen restarting the
tyr ep ressure monitor. Th emonitor warns you
when the pressure drops in one or mor eof
the tyres. G
Ris
kofa ccident
Th et yrep ressure monitor does not warn
yo uofani ncorrectly se ttyrep ressure. The
table on the insid eofthe fuel filler flap will
help yo udecidew hether the tyr epressures
shoul dbec orrected.
Th et yrep ressure monitor is not able to
warn yo uofasuddenlossofp ressure, e.g.
if the tyr eispenetrate dbyaforeign object.
In the event of asudde nlossofp ressure,
bring the vehicl etoahaltbyb raking care-
fully. Do not make any sudden steering
movements when doing so.
i Theo peratio noft he tyr epressure moni-
tor ca nbeaffected by interferenc efrom
radi otransmitting equipment (e.g. radio
headphones, two-wa yradios )tha tm aybe
being operated in or nea rthe vehicle. Operation
*optional
230_AKB; 5; 4, en-GB
bjanott,
Version: 2.9.6 2008-04-08T15:09:54+02:00-Seite 186 Dateiname: 6515_3089_02_buchblock.pdf; preflight
Page 190 of 317
Tyre
sand wheels 187
i
If yo uarecarrying adefla tedt yreint he
vehicle, yo umayonl yreactivate the tyre
pressure monitor if:
R the deflate dtyreisnol ongerint he vehi-
cle
R yo uh avea djusted the tyr epressure cor-
rectly
Callin gupt he tyre pressure using the
on-board computer X
Make sure tha tthe key is in position 2in
the ignition lock.
X Press the jork button to select the
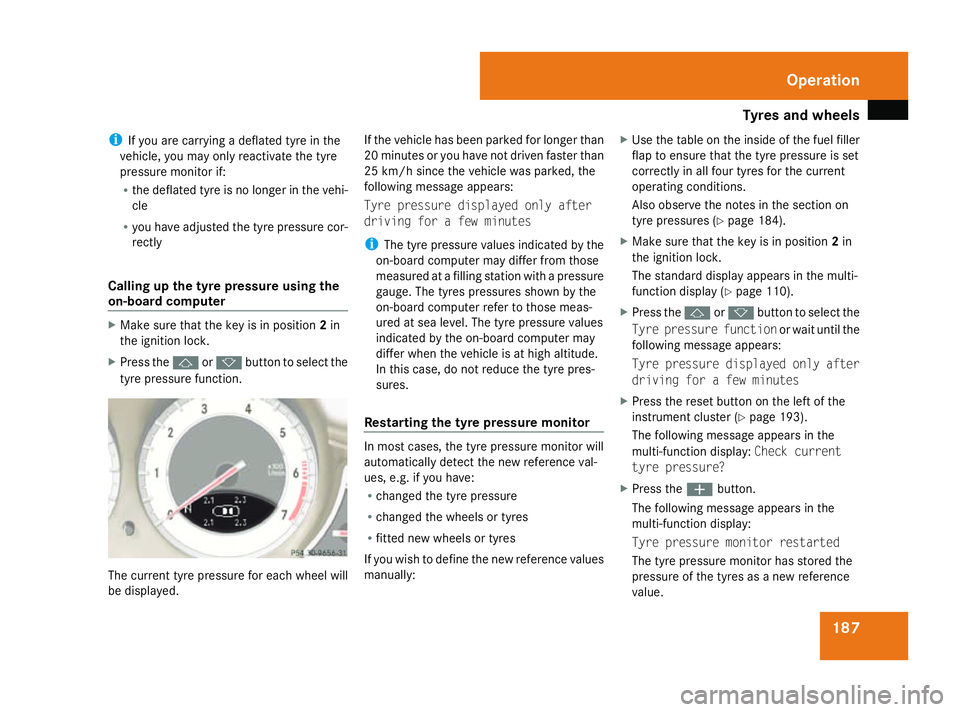
tyr ep ressure function. Th
ec urrent tyr epressure for each whee lwill
be displayed. If the vehicl
ehasbeen parked for longe rthan
20 minute soryouhave not driven faste rthan
25 km/h since the vehicl ewasparked ,the
following message appears:
Tyr epressure displayed onl yafter
drivin gfor afew minutes
i Thet yrep ressure values indicated by the
on-board computer ma ydiffe rf romt hose
measured at afillin gstatio nwithap ressure
gauge. Th etyres pressures shown by the
on-board computer refer to those meas-
ured at se alevel.T he tyrep ressure values
indicated by the on-board computer may
diffe rwhent he vehicl eisathigha ltitude.
In thi scase, d onot reduc ethe tyr epres-
sures.
Restarting the tyre pressure monitor In mos
tcases, t he tyrepressure monitor will
automaticall ydetect the new reference val-
ues, e.g .ifyouhave:
R change dthe tyr epressure
R change dthe wheels or tyres
R fitted new wheels or tyres
If yo uwishtod efinethe new reference values
manually: X
Use the table on the insid eofthe fuel filler
flap to ensur ethatthe tyr epressure is set
correctly in al lfou rtyres for the current
operating conditions.
Als oo bser ve the note sinthe sectio non
tyr ep ressures (Y page 184).
X Make sure tha tthe key is in position 2in
the ignition lock.
Th es tandard displa yappears in the multi-
functio ndisplay ( Ypage 110).
X Press the jork button to select the
Tyr epressure function or wait untilthe
following message appears:
Tyr epressure displayed onl yafter
drivin gfor afew minutes
X Press the reset button on the left of the
instrumen tcluste r(Ypage 193).
Th ef ollowing message appear sinthe
multi-functio ndisplay: Check current
tyr epressure?
X Press the æbutton.
Th ef ollowing message appear sinthe
multi-functio ndisplay:
Tyr epressure monito rrestarted
Th et yrep ressure monitor ha sstored the
pressure of the tyres as anew reference
value. Operation
230_AKB; 5; 4, en-GB
bjanott,
Version: 2.9.6
2008-04-08T15:09:54+02:0
0-Seite 187 ZDateiname: 6515_3089_02_buchblock.pdf; preflight
Page 191 of 317
Tyre
sand wheels 188
If yo
uwishtoc ancel the restart:
X Press the çbutton.
If the following message appear sinthe multi-
functio ndisplay:
R Reactivat etyrep ressure monitor
after correctin gtyrep ressure
R Please correc tthe tyr epressure
X Check the tyr epressure on al lfou rw heels
and correc tasn ecessary.
X Star tthe tyr epressure monitor again. Interchanging the wheels
G
Ris
kofa ccident
Interchange the front and rea rwheel sonly
if the yhavet he same dimensions :for exam-
pl es ize, offset, etc.
After every whee linterchange/change,
have the tightening torque checked at a
qualifie dspecialis tworkshop tha thas the
necessary specialis tknowledg eand tools
to carry ou tthe work required .Mercedes-
Benz recommend sthaty ou usea
Mercedes-Benz Service Centre for thi spur-
pose .Inp articular, work relevant to safety or on safety-related systems must be car-
ried ou
tataqualifie dspecialis tworkshop.
Th ew heel scould work loos eiftheya renot
tightened to atorque of 130Nm .
For safety reasons, Mercedes-Benz recom-
mends tha tyou onlyusewhee lbolts of the
correc tsizew hich have been approved for
Mercedes-Benz vehicles.
Th ew earp attern sont he front and rea rtyres
diffe rdepen ding on the operating conditions.
Interchange the wheels befor eaclear wear
pattern ha sformed on the tyres .Front tyres
typicall ywearm oreont he shoulders and the
rea rtyres in the centre.
Interchange the wheels every 5,000 km to
10,000 km depending on the degre eoftyre
wear ,provide dthatthe vehicl ehasthe same
size front and rea rtyres .Don ot revers ethe
directio noftyrer otation.
Clea nthe contact surfaces of the whee land
the brake disc thoroughly every tim eawheel
is interchanged. Check the tyr epressure and,
if necessary ,restar tthe tyr epressure loss
warning syste morthe tyrepressure moni-
tor*. !
On vehicles fitted with atyrep ressure
monitor* ,electroni ccomponents ar eloc a-
ted in the wheel.
Tyre fitting tools shoul dnot be applie din
the area of the valve, as thi scould damage
the electroni ccomponents.
Alway shavet he wheels interchanged/
change dataqualified specialis tworkshop,
e.g .aM ercedes-Benz Service Centre. Operation
*optional
230_AKB; 5; 4, en-GB
bjanott,
Version: 2.9.6 2008-04-08T15:09:54+02:00-Seite 188 Dateiname: 6515_3089_02_buchblock.pdf; preflight
Page 192 of 317
Winte
rdriving 189Winte
rdriving Points to remember
Have you rvehicle winterproofed at aqualified
specialist workshop, e.g. at aMercedes-Benz
Service Centre, at the onset of winter.
! Take care not to damage the sealing strip
and the moulding on the sid eofthe rear
window whe nscraping ice off the rear win-
dow. Winte
rtyres
Use winter tyres at temperatures below
+7 °C and on snow or ice-covere droads. Only
then can the effect of the ABS and ESP ®
driv-
ing systems be ensure dinwinter too.
Use winter tyres of the same make and tread
on allw heels to maintain safe handling char-
acteristics. G
Risk of accident
Winter tyres with atread depth of less than
4mmm ust be replaced immediately .They
are no longe rsuitabl efor winter use ,can
no longe rprovide sufficient grip .This could
cause you to lose control of you rvehicle
and cause an accident. Always observe the maximu
mpermitted
spee dspecified for the winter tyres you have
fitted. If you fit winter tyres which have a
lower maximu mpermitted spee dthan that of
the vehicle, affi xanappropriate warning sign
in the driver's fiel dofvision. This can be
obtained at aqualified specialist workshop,
e.g. from aMercedes-Benz Service Centre.
Under these circumstances, you should also
restrict the maximu mspee doft he vehicle
using permanent Speedtronic 20
to the maxi-
mum permissible spee dfor the winter tyres
(Y pag e136).
Once you have fitted the winter tyres:
X Check the tyre pressures (Y page184).
X Restart the tyre pressure moni-
tor* (Y page186). G
Risk of accident
If you fit the spare wheel* whe ndriving with
winter tyres, bea rinmind that driving sta-
bility wil lbeimpaired owing to unstable
cornering characteristics caused by the dif-
ferent tyres. You should therefore adapt
you rdriving styl eand drive carefully.
Have the spare wheel* replaced at the
nearest qualified specialist workshop which has the necessary specialist knowl-
edge and tools to carry out the work
required
.Mercedes-Benz recommends
that you use aMercedes-Benz Service
Centre for this purpose. In particular, work
relevant to safety or on safety-related sys-
tems must be carrie dout at aqualified
specialist workshop. Sno
wchains
For safety reasons, Mercedes-Benz recom-
mends that you only use snow chains which
have bee nspecially approved for you rvehicle
by Mercedes-Benz, or are of acorresponding
standard of quality.
! Information about the use of snow chain-
compatibl eAMG winter tyres is applicable
for AMG tyres. Use of snow chains is only
permissible with these tyres.
If you intend to fit snow chains, please bear
the following points in mind:
20 Only available for certai ncountries. Operation
*o ptional
230_AKB; 5; 4, en-GB
bjanott,
Version: 2.9.6 2008-04-08T15:09:54+02:00-Seite 189 ZDateiname: 6515_3089_02_buchblock.pdf; preflight
Page 193 of 317
Driving
tips 190
R
Snow chains cannot be fitted to al lwheel/
tyr ec ombinations.
R Snow chains must not be fitted to emer-
gency wheels ,e.g.ac ollapsible emergency
spar ewheel.
R Fit sno wchains onl yinpairsand onl ytothe
rea rwheels. Complywitht he manufactur-
er' sinstallatio ninstructions.
On vehicles with Activ eBodyC ontrol (ABC)*
(Y page 139) ,ifsnowc hains have been fitted,
yo um ayonl ydrive at raised vehicl elevel.
Do not exceed the maximum permissible
spee dof50k m/h.
i Youm aywish to deactivate ESP ®
when
pulling away with sno wchains fitted
(Y page 54) .Thisw ayyouc an allo wthe
wheels to spin in acontrolle dmanner ,ach-
ieving an increase ddriving force (cutting
action). Winte
rdriving G
Ris
kofa ccident
Do not shift down for additional engine
braking on aslipper yroads urface. This
could caus ethe drive wheels to lose their
gri pa nd the vehicl ecould skid.
Yo us houl ddrive particularl ycarefully on slip-
pery roa dsurfaces .Avoi ds udde naccelera-
tion, steering and braking manoeuvres.
If the vehicl ethreatens to ski dorcannot be
stopped when moving at lo wspeed:
X Shift the selector lever to N.
X Try to bring the vehicl eunder control using
correctiv esteering. Driving tips
Rolling with the engine switche
doff G
Ris
kofa ccident
Do not switch off the engine whil ethe vehi-
cle is in motion.
There is no powe rassis tance for the steer-
ing or the service brake when the engine is
not running.
Steering and braking require significantly
mor eeffort and yo ucould lose control of
the vehicl eand caus eanaccident as a
result. Braking
G
Ris
kofa ccident
Do not change down for additional engine
braking on aslipper yroads urface. This
could caus ethe drive wheels to lose their
gri pa nd the vehicl ecould skid. G
Ris
kofa ccident
Make sure tha tother roa dusers ar enot
endangere dbyyourb raking. Operation
230_AKB; 5; 4, en-GB
bjanott,
Version: 2.9.6 2008-04-08T15:09:54+02:00-Seite 190 Dateiname: 6515_3089_02_buchblock.pdf; preflight
Page 197 of 317
Care
194 Fading out th
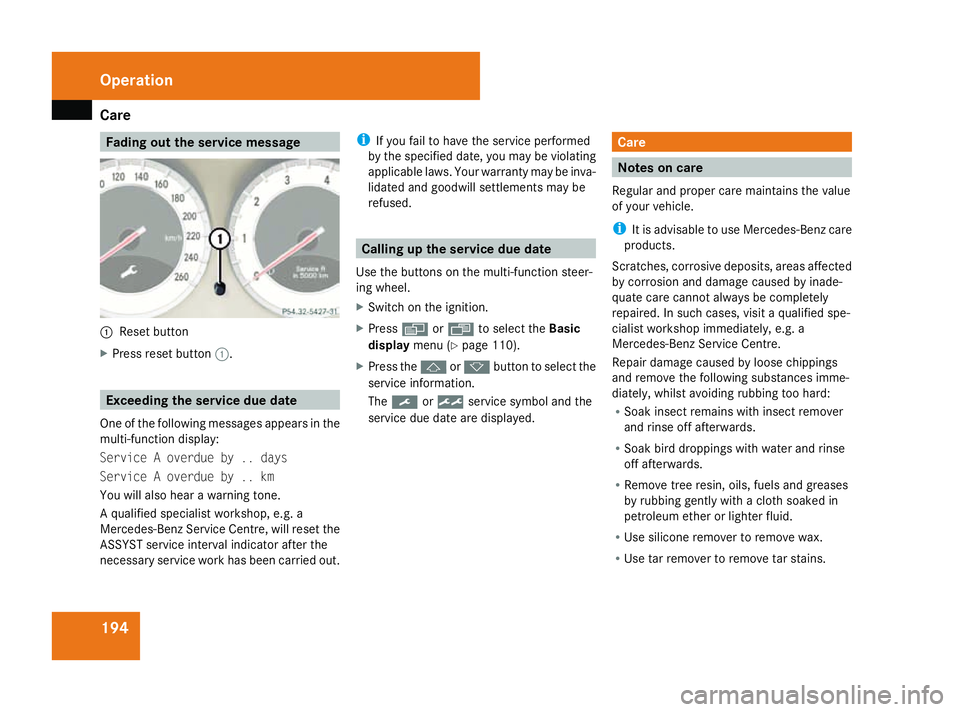
eservice message 1
Reset button
X Pres srese tbutton 1. Exceeding th
eservice du edate
One of th efollowing messages appears in the
multi-functio ndisplay:
Service Aoverdue by .. days
Service Aoverdue by .. km
You will also hear awarning tone.
Aq ualified specialist workshop, e.g .a
Mercedes-Ben zServic eCentre, will rese tthe
ASSYS Tservice interval indicator after the
necessar yservice work has been carried out. i
If you fail to have th eservice performed
by th especified date, you may be violating
applicabl elaws. Your warranty may be inva-
lidated and goodwill settlements may be
refused. Calling up th
eservice du edate
Use th ebuttons on th emulti-functio nsteer-
ing wheel.
X Switch on th eignition.
X Press èorÿ to selec tthe Basic
display menu(Ypage 110).
X Pres sthe j ork button to selec tthe
service information.
The 9 or½ service symbol and the
service due date are displayed. Care
Notes on care
Regular and prope rcarem aintain sthe value
of your vehicle.
i It is advisabl etouse Mercedes-Ben zcare
products.
Scratches, corrosive deposits, areas affected
by corrosion and damage caused by inade-
quate car ecannot always be completely
repaired. In such cases ,visit aqualified spe-
cialis tworkshop immediately, e.g .a
Mercedes-Ben zServic eCentre.
Repair damage caused by loose chippings
and remove th efollowing substances imme-
diately, whilst avoidin grubbin gtoo hard:
R Soak insect remain swith insect remover
and rinse off afterwards.
R Soak bird droppings with water and rinse
off afterwards.
R Remov etreer esin, oils, fuels and greases
by rubbin ggently with acloths oaked in
petroleum ether or lighter fluid.
R Use silicone remover to remove wax.
R Use tar remover to remove tar stains. Operation
230_AKB; 5; 4, en-GB
bjanott
,V ersion: 2.9.6
2008-04-08T15:09:54+02:00
-Seite 194 Dateiname: 6515_3089_02_buchblock.pdf; preflight
Page 200 of 317
Care
197
Cleaning th
eplastic trim !
Do no tuse dry, coars eorhard cloth sand
do no tscrub. Doing so will scratch or dam-
age th esurfaces.
! In order to protect th evehicle's high-qual-
it ys urface sand to retain th eoverall
appearance, avoi dcontac twithc osmetics
and suntan lotion.
X Wipe plastic part swithad amp,lint-free
cloth (e.g. amicrofibre cloth).
X Ligh tsoiling: usealow-foaming soap (e.g.
al igh tliquid han dsoap )diluted in water.
X Heavy soiling: useacleaning agen ttha tis
solvent-free and non-corrosive. Mercedes-
Benz recommends that you use a
Mercedes-Benz cleaning produc tfor this
purpose.
Cleaning th esteering wheel boss and
dashboard X
Moiste naclean lint-free cloth wit hwater.
X Clean th eplastic part sand th edashboard.
X If particularly dirty, use amild detergent. G
Ris
kofi njury
Do no tuse cleaners and cockpit care
sprays containing solvents to clean the
cockpit and steering whee lboss. Cleaners
containing solvents caus ethe surface to
become porous and in th eevent of an air-
bag bein gtriggered ,plastic part stha th ave
become loos ecould caus econsid erable
injuries.
Cleaning th eleather trim* !
Cleaning
R Clean genuine leather cover susinga
damp cloth ,the nw ipe th ecoversd own
usin gad ry cloth .When doin gthis, make
sur ethatthe leather does no tbecome
soaked. Fo rleather care, you should use
leather car efoam A00198659711 0.
You can purchase this from any
Mercedes-Benz Service Centre.
R Clean artificial leather cover swithac loth
moistened wit hasolution containing 1%
detergen t(e. g. washing-up liquid).
R Clean fabric cover switham icrofibre
cloth moistened wit hasolution contain-
ing 1% detergen t(e. g. washing-up liquid).
When cleaning ,tak ec aren otto rub too vigorously and always wipe entire seat
section
stoavoidleaving visible lines.
Leav ethe seat to dry afterwards. Clean-
ing result sdepend on th etypeofd irt and
how lon githas been there.
R Clean Alcantara cover swithad amp
cloth .Makes ure you wipe entire seat
section stoavoidleaving visible lines.
i Notethatleather cover sarean atural
produc tand as suc hare subjec ttoanatural
agein gprocess and may reac tdifferently
(e.g. increased formation of wrinkles) to
certain environmental influence s(suc has
high humidity, intense heat).
Not etha tregular car eisessential to ensure
that th equalit y(bot happearanc eand com-
fort) of th ecoversisr etained ove rtim e.
Tail pip ecare( AMG vehicles) Impurities combined wit
hthe effects of road
gri tand corrosiv eenvironmental factors may
caus eflas hrusttof ormont hesurface.
Regular car eoftheexhaust tai lpipes will
ensur ethatthe ir original shin eisrestored. Operation
*o ptional
230_AKB; 5; 4, en-GB
bjanott
,V ersion: 2.9.6
2008-04-08T15:09:54+02:00
-Seite 197 ZDateiname: 6515_3089_02_buchblock.pdf; preflight
Page 201 of 317
Care
198
!
Do no tclean exhaust tai lpipes wit halka-
line-based cleaning agents suc haswheel
cleaner.
Use th echrome-cleaning agen trecommen-
ded by Mercedes-Benz for cleaning .Inf or-
mation about chrome-cleaning agents can
be obtained from any Mercedes-Benz
Service Centre.
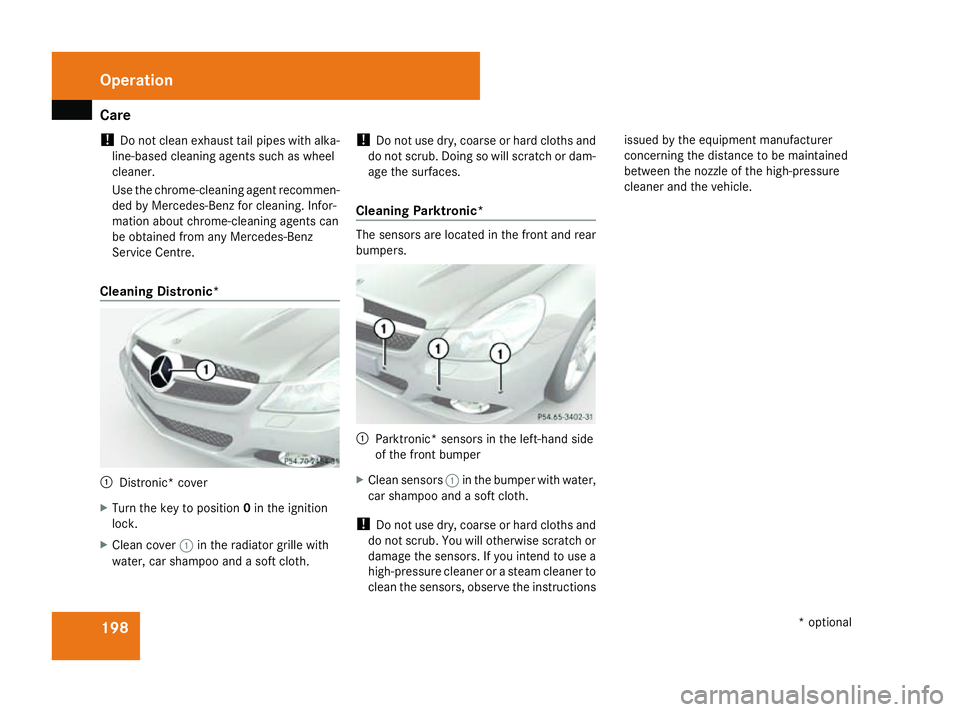
Cleaning Distronic* 1
Distronic* cover
X Turn th ekeyto position 0in th eignition
lock.
X Clean cover 1in th eradiato rgrille with
water, car shampoo and asoftc loth. !
Do no tuse dry, coars eorhard cloth sand
do no tscrub. Doing so will scratch or dam-
age th esurfaces.
Cleaning Parktronic* The sensor
sare locate dinthefron tand rear
bumpers. 1
Parktronic* sensor sintheleft-han dside
of th efront bumper
X Clean sensors 1in th ebumper wit hwater,
car shampoo and asoftc loth.
! Do no tuse dry, coars eorhard cloth sand
do no tscrub. You will otherwise scratch or
damag ethe sensors. If you inten dtouse a
high-pressur ecleane roras team cleane rto
clean th esensors, observ ethe instructions issue
dbyt heequipmen tmanufacturer
concerning th edistanc etobem aintained
between th enozzle of thehigh-pressure
cleane rand th evehicle. Operation
*optional
230_AKB; 5; 4, en-GB
bjanott
,V ersion: 2.9.6
2008-04-08T15:09:54+02:00
-Seite 198 Dateiname: 6515_3089_02_buchblock.pdf; preflight