2008 MERCEDES-BENZ SL ROADSTER buttons
[x] Cancel search: buttonsPage 15 of 317
12
Shift ranges
Automatic transmission .........100
Display in the speedometer .......99
Side window
Fault ........................ 250
Opening/closing ............... 93
Resetting .................... .95
Side windows
Cleaning ..................... 196
Sno wchains .................... 189
Socket ......................... 166
Soft top see Roof
Spare wheel
Fitting ....................... 270
Storage location ............... 200
Technical data ................ 297
Speed
Technical data ................ 291
Spee dlimiter
Speedtronic .................. 134
Speedometer
Digita lspeedometer (on-board
computer) ................... 111
Setting the unit (on-board com-
puter) ....................... 117
Speedtronic .................... 134
Display message ..........212, 213
Permanent ................... 136
Variabl e..................... 134SRS (Supplemental Restrain
tSys-
tem) ............................ 41
Warning lamp .................. 41
Station
see Radio
Status line (on-board computer) ...108
Selecting the displa y...........118
Steering
Display message .............. 220
Steering wheel
Adjusting ..................... 79
Buttons (on-board computer) .....107
Storing settings ................ 82
Steering wheel gearshift paddles ..102
Stowage compartment ...........161
Armrest (under) ............... 162
Door ........................ 163
Glove compartment ............161
Locking/unlocking .............162
Rea r........................ 163
Stowage compartments
Overview ..................... 36
Stowage space
Cup holde r.................. .159
Display message .............. 224
Stowage well
Boot floo r(un derneath) ......... 161
Submen u(on-board computer) ....116
Convenience ................. 117
Instrument cluster .............117Lighting
..................... 117
Vehicle ...................... 117
Sun visor ....................... 165
Supplemental Restrain tSystem
see SRS
Supplemental Restrain tSyste m(SRS)
Display message .............. 212
Warning lamp ................. 235
Surround lighting
see Locator lighting
Suspensio ntuning ............... 141
SETUP (on-board computer) .....111
Switchin goff the alarm
ATA .......................... 60 T
Tail lamps Changing .................... 263
Display message .............. 224
Tank capacity ................... 300
Tank contents Calling up the range (on-board
computer) ................... 123
Technical data
Acceleration .................. 291
Engine ...................... 290
Speed ....................... 291
Tyres ................... 293, 295
Vehicle dimensions ............298 Index
230_AKB; 5; 4, en-GB
bjanott,
Version: 2.9.6 2008-04-08T15:09:54+02:00-Seite 12 Dateiname: 6515_3089_02_buchblock.pdf; preflight
Page 34 of 317
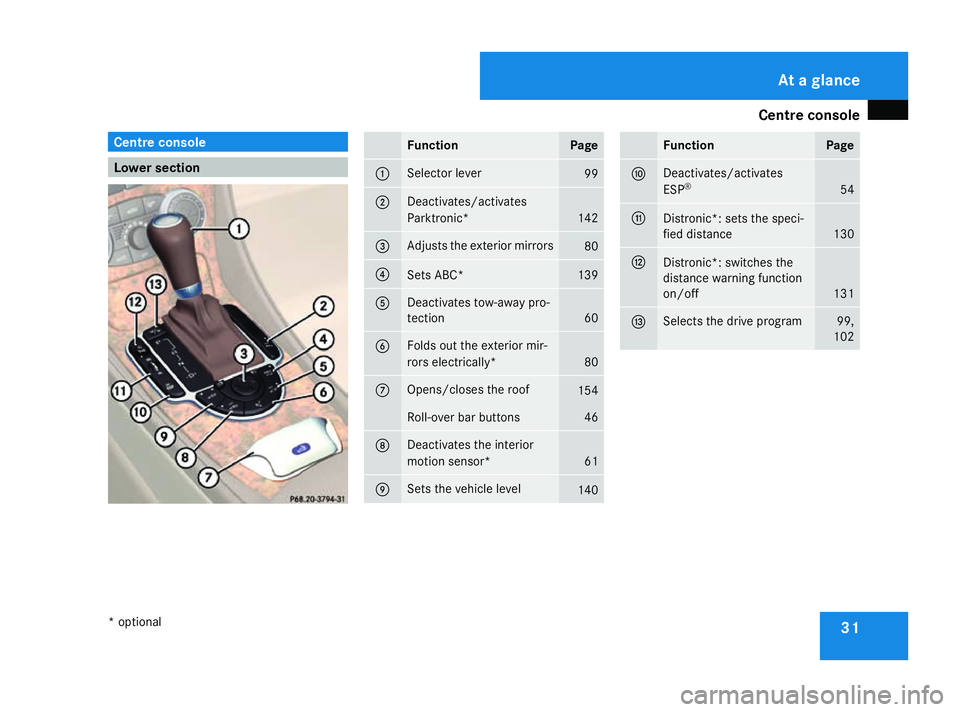
Centre console
31Centre console
Lower section Function Page
1 Selector lever
99
2 Deactivates/activates
Parktronic*
142
3 Adjusts the exterior mirrors
80
4
Set
sABC* 139
5 Deactivates tow-away pro-
tection
60
6 Folds out the exterior mir-
ror
se lectrically* 80
7 Opens/closes the roof
154
Roll-over bar buttons 46
8 Deactivates the interior
motion sensor*
61
9 Set
sthe vehicle level 140 Function Page
a Deactivates/activates
ESP
® 54
b
Distronic*: set
sthe speci-
fied distance 130
c
Distronic*: switches the
distanc
ewarnin gfunction
on/off 131
d Selects the driv
eprogram 99,
102 At
ag lance
*o ptional
230_AKB; 5; 4, en-GB
bjanott ,V ersion: 2.9.6
2008-04-08T15:09:54+02:00
-Seite 31 Dateiname: 6515_3089_02_buchblock.pdf; preflight
Page 36 of 317
Overhea
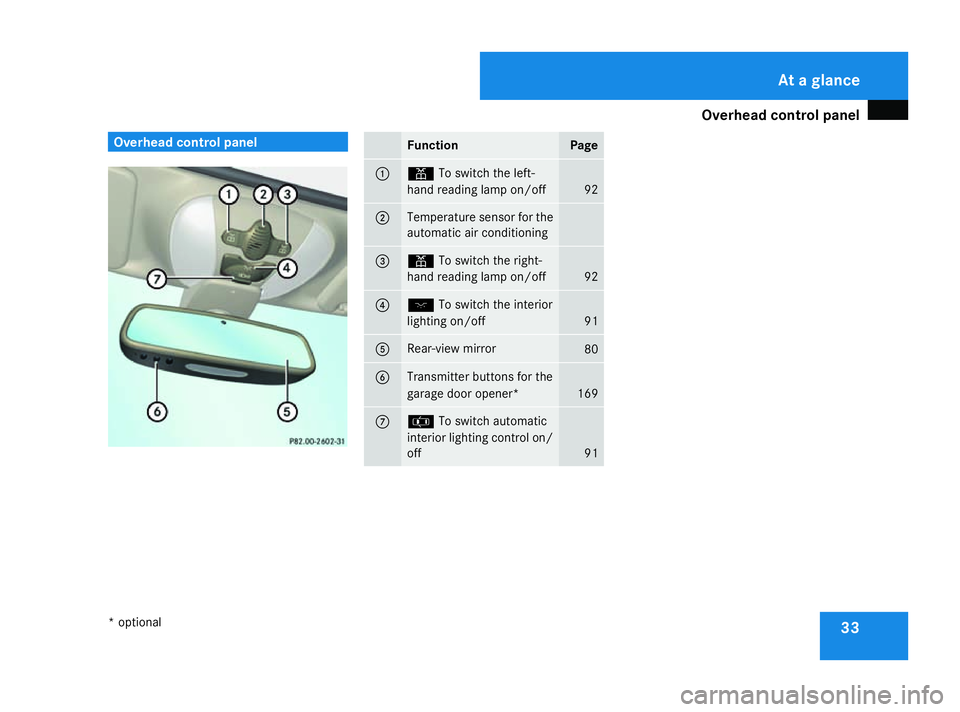
dcontrol panel 33Overhea
dcontrol panel Function Page
1 X
To switch the left-
hand reading lamp on/off 92
2 Temperature sensor for the
automatic air conditioning
3 X
To switch the right-
hand reading lamp on/off 92
4 ð
To switch the interior
lightin gon/off 91
5 Rear-view mirror
80
6 Transmitter buttons for the
garage door opener*
169
7 ¤
To switch automatic
interior lightin gcontrol on/
off 91 At
ag lance
*o ptional
230_AKB
;5;4,en-GB
bjanott, Version:2.9.6
2008-04-08T15:09:54+02:0
0-Seite 33 Dateiname: 6515_3089_02_buchblock.pdf; preflight
Page 49 of 317
Occupant safety
46 Roll-over bar
G
Risk of injury
Make sure that the roll-over bar's range of
movemen tisfree to preven tinjuries when
the roll-over bar is extended or retracted.
The roll-over bar extends automatically if sys-
tems detec tthat the vehicle is in danger of
rolling over to the side. You will hear aratch-
etin gnoise when the roll-over bar extends.
You can also extend and retract the roll-over
bar manually with the buttons.
! If the ambient temperature drops below
-5 †, you must extend the roll-over bar
manually. Otherwise, the hydraulics could
be damaged. Extending and retracting the roll-over
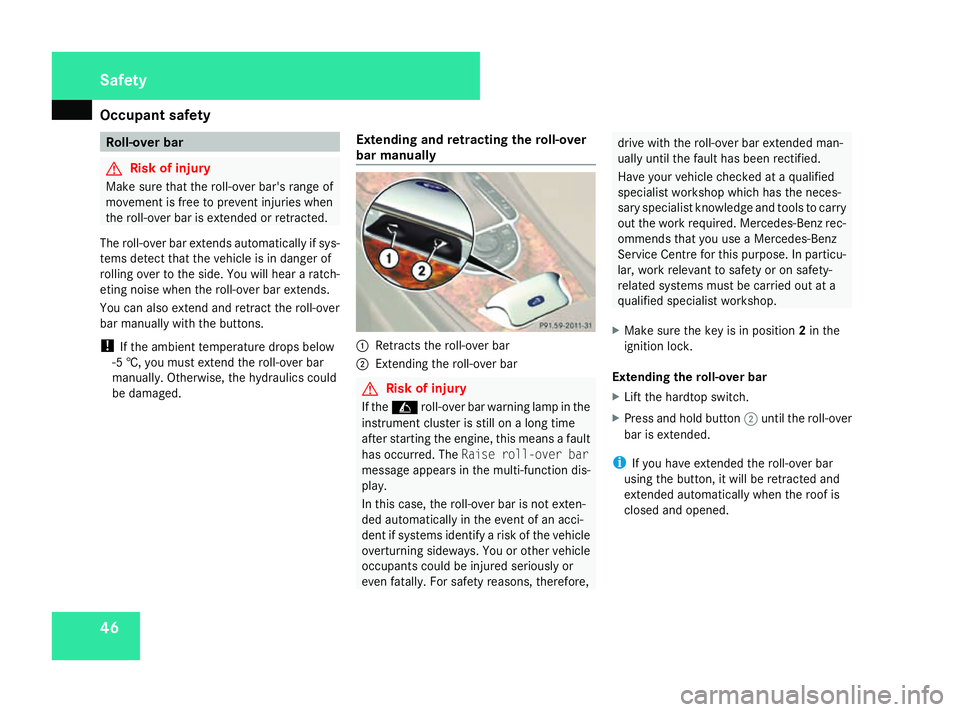
bar manually 1
Retract sthe roll-over bar
2 Extending the roll-over bar G
Risk of injury
If the C roll-over bar warning lamp in the
instrument cluster is still on along time
after starting the engine, this means afault
has occurred. The Raise roll-over bar
message appears in the multi-function dis-
play.
In this case, the roll-over bar is not exten-
ded automatically in the event of an acci-
dent if systems identify arisk of the vehicle
overturnin gsideways. You or other vehicle
occupants could be injured seriously or
even fatally. For safety reasons ,therefore, drive with the roll-over bar extended man-
ually until the fault has been rectified.
Have your vehicle checked at
aqualified
specialist workshop which has the neces-
sary specialist knowledge and tools to carry
out the work required. Mercedes-Benz rec-
ommends that you use aMercedes-Benz
Service Centr efor this purpose. In particu-
lar, work relevant to safety or on safety-
related systems must be carried out at a
qualified specialist workshop.
X Make sure the key is in position 2in the
ignition lock.
Extending the roll-over bar
X Lift the hardtop switch.
X Press and hold button 2until the roll-over
bar is extended.
i If you have extended the roll-over bar
using the button, it will be retracted and
extended automatically when the roof is
closed and opened. Safety
230_AKB
;5;4,en-GB
bjanott, Version:2.9.6
2008-04-08T15:09:54+02:0
0-Seite 46 Dateiname: 6515_3089_02_buchblock.pdf; preflight
Page 67 of 317
Opening and closing
64 Opening and closing
Key
The vehicle's equipment includes two keys
with remot econtrol. Each key contains an
emergency key element.
The key is configured at the factory to cen-
trally lock and unlock the following:
R the doors
R the boot lid
R the fuel filler flap
R the glove compartment
R the stowage compartment under the arm-
rest
R the stowage compartment sinthe rear G
Risk of accident
If children are left unsupervised in the vehi-
cle, they could:
R open adoor from the inside at any time,
even if it has been locked
R start the vehicle using akey which has
been left in the vehicle
R release the parkin gbrake
They could endanger themselves and oth-
ers. Never leave children unsupervised in the vehicle. Always take the key with you
when leaving the vehicle, even if you are
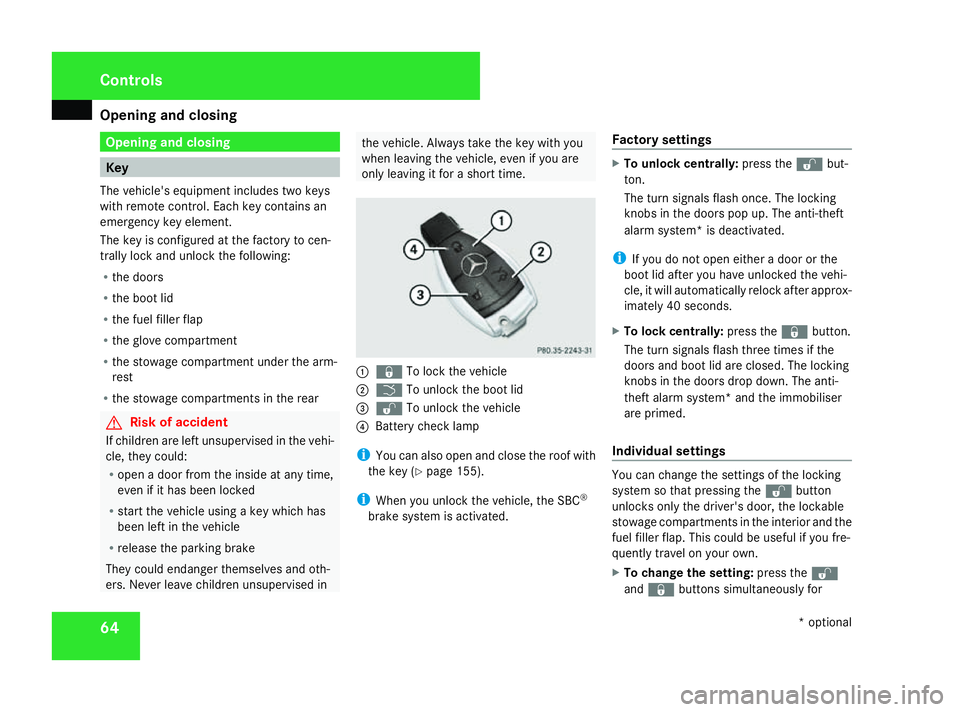
only leaving it for ashort time. 1
j To lock the vehicle
2 i To unlock the boot lid
3 k To unlock the vehicle
4 Battery chec klamp
i You can also open and close the roof with
the key (Y page 155).
i When you unlock the vehicle, the SBC ®
brake system is activated. Factory settings X
To unlock centrally: press thekbut-
ton.
The turn signals flash once. The locking
knobs in the doors pop up. The anti-theft
alarm system* is deactivated.
i If you do not open either adoor or the
boot lid after you have unlocked the vehi-
cle, it will automatically relock after approx-
imately 40 seconds.
X To lock centrally: press thejbutton.
The turn signals flash three times if the
doors and boot lid are closed. The locking
knobs in the doors drop down. The anti-
thef talarm system* and the immobiliser
are primed.
Individual settings You can change the settings of the locking
system so that pressin
gthe k button
unlock sonly the driver's door, the lockable
stowage compartment sinthe interior and the
fuel filler flap. This could be useful if you fre-
quently travel on your own.
X To change the setting: press thek
and j buttons simultaneously for Controls
*optional
230_AKB
;5;4,en-GB
bjanott, Version:2.9.6
2008-04-08T15:09:54+02:0
0-Seite 64 Dateiname: 6515_3089_02_buchblock.pdf; preflight
Page 68 of 317
Opening and closing
65
approximately six seconds until the battery
chec
klamp flashes twice.
The key now function sasfollows:
X To unlock the driver's door: press the
k buttononce.
X To unlock centrally: press thekbut-
ton twice.
X To lock centrally: press thejbutton.
Restoring the factor ysettings X
Press the kandj buttons simulta-
neously for approximately six seconds until
the batter ychec klamp flashes twice. KEYLESS GO key*
The optional equipment supplied with your
vehicle includes two KEYLESSGOk eys. You
can start ,lock or unlock the vehicle using the
KEYLESSGOk ey. To do this, you need only
carry the KEYLESSGOk ey on your person.
When you touch the surface of the sensor son
the vehicle's door handles, KEYLESSGO
establishes aradio connection between the
vehicle and the key. The distanc ebetween
the KEYLESSGOk ey and the vehicle's door handle from which you wish to lock or unlock
the vehicle, must not be greater than
1m.
When you pull the door handle, the following
unlock centrally if the factory settings have
not been changed:
R the doors
R the boot lid
R the fuel filler flap
R the glove compartment
R the stowage compartment under the arm-
rest
R the stowage compartment sinthe rear
If you pull on the handle of the boot lid, only
the boot of your vehicle is unlocked.
When starting the engin eand whilst driving
KEYLESSGOa lso checks by establishing brief
periods of radio contact whether avalid KEY-
LES SGOk ey is in the vehicle. G
Risk of accident
If children are left unsupervised in the vehi-
cle, they could open adoor from the inside,
even if it has been locked. Or they could
start the vehicle if avalid KEYLESSGOk ey
is in the vehicle and they press the KEY-
LES SGOb uttonont he gear selector lever.
They could endanger themselves and oth- ers. Never leave children unsupervised in
the vehicle. Switc
hoff the engin eand take
the KEYLESSGOk ey with you, even if you
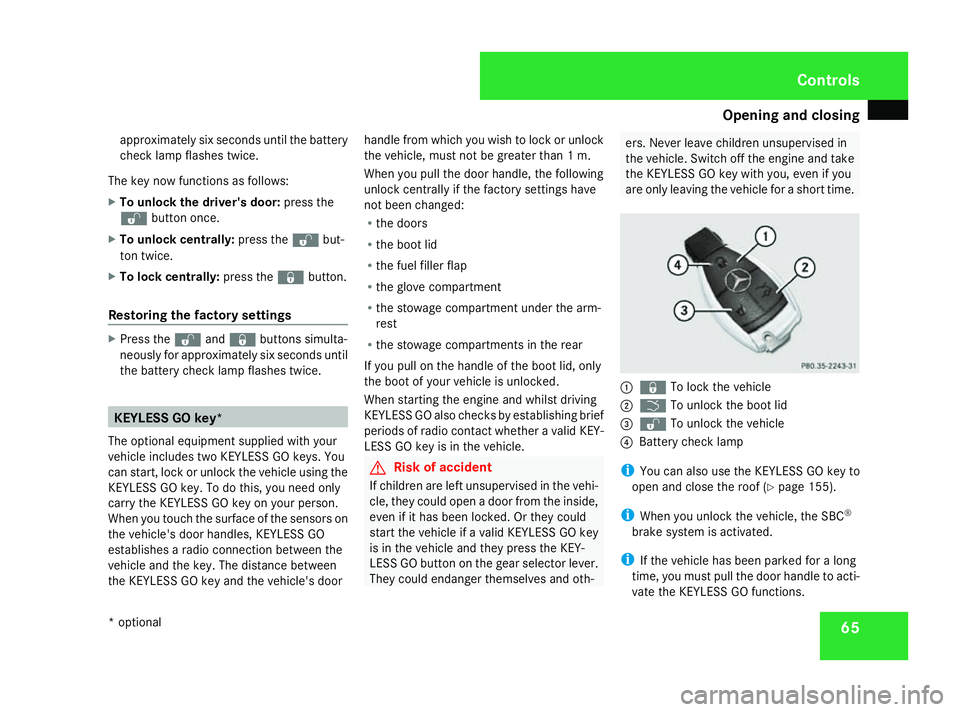
are only leaving the vehicle for ashort time. 1
j To lock the vehicle
2 i To unlock the boot lid
3 k To unlock the vehicle
4 Battery chec klamp
i You can also use the KEYLESSGOk ey to
open and close the roof (Y page 155).
i When you unlock the vehicle, the SBC ®
brake system is activated.
i If the vehicle has been parked for along
time, you must pull the door handle to acti-
vate the KEYLESSGOf unctions. Controls
*o ptional
230_AKB
;5;4,en-GB
bjanott, Version:2.9.6
2008-04-08T15:09:54+02:0
0-Seite 65 ZDateiname: 6515_3089_02_buchblock.pdf; preflight
Page 70 of 317
Opening and closing
67
X
To change the setting: press thek
and j buttons simultaneously for
approximately six seconds until the battery
chec klamp flashes twice.
The KEYLESSGOk ey will now function as fol-
lows:
X To unlock the driver's door: pull the door
handle on the driver's door.
X To unlock centrally: pull the front-
passenger door handle.
X To lock centrally: press locking button
1 on the door handle.
Restoring the factor ysettings X
Press the kandj buttons simulta-
neously for approximately six seconds until
the batter ychec klamp flashes twice.
Locking from the boot* On vehicles with KEYLESSGOa
nd remote
boot lid closing*, you can close the boot lid
automatically and thereby centrally lock your
vehicle (Y page 71). Power closing feature
The power closin gmechanism pulls the boot
lid int oits lock automatically even if it is only
partly closed. G
Risk of injury
Make sure that nobody can become trap-
ped when closin gthe boot lid.
If ther eisad anger of being trapped, press
the boot lock.
Do not activate the power closin gfunction
by tamperin gwith the lock mechanism. You
could otherwise injure yourself. G
Risk of accident
Make sure the boot lid is alway sfully
closed. Otherwise, the boot lid could open
during the journey and endanger yourself
or others.
X Lightly push closed the boot lid.
The power closin gmechanism will pull the
boot lid closed completely. Opening the doors from the inside
You can open adoor from the inside at any
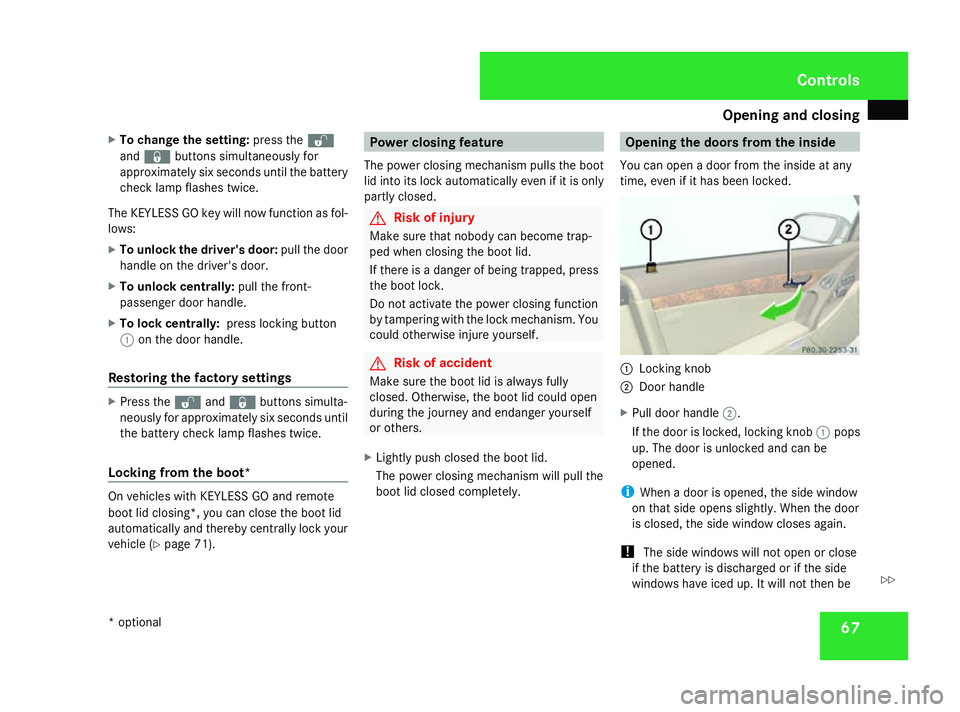
time, even if it has been locked. 1
Locking knob
2 Door handle
X Pull door handle 2.
If the door is locked, locking knob 1pops
up. The door is unlocked and can be
opened.
i When adoor is opened, the side window
on that side opens slightly. When the door
is closed, the side window closes again.
! The side windows will not open or close
if the battery is discharged or if the side
windows have iced up. It will not then be Controls
*o ptional
230_AKB
;5;4,en-GB
bjanott, Version:2.9.6
2008-04-08T15:09:54+02:0
0-Seite 67 ZDateiname: 6515_3089_02_buchblock.pdf; preflight
Page 82 of 317
Steering wheel
79
R
the steering wheel can be reached with
your arms slightly bent
R you can move your legs freely
R you can see all the displaysint he instru-
ment cluster clearly Adjusting the steering wheel
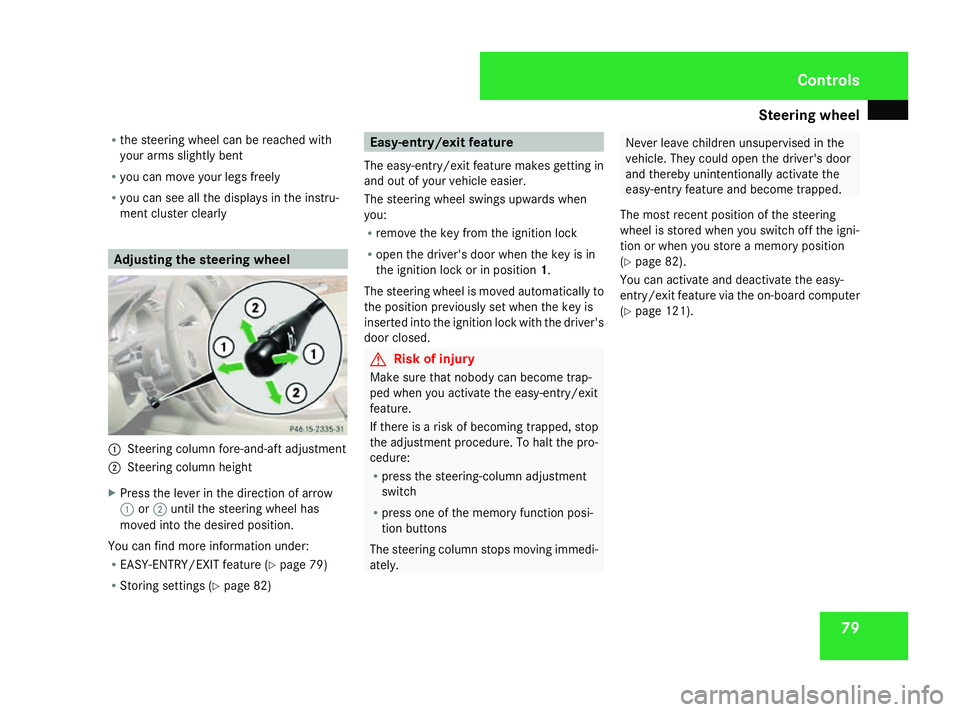
1
Steering column fore-and-aft adjustment
2 Steering column height
X Press the lever in the direction of arrow
1 or2 until the steering wheel has
moved into the desired position.
You can find more information under:
R EASY-ENTRY/EXIT feature (Y page 79)
R Storing settings (Y page 82) Easy-entry/exit feature
The easy-entry/exit feature makes getting in
and out of yourv ehicle easier.
The steering wheel swings upwards when
you:
R remove the key from the ignition lock
R open the driver's door when the key is in
the ignition lock or in position 1.
The steering wheel is moved automatically to
the position previously set when the key is
inserted into the ignition lock with the driver's
door closed. G
Risk of injury
Make sure that nobody can become trap-
ped when you activate the easy-entry/exit
feature.
If there is arisk of becoming trapped, stop
the adjustment procedure .Tohalt the pro-
cedure:
R press the steering-column adjustment
switch
R press one of the memory function posi-
tion buttons
The steering column stops moving immedi-
ately. Never leave children unsupervised in the
vehicle. They could open the driver's door
and thereby unintentionally activate the
easy-entryf
eature and become trapped.
The most recent position of the steering
wheel is stored when you switch off the igni-
tion or when you store amemory position
(Y page 82).
You can activate and deactivate the easy-
entry/exit feature via the on-board computer
(Y page 121). Controls
230_AKB; 5; 4, en-GB
bjanott,
Version: 2.9.6
2008-04-08T15:09:54+02:00
-Seite 79 ZDateiname: 6515_3089_02_buchblock.pdf; preflight