2008 MERCEDES-BENZ CLS COUPE brake light
[x] Cancel search: brake lightPage 213 of 329
Care
210 Calling up the service due date
Use the buttons on the multi-function steer-
ing wheel.
X Switch on the ignition.
X Press è or ÿ to select the Basic
display menu (Y page 115).
X Press j or k to select the service
information.
The 9 service symbol and the service
due date are displayed.
X To select a different display, press j,
è or ÿ. Care
Notes on care
Regular and proper care maintains the value
of your vehicle.
i It
is advisable to use Mercedes-Benz care
products.
Scratches, corrosive deposits, areas affected
by corrosion and damage caused by inade-
quate care cannot always be completely
repaired. In such cases, visit a qualified spe-
cialist workshop immediately, e.g. a
Mercedes-Benz Service Centre.
Repair damage caused by loose chippings
and remove the following substances imme-
diately, whilst avoiding rubbing too hard:
R Soak insect remains with insect remover
and rinse off afterwards.
R Soak bird droppings with water and rinse
off afterwards.
R Remove tree resin, oils, fuels and grease by
rubbing gently with a cloth soaked in clean-
ing or lighter fluid.
R Use silicone remover to remove wax.
R Use tar remover to remove tar stains. H
Environmental note
Dispose of empty packaging, cleaning
cloths and polishing wads in an environ-
mentally responsible manner.
! Do not affix:
R stickers
R films
R magnetic plates or similar
to painted surfaces, otherwise you could
damage the paintwork. Vehicle care
!
Do not park the vehicle for a long period
of time directly after cleaning, especially if
the wheels have just been cleaned with a
wheel cleaner. Wheel cleaners could cause
rapid corrosion of the brake discs and
brake pads/linings. After cleaning, park
the vehicle when it is at normal operating
temperature. Operation
219_AKB; 2; 4, en-GB
mkalafa,
2007-11-13T09:28:36+01:00 - Seite 210
Page 225 of 329

Display messages
222 Display messages Possible cause/consequence Possible solution
DISTRONIC currently unavail-
able See Owner's
Manual
Distronic* is deactivated and is tempora-
rily inoperative, if:
R
the Distronic*
cover in the radiator
grille is dirty
R its function is impaired due to heavy
rain, snow or fog.
R the radar sensor system is temporarily
unavailable, e.g. because of electro-
magnetic radiation.
R The radar sensor system has not detec-
ted any vehicles or stationary objects,
e.g. traffic signs, for a long time.
R The system has overheated. Distronic* is available again and the display mes-
sage disappears when the dirt (e.g. slush) falls off
while you are driving or if the system detects that
the sensors are fully available again.
If the display message does not disappear:
X
Clean the Distronic* cover in the radiator grille
(Y page 213).
X If necessary, wait until the system has cooled
down.
X Restart the engine. ESP
also lights up:
v inoperative See
Owner's Manual
G
Risk of accident
ESP ®
and therefore also Brake Assist and
PRE-SAFE ®
are unavailable due to a mal-
function.
The brake system is still available with
complete brake boosting effect. X
Drive on carefully.
X Visit a qualified specialist workshop. Practical advice
* optional
219_AKB; 2; 4, en-GB
mkalafa,
2007-11-13T09:28:36+01:00 - Seite 222
Page 248 of 329
Troubleshooting
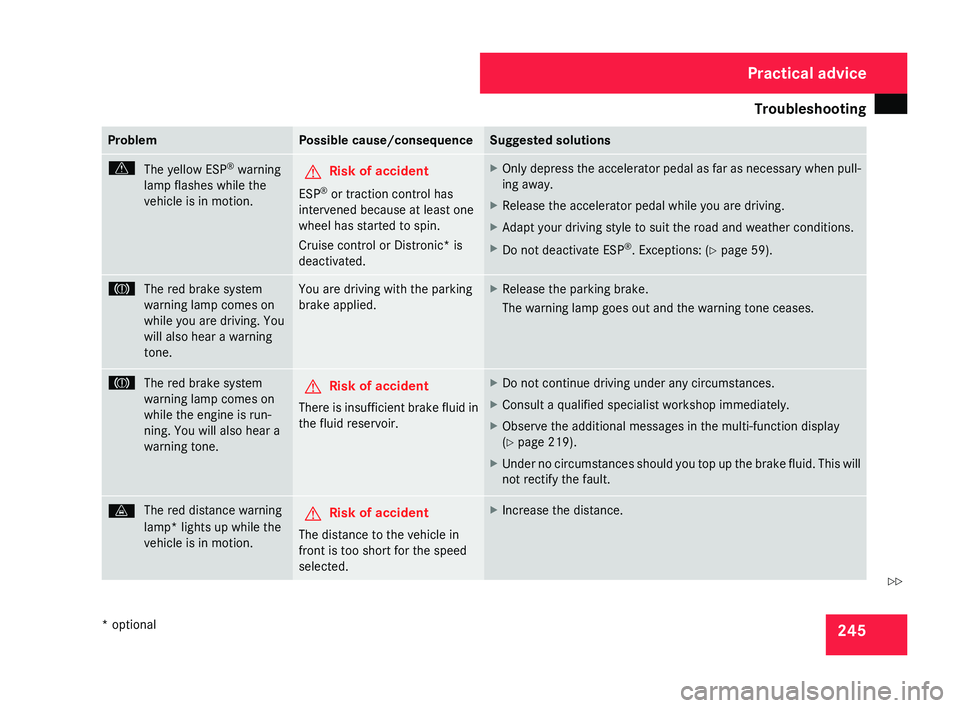
245Problem Possible cause/consequence Suggested solutions
v
The yellow ESP ®
warning
lamp flashes while the
vehicle is in motion. G
Risk of accident
ESP ®
or traction control has
intervened because at least one
wheel has started to spin.
Cruise control or Distronic* is
deactivated. X
Only depress the accelerator pedal as far as necessary when pull-
ing away.
X Release the accelerator pedal while you are driving.
X Adapt your driving style to suit the road and weather conditions.
X Do not deactivate ESP ®
. Exceptions: (Y page 59).3
The red brake system
warning lamp comes on
while you are driving. You
will also hear a warning
tone. You are driving with the parking
brake applied. X
Release the parking brake.
The warning lamp goes out and the warning tone ceases. 3
The red brake system
warning lamp comes on
while the engine is run-
ning. You will also hear a
warning tone. G
Risk of accident
There is insufficient brake fluid in
the fluid reservoir. X
Do not continue driving under any circumstances.
X Consult a qualified specialist workshop immediately.
X Observe the additional messages in the multi-function display
(Y page 219).
X Under no circumstances should you top up the brake fluid. This will
not rectify the fault. l
The red distance warning
lamp* lights up while the
vehicle is in motion. G
Risk of accident
The distance to the vehicle in
front is too short for the speed
selected. X
Increase the distance. Practical advice
* optional
219_AKB; 2; 4, en-GB
mkalafa,
2007-11-13T09:28:36+01:00 - Seite 245 Z
Page 249 of 329

Troubleshooting
246 Problem Possible cause/consequence Suggested solutions
l
The red distance warning
lamp* lights up while the
vehicle is in motion. You
will also hear a warning
tone. G
Risk of accident
You are approaching a vehicle in
front at too great a speed or Dis-
tronic*
has detected a stationary
obstacle in your line of travel. X
Be prepared to brake immediately.
X Pay careful attention to the traffic situation. You may have to brake
or take evasive action. D
The red coolant warning
lamp comes on while the
engine is running. There is insufficient coolant in the
expansion tank.
The coolant is too hot and the
engine is no longer being cooled
sufficiently. X
Stop the vehicle as soon as possible. Pay attention to the traffic
conditions as you do so.
X Allow the engine and coolant to cool.
X Check the coolant level. Observe the warning notes
(Y page 196). Top up the coolant if necessary.
X Have the coolant system checked at a qualified specialist work-
shop if the coolant needs topping up more often than usual. D
The red coolant warning
lamp comes on while the
engine is running. If the coolant level is correct, the
radiator fan may be faulty.
The coolant is too hot and the
engine is no longer being cooled
sufficiently. X
If the coolant temperature is less than 120†, you can continue
driving to the nearest qualified specialist workshop.
X In doing so, avoid heavy loads on the engine (e.g. driving in moun-
tainous terrain) and stop-and-go driving. Practical advice
* optional
219_AKB; 2; 4, en-GB
mkalafa,
2007-11-13T09:28:36+01:00 - Seite 246
Page 254 of 329
Troubleshooting
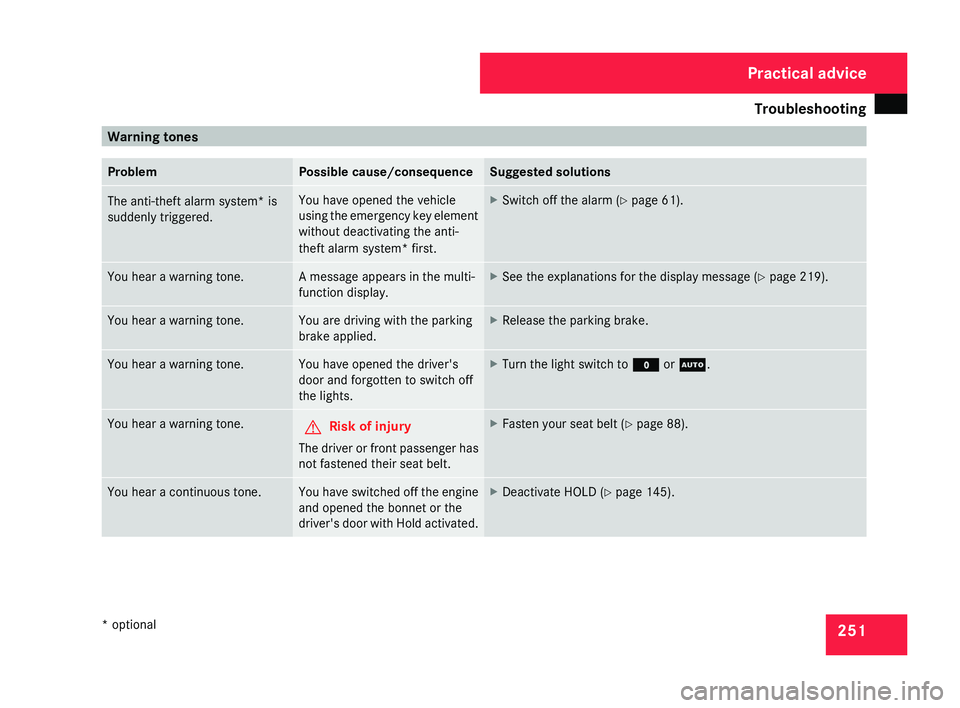
251Warning tones
Problem Possible cause/consequence Suggested solutions
The anti-theft alarm system* is
suddenly triggered. You have opened the vehicle
using
the emergency key element
without deactivating the anti-
theft alarm system* first. X
Switch off the alarm (Y page 61). You hear a warning tone. A message appears in the multi-
function display. X
See the explanations for the display message ( Y page 219).You hear a warning tone. You are driving with the parking
brake applied. X
Release the parking brake. You hear a warning tone. You have opened the driver's
door and forgotten to switch off
the lights. X
Turn the light switch to M or U.You hear a warning tone.
G
Risk of injury
The driver or front passenger has
not fastened their seat belt. X
Fasten your seat belt ( Y page 88).You hear a continuous tone. You have switched off the engine
and opened the bonnet or the
driver's
door with Hold activated. X
Deactivate HOLD (Y page 145). Practical advice
* optional
219_AKB; 2; 4, en-GB
mkalafa,
2007-11-13T09:28:36+01:00 - Seite 251
Page 275 of 329
Changing the bulbs
272
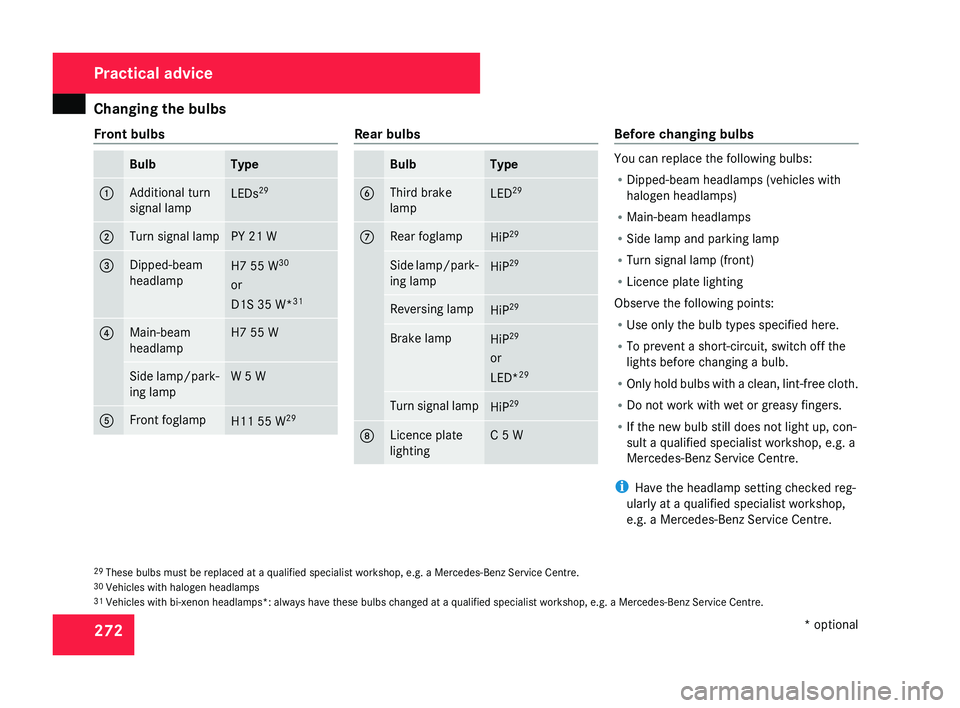
Front bulbs Bulb Type
1 Additional turn
signal lamp
LEDs
29 2 Turn signal lamp PY 21 W
3 Dipped-beam
headlamp
H7 55 W
30
or
D1S 35 W* 31 4 Main-beam
headlamp H7 55 W
Side lamp/park-
ing lamp W 5 W
5 Front foglamp
H11 55 W
29 Rear bulbs
Bulb Type
6 Third brake
lamp
LED
29 7 Rear foglamp
HiP
29 Side lamp/park-
ing lamp
HiP
29 Reversing lamp
HiP
29 Brake lamp
HiP
29
or
LED* 29 Turn signal lamp
HiP
29 8 Licence plate
lighting C 5 W Before changing bulbs
You can replace the following bulbs:
R
Dipped-beam headlamps (vehicles with
halogen headlamps)
R Main-beam headlamps
R Side lamp and parking lamp
R Turn signal lamp (front)
R Licence plate lighting
Observe the following points:
R Use only the bulb types specified here.
R To prevent a short-circuit, switch off the
lights before changing a bulb.
R Only
hold bulbs with a clean, lint-free cloth.
R Do not work with wet or greasy fingers.
R If the new bulb still does not light up, con-
sult a qualified specialist workshop, e.g. a
Mercedes-Benz Service Centre.
i Have the headlamp setting checked reg-
ularly at a qualified specialist workshop,
e.g. a Mercedes-Benz Service Centre.
29 These bulbs must be replaced at a qualified specialist workshop, e.g. a Mercedes-Benz Service Centre.
30 Vehicles with halogen headlamps
31 Vehicles with bi-xenon headlamps*: always have these bulbs changed at a qualified specialist workshop, e.g. a Mercedes-Benz Service Centre. Practical advice
* optional
219_AKB; 2; 4, en-GB
mkalafa,
2007-11-13T09:28:36+01:00 - Seite 272
Page 295 of 329
Jump-starting
292 G
Risk of injury
There is a risk of acid burns when jump-
starting a vehicle due to the gases which
escape from the battery. Do not lean over
the battery while the engine is being jump-
started. G
Risk of explosion
Gases escaping from the battery during
jump-starting may cause minor explosions.
Avoid creating sparks. Keep naked flames
away from the battery, and do not smoke.
Comply with safety precautions and take
protective measures when handling batter-
ies. You will find these under “Battery” in
the index.
X Make sure that the two vehicles do not
touch.
X Depress the parking brake.
X Move the selector lever to P.
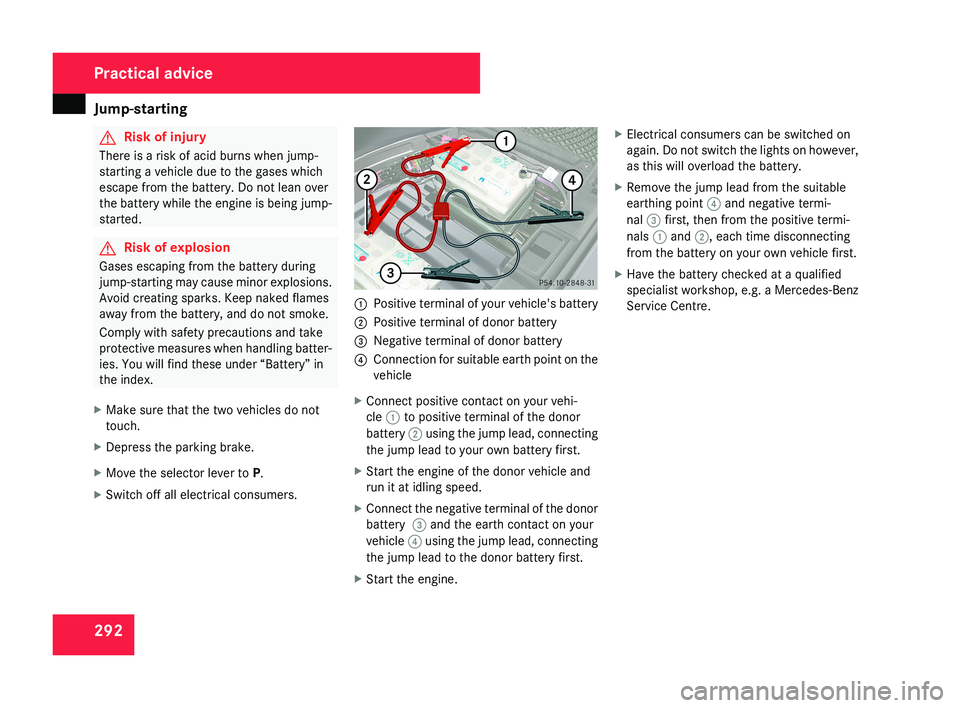
X Switch off all electrical consumers.1 Positive terminal of your vehicle's battery
2 Positive terminal of donor battery
3 Negative terminal of donor battery
4 Connection for suitable earth point on the
vehicle
X Connect positive contact on your vehi-
cle 1 to positive terminal of the donor
battery 2 using the jump lead, connecting
the jump lead to your own battery first.
X Start the engine of the donor vehicle and
run it at idling speed.
X Connect the negative terminal of the donor
battery 3 and the earth contact on your
vehicle 4 using the jump lead, connecting
the jump lead to the donor battery first.
X Start the engine. X
Electrical consumers can be switched on
again. Do not switch the lights on however,
as this will overload the battery.
X Remove the jump lead from the suitable
earthing point 4 and negative termi-
nal 3 first, then from the positive termi-
nals 1 and 2, each time disconnecting
from the battery on your own vehicle first.
X Have the battery checked at a qualified
specialist workshop, e.g. a Mercedes-Benz
Service Centre.
Practical advice
219_AKB; 2; 4, en-GB
mkalafa,
2007-11-13T09:28:36+01:00 - Seite 292