2008 MERCEDES-BENZ CLS COUPE interior lights
[x] Cancel search: interior lightsPage 8 of 329

5
Central locking
Automatic locking (on-board com-
puter) . . . . . . . . . . . . . . . . . . . . . . . 127
Key . . . . . . . . . . . . . . . . . . . . . . . . . . 66
KEYLESS GO . . . . . . . . . . . . . . . 68, 69
Central locking/unlocking button . . . 70
Central unlocking Key . . . . . . . . . . . . . . . . . . . . . . . . . . 66
KEYLESS GO . . . . . . . . . . . . . . . 68, 69
Centre console
Lower section . . . . . . . . . . . . . . . . . . 32
Upper section . . . . . . . . . . . . . . . . . . 34
Changing a wheel
see Flat tyre
Child-proof locks
Rear doors . . . . . . . . . . . . . . . . . . . . 56
Side windows (rear) . . . . . . . . . . . . . 56
Children
in the vehicle . . . . . . . . . . . . . . . . . . 49
Restraint systems . . . . . . . . . . . . . . 49
Child seat
Automatic recognition . . . . . . . . . . . 51
Automatic recognition (malfunc-
tion) . . . . . . . . . . . . . . . . . . . . . . . . 243
ISOFIX . . . . . . . . . . . . . . . . . . . . . . . 55
Recommendations . . . . . . . . . . . . . . 54
Suitable positions . . . . . . . . . . . . . . 53
Cigarette lighter . . . . . . . . . . . . . . . . 181
Cockpit Overview . . . . . . . . . . . . . . . . . . . . . 22 Collapsible wheel
Pumping up . . . . . . . . . . . . . . . . . . 285
Storage location . . . . . . . . . . . . . . . 218
Technical data . . . . . . . . . . . . . . . . 308
COMAND . . . . . . . . . . . . . . . . . . . . . . . 114
On-board computer . . . . . . . . . . . . 114
Constant headlamp mode
Setting (on-board computer) . . . . . 125
Consumption statistics (on-board
computer) . . . . . . . . . . . . . . . . . . . . . . 130
Convenience closing . . . . . . . . . . . . . 100
Coolant . . . . . . . . . . . . . . . . . . . . . . . . 196
Checking the level . . . . . . . . . . . . . 196
Display message . . . . . . . . . . 229, 232
Mixture ratio . . . . . . . . . . . . . . . . . 316
Temperature gauge . . . . . . . . . . . . 110
Warning lamp . . . . . . . . . . . . . . . . . 246
Cruise control . . . . . . . . . . . . . . . . . . 132
Display message . . . . . . . . . . . . . . 227
Cup holder . . . . . . . . . . . . . . . . . . . . . 172 D
Dashboard see Cockpit
Date
Setting (on-board computer) . . . . . 124
Daytime driving lights
see Constant headlamp mode Delayed switch-off
Exterior lighting (on-board com-
puter)
. . . . . . . . . . . . . . . . . . . . . . . 126
Interior lighting (on-board com-
puter) . . . . . . . . . . . . . . . . . . . . . . . 126
Diesel
Low outside temperatures . . . . . . . 193
Diesel engine
Winter driving . . . . . . . . . . . . . . . . . 193
Digital speedometer . . . . . . . . . . . . . 116
Dipped-beam headlamps Automatic headlamp mode* . . . . . . 92
Display message . . . . . . . . . . . . . . 233
Symmetrical . . . . . . . . . . . . . . . . . . 208
Display message . . . . . . . . . . . . . . . . 219
Displaying . . . . . . . . . . . . . . . . . . . 121
Service display . . . . . . . . . . . . . . . . 209
Symbol messages . . . . . . . . . . . . . 228
Text messages . . . . . . . . . . . . . . . . 220
Up (AMG menu) . . . . . . . . . . . . . . . 116
Distance warning function . . . . . . . . 138
Distance warning lamp . . . . . . . . . . . 138
Distronic . . . . . . . . . . . . . . . . . . . . . . . 135
Cleaning the sensors . . . . . . . . . . . 213
Cover . . . . . . . . . . . . . . . . . . . . . . . 213
Display message . . . . . . . . . . . . . . 221
Distance warning function . . . . . . . 138
Driving tips . . . . . . . . . . . . . . . . . . . 141
Warning lamp . . . . . . . . . . . . . . . . . 245 Index
219_AKB; 2; 4, en-GB
mkalafa,
2007-11-13T09:28:36+01:00 - Seite 5
Page 11 of 329

8
Head restraint
Adjusting (front) . . . . . . . . . . . . . 76, 77
Adjusting (rear) . . . . . . . . . . . . . . . . 78
Luxury . . . . . . . . . . . . . . . . . . . . 76, 77
NECK-PRO . . . . . . . . . . . . . . . . . . . . 49
Resetting triggered head
restraints . . . . . . . . . . . . . . . . . . . . 269
Heating
see Air conditioning
High-pressure cleaners . . . . . . . . . . . 211
HOLD . . . . . . . . . . . . . . . . . . . . . . . . . . 144
Display message . . . . . . . . . . . . . . 226 I
Immobiliser
. . . . . . . . . . . . . . . . . . . . . 61
Indicator and warning lamp Brakes (red) . . . . . . . . . . . . . . . . . . 245
Coolant . . . . . . . . . . . . . . . . . . . . . 246
Distronic (red) . . . . . . . . . . . . 138, 245
Engine diagnostic . . . . . . . . . . . . . . 247
ESP ®
. . . . . . . . . . . . . . . . . . . . 59, 244
LIM . . . . . . . . . . . . . . . . . . . . . . . . . 133
PASSENGER AIRBAG OFF . . . . 51, 242
Reserve fuel . . . . . . . . . . . . . . . . . . 250
Seat belt . . . . . . . . . . . . . . . . . . . . . 249
SRS . . . . . . . . . . . . . . . . . . . . . 43, 248
Tyre pressure monitor . . . . . . . . . . 248
Indicator and warning lamps . . . . . . 244 Indicator lamp
see Indicator and warning lamp
Instrument cluster . . . . . . . . . . . . . . 109
Overview . . . . . . . . . . . . . . . . . . . . . 26
Selecting the language (on-board
computer) . . . . . . . . . . . . . . . . . . . 123
Instrument lighting . . . . . . . . . . . . . . 110
Interior lighting . . . . . . . . . . . . . . . . . . 96
Ambient (on-board computer) . . . . 126
Automatic control . . . . . . . . . . . . . . 96
Delayed switch-off (on-board
computer) . . . . . . . . . . . . . . . . . . . 126
Manual control . . . . . . . . . . . . . . . . . 96
Reading lamp . . . . . . . . . . . . . . . . . . 96
Interior motion sensor . . . . . . . . . . . . 62
ISOFIX child seat securing system . . 55 J
Jack Operation
. . . . . . . . . . . . . . . . . . . . 283
Storage location . . . . . . . . . . . . . . . 217
Jump-starting . . . . . . . . . . . . . . . . . . . 291
Jump leads . . . . . . . . . . . . . . . . . . . 291 K
Key
. . . . . . . . . . . . . . . . . . . . . . . . . . . . 66
Changing the battery . . . . . . . . . . . 270
Checking the battery . . . . . . . . . . . 270
Convenience closing . . . . . . . . . . . 101 Display message
. . . . . . . . . . . . . . 238
Factory setting . . . . . . . . . . . . . . 66, 67
Loss . . . . . . . . . . . . . . . . . . . . . . . . 261
Malfunction . . . . . . . . . . . . . . . . . . 261
Modifying the programming . . . . . . . 66
KEYLESS GO . . . . . . . . . . . . . . . . . . . . . 67
Button . . . . . . . . . . . . . . . . . . . . . . . 74
Changing the battery . . . . . . . . . . . 270
Checking the battery . . . . . . . . . . . 270
Closing the boot lid automatically . . 73
Convenience closing . . . . . . . . . . . 101
Factory settings . . . . . . . . . . . . . . . . 68
Losing the key . . . . . . . . . . . . . . . . 264
Malfunction . . . . . . . . . . . . . . . . . . 263
Modifying the programming . . . . . . . 68
Starting the engine . . . . . . . . . . . . 102
Key positions
Key . . . . . . . . . . . . . . . . . . . . . . . . . . 74
KEYLESS GO . . . . . . . . . . . . . . . . . . 74
Kickdown . . . . . . . . . . . . . . . . . . 107, 109 L
Lamps see Indicator and warning lamp
Language
Selecting (on-board computer) . . . 123
Licence plate lighting
Display message . . . . . . . . . . . . . . 235
Lighting
see Lights Index
219_AKB; 2; 4, en-GB
mkalafa,
2007-11-13T09:28:36+01:00 - Seite 8
Page 46 of 329

Occupant safety
43In particular, work relevant to safety or on
safety-related
systems must be carried out
at a qualified specialist workshop. If this
work is not carried out correctly, the oper-
ating safety of your vehicle may be affec-
ted. There is a risk of an accident and injury. SRS (Supplemental Restraint System)
The SRS reduces the risk of occupants com-
ing into contact with the vehicle's interior in
the event of an accident. It can also reduce
the forces to which occupants are exposed
during an accident.
The SRS consists of:
R 1 warning lamp
R belt tensioners
R belt force limiters
R Airbags
1 warning lamp The SRS functions are checked regularly
when you turn on the ignition and when the
engine
is running. Malfunctions can therefore
be detected in good time. The 1 warning lamp in the instrument
cluster
lights up when the ignition is switched
on. It goes out no later than a few seconds
after the engine is started. G
Risk of injury
If SRS is malfunctioning, individual systems
may be activated unintentionally or not be
triggered in the event of an accident with
heavy braking.
A malfunction has occurred if the 1
warning lamp:
R does
not light up when you switch on the
ignition
R does not go out after the engine has been
running for a few seconds
R lights up again once the engine is running
In this case, have SRS checked immedi-
ately at a qualified specialist workshop.
Triggering of belt tensioners, belt force
limiters and airbags In the event of a collision, the sensor in the
airbag
control unit evaluates important phys-
ical data such as duration, direction and force
of the vehicle deceleration or acceleration.
Based on the evaluation of this data and depending on the vehicle's rate of longitudi-
nal deceleration in a collision, in the first
stage the airbag control unit pre-emptively
triggers the belt tensioners.
i
The
front belt tensioners can only be trig-
gered if the belt tongue is correctly
engaged in the seat belt buckle.
The front airbags are only deployed if there is
an even higher rate of vehicle deceleration in
a longitudinal direction.
Vehicles fitted with adaptive, dual-stage front
airbags: when the first deployment threshold
is reached, the front airbag is filled with
enough gas to reduce the risk of injuries. The
front airbag is only fully inflated if a second
threshold is reached within a few millisec-
onds due to the control unit having detected
further deceleration.
Criteria for triggering belt tensioners and
airbags
In the first stage of a collision, the airbag con-
trol unit evaluates the duration and direction
of vehicle acceleration or deceleration in
order to determine whether it is necessary to
trigger the belt tensioner and/or airbag.
The belt tensioner and airbag triggering
thresholds are variable and are adapted to the
rate of deceleration of the vehicle. This proc- Safety
219_AKB; 2; 4, en-GB
mkalafa,
2007-11-13T09:28:36+01:00 - Seite 43 Z
Page 65 of 329
Anti-theft systems
62 Tow-away protection*
An audible and visual alarm is triggered if your
vehicle's angle of inclination is altered while
tow-away protection is primed. This happens
if the vehicle is jacked up on one side, for
example.
Priming tow-away protection X
Lock the vehicle using the key. On vehicles
with KEYLESS GO*, the locking button on
the door handle/boot lid can also be used.
Tow-away protection is primed after
approximately 30 seconds.
To deactivate tow-away protection When you unlock your vehicle using the key
or KEYLESS GO*, tow-away protection is
automatically deactivated.
Deactivate tow-away protection manually to
prevent a false alarm if your vehicle:
R
is being transported
R is being loaded, e.g. onto a ferry or car
transporter
R is being parked on a movable surface, e.g.
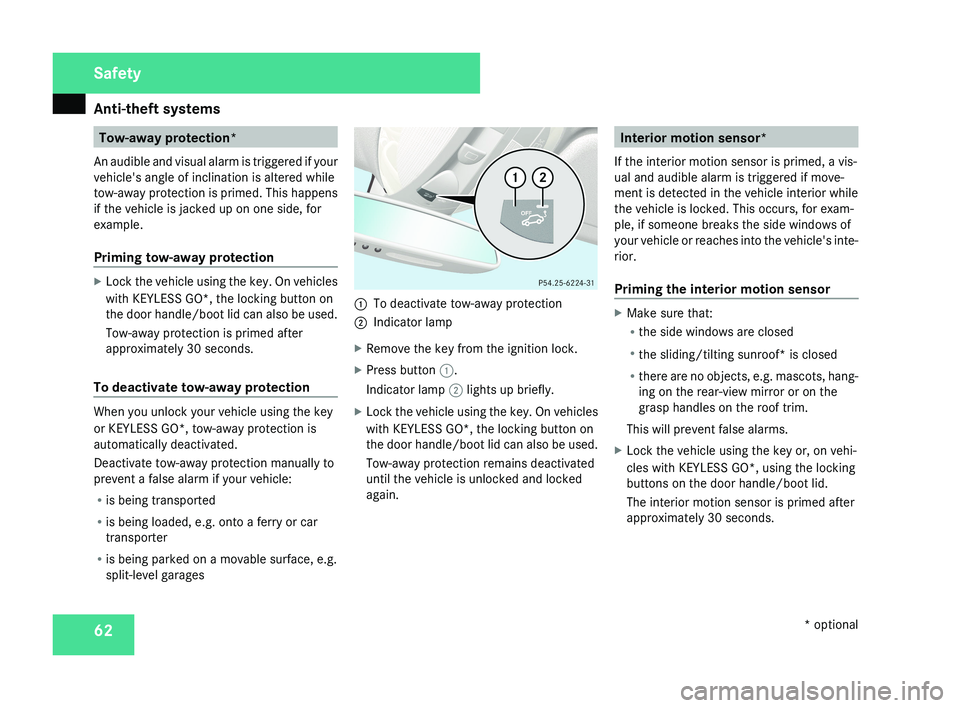
split-level garages 1
To deactivate tow-away protection
2 Indicator lamp
X Remove the key from the ignition lock.
X Press button 1.
Indicator lamp 2 lights up briefly.
X Lock the vehicle using the key. On vehicles
with KEYLESS GO*, the locking button on
the door handle/boot lid can also be used.
Tow-away protection remains deactivated
until the vehicle is unlocked and locked
again. Interior motion sensor*
If the interior motion sensor is primed, a vis-
ual and audible alarm is triggered if move-
ment is detected in the vehicle interior while
the vehicle is locked. This occurs, for exam-
ple, if someone breaks the side windows of
your vehicle or reaches into the vehicle's inte-
rior.
Priming the interior motion sensor X
Make sure that:
R
the side windows are closed
R the sliding/tilting sunroof* is closed
R there are no objects, e.g. mascots, hang-
ing on the rear-view mirror or on the
grasp handles on the roof trim.
This will prevent false alarms.
X Lock the vehicle using the key or, on vehi-
cles with KEYLESS GO*, using the locking
buttons on the door handle/boot lid.
The interior motion sensor is primed after
approximately 30 seconds. Safety
* optional
219_AKB; 2; 4, en-GB
mkalafa,
2007-11-13T09:28:36+01:00 - Seite 62
Page 99 of 329
Lights
96When in reverse gear: the cornering light on
the outside of the bend comes on.
Switching off X
Switch off the turn signal.
i The cornering light is activated until you
turn the steering wheel back to the straight-
ahead position and the turn signal switches
off. The cornering light may remain lit for a
short time, but no more than three minutes.
It then goes out, even if the turn signal is
still switched on. Interior lighting
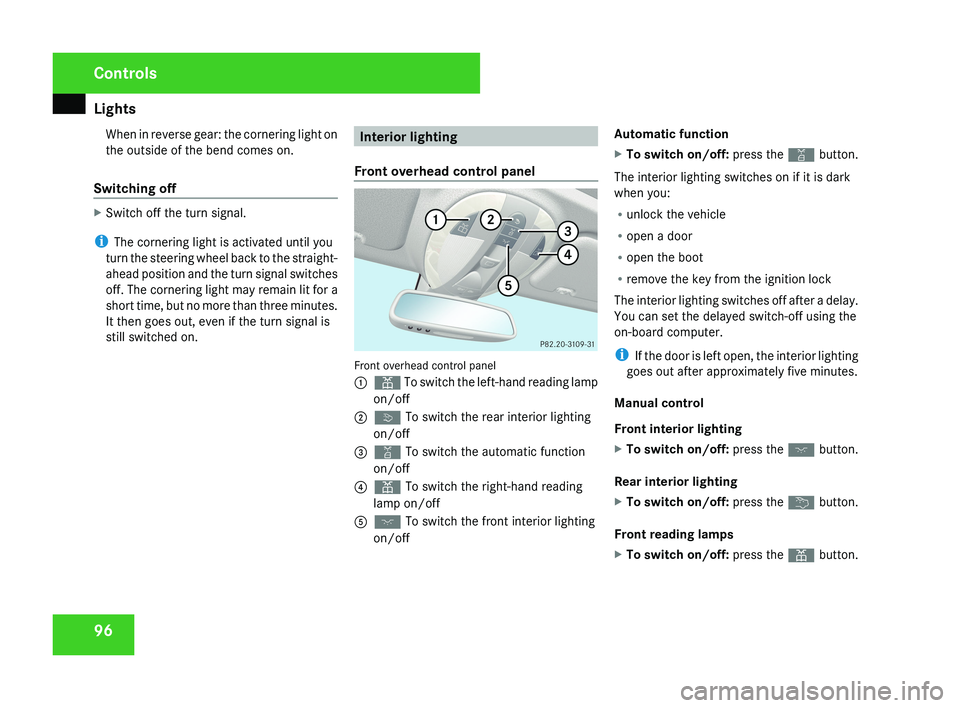
Front overhead control panel Front overhead control panel
1
X To switch the left-hand reading lamp
on/off
2 ò To switch the rear interior lighting
on/off
3 ¡ To switch the automatic function
on/off
4 X To switch the right-hand reading
lamp on/off
5 ð To switch the front interior lighting
on/off Automatic function
X
To switch on/off: press the ¡ button.
The interior lighting switches on if it is dark
when you:
R unlock the vehicle
R open a door
R open the boot
R remove the key from the ignition lock
The interior lighting switches off after a delay.
You can set the delayed switch-off using the
on-board computer.
i If the door is left open, the interior lighting
goes out after approximately five minutes.
Manual control
Front interior lighting
X To switch on/off: press the ð button.
Rear interior lighting
X To switch on/off: press the ¦ button.
Front reading lamps
X To switch on/off: press the X button. Controls
219_AKB; 2; 4, en-GB
mkalafa,
2007-11-13T09:28:36+01:00 - Seite 96
Page 129 of 329
On-board computer
126
X
Press the æ or ç button to switch
the Surround lighting function on or
off.
X Press the j, è or ÿ button to
select a different display.
Setting the ambient lighting X
Press the è or · button to select the
Settings... menu.
X Press the j
button to call up the selec-
tion of submenus.
X Press the æ
or ç button to select the
Lighting submenu.
X Press the j button to select Ambient
light.
X Press the æ
or ç button to adjust the
brightness to any level from 0 (off) to 5
(bright).
X Press the j, è or ÿ button to
select a different display.
Activating or deactivating the exterior
lighting delayed switch-off You can set whether the exterior lighting
should remain on for 15 seconds after the doors are closed when it is dark using the
Headlamps delayed switch-off function.
If none of the doors are opened after the
engine
is switched off or if an open door is not
closed, the exterior lighting goes out after
60 seconds.
When you have set a delayed switch-off time
and then switch off the engine, the following
remain lit:
R the side lamps
R the tail lamps
R the licence plate lighting
R the front foglamps
R the lights* in the exterior mirrors
X Press the è
or · button to select the
Settings... menu.
X Press the j
button to call up the selec-
tion of submenus.
X Press the æ
or ç button to select the
Lighting submenu.
X Press the j
button to select Headlamps
delayed switch-off. X
Press the æ or ç button to activate
or deactivate the Headlamps delayed
switch-off feature.
X Press the j, è or ÿ button to
select a different display.
To temporarily deactivate the delayed switch-
off:
X Before leaving the vehicle, turn the key to
position 0 in the ignition lock.
X Turn the key to position 2 in the ignition
lock and back to position 0.
Delayed
switch-off is deactivated. It is reac-
tivated as soon as you start the engine
again.
Activating or deactivating the interior
lighting delayed switch-off The
Interior
lighting delayed switch-
off function allows you to set whether the
interior lighting should remain on for 10 sec-
onds after the key is removed from the igni-
tion lock when it is dark.
X Press the è
or · button to select the
Settings... menu.
X Press the j
button to call up the selec-
tion of submenus. Controls
* optional
219_AKB; 2; 4, en-GB
mkalafa,
2007-11-13T09:28:36+01:00 - Seite 126
Page 162 of 329
Air conditioning
159
X
To switch on: press the œ button.
The indicator lamp in the œ button
comes on.
X To deactivate: press the œ button.
The indicator lamp in the œ button goes
out. The cooling with air dehumidification
function has a delayed switch-off feature.
i The cooling with air dehumidification
function in the rear compartment is only
operative if the 4-zone Thermotronic cool-
ing with air dehumidification function* is
switched on. Controlling the air conditioning auto-
matically
In automatic mode, the set temperature is
maintained at a constant level fully automat-
ically. To do so, the system automatically
regulates the temperature of the dispensed
air, the airflow and the air distribution.
The automatic air conditioning will achieve
optimal operation if "cooling with air dehu-
midification" is also activated. If necessary,
cooling
with air dehumidification can be deac-
tivated. X
Make sure that the key is in position 2 in
the ignition lock.
X Set the desired temperature.
X To activate: press the U button.
The AUTO
display for the air distribution and
airflow comes on. The indicator lamp 22
on
the U button lights up. Airflow and air
distribution are set to automatic mode.
X To deactivate: press the Q or ·
button.
The AUTO display for the airflow goes out.
The automatic control is deactivated and
the airflow is controlled according to the
selected
setting. Automatic air distribution
remains activated.
or
X 2-zone Thermatic only: press
the © or
ª air distribution button.
The AUTO display for the air distribution
goes out. The automatic control is deacti-
vated and the air distribution is controlled
according to the selected setting. Auto-
matic airflow remains activated. or
X
4-zone Thermotronic only*: turn air dis-
tribution thumbwheel 1 or 7 to the
desired symbol
(Y page 155).
The indicator lamp in the U button goes
out. The automatic control is deactivated
and the air distribution is controlled
according to the selected setting. Auto-
matic airflow remains activated. Setting the temperature
2-zone Thermatic Different temperatures can be set for the
driver's and front-passenger sides.
X
To increase/reduce: turn thumbwheels
1 and 7 clockwise or anti-clockwise
(Y
page 153). Only change the temperature
setting in small increments. Start at 22 †.
4-zone Thermotronic* The interior temperature for each of the four
air-conditioning zones can be adjusted sepa-
rately.
22 Only for vehicles with 4-zone Thermotronic*. Controls
* optional
219_AKB; 2; 4, en-GB
mkalafa,
2007-11-13T09:28:36+01:00 - Seite 159 Z
Page 167 of 329
Air conditioning
164 Windows misted up
Windows misted up on the inside X
Activate the "cooling function with air-
dehumidification" function.
X Activate the automatic mode.
X If the windows continue to mist up, activate
the "demisting" function.
Windows misted up on the outside X
Activate the windscreen wipers.
X 2-zone Thermatic: press and hold the
© or ª button until the a, Ú
or Y symbol is shown in the display.
X 4-zone Thermotronic*: turn the thumb-
wheel for air distribution to the Y or
a symbol.
i You should only select this setting until
the windscreen is clear again. Switching the rear window heating
on/off
G
Risk of accident
Clear all windows of ice or snow before set-
ting off. Impaired visibility could otherwise
endanger yourself and others.
i At very low temperatures, the rear win-
dow heating is only switched on once the
vehicle interior has warmed up.
i The rear window heating has a high cur-
rent draw. You should therefore switch it
off
as soon as the window is clear, as it only
switches itself off automatically after
between six and twenty minutes.
i If the battery voltage is too low, the rear
window heating may switch off.
X Make sure that the key is in position 2 in
the ignition lock.
X Press the ¯ button.
The
indicator lamp in the ¯ switch lights
up or goes out. Activating/deactivating air-recircula-
tion mode
You can deactivate the flow of fresh air if
unpleasant odours are entering the vehicle
from outside. The air already inside the vehi-
cle will then be recirculated. G
Risk of accident
Only switch over to air-recirculation mode
briefly
at low outside temperatures. Other-
wise, the windows could mist up, thus
impairing visibility and endangering your-
self and others. This may prevent you from
observing the traffic conditions, thereby
causing an accident.
X To activate: press the , button.
The indicator lamp in the , button
comes on.
i Air-recirculation mode is activated auto-
matically at high outside temperatures.
When air-recirculation mode is activated
automatically, the indicator lamp in
the , button is not lit.
Outside air is added after about 30
minutes. Controls
* optional
219_AKB; 2; 4, en-GB
mkalafa,
2007-11-13T09:28:36+01:00 - Seite 164