2008 MERCEDES-BENZ CLS COUPE mirror controls
[x] Cancel search: mirror controlsPage 68 of 329

65
Opening and closing
...........................66
Key positions ....................................... 74
Seats .................................................... 75
Steering wheel .................................... 81
Mirrors ................................................. 83
Memory functions* ............................. 86
Seat belts ............................................. 88
Lights ................................................... 91
Windscreen wipers .............................97
Side windows ...................................... 98Driving and parking ..........................
101
Transmission ..................................... 104
Instrument cluster ............................109
On-board computer ..........................111
Driving systems ................................ 132
Air conditioning ................................. 151
Sliding sunroof .................................. 169
Loading and stowing ........................172
Features ............................................. 180 Controls
219_AKB; 2; 4, en-GB
mkalafa,
2007-11-13T09:28:36+01:00 - Seite 65
Page 86 of 329
Mirrors
83Easy-entry/exit feature*
The Easy-entry/exit feature makes getting in
and out of your vehicle easier.
The steering wheel swings upwards when
you:
R remove the key from the ignition lock
R open the driver's door when the key is in
the ignition lock or in position 1
The steering wheel is moved automatically to
the position previously set when the key is
inserted into the ignition lock with the driver's
door closed. G
Risk of injury
Make sure that nobody can become trap-
ped when you activate the easy-entry/exit
feature.
If there is a risk of becoming trapped, stop
the adjustment procedure. To halt the pro-
cedure:
R press the steering-column adjustment
switch
R press one of the memory function posi-
tion buttons
The steering column stops moving immedi-
ately. Never leave children unsupervised in the
vehicle. They could open the driver's door
and thereby unintentionally activate the
easy-entry feature and become trapped.
The most recent position of the steering
wheel is stored when you switch off the igni-
tion or when you store a memory position
(Y page 86).
You can activate and deactivate the Easy-
entry/exit feature via the on-board computer
(Y page 128). Mirrors
Before starting off, adjust the mirrors in such
a way that you can get a good overview of
road and traffic conditions. Rear-view mirror
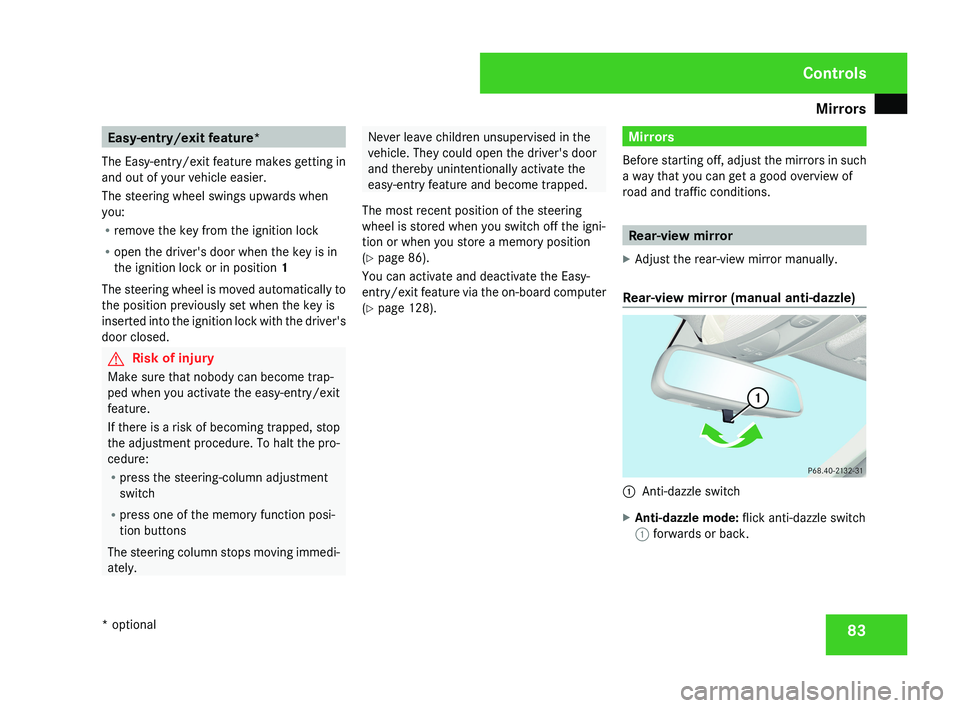
X Adjust the rear-view mirror manually.
Rear-view mirror (manual anti-dazzle) 1
Anti-dazzle switch
X Anti-dazzle mode: flick anti-dazzle switch
1 forwards or back. Controls
* optional
219_AKB; 2; 4, en-GB
mkalafa,
2007-11-13T09:28:36+01:00 - Seite 83
Page 87 of 329
Mirrors
84 Exterior mirrors
G
Risk of accident
The exterior mirrors reduce the size of the
image. Objects are actually closer than
they appear. You could misjudge the dis-
tance from vehicles driving behind and
cause an accident, e.g. when changing
lane. For this reason, make sure of the
actual distance from the vehicle driving
behind by glancing over your shoulder.
The convex exterior mirrors give a larger field
of vision.
At low outside temperatures, the exterior mir-
rors are heated automatically.
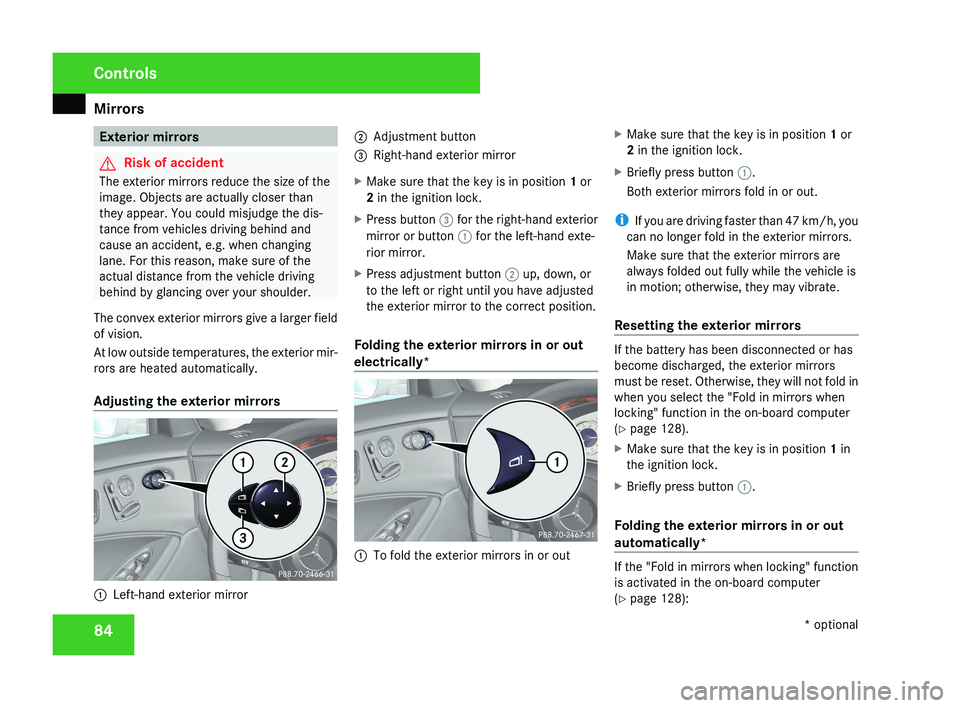
Adjusting the exterior mirrors 1
Left-hand exterior mirror 2
Adjustment button
3 Right-hand exterior mirror
X Make sure that the key is in position 1 or
2 in the ignition lock.
X Press button 3 for the right-hand exterior
mirror or button 1 for the left-hand exte-
rior mirror.
X Press adjustment button 2 up, down, or
to the left or right until you have adjusted
the exterior mirror to the correct position.
Folding the exterior mirrors in or out
electrically* 1
To fold the exterior mirrors in or out X
Make sure that the key is in position 1 or
2 in the ignition lock.
X Briefly press button 1.
Both exterior mirrors fold in or out.
i If you are driving faster than 47 km/h, you
can no longer fold in the exterior mirrors.
Make sure that the exterior mirrors are
always folded out fully while the vehicle is
in motion; otherwise, they may vibrate.
Resetting the exterior mirrors If the battery has been disconnected or has
become discharged, the exterior mirrors
must be reset. Otherwise, they will not fold in
when you select the "Fold in mirrors when
locking" function in the on-board computer
(Y page 128).
X
Make sure that the key is in position 1 in
the ignition lock.
X Briefly press button 1.
Folding the exterior mirrors in or out
automatically* If the "Fold in mirrors when locking" function
is activated in the on-board computer
(Y page 128):Controls
* optional
219_AKB; 2; 4, en-GB
mkalafa,
2007-11-13T09:28:36+01:00 - Seite 84
Page 88 of 329
Mirrors
85
R
The exterior mirrors fold in automatically as
soon as you lock the vehicle from the out-
side.
R The exterior mirrors fold out again auto-
matically as soon as you unlock the vehicle
and then open the driver's or front-
passenger door.
i If you have activated this function and fold
in the exterior mirrors using button 1, they
will not be folded out automatically. You
can then only fold out the exterior mirrors
using button 1. Automatic anti-dazzle mirrors*
The rear-view mirror and the exterior mirror
on the driver's side automatically go into anti-
dazzle mode if the ignition is switched on and
incident light from headlamps strikes the sen-
sor in the rear-view mirror.
The mirrors do not go into anti-dazzle mode if
reverse gear is engaged and the interior light-
ing is switched on. G
Risk of accident
If the incident light from headlamps cannot
strike the sensor in the rear-view mirror, for
instance when the rear window blind* is extended, the mirrors' automatic anti-daz-
zle function will not operate.
Incident light could then dazzle you. This
may prevent you from observing the traffic
conditions, thereby causing an accident. In
this case, adjust the rear-view mirror man-
ually.
G
Risk of injury
Electrolyte may escape if the glass in an
automatic anti-dazzle mirror breaks.
Electrolyte is an aggressive irritant and
must not be allowed to come into contact
with your skin, eyes or respiratory organs.
If electrolyte comes into contact with your
eyes or skin, rinse thoroughly with clean
water immediately. Consult a doctor if nec-
essary.
! If electrolyte comes into contact with the
vehicle paintwork, immediately rinse off
the undried liquid completely with clean
water. It will otherwise result in damage to
the paintwork. Parking aid*
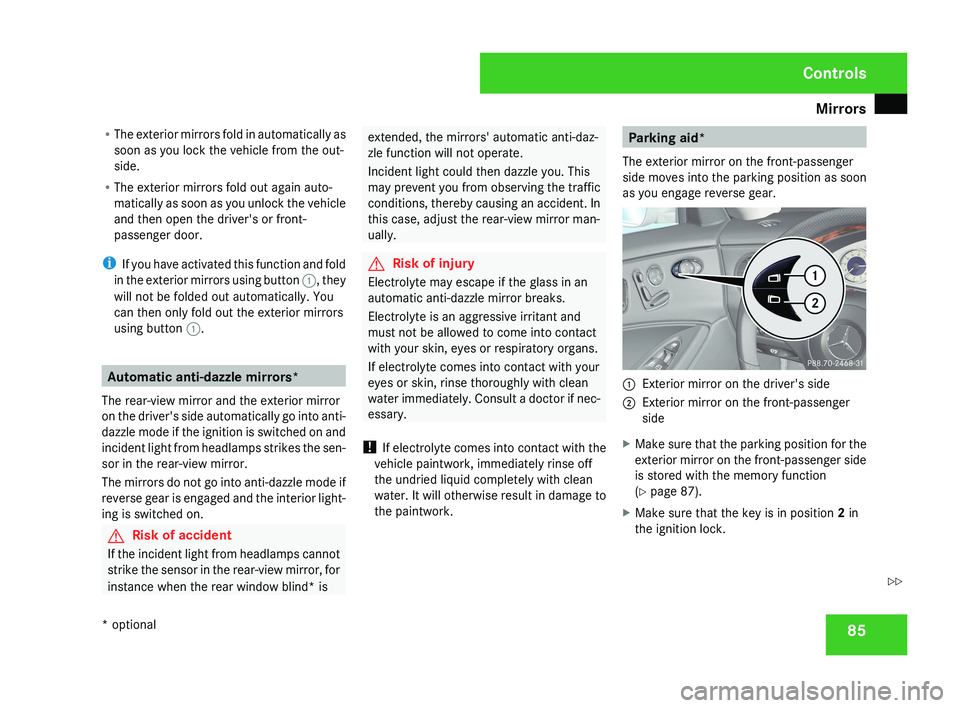
The exterior mirror on the front-passenger
side moves into the parking position as soon
as you engage reverse gear.1 Exterior mirror on the driver's side
2 Exterior mirror on the front-passenger
side
X Make sure that the parking position for the
exterior mirror on the front-passenger side
is stored with the memory function
(Y page 87).
X Make sure that the key is in position 2 in
the ignition lock.
Controls
* optional
219_AKB; 2; 4, en-GB
mkalafa,
2007-11-13T09:28:36+01:00 - Seite 85
Z
Page 89 of 329
Memory functions*
86
X
Make sure that button 2 for the exterior
mirror on the front-passenger side is
pressed.
X Engage reverse gear.
The exterior mirror on the front-passenger
side moves to the stored parking position.
The exterior mirror on the front-passenger
side moves back to its original position:
R as soon as you exceed a speed of
10 km/h
R about ten seconds after you have disen-
gaged reverse gear
R if you press button 1 for the exterior mir-
ror on the driver's side Memory functions*
Storing settings
You can store up to three different settings
using the memory button.
The following settings are stored as a single
memory preset:
R Position of the seat, backrest and head
restraint
R Dynamic driving seat*: activated/deacti-
vated
R Driver's side: steering-wheel position
R Driver's side: position of the exterior mir-
rors on the driver's and front-passenger
sides G
Risk of injury
The memory function can also be used
when the key has been removed. For this
reason, children should never be left unsu-
pervised in the vehicle. They could other-
wise become trapped when moving the
seat or the steering wheel. G
Risk of accident
Only activate the memory function on the
driver’s side when the vehicle is stationary.
You could otherwise be distracted from the traffic conditions by the steering wheel and
seat moving of their own accord, and as a
result cause an accident.
! If PRE-SAFE ®
* has been activated, the
front-passenger seat is moved to a more
favourable position. When you move the
seat, make sure that there are no objects
in the footwell or behind the seats. Other-
wise, you could damage the seats and the
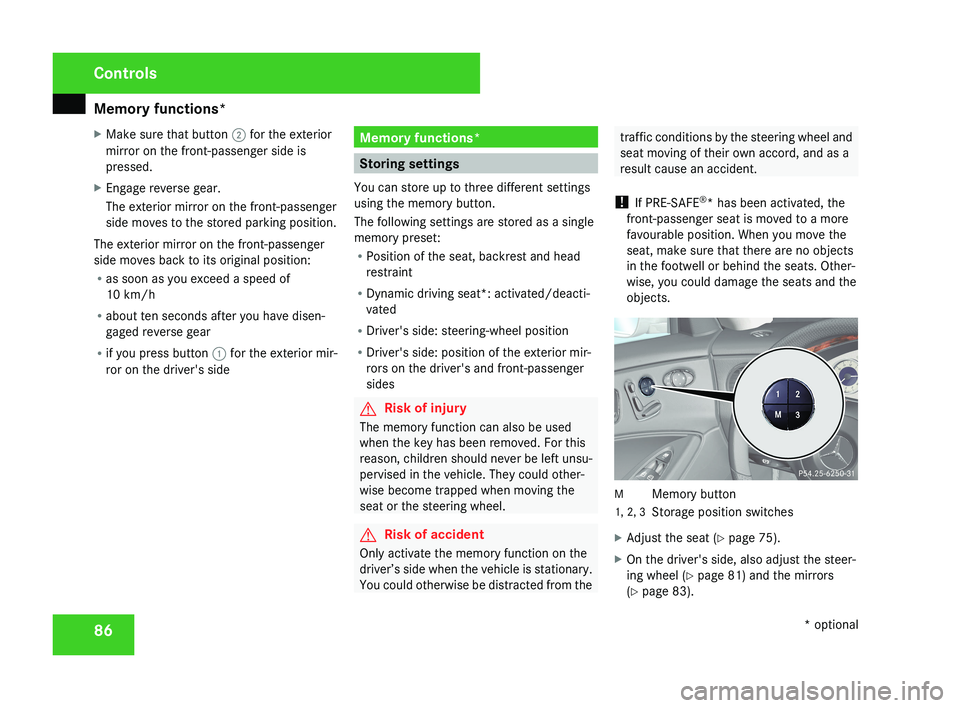
objects.M Memory button
1, 2, 3 Storage position switches
X Adjust the seat ( Y page 75).
X On the driver's side, also adjust the steer-
ing wheel ( Y page 81) and the mirrors
(Y page 83).
Controls
* optional
219_AKB; 2; 4, en-GB
mkalafa,
2007-11-13T09:28:36+01:00 - Seite 86
Page 90 of 329
Memory functions*
87
X
Press the M memory button.
X Press one of storage position switches 1,
2 or 3 within three seconds.
The settings are stored in the selected pre-
set position. A tone sounds when the set-
tings have been completed. Calling up a stored setting
G
Risk of accident
Only activate the memory function on the
driver’s side when the vehicle is stationary.
You could otherwise be distracted from the
traffic conditions by the steering wheel and
seat moving of their own accord, and as a
result cause an accident.
X Press and hold the relevant storage posi-
tion switch 1, 2 or 3 until the seat, steering
wheel and mirrors are in the stored posi-
tion.
i The setting procedure is interrupted as
soon as you release the storage position
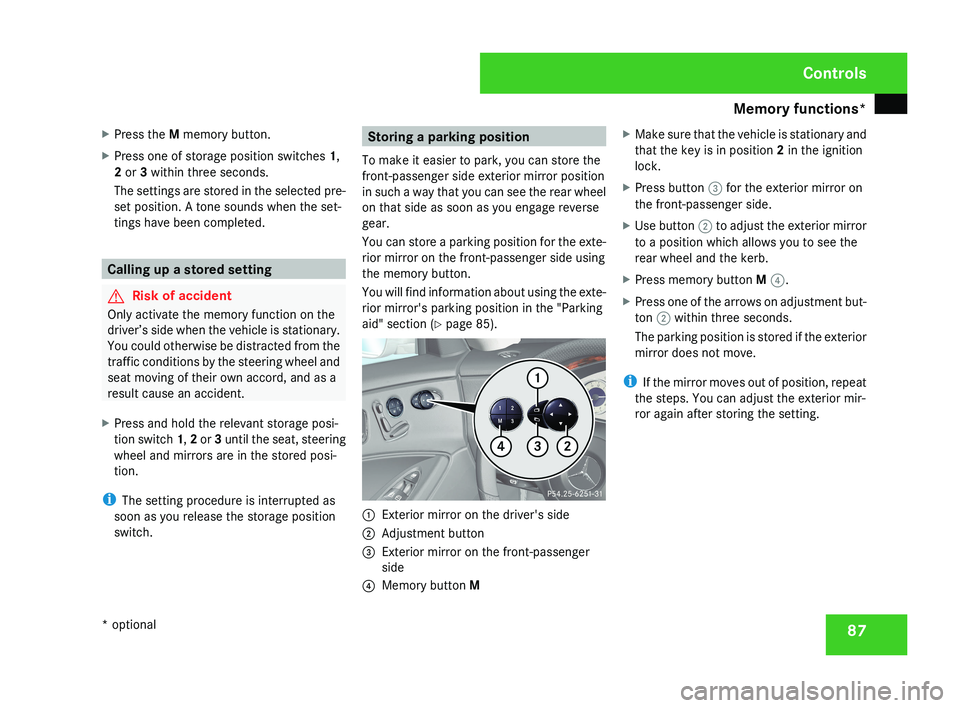
switch. Storing a parking position
To make it easier to park, you can store the
front-passenger side exterior mirror position
in such a way that you can see the rear wheel
on that side as soon as you engage reverse
gear.
You can store a parking position for the exte-
rior mirror on the front-passenger side using
the memory button.
You will find information about using the exte-
rior mirror's parking position in the "Parking
aid" section ( Y page 85).1
Exterior mirror on the driver's side
2 Adjustment button
3 Exterior mirror on the front-passenger
side
4 Memory button M X
Make sure that the vehicle is stationary and
that the key is in position 2 in the ignition
lock.
X Press button 3 for the exterior mirror on
the front-passenger side.
X Use button 2 to adjust the exterior mirror
to a position which allows you to see the
rear wheel and the kerb.
X Press memory button M 4.
X Press one of the arrows on adjustment but-
ton 2 within three seconds.
The parking position is stored if the exterior
mirror does not move.
i If the mirror moves out of position, repeat
the steps. You can adjust the exterior mir-
ror again after storing the setting.
Controls
* optional
219_AKB; 2; 4, en-GB
mkalafa,
2007-11-13T09:28:36+01:00 - Seite 87
Page 126 of 329
On-board computer
123Vehicle submenu
R
Permanent Speedtronic (Y page 144)
R Automatic locking feature ( Y page 127)Heater* submenu
R
Selecting
the switch-on time for the aux-
iliary heating* ( Y page 127)
R Changing the switch-on time for the aux-
iliary heating* ( Y page 128) Convenience submenu*
R
Easy-entry/exit feature* ( Y page 128)
R Fold in mirrors when locking the vehi-
cle* ( Y page 128) Dynamic driving seat* submenu
R
Settings for the driver's and front-
passenger seat ( Y page 129) Selecting the unit of measurement for
distance
The selected unit of measurement for dis-
tance applies to:
R
the total distance recorder and the trip
meter
R the trip computer
R the digital speedometer 18
R cruise control
R Speedtronic
R Distronic*
X Press the è
or · button to select the
Settings... menu.
X Press the j
button to call up the selec-
tion of submenus.
X Press the æ
or ç button to select the
Inst. cluster submenu.
X Press the j button to select Display
unit Speed-/odometer. X
Press the æ or ç button to select
km (kilometres) or miles as the unit of
measurement for distance.
X Press the j, è or ÿ button to
select a different display.
Selecting the language X
Press the è
or · button to select the
Settings... menu.
X Press the j
button to call up the selec-
tion of submenus.
X Press the æ
or ç button to select the
Inst. cluster submenu.
X Press the j button to select Lan-
guage.
X Press the æ or ç button to select a
language:
R Deutsch
R English
R Français
R Italiano
R Español
R Nederlands
18 Vehicles for the United Kingdom: the digital speedometer always displays
km/h. Controls
* optional
219_AKB; 2; 4, en-GB
mkalafa,
2007-11-13T09:28:36+01:00 - Seite 123 Z
Page 128 of 329
On-board computer
125
X
Press the è or · button to select the
Settings... menu.
X Press the j
button to call up the selec-
tion of submenus.
X Press the æ
or ç button to select the
Time/Date submenu.
Setting the time
X Use j to select Clock, hours Con-
firm by press. R (or Clock, minutes
Confirm by press. R).
X Press the æ or ç button to set a
value.
X Press the reset button on the left of the
instrument cluster.
The set time is stored.
Setting the date
X Press the j
button to select Set date
Day (or Set date Month or Set date
Year).
X Press the æ or ç button to set the
values.
X Press the j, è or ÿ button to
select a different display. Setting constant headlamp mode If you have set constant headlamp mode and
the light switch is in position M orU,
the
side lamps, dipped-beam headlamps and
licence plate lighting are switched on auto-
matically when the engine is running. Turning
the light switch to a different position
switches on the corresponding lights.
For safety reasons, it is only possible to set
this function when the vehicle is stationary.
In countries in which constant headlamp
mode is a legal requirement, Constant is the
factory setting.
X Press the è
or · button to select the
Settings... menu.
X Press the j
button to call up the selec-
tion of submenus.
X Press the æ
or ç button to select the
Lighting submenu.
X Press the j button to select Headlamp
mode.
X Press the æ or ç button to set the
mode
for the headlamps to Manual or Con-
stant (constant headlamp mode).
X Press the j, è or ÿ button to
select a different display. Switching the surround lighting on or
off If the surround lighting is switched on, the
following lights will be switched on automat-
ically
in the dark after you have unlocked the
vehicle using the key:
R the side lamps
R the tail lamps
R the licence plate lighting
R the front foglamps
R the lights* in the exterior mirrors
The surround lighting switches off automati-
cally if you open the driver's door or after 40
seconds.
X Press the è
or · button to select the
Settings... menu.
X Press the j
button to call up the selec-
tion of submenus.
X Press the æ
or ç button to select the
Lighting submenu.
X Press the j button to select the Sur-
round lighting function. Controls
* optional
219_AKB; 2; 4, en-GB
mkalafa,
2007-11-13T09:28:36+01:00 - Seite 125 Z