2008 MERCEDES-BENZ CLS COUPE engine oil
[x] Cancel search: engine oilPage 9 of 329
6
Door
Automatic locking . . . . . . . . . . . . . . 69
Display message . . . . . . . . . . . . . . 229
Emergency locking . . . . . . . . . . . . . 267
Emergency unlocking . . . . . . . . . . . 266
Opening (from the inside) . . . . . . . . 69
Door control panel
Overview . . . . . . . . . . . . . . . . . . . . . 37
Drinks holder
see Cup holder
Driver's airbag . . . . . . . . . . . . . . . . . . . 46
Driver's door Unlocking (KEYLESS GO) . . . . . . . . . 69
Driver's seat position . . . . . . . . . . . . . 90
Driving abroad . . . . . . . . . . . . . . . . . . 208
Driving safety system . . . . . . . . . . . . . 57 ABS . . . . . . . . . . . . . . . . . . . . . . . . . 57
ADAPTIVE BRAKE . . . . . . . . . . . . . . . 60
Adaptive brake lamps . . . . . . . . . . . 58
BAS . . . . . . . . . . . . . . . . . . . . . . . . . 58
EBV . . . . . . . . . . . . . . . . . . . . . . . . . 60
ESP ®
. . . . . . . . . . . . . . . . . . . . . . . . 59
Driving system . . . . . . . . . . . . . . . . . . 132
Airmatic DC . . . . . . . . . . . . . . . . . . 146
Cruise control . . . . . . . . . . . . . . . . 132
Distronic . . . . . . . . . . . . . . . . . . . . 135
HOLD . . . . . . . . . . . . . . . . . . . . . . . 144
Parktronic . . . . . . . . . . . . . . . . . . . 148
Speedtronic . . . . . . . . . . . . . . . . . . 142 Driving tip
Braking . . . . . . . . . . . . . . . . . . . . . . 206
Distronic . . . . . . . . . . . . . . . . . . . . 141
Driving abroad . . . . . . . . . . . . . . . . 208
Driving on flooded roads . . . . . . . . 208
Driving on wet roads . . . . . . . . . . . 208
Winter . . . . . . . . . . . . . . . . . . . . . . 205
DVD audio
Operation (on-board computer) . . . 119
DVD video
Operation (on-board computer) . . . 120
Dynamic driving seat . . . . . . . . . . . . . 79
Select Seat adjustment (on-board
computer) . . . . . . . . . . . . . . . . . . . 129 E
Easy-entry/exit feature Activating/deactivating (on-
board computer)
. . . . . . . . . . . . . . 128
Easy-entry feature . . . . . . . . . . . . . . . . 83
Easy-exit feature . . . . . . . . . . . . . . . . . 83
EBV (electronic brake-power distri-
bution) . . . . . . . . . . . . . . . . . . . . . . . . . 60
Display message . . . . . . . . . . . . . . 231
Electrical/electronic equipment
Retrofitting . . . . . . . . . . . . . . . . . . . 299
Electronic brake-power distribution
see EBV Electronic Stability Program
see ESP ®
e mark . . . . . . . . . . . . . . . . . . . . . . . . . 299
Emergency key element Lost . . . . . . . . . . . . . . . . . . . . . . . . 261
Emergency locking
Vehicle . . . . . . . . . . . . . . . . . . . . . . 267
Emergency running mode
Automatic transmission . . . . . . . . . 257
Emergency unlocking
Boot . . . . . . . . . . . . . . . . . . . . . . . . 267
Vehicle . . . . . . . . . . . . . . . . . . . . . . 266
Engine
Display message . . . . . . . . . . . . . . 237
Running irregularly . . . . . . . . . . . . . 256
Starting problems . . . . . . . . . . . . . 255
Starting with KEYLESS GO . . . . . . . 102
Starting with the key . . . . . . . . . . . 101
Technical data . . . . . . . . . . . . . . . . 302
Engine diagnostic warning lamp . . . 247
Engine electronics . . . . . . . . . . . . . . . 299
Malfunction . . . . . . . . . . . . . . . . . . 255
Engine number . . . . . . . . . . . . . . . . . . 301
Engine oil . . . . . . . . . . . . . . . . . . . . . . 314
Checking the oil level (dipstick) . . . 195
Consumption . . . . . . . . . . . . . . . . . 195
Display message . . . . . . . . . . . . . . 237
Filler neck . . . . . . . . . . . . . . . . . . . 195 Index
219_AKB; 2; 4, en-GB
mkalafa,
2007-11-13T09:28:36+01:00 - Seite 6
Page 16 of 329
13
Vehicle dimensions
. . . . . . . . . . . . 309
Vehicle weights . . . . . . . . . . . . . . . 310
Wheels . . . . . . . . . . . . . . . . . . . . . . 305
Telephone
see Mobile phone
Temperature
Engine oil (on-board computer) . . . 116
Outside temperature . . . . . . . . . . . 111
Thermatic
Malfunction indicator lamp . . . . . . 242
Thermotronic
Malfunction indicator lamp . . . . . . 242
Third brake lamp
Display message . . . . . . . . . . . . . . 234
Tightening torque . . . . . . . . . . . . . . . 286
Time Lap time (on-board computer) . . . . 117
Setting (on-board computer) . . . . . 124
Setting the time (on-board com-
puter) . . . . . . . . . . . . . . . . . . . . . . . 124
Timer (on-board computer) . . . . . . . 117
TIREFIT kit Storage location . . . . . . . . . . . . . . . 217
Using . . . . . . . . . . . . . . . . . . . . . . . 277
Total distance recorder
. . . . . . . . . . . . . . . . . . . . . . . . . . . . . 27, 29
Resetting the trip meter . . . . . . . . . 110
Tow-away protection . . . . . . . . . . . . . . 62
Towing . . . . . . . . . . . . . . . . . . . . . . . . 294 Towing eye
Fitting . . . . . . . . . . . . . . . . . . . . . . . 294
Removing . . . . . . . . . . . . . . . . . . . . 295
Transmission output (maximum)
Telephone/two-way radio . . . . . . . 299
Transport (vehicle) . . . . . . . . . . . . . . 295
Trip computer
Menu (on-board computer) . . . . . . 129
Trip meter . . . . . . . . . . . . . . . . . . . . . . 115
Resetting . . . . . . . . . . . . . . . . . . . . 110
Turn signal lamps
Display message . . . . . . . . . . 233, 234
TV
Operation (on-board computer) . . . 119
Two-way radio
Installation . . . . . . . . . . . . . . . . . . . 299
Tyre grip . . . . . . . . . . . . . . . . . . . . . . . 207
Tyre pressure . . . . . . . . . . . . . . . . . . 200
Calling up (on-board computer) . . 202
Display message . . . . . . . . . . 224, 237
Tyre pressure loss warning system 201
Tyre pressure monitor Warning lamp . . . . . . . . . . . . . . . . . 248
Tyre pressures
Table . . . . . . . . . . . . . . . . . . . . . . . 304
Tyres
Direction of rotation . . . . . . . . . . . . 199
General notes . . . . . . . . . . . . . . . . . 198
Technical data . . . . . . . . . . . . . . . . 305
Tyre tread . . . . . . . . . . . . . . . . . . . . . . 200 U
Unit for distance Setting (on-board computer)
. . . . . 123
Unladen weight . . . . . . . . . . . . . . . . . 310
Unlocking Emergency unlocking . . . . . . . . . . . 266
From the inside (central unlocking
button) . . . . . . . . . . . . . . . . . . . . . . . 70
Up (display message) . . . . . . . . . . . . 116 V
Variable Speedtronic . . . . . . . . . . . . .
142
Vehicle Emergency unlocking . . . . . . . 266, 267
Individual settings (on-board com-
puter) . . . . . . . . . . . . . . . . . . . . . . . 121
Leaving parked up . . . . . . . . . . . . . 265
Towing . . . . . . . . . . . . . . . . . . . . . . 294
Transporting . . . . . . . . . . . . . . . . . . 295
Vehicle battery . . . . . . . . . . . . . . . . . 288
Vehicle dimensions . . . . . . . . . . . . . . 309
Vehicle electronics . . . . . . . . . . . . . . 299
Vehicle identification plates . . . . . . 300
Vehicle level Display message . . . . . . . . . . . . . . 229
Setting (AIRMATIC DC) . . . . . . . . . 146
Vehicle tool kit . . . . . . . . . . . . . . . . . . 217
Vehicle weights . . . . . . . . . . . . . . . . . 310 Index
219_AKB; 2; 4, en-GB
mkalafa,
2007-11-13T09:28:36+01:00 - Seite 13
Page 24 of 329

Exterior view
21Function Page
1 Boot
Opening and closing 70
Spare wheel 217
Vehicle tool kit 217
Vehicle battery 288
2 Rear lights
271
3 Rear window heating
164
4 Fuel filler flap
190
Fuel requirements 191
5 Opening and closing the
doors
66
6 Demisting the windscreen
163
Cleaning the windows 212
7
Sliding/tilting sunroof* 169
8 Exterior mirrors
84
Parking aid*
85 Function Page
9 Windscreen wipers, opera-
tion
97
Cleaning the wiper blades 211
Replacing the wiper blades 275
a Opening the bonnet
193
Engine oil 195
Coolant 196
b Front lights
271
c Fitting the front towing eye
293
d Tyres and wheels
198
Checking the tyre pressure 200
Flat tyre, fitting the spare
wheel
276
e Fitting the rear towing eye
293 At a glance
* optional
219_AKB; 2; 4, en-GB
mkalafa,
2007-11-13T09:28:36+01:00 - Seite 21
Page 119 of 329
On-board computer
116
Instead of outside temperature
1, you can
opt to display the digital speedome-
ter 14
(Y page 124).
You can select the following functions in the
Basic display menu by pressing the j or
k button:
R digital speedometer 15
R ASSYST PLUS service display
(Y page 209)
R outside temperature 15
R tyre pressure loss warning system
(Y page 201) or tyre pressure moni-
tor* (Y page 202)
Displaying the digital speedometer or
outside temperature You can use the
Basic display submenu
(Y page 124) to select whether the first func-
tion listed in the Basic display menu is the
digital speedometer or the outside tempera-
ture.
X Press the j or k button to select the
digital speedometer or the outside temper-
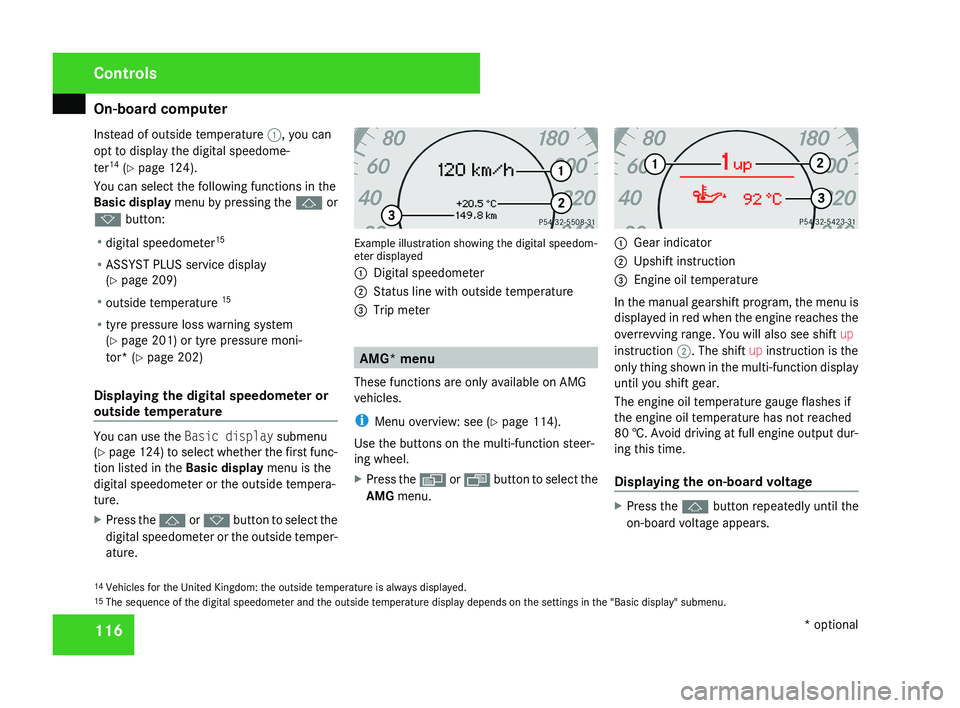
ature. Example illustration showing the digital speedom-
eter displayed
1
Digital speedometer
2 Status line with outside temperature
3 Trip meter AMG* menu
These functions are only available on AMG
vehicles.
i Menu overview: see ( Y page 114).
Use the buttons on the multi-function steer-
ing wheel.
X Press the è or · button to select the
AMG menu. 1
Gear indicator
2 Upshift instruction
3 Engine oil temperature
In the manual gearshift program, the menu is
displayed in red when the engine reaches the
overrevving range. You will also see shift up
instruction 2. The shift up instruction is the
only thing shown in the multi-function display
until you shift gear.
The engine oil temperature gauge flashes if
the engine oil temperature has not reached
80 †. Avoid driving at full engine output dur-
ing this time.
Displaying the on-board voltage X
Press the j button repeatedly until the
on-board voltage appears.
14 Vehicles for the United Kingdom: the outside temperature is always displayed.
15 The sequence of the digital speedometer and the outside temperature display depends on the settings in the "Basic display" submenu. Controls
* optional
219_AKB; 2; 4, en-GB
mkalafa,
2007-11-13T09:28:36+01:00 - Seite 116
Page 193 of 329
Refuelling
190 Running-in notes
The first 1,500 km
If you treat the engine with sufficient care
from the very start, it will reward you with
excellent performance for a very long period
afterwards.
R You should therefore drive at varying road
and engine speeds for the first 1,500 km
.
R Avoid heavy loads, e.g. driving at full throt-
tle, during this time. Do not exceed 2
/ 3 of
the maximum permissible engine speed for
each gear.
R Change gear in good time.
R Do not shift down a gear manually in order
to brake.
R Try to avoid depressing the accelerator
pedal beyond the pressure point (kick-
down).
R Only use ranges 3, 2 or 1 for slow driving,
e.g. in mountainous terrain.
After 1,500 km you may gradually bring the
vehicle up to full road and engine speeds.
Additional driving tips for AMG vehicles: R
Do not drive faster than
140 km/h for the
first 1,500 km.
R Only bring the engine up to a maximum
speed of 4,500 rpm for a brief period.
i You should also observe these notes if the
engine or rear axle transmission on your
vehicle has been replaced. AMG vehicles with a rear axle differ-
ential lock*
Your vehicle is equipped with a self-locking
differential
on the rear axle. To better protect
the differential gear on the rear axle, you
should perform an oil change after a running-
in phase of 3,000 km. This oil change will
increase the service life of your differential.
Have the oil change performed at a qualified
specialist workshop. Mercedes-Benz recom-
mends that you use a Mercedes-Benz Service
Centre for this purpose. Refuelling
Refuelling
G
Risk of explosion
Fuel is highly flammable. Fire, naked flames
and
smoking are therefore prohibited when
handling fuels.
Before refuelling, turn off the engine and
the auxiliary heating*. G
Risk of injury
Avoid any contact with fuels.
You can damage your health if your skin
comes
into direct contact with fuel or if you
inhale the vapour. G
Risk of fire
Do not use petrol to refuel vehicles with a
diesel
engine. Never mix diesel with petrol.
This would damage the fuel system and
engine and could result in a vehicle fire.
! Do not use petrol to refuel vehicles with a
diesel engine. Do not use diesel to refuel
vehicles with a petrol engine. Even small
amounts of the wrong fuel will damage the
injection system. Damage resulting from
adding the wrong fuel is not covered by the
warranty. Operation
* optional
219_AKB; 2; 4, en-GB
mkalafa,
2007-11-13T09:28:36+01:00 - Seite 190
Page 195 of 329
Refuelling
192
CLS 350 CGI !
Refuel using only unleaded premium
grade petrol with a minimum octane num-
ber of 95 RON/85 MON conforming to
European standard EN 228.
You could otherwise impair engine output
or damage the engine.
You
will find further information about pet-
rol under "Technical data" in the index.
i In some countries, only petrol of insuffi-
cient quality (high-sulphur fuel) may be
available. This fuel can temporarily produce
unpleasant odours, especially on short
journeys. Refuelling with petrol of sufficient
quality (sulphur-free fuel) will reduce such
odours.
AMG vehicles !
Refuel using only super unleaded petrol
with a minimum octane number of 98
RON/88 MON conforming to European
standard EN 228.
You could otherwise impair engine output
or damage the engine.
You
will find further information about pet-
rol under "Technical data" in the index. i
If the recommended fuel is not available
and
only as a temporary measure, you may
also use premium unleaded petrol,
95 RON/85 MON. This may reduce per-
formance and increase petrol consump-
tion. You must avoid driving at full throttle.
! In emergencies, only when the recom-
mended fuel is not available, you may also
use standard unleaded petrol, 91 RON/
82.5 MON. However, using this fuel results
in considerably higher petrol consumption
and significantly reduced performance.
Avoid driving at full throttle, and only drive
in drive program C.
If no fuel other than regular petrol fuel 91
RON/82.5 MON or a lower grade is per-
manently available, you should have the
vehicle adapted to run on this fuel by the
local after-sales service. Diesel (EN 590)
! Only use diesel that complies with the
EN 590 European standard.
You could otherwise impair engine output
or damage the engine.
You will find further information about die-
sel under "Fuel" in the index.
! When
refuelling vehicles with a diesel par-
ticle filter in countries outside the EU, only
low-sulphur Euro diesel with less than
0.005 percent sulphur content by weight
should be used. In countries in which diesel
with a higher sulphur content is available
(e.g. 0.035 percent by weight), the engine
oil should be renewed at more frequent
intervals. More information about intervals
for changing the engine oil can be obtained
from any Mercedes-Benz Service Centre.
! Using fuel that does not comply with EN
590 can increase wear and damage the
engine and the exhaust system. Do not use
the following:
R Marine diesel
R Heating oil
R Bio-diesel Operation
219_AKB; 2; 4, en-GB
mkalafa,
2007-11-13T09:28:36+01:00 - Seite 192
Page 196 of 329
Engine compartment
193
R
Vegetable oil
R Petrol
R Petroleum
R Kerosene
Do
not add such fuels to diesel fuel and do
not use any special additives (exception:
flow improvers – see "Low outside temper-
atures").
Damage caused by the use of unapproved
fuels or additives is not covered by the war-
ranty.
Low outside temperatures The flow properties of diesel may be insuffi-
cient at low ambient temperatures.
To prevent operating problems, diesel fuel
with improved cold flow qualities is available
during the winter months. Your vehicle must
be
refuelled with this winter diesel at temper-
atures of -5 °C or below.
You can use this winter diesel at tempera-
tures down to about -20 °C without problems.
If only summer diesel fuel or less cold-resist-
ant winter diesel fuel (e.g. in Mediterranean
regions) is available, you should add an
amount of flow improver to the fuel corre-
sponding to the outside temperature. Mix the additive with the diesel in good time,
before the flow properties of the diesel
become
insufficient. Otherwise, malfunctions
can only be rectified by heating the entire fuel
system, e.g. by parking the vehicle in a heated
garage. G
Risk of fire
Do not use petrol to refuel vehicles with a
diesel
engine. Never mix diesel with petrol.
This would damage the fuel system and
engine and could result in a vehicle fire.
Flow improver
The effectiveness of a flow improver is not
guaranteed with every fuel. Observe the infor-
mation provided by the manufacturer when
using a flow improver. Only use flow improv-
ers that have been tested and approved by
Mercedes-Benz. Information about flow
improvers that have been tested and
approved by Mercedes-Benz can be obtained
from any Mercedes-Benz Service Centre. Engine compartment
Bonnet
G
Risk of accident
Do not pull the release lever while the vehi-
cle is in motion. The bonnet could other-
wise open.
Opening G
Risk of injury
There is a risk of injury if the bonnet is open,
even if the engine is not running.
Some engine components can become
very hot.
To
avoid the risk of burns, only touch those
components described in the Owner’s Man-
ual and observe the relevant safety notes. G
Risk of injury
The radiator fan between the radiator and
the engine can start automatically, even if
the
key has been removed from the ignition
lock. For this reason you must not reach
into the turning area of the fan. You could
otherwise sustain an injury.
Vehicles with a petrol engine: Operation
219_AKB; 2; 4, en-GB
mkalafa,
2007-11-13T09:28:36+01:00 - Seite 193 Z
Page 197 of 329
Engine compartment
194 The electronic ignition system uses high
voltage. For this reason you must never
touch components of the ignition system
(ignition coil, ignition cable, spark plug con-
nector or test socket) when:
R
the engine is running
R the engine is being started
R the ignition is switched on and the engine
is being cranked by hand
Vehicles with a diesel engine:
The electronic injection control uses high
voltage. Therefore, never touch fuel injec-
tion system components when:
R the engine is running
R the engine is being started
R the ignition is switched on
X Make sure that the windscreen wipers are
switched off. G
Risk of injury
The windscreen wipers and wiper rods
could be set in motion.
When the bonnet is open, you or others
could be injured by the wiper rods. Make sure that the windscreen wipers are
switched off and that the key has been
pulled out of the ignition lock before open-
ing the bonnet.
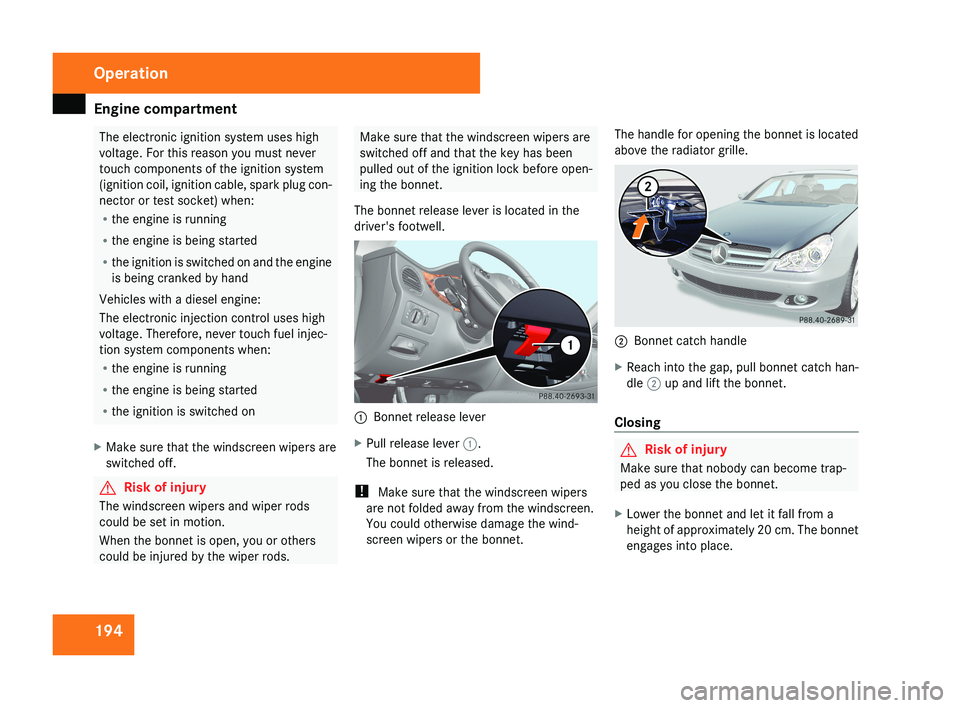
The bonnet release lever is located in the
driver's footwell.1 Bonnet release lever
X Pull release lever 1.
The bonnet is released.
! Make sure that the windscreen wipers
are not folded away from the windscreen.
You could otherwise damage the wind-
screen wipers or the bonnet. The handle for opening the bonnet is located
above the radiator grille.
2
Bonnet catch handle
X Reach into the gap, pull bonnet catch han-
dle 2 up and lift the bonnet.
Closing
G Risk of injury
Make sure that nobody can become trap-
ped as you close the bonnet.
X Lower the bonnet and let it fall from a
height of approximately 20 cm. The bonnet
engages into place.
Operation
219_AKB; 2; 4, en-GB
mkalafa,
2007-11-13T09:28:36+01:00 - Seite 194