2008 MERCEDES-BENZ CLS COUPE towing
[x] Cancel search: towingPage 16 of 329
13
Vehicle dimensions
. . . . . . . . . . . . 309
Vehicle weights . . . . . . . . . . . . . . . 310
Wheels . . . . . . . . . . . . . . . . . . . . . . 305
Telephone
see Mobile phone
Temperature
Engine oil (on-board computer) . . . 116
Outside temperature . . . . . . . . . . . 111
Thermatic
Malfunction indicator lamp . . . . . . 242
Thermotronic
Malfunction indicator lamp . . . . . . 242
Third brake lamp
Display message . . . . . . . . . . . . . . 234
Tightening torque . . . . . . . . . . . . . . . 286
Time Lap time (on-board computer) . . . . 117
Setting (on-board computer) . . . . . 124
Setting the time (on-board com-
puter) . . . . . . . . . . . . . . . . . . . . . . . 124
Timer (on-board computer) . . . . . . . 117
TIREFIT kit Storage location . . . . . . . . . . . . . . . 217
Using . . . . . . . . . . . . . . . . . . . . . . . 277
Total distance recorder
. . . . . . . . . . . . . . . . . . . . . . . . . . . . . 27, 29
Resetting the trip meter . . . . . . . . . 110
Tow-away protection . . . . . . . . . . . . . . 62
Towing . . . . . . . . . . . . . . . . . . . . . . . . 294 Towing eye
Fitting . . . . . . . . . . . . . . . . . . . . . . . 294
Removing . . . . . . . . . . . . . . . . . . . . 295
Transmission output (maximum)
Telephone/two-way radio . . . . . . . 299
Transport (vehicle) . . . . . . . . . . . . . . 295
Trip computer
Menu (on-board computer) . . . . . . 129
Trip meter . . . . . . . . . . . . . . . . . . . . . . 115
Resetting . . . . . . . . . . . . . . . . . . . . 110
Turn signal lamps
Display message . . . . . . . . . . 233, 234
TV
Operation (on-board computer) . . . 119
Two-way radio
Installation . . . . . . . . . . . . . . . . . . . 299
Tyre grip . . . . . . . . . . . . . . . . . . . . . . . 207
Tyre pressure . . . . . . . . . . . . . . . . . . 200
Calling up (on-board computer) . . 202
Display message . . . . . . . . . . 224, 237
Tyre pressure loss warning system 201
Tyre pressure monitor Warning lamp . . . . . . . . . . . . . . . . . 248
Tyre pressures
Table . . . . . . . . . . . . . . . . . . . . . . . 304
Tyres
Direction of rotation . . . . . . . . . . . . 199
General notes . . . . . . . . . . . . . . . . . 198
Technical data . . . . . . . . . . . . . . . . 305
Tyre tread . . . . . . . . . . . . . . . . . . . . . . 200 U
Unit for distance Setting (on-board computer)
. . . . . 123
Unladen weight . . . . . . . . . . . . . . . . . 310
Unlocking Emergency unlocking . . . . . . . . . . . 266
From the inside (central unlocking
button) . . . . . . . . . . . . . . . . . . . . . . . 70
Up (display message) . . . . . . . . . . . . 116 V
Variable Speedtronic . . . . . . . . . . . . .
142
Vehicle Emergency unlocking . . . . . . . 266, 267
Individual settings (on-board com-
puter) . . . . . . . . . . . . . . . . . . . . . . . 121
Leaving parked up . . . . . . . . . . . . . 265
Towing . . . . . . . . . . . . . . . . . . . . . . 294
Transporting . . . . . . . . . . . . . . . . . . 295
Vehicle battery . . . . . . . . . . . . . . . . . 288
Vehicle dimensions . . . . . . . . . . . . . . 309
Vehicle electronics . . . . . . . . . . . . . . 299
Vehicle identification plates . . . . . . 300
Vehicle level Display message . . . . . . . . . . . . . . 229
Setting (AIRMATIC DC) . . . . . . . . . 146
Vehicle tool kit . . . . . . . . . . . . . . . . . . 217
Vehicle weights . . . . . . . . . . . . . . . . . 310 Index
219_AKB; 2; 4, en-GB
mkalafa,
2007-11-13T09:28:36+01:00 - Seite 13
Page 24 of 329

Exterior view
21Function Page
1 Boot
Opening and closing 70
Spare wheel 217
Vehicle tool kit 217
Vehicle battery 288
2 Rear lights
271
3 Rear window heating
164
4 Fuel filler flap
190
Fuel requirements 191
5 Opening and closing the
doors
66
6 Demisting the windscreen
163
Cleaning the windows 212
7
Sliding/tilting sunroof* 169
8 Exterior mirrors
84
Parking aid*
85 Function Page
9 Windscreen wipers, opera-
tion
97
Cleaning the wiper blades 211
Replacing the wiper blades 275
a Opening the bonnet
193
Engine oil 195
Coolant 196
b Front lights
271
c Fitting the front towing eye
293
d Tyres and wheels
198
Checking the tyre pressure 200
Flat tyre, fitting the spare
wheel
276
e Fitting the rear towing eye
293 At a glance
* optional
219_AKB; 2; 4, en-GB
mkalafa,
2007-11-13T09:28:36+01:00 - Seite 21
Page 68 of 329

65
Opening and closing
...........................66
Key positions ....................................... 74
Seats .................................................... 75
Steering wheel .................................... 81
Mirrors ................................................. 83
Memory functions* ............................. 86
Seat belts ............................................. 88
Lights ................................................... 91
Windscreen wipers .............................97
Side windows ...................................... 98Driving and parking ..........................
101
Transmission ..................................... 104
Instrument cluster ............................109
On-board computer ..........................111
Driving systems ................................ 132
Air conditioning ................................. 151
Sliding sunroof .................................. 169
Loading and stowing ........................172
Features ............................................. 180 Controls
219_AKB; 2; 4, en-GB
mkalafa,
2007-11-13T09:28:36+01:00 - Seite 65
Page 148 of 329
Driving systems
145
Activating HOLD X
Make sure that the activation conditions
are met.
X Depress the brake.
X Depress the brake again quickly until
HOLD appears in the display.
HOLD is activated. You can release the
brake pedal.
i If depressing the brake pedal the first
time does not activate HOLD, wait briefly
and then try again. G
Risk of accident
The vehicle's brakes are applied when
HOLD is activated. For this reason, deacti-
vate HOLD if the vehicle is to be set in
motion by other means (e.g. in a car wash
or by towing).
Deactivating HOLD HOLD is deactivated if:
R
you
accelerate when the selector lever is in
position D or R
R you move the selector lever to position P
R you release the brakes completely and
apply them again with a certain amount of pressure until the
HOLD message in the
multi-function display goes out G
Risk of accident
Never get out of the vehicle when HOLD is
activated.
HOLD
must never be operated or deactiva-
ted by a passenger or from outside the
vehicle.
HOLD does not replace the parking brake
and must not be used for parking.
The HOLD braking effect is cancelled and
the vehicle can start moving if:
R HOLD is deactivated by depressing the
accelerator pedal or the brake pedal
R there is a malfunction in the system or an
interruption in the power supply, e.g. bat-
tery failure
R the electrical system in the engine com-
partment, the battery or the fuses are
tampered with
R the battery is disconnected G
Risk of accident
If you wish to leave the vehicle or park it,
deactivate HOLD and secure the vehicle
against rolling away. You will see a warning message in the multi-
function display if HOLD is activated and:
R
the
driver's door is opened and you release
the seat belt
R the ignition is switched off
R the bonnet is opened
Selector lever in park position
X Move the selector lever to P
to prevent the
vehicle from rolling away.
HOLD is deactivated. The warning message
in the multi-function display goes out.
A horn will also sound at regular intervals if
HOLD is activated and you:
R stop
the engine and open the driver's door
R open the bonnet
The horn draws your attention to the fact that
the vehicle has been parked while HOLD is
still activated. The sound becomes louder if
you attempt to lock the vehicle. The vehicle
is not locked until HOLD is deactivated.
i If the ignition has been switched off, the
engine cannot be restarted until HOLD is
deactivated.
If there is a fault in the system or power supply
while HOLD is activated, the Brake immedi-
ately message appears in the multi-function Controls
219_AKB; 2; 4, en-GB
mkalafa,
2007-11-13T09:28:36+01:00 - Seite 145 Z
Page 175 of 329
Loading and stowing
172 Loading and stowing
Cup holder
G
Risk of injury
Keep the cup holder closed while the vehi-
cle is in motion. Otherwise, vehicle occu-
pants could be injured by objects being
thrown around if you:
R brake sharply
R change direction suddenly
R are involved in an accident
Only use the cup holders for containers of
a suitable size and which have lids. Other-
wise, the drinks could spill.
Cup holders should not be used for hot
drinks. Otherwise, you may scald yourself. Cup holder* in the centre console X
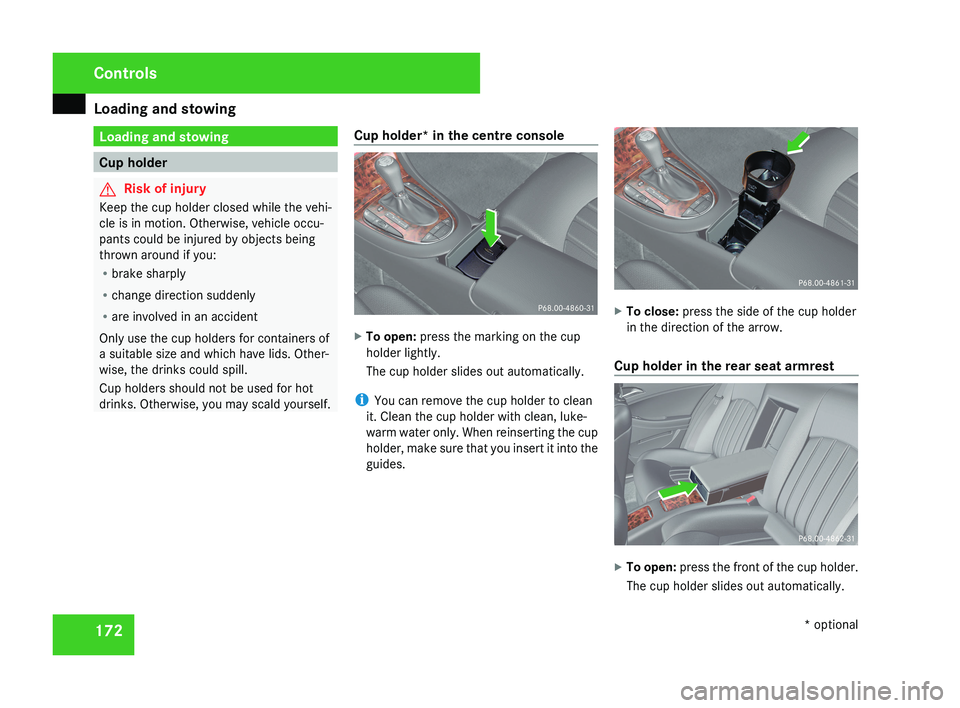
To open: press the marking on the cup
holder lightly.
The cup holder slides out automatically.
i You can remove the cup holder to clean
it. Clean the cup holder with clean, luke-
warm water only. When reinserting the cup
holder, make sure that you insert it into the
guides. X
To close: press the side of the cup holder
in the direction of the arrow.
Cup holder in the rear seat armrest X
To open: press the front of the cup holder.
The cup holder slides out automatically. Controls
* optional
219_AKB; 2; 4, en-GB
mkalafa,
2007-11-13T09:28:36+01:00 - Seite 172
Page 176 of 329
Loading and stowing
173
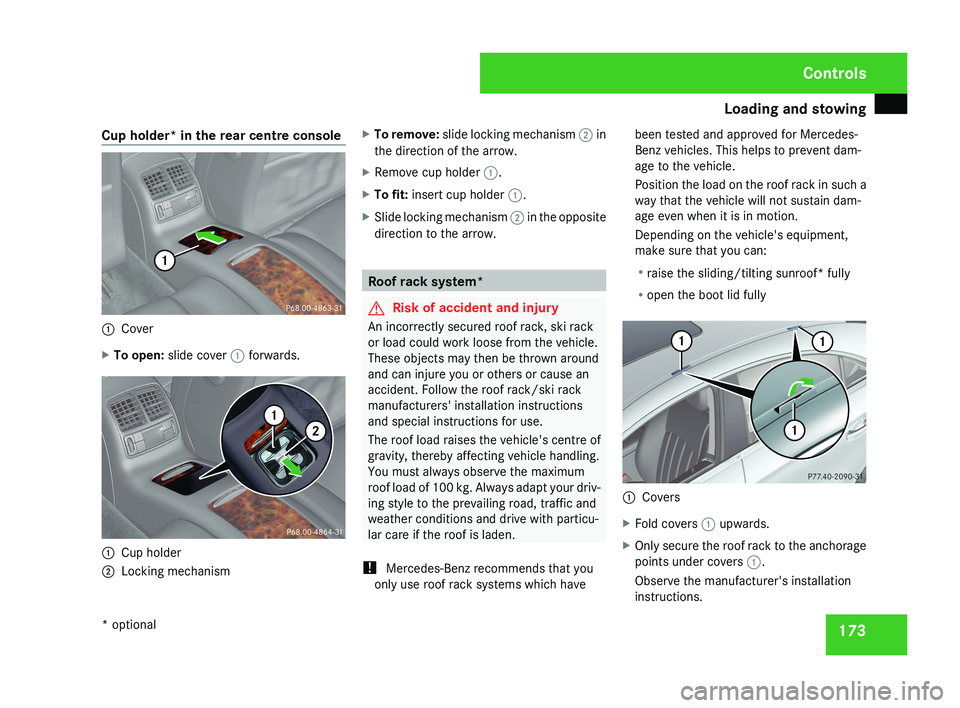
Cup holder* in the rear centre console
1
Cover
X To open: slide cover 1 forwards.1
Cup holder
2 Locking mechanism X
To remove: slide locking mechanism 2 in
the direction of the arrow.
X Remove cup holder 1.
X To fit: insert cup holder 1.
X Slide locking mechanism 2 in the opposite
direction to the arrow. Roof rack system*
G
Risk of accident and injury
An incorrectly secured roof rack, ski rack
or load could work loose from the vehicle.
These objects may then be thrown around
and can injure you or others or cause an
accident. Follow the roof rack/ski rack
manufacturers' installation instructions
and special instructions for use.
The roof load raises the vehicle's centre of
gravity, thereby affecting vehicle handling.
You must always observe the maximum
roof load of 100 kg. Always adapt your driv-
ing style to the prevailing road, traffic and
weather conditions and drive with particu-
lar care if the roof is laden.
! Mercedes-Benz recommends that you
only use roof rack systems which have been tested and approved for Mercedes-
Benz vehicles. This helps to prevent dam-
age to the vehicle.
Position the load on the roof rack in such a
way that the vehicle will not sustain dam-
age even when it is in motion.
Depending on the vehicle's equipment,
make sure that you can:
R
raise the sliding/tilting sunroof* fully
R open the boot lid fully 1
Covers
X Fold covers 1 upwards.
X Only secure the roof rack to the anchorage
points under covers 1.
Observe the manufacturer's installation
instructions. Controls
* optional
219_AKB; 2; 4, en-GB
mkalafa,
2007-11-13T09:28:36+01:00 - Seite 173
Page 177 of 329
Loading and stowing
174 Skibag*
G
Risk of injury
The skibag is designed to carry up to four
pairs of skis. Do not use the skibag to carry
any other type of load.
The skibag must always be secured when
laden. Otherwise, injuries could be caused
by it in the event of an accident.
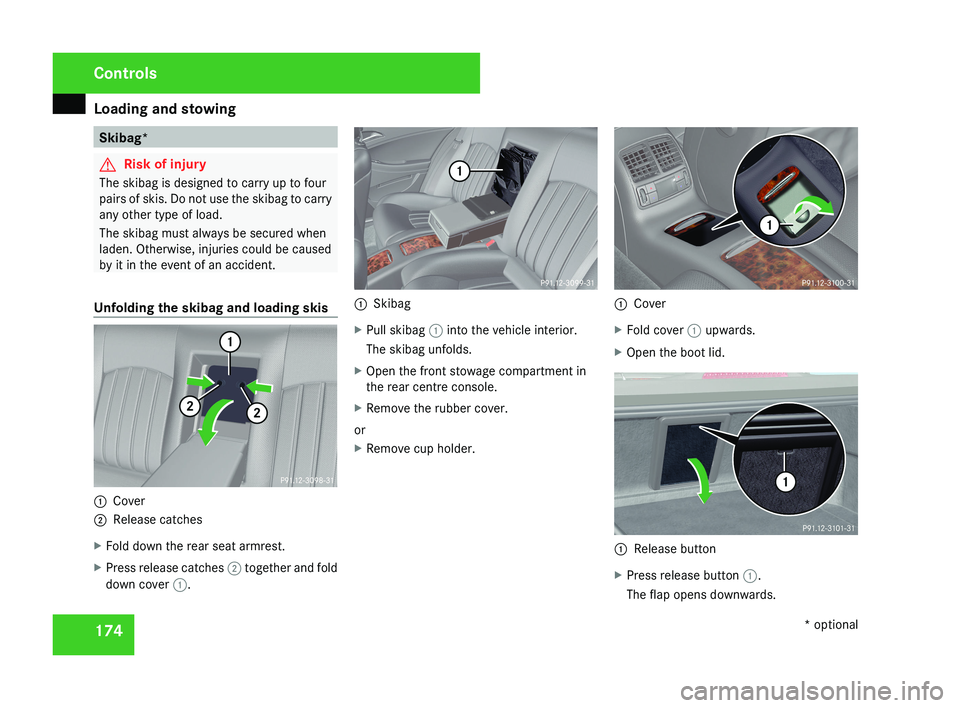
Unfolding the skibag and loading skis 1
Cover
2 Release catches
X Fold down the rear seat armrest.
X Press release catches 2 together and fold
down cover 1. 1
Skibag
X Pull skibag 1 into the vehicle interior.
The skibag unfolds.
X Open the front stowage compartment in
the rear centre console.
X Remove the rubber cover.
or
X Remove cup holder. 1
Cover
X Fold cover 1 upwards.
X Open the boot lid. 1
Release button
X Press release button 1.
The flap opens downwards. Controls
* optional
219_AKB; 2; 4, en-GB
mkalafa,
2007-11-13T09:28:36+01:00 - Seite 174
Page 178 of 329
Loading and stowing
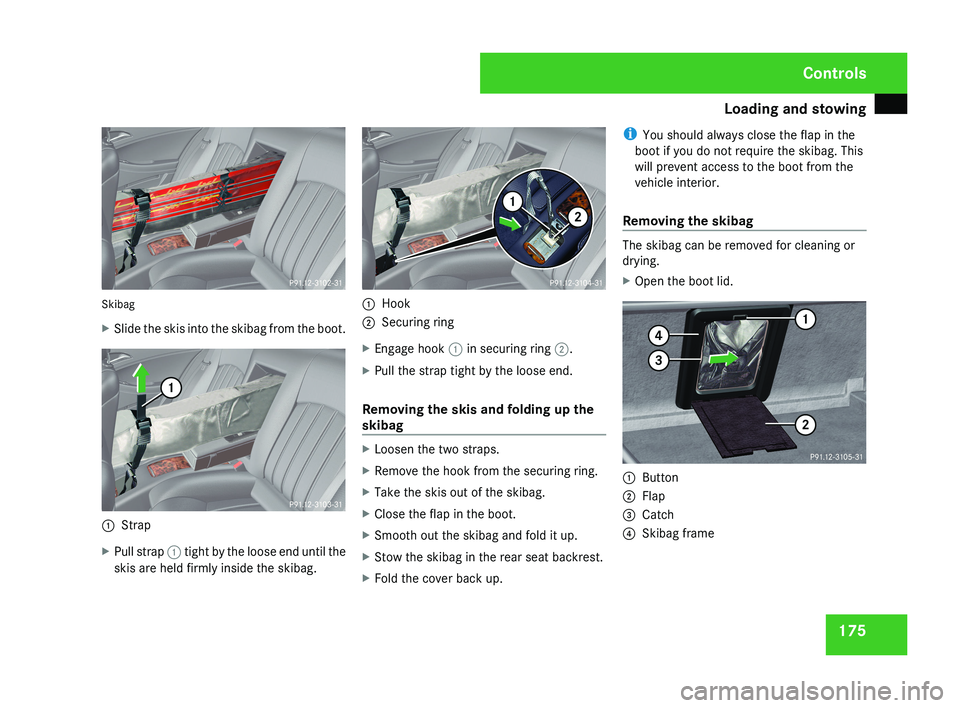
175Skibag
X
Slide the skis into the skibag from the boot.
1 Strap
X Pull strap 1 tight by the loose end until the
skis are held firmly inside the skibag.
1 Hook
2 Securing ring
X Engage hook 1 in securing ring 2.
X Pull the strap tight by the loose end.
Removing the skis and folding up the
skibag
X Loosen the two straps.
X Remove the hook from the securing ring.
X Take the skis out of the skibag.
X Close the flap in the boot.
X Smooth out the skibag and fold it up.
X Stow the skibag in the rear seat backrest.
X Fold the cover back up. i
You should always close the flap in the
boot if you do not require the skibag. This
will prevent access to the boot from the
vehicle interior.
Removing the skibag
The skibag can be removed for cleaning or
drying.
X Open the boot lid.
1 Button
2 Flap
3 Catch
4 Skibag frame
Controls
219_AKB; 2; 4, en-GB
mkalafa,
2007-11-13T09:28:36+01:00 - Seite 175