2008 MERCEDES-BENZ CLS COUPE towing
[x] Cancel search: towingPage 179 of 329
Loading and stowing
176
X
Press button 1.
Flap 2 folds down.
X Press catch 3 in and pull out frame 4
containing the skibag. G
Risk of poisoning
When the skibag has been removed, always
drive with the boot lid closed. Exhaust
fumes could otherwise enter the vehicle
interior. Luggage net in the front-passenger
footwell
G
Risk of injury
Only place lightweight items in the luggage
net. Do not use it to transport heavy, bulky,
sharp-edged or fragile objects. In the event
of an accident, the luggage net will not
secure the transported goods. Loading guidelines
G
Risk of injury
Secure and position the load as described
in the loading guidelines.
Even if you follow all the loading guidelines,
the load will increase the risk of injury in the
event of an accident. G
Risk of poisoning
Keep the boot lid closed while the vehicle
is in operation. Otherwise, exhaust fumes
could enter the vehicle interior and poison
you.
The handling characteristics of a laden vehi-
cle are dependent on the distribution of the
load within the vehicle. You should therefore
load your vehicle as shown in the illustrations.
Observe the following notes when transport-
ing a load:
R When transporting a load, never exceed the
maximum permissible gross vehicle weight
or the permissible axle loads for the vehicle
(including occupants).
R Position heavy loads as far forwards and as
low in the boot as possible.
R The load must not protrude above the
upper edge of the backrests. R
Always place the load against the front or
rear seat backrests.
R Secure the load with sufficiently strong and
wear-resistant load restraints. Pad sharp
edges for protection.
i Load restraints are available at any quali-
fied specialist workshop, e.g. a Mercedes-
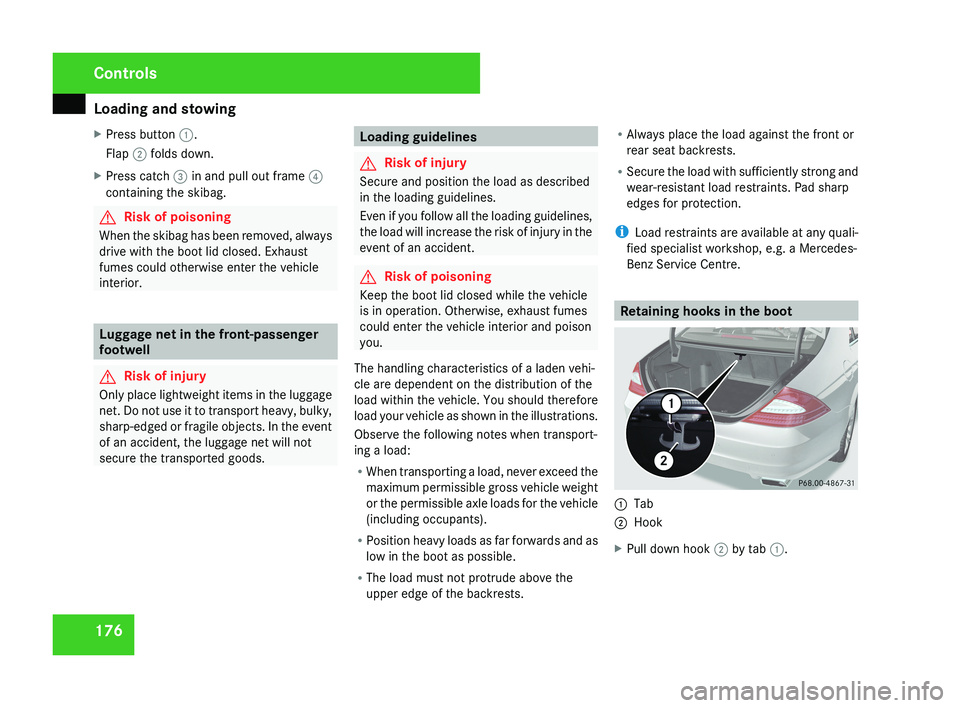
Benz Service Centre. Retaining hooks in the boot1
Tab
2 Hook
X Pull down hook 2 by tab 1.
Controls
219_AKB; 2; 4, en-GB
mkalafa,
2007-11-13T09:28:36+01:00 - Seite 176
Page 180 of 329
Loading and stowing
177Stowage compartments
G
Risk of injury
The stowage compartments must be closed
when items are stored in them. Luggage
nets are not designed to secure heavy
items of luggage.
You or other vehicle occupants could be
injured by objects being thrown around if
you:
R brake sharply
R change direction suddenly
R have an accident
Sharp-edged and fragile objects must not
be carried in the luggage net.
Do not carry hard objects in the ruffled
pockets. Objects must not protrude over
the top of the ruffled pockets.
i You will find an overview of the stowage
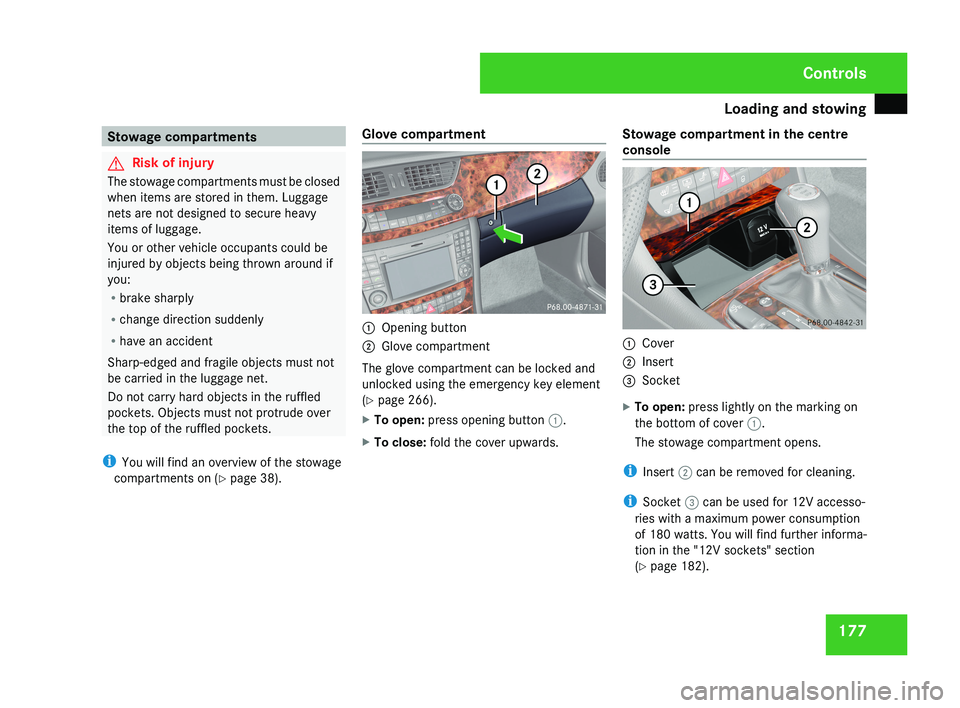
compartments on (Y page 38). Glove compartment 1
Opening button
2 Glove compartment
The glove compartment can be locked and
unlocked using the emergency key element
(Y page 266).
X To open: press opening button 1.
X To close: fold the cover upwards. Stowage compartment in the centre
console 1
Cover
2 Insert
3 Socket
X To open: press lightly on the marking on
the bottom of cover 1.
The stowage compartment opens.
i Insert 2 can be removed for cleaning.
i Socket 3 can be used for 12V accesso-
ries with a maximum power consumption
of 180 watts. You will find further informa-
tion in the "12V sockets" section
(Y page 182). Controls
219_AKB; 2; 4, en-GB
mkalafa,
2007-11-13T09:28:36+01:00 - Seite 177
Page 181 of 329
Loading and stowing
178
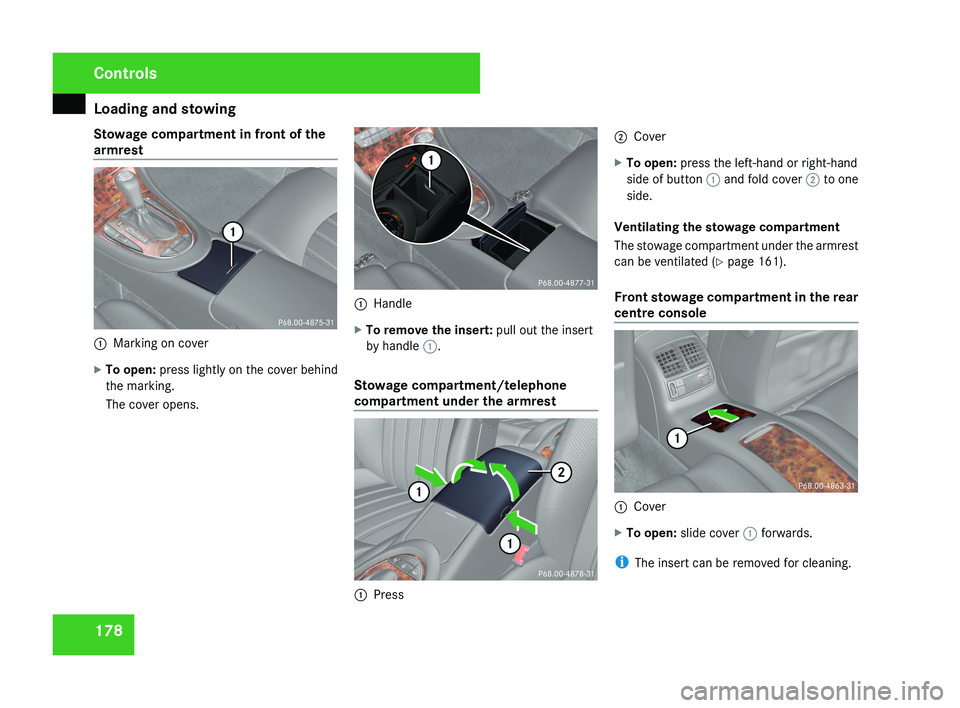
Stowage compartment in front of the
armrest
1
Marking on cover
X To open: press lightly on the cover behind
the marking.
The cover opens. 1
Handle
X To remove the insert: pull out the insert
by handle 1.
Stowage compartment/telephone
compartment under the armrest 1
Press 2
Cover
X To open: press the left-hand or right-hand
side of button 1 and fold cover 2 to one
side.
Ventilating the stowage compartment
The stowage compartment under the armrest
can be ventilated (Y page 161).
Front stowage compartment in the rear
centre console 1
Cover
X To open: slide cover 1 forwards.
i The insert can be removed for cleaning. Controls
219_AKB; 2; 4, en-GB
mkalafa,
2007-11-13T09:28:36+01:00 - Seite 178
Page 182 of 329
Loading and stowing
179
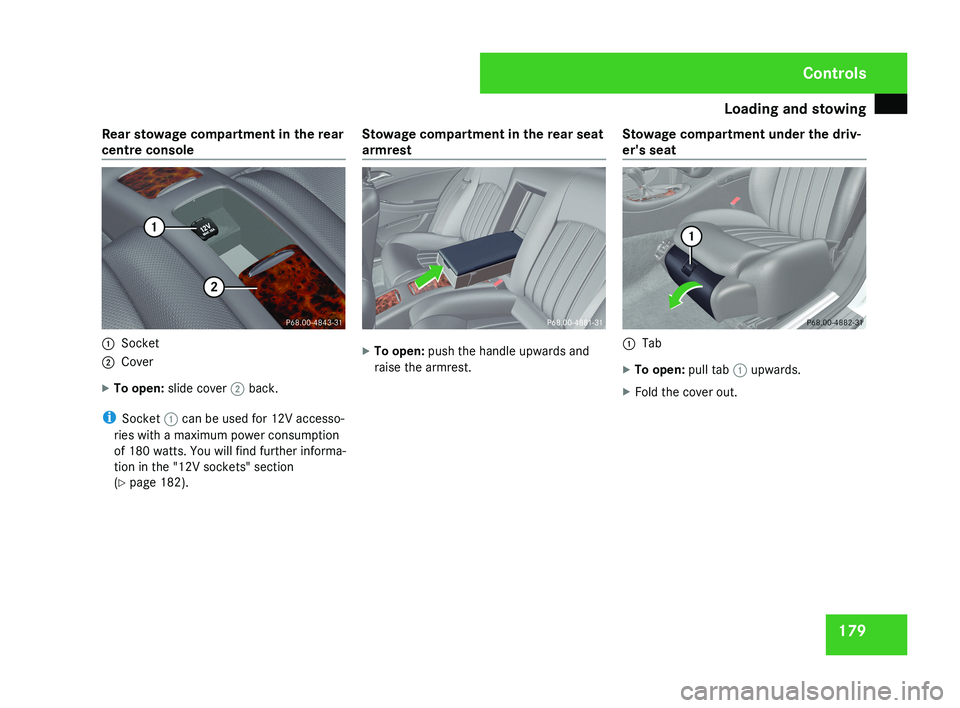
Rear stowage compartment in the rear
centre console
1
Socket
2 Cover
X To open: slide cover 2 back.
i Socket 1 can be used for 12V accesso-
ries with a maximum power consumption
of 180 watts. You will find further informa-
tion in the "12V sockets" section
(Y page 182). Stowage compartment in the rear seat
armrest X
To open: push the handle upwards and
raise the armrest. Stowage compartment under the driv-
er's seat 1
Tab
X To open: pull tab 1 upwards.
X Fold the cover out. Controls
219_AKB; 2; 4, en-GB
mkalafa,
2007-11-13T09:28:36+01:00 - Seite 179
Page 218 of 329
215
Where will I find...? ...........................
216
Display messages ............................. 219
Troubleshooting ................................ 241
Locking/unlocking in an emer-
gency ................................................. 266
Resetting triggered NECK-PRO
head restraints .................................. 269
Changing the batteries .....................269
Changing the bulbs ...........................271
Replacing the wiper blades ..............275
Flat tyre ............................................. 276
Battery ............................................... 288
Jump-starting .................................... 291
Towing and tow-starting .................. 293
Fuses .................................................. 295
Practical advice
219_AKB; 2; 4, en-GB
mkalafa,
2007-11-13T09:28:36+01:00 - Seite 215
Page 296 of 329
Towing and tow-starting
293Towing and tow-starting
Points to remember
G
Risk of accident
If you tow the vehicle, you must use a rigid
towing bar if:
R the engine is not running
R there is a brake system malfunction
R the voltage supply or the vehicle's elec-
trical system is damaged
There
is no power assistance for the steer-
ing when the engine is not running. G
Risk of accident
The vehicle is braked when HOLD is activa-
ted.
Therefore, deactivate HOLD if the vehi-
cle is to be towed.
If you tow or tow-start another vehicle, its
weight must not exceed the maximum per-
missible gross vehicle weight of your vehi-
cle.
It is better to have the vehicle transported
than to have it towed.
When towing, observe the legal requirements
in all countries concerned. !
When towing, pull away slowly and with-
out
jerking. If the tractive power is too high,
the vehicles could be damaged. Do not use
the towing eye for recovery.
! You may tow the vehicle for a maximum
of 50 km. A towing speed of 50 km/h must
not be exceeded.
With towing distances over 50 km, the
entire vehicle needs to be lifted up and
transported.
! Only secure the tow cable or towing bar
to the towing eyes. You may otherwise
damage the vehicle.
R Vehicles with an automatic transmission
must not be tow-started.
R If the engine does not start, try jump-start-
ing it (Y page 291).
R If it is not possible to jump-start the vehicle,
have it towed to the nearest qualified spe-
cialist workshop, e.g. a Mercedes-Benz
Service Centre.
R If the vehicle has suffered transmission
damage, only tow it with the propeller shaft
disconnected.
R The selector lever must be in position N on
vehicles with automatic transmission. R
If you are towing the vehicle over a consid-
erable distance, this may only be done with
the rear axle raised.
R The ignition must be switched off if you are
towing the vehicle with the front/rear axle
raised. Intervention by ESP ®
could other-
wise damage the brake system.
R Before towing the vehicle, make sure that
the battery is connected and charged. Oth-
erwise:
-You cannot switch on the ignition
- You cannot move the selector lever to N
- You have no support when braking
i Switch off the automatic locking feature
before the vehicle is towed (Y page 127).
You could otherwise be locked out when
pushing or towing the vehicle. Practical advice
219_AKB; 2; 4, en-GB
mkalafa,
2007-11-13T09:28:36+01:00 - Seite 293
Page 297 of 329
Towing and tow-starting
294 Fitting the towing eye
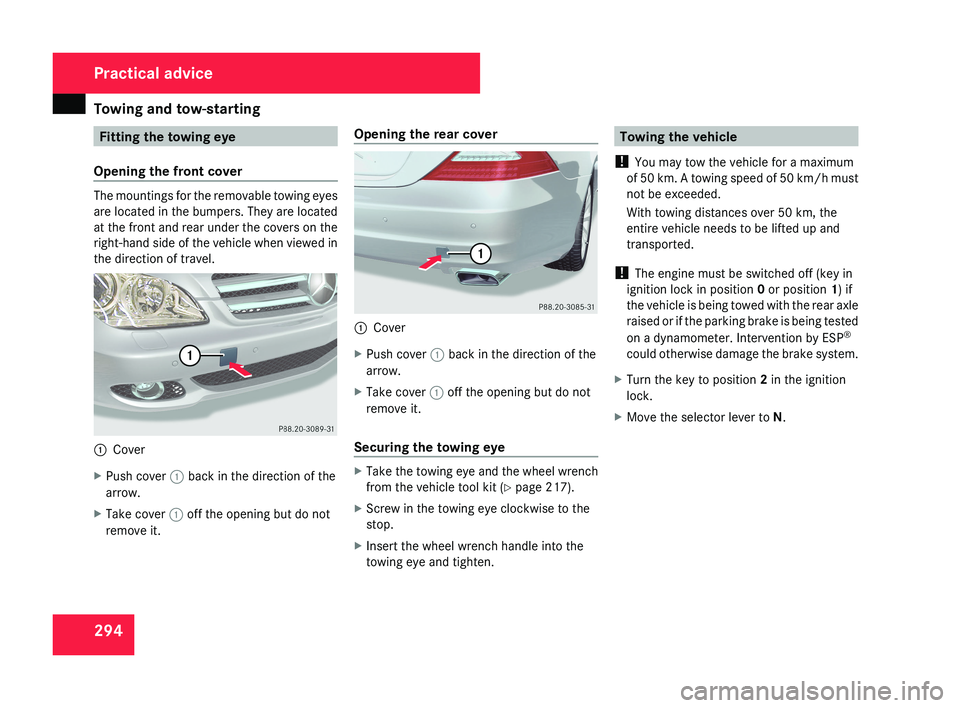
Opening the front cover The mountings for the removable towing eyes
are located in the bumpers. They are located
at the front and rear under the covers on the
right-hand side of the vehicle when viewed in
the direction of travel.
1
Cover
X Push cover 1 back in the direction of the
arrow.
X Take cover 1 off the opening but do not
remove it. Opening the rear cover
1
Cover
X Push cover 1 back in the direction of the
arrow.
X Take cover 1 off the opening but do not
remove it.
Securing the towing eye X
Take the towing eye and the wheel wrench
from the vehicle tool kit ( Y page 217).
X Screw in the towing eye clockwise to the
stop.
X Insert the wheel wrench handle into the
towing eye and tighten. Towing the vehicle
! You may tow the vehicle for a maximum
of 50 km. A towing speed of 50 km/h must
not be exceeded.
With towing distances over 50 km, the
entire vehicle needs to be lifted up and
transported.
! The engine must be switched off (key in
ignition lock in position 0 or position 1) if
the vehicle is being towed with the rear axle
raised or if the parking brake is being tested
on a dynamometer. Intervention by ESP ®
could otherwise damage the brake system.
X Turn the key to position 2 in the ignition
lock.
X Move the selector lever to N. Practical advice
219_AKB; 2; 4, en-GB
mkalafa,
2007-11-13T09:28:36+01:00 - Seite 294
Page 298 of 329

Fuses
295Removing the towing eye
X Take the wheel wrench from the vehicle
tool kit ( Y page 217).
X Insert the wheel wrench handle into the
towing eye and turn it anti-clockwise.
X Unscrew the towing eye.
X Replace the cover and press it until it
engages.
X Return the towing eye and the wheel
wrench to the vehicle tool kit. Transporting the vehicle
The towing eyes can be used to pull the vehi-
cle onto a trailer or transporter for transport-
ing purposes.
! Only lash the vehicle down by the wheels
or wheel rims, not by parts of the vehicle
such as axle or steering components. The
vehicle could otherwise be damaged.
X Turn the key to position 2 in the ignition
lock.
X Move the selector lever to N. Fuses
Notes on changing fuses
The
fuses in your vehicle serve to close down
faulty circuits. If a fuse blows, all the compo-
nents on the circuit and their functions will
fail.
i Blown fuses must be replaced with fuses
of the same rating (which can be recog-
nised by the colour and amperage) and
which have the amperage specified in the
fuse allocation chart. A Mercedes-Benz
Service Centre will be happy to advise you. G
Risk of fire
Only use fuses that have been approved for
Mercedes-Benz vehicles and which have
the correct amperage for the system con-
cerned. Do not attempt to repair or bridge
faulty
fuses. A circuit overload could other-
wise cause a fire. Have the cause traced
and rectified at a qualified specialist work-
shop, e.g. a Mercedes-Benz Service Centre.
If the newly inserted fuse also blows, have the
cause traced and rectified at a qualified spe-
cialist workshop, e.g. a Mercedes-Benz
Service Centre. !
Only use fuses that have been approved
for Mercedes-Benz vehicles and which
have the correct amperage for the system
concerned.
Otherwise, components or sys-
tems could be damaged.
The fuses are located in various fuse boxes:
R Main fuse box on the driver's side of the
dashboard
R Fuse box in the boot, on the left-hand side
of the vehicle
Fuse allocation chart The fuse allocation chart is in the main fuse
box in the dashboard. The fuse amperage is
also indicated there. Practical advice
219_AKB; 2; 4, en-GB
mkalafa,
2007-11-13T09:28:36+01:00 - Seite 295