2008 MERCEDES-BENZ CLS COUPE service reset
[x] Cancel search: service resetPage 14 of 329
11
Rain sensor
Windscreen wipers . . . . . . . . . . . . . . 98
Range (on-board computer) . . . . . . . 130
R button
see Reset button
Rear foglamp
Display message . . . . . . . . . . . . . . 235
Rear-view mirror
Adjusting . . . . . . . . . . . . . . . . . . . . . 83
Anti-dazzle (manual) . . . . . . . . . . . . . 83
Anti-dazzle mode (automatic) . . . . . 85
Rear window
Cleaning . . . . . . . . . . . . . . . . . . . . . 212
Rear window blind . . . . . . . . . . . . . . . 180
Rear window heating Malfunction indicator lamp . . . . . . 242
Refuelling . . . . . . . . . . . . . . . . . . . . . . 190
Remote control Auxiliary heating . . . . . . . . . . . . . . 167
Changing the batteries (auxiliary
heating) . . . . . . . . . . . . . . . . . . . . . 270
Garage door opener . . . . . . . . . . . . 186
Programming (garage door
opener) . . . . . . . . . . . . . . . . . . . . . . 186
Replacing the wiper blades . . . . . . . 275
Reserve Display message . . . . . . . . . . . . . . 240
Reserve fuel . . . . . . . . . . . . . . . . . . . . 311
Display message . . . . . . . . . . . . . . 240 Fuel tank . . . . . . . . . . . . . . . . . . . . 311
Warning lamp . . . . . . . . . . . . . . . . . 250
Reset button . . . . . . . . . . . . . . . . . . . 110
Restraint system
Airbags . . . . . . . . . . . . . . . . . . . . . . . 45
Display message . . . . . . . . . . . . . . 227
Restraint systems
For children . . . . . . . . . . . . . . . . . . . 49
Retaining hooks (boot) . . . . . . . . . . . 176
Rev counter . . . . . . . . . . . . . . . . . . . . 111
Reverse gear Engaging (automatic transmission) 105
Reversing lamp
Display message . . . . . . . . . . . . . . 236
Roller sunblind
Rear window . . . . . . . . . . . . . . . . . 180
Roof load, maximum . . . . . . . . . . . . . 310
Roof rack . . . . . . . . . . . . . . . . . . . . . . 173
Run-on time (mobile phone) . . . . . . . 184 S
Seat Adjusting
. . . . . . . . . . . . . . . . . . 75, 77
Correct driver's seat position . . . . . . 90
Storing settings . . . . . . . . . . . . . . . . 86
Seat belt
Adjusting the height . . . . . . . . . . . . . 90
Fastening . . . . . . . . . . . . . . . . . . . . . 88
Warning lamp . . . . . . . . . . . . . . 89, 249 Seat heating
. . . . . . . . . . . . . . . . . . . . . 80
Seat ventilation . . . . . . . . . . . . . . . . . . 80
Malfunction indicator lamp . . . . . . 241
Selector lever
Display message . . . . . . . . . . . . . . 223
Positions . . . . . . . . . . . . . . . . . . . . 105
Service
Display message . . . . . . . . . . . . . . 209
Service display
see ASSYST PLUS
Service indicator
see ASSYST PLUS
Service products . . . . . . . . . . . . . . . . 311
Brake fluid . . . . . . . . . . . . . . . . . . . 317
Coolant . . . . . . . . . . . . . . . . . . . . . 316
Windscreen washer fluid . . . . . . . . 317
Settings
Calling up a stored setting . . . . . . . . 87
Factory (key) . . . . . . . . . . . . . . . 66, 67
Factory (KEYLESS GO) . . . . . . . . . . . 68
Factory (on-board computer) . . . . . 121
Shift ranges
Automatic transmission . . . . . . . . . 106
Display in the speedometer . . . . . . 105
Sidebags . . . . . . . . . . . . . . . . . . . . . . . . 47
Side window Fault . . . . . . . . . . . . . . . . . . . . . . . . 260
Opening/closing . . . . . . . . . . . . . . . 98
Resetting . . . . . . . . . . . . . . . . . . . . 100 Index
219_AKB; 2; 4, en-GB
mkalafa,
2007-11-13T09:28:36+01:00 - Seite 11
Page 52 of 329
Occupant safety
49NECK-PRO head restraint
NECK-PRO head restraints are designed to
increase protection to the driver's and front-
passenger's head and neck. To this end, the
head restraints on the driver's and front-
passenger seats are moved forwards and
upwards
in the event of a rear-end collision in
the direction of travel. This provides better
head support. G
Risk of injury
Head restraint covers prevent the NECK-
PRO head restraints from triggering cor-
rectly. Consequently, the NECK-PRO head
restraints
cannot provide the intended level
of protection. Do not use head restraint
covers.
If the NECK-PRO head restraints are triggered
in an accident, you must reset the head
restraints on the driver's and front-passenger
seats (Y page 269). Head restraints that have
been triggered are tilted forwards. Children in the vehicle
If a child is riding in your vehicle, secure the
child using a child restraint system appropri-
ate to the size and age of the child and
approved for Mercedes-Benz vehicles. Pref-
erably,
you should fit the restraint system on
a suitable rear seat. Preferably, you should fit
it to a suitable rear seat. Make sure that the
child is strapped in throughout the trip.
You can obtain information about the correct
child restraint system from any Mercedes-
Benz Service Centre.
i It is advisable to use Mercedes-Benz care
products to clean child restraint systems.
You can obtain information about this from
any Mercedes-Benz Service Centre. G
Risk of injury
Do not leave children unsupervised in the
vehicle, even if they are secured in a child
restraint system. The children could injure
themselves on parts of the vehicle. They
could also be seriously or even fatally
injured by prolonged exposure to extreme
heat or cold.
Do
not expose the child restraint system to
direct sunlight. The metallic parts of the child restraint system could heat up and the
child could be burned by them.
If
the children open the door other persons
could be injured. They could get out and
injure themselves or be injured by a passing
vehicle.
You should also observe the information on
HOLD; see the index. G
Risk of injury
An unsecured or incorrectly positioned load
increases the risk of injury to the child in
the event of:
R an accident
R a braking manoeuvre
R a sudden change of direction
Do not carry heavy or hard objects inside
the vehicle unless they are secured. You
will
find further information under "Loading
guidelines" in the index.
Child restraint systems Mercedes-Benz recommends that you only
use the child restraint systems listed on
(Y page 54). Safety
219_AKB; 2; 4, en-GB
mkalafa,
2007-11-13T09:28:36+01:00 - Seite 49 Z
Page 118 of 329
On-board computer
115Function
1 Basic display menu (Y page 115)
R
Digital speedometer 12
(Y page 116)
R Outside tempera-
ture 12
(Y page 116)
R ASSYST PLUS service display
(Y page 209)
R Tyre pressure loss warning system
(Y page 201) or tyre pressure mon-
itor* (Y page 202) 2
AMG* menu (Y page 116)
3
Audio/TV*/DVD*
(Y page 118)
menu
R Radio station ( Y page 119)
R Audio drive or media ( Y page 119)
R TV* (Y page 119)
R DVD video* (Y page 120) 4
Navigation* menu (Y page 120) Function
5
Distronic
* menu (distance display)
(Y page 135) 6
Message memory menu
13
(fault and
warning messages) ( Y page 121) 7 Settings menu (Y page 121)
R
Resetting to factory settings
(Y page 121)
R Selecting a submenu ( Y page 122) 8 Trip computer
menu
R Consumption statistics
(Y page 130)
R Range ( Y page 130) 9
Telephone*
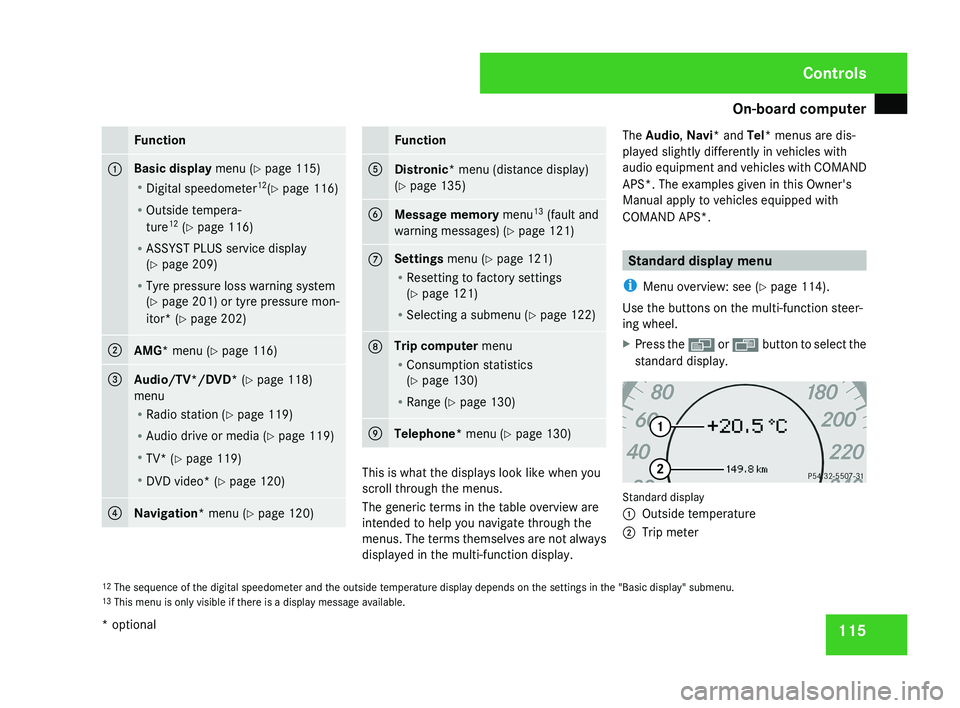
menu (Y page 130) This is what the displays look like when you
scroll through the menus.
The generic terms in the table overview are
intended to help you navigate through the
menus. The terms themselves are not always
displayed in the multi-function display.The Audio
, Navi* and Tel* menus are dis-
played slightly differently in vehicles with
audio equipment and vehicles with COMAND
APS*. The examples given in this Owner's
Manual apply to vehicles equipped with
COMAND APS*. Standard display menu
i Menu overview: see ( Y page 114).
Use the buttons on the multi-function steer-
ing wheel.
X Press the è or · button to select the
standard display. Standard display
1
Outside temperature
2 Trip meter
12 The sequence of the digital speedometer and the outside temperature display depends on the settings in the "Basic display" submenu.
13 This menu is only visible if there is a display message available. Controls
* optional
219_AKB; 2; 4, en-GB
mkalafa,
2007-11-13T09:28:36+01:00 - Seite 115
Page 207 of 329
Winter driving
204
X
Press the reset button on the left of the
instrument cluster
(Y page 209).
The following message appears in the
multi-function display: Check current
tyre pressure?
X Press the æ button.
The following message appears in the
multi-function display:
Tyre pressure monitor restarted
The tyre pressure monitor has stored the
pressure of the tyres as a new reference
value.
If you wish to cancel the restart:
X Press the ç button. Winter driving
Have your vehicle winterproofed at a qualified
specialist workshop, e.g. at a Mercedes-Benz
Service Centre, at the onset of winter.
! Do not use a sharp object to remove snow
or ice from the trim on the B-pillar between
the side windows. Winter tyres
Use
winter tyres at temperatures below +7 °
C and on snow or ice-covered roads. Only
then can the effect of the ABS and ESP ®
driv-
ing systems be ensured in winter too.
Use winter tyres of the same make and tread
on all wheels to maintain safe handling char-
acteristics. G
Risk of accident
You must replace winter tyres with a tread
depth
of less than 4 mm immediately. They
are no longer suitable for winter use, in par-
ticular because they do not provide suffi-
cient grip. This could cause you to lose
control of your vehicle and cause an acci-
dent. Always observe the maximum permitted
speed
specified for the winter tyres you have
fitted. If you fit winter tyres which have a
lower maximum permitted speed than that of
the vehicle, affix an appropriate warning sign
in the driver's field of vision. This can be
obtained at a qualified specialist workshop,
e.g. from a Mercedes-Benz Service Centre.
In such circumstances, you should also
restrict the maximum speed of the vehicle
using permanent Speedtronic 26
to the maxi-
mum permissible speed for winter tyres
(Y page 144).
Once you have fitted the winter tyres:
X Restart the tyre pressure moni-
tor* (Y page 202). G
Risk of accident
If you fit the spare wheel* when driving with
winter tyres, bear in mind that driving sta-
bility will be impaired owing to unstable
cornering
characteristics caused by the dif-
ferent tyres. You should therefore adapt
your driving style and drive carefully.
Have the spare wheel* replaced at the
nearest qualified specialist workshop
which has the necessary specialist knowl-
edge and tools to carry out the work
26 Only available for certain countries. Operation
* optional
219_AKB; 2; 4, en-GB
mkalafa,
2007-11-13T09:28:36+01:00 - Seite 204
Page 212 of 329
Service
209Service
Active Service System PLUS
ASSYST PLUS, the Active Service System,
tells you when the next service is due. When-
ever a service is due, this is shown in the
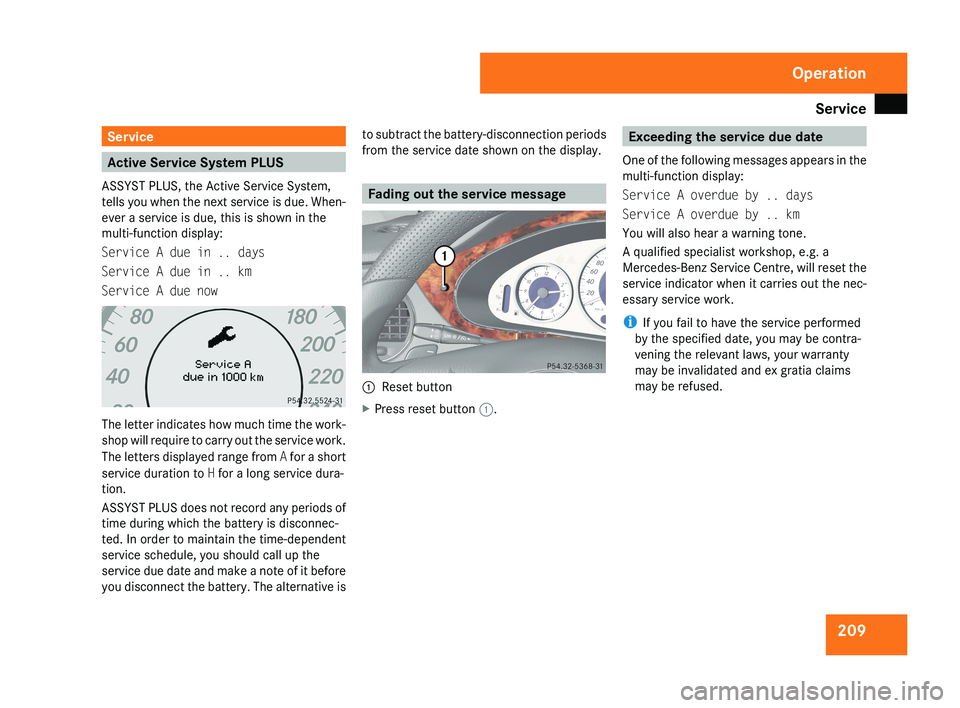
multi-function display:
Service A due in .. days
Service A due in .. km
Service A due nowThe letter indicates how much time the work-
shop will require to carry out the service work.
The letters displayed range from A for a short
service duration to H for a long service dura-
tion.
ASSYST PLUS does not record any periods of
time during which the battery is disconnec-
ted. In order to maintain the time-dependent
service schedule, you should call up the
service due date and make a note of it before
you disconnect the battery. The alternative is to subtract the battery-disconnection periods
from the service date shown on the display.
Fading out the service message
1
Reset button
X Press reset button 1.
Exceeding the service due date
One of the following messages appears in the
multi-function display:
Service A overdue by .. days
Service A overdue by .. km
You will also hear a warning tone.
A qualified specialist workshop, e.g. a
Mercedes-Benz Service Centre, will reset the
service indicator when it carries out the nec-
essary service work.
i If you fail to have the service performed
by the specified date, you may be contra-
vening the relevant laws, your warranty
may be invalidated and ex gratia claims
may be refused.
Operation
219_AKB; 2; 4, en-GB
mkalafa,
2007-11-13T09:28:36+01:00 - Seite 209
Page 272 of 329
Changing the batteries
269Resetting triggered NECK-PRO head
restraints
If the NECK-PRO head restraints are triggered
in an accident, you must reset the head
restraints on the driver's and front-passenger
seats. Otherwise, the additional protection
will not be available in the event of another
rear-end collision. You can recognise when
head restraints have been triggered by the
fact that they have been moved forwards and
can no longer be adjusted.
Mercedes-Benz recommends that you have
NECK-PRO head restraints checked at a quali-
fied specialist workshop, e.g. a Mercedes-
Benz Service Centre, following a rear-end
collision.
i If you have problems resetting the head
restraints, have this work carried out at a
qualified specialist workshop, e.g. a
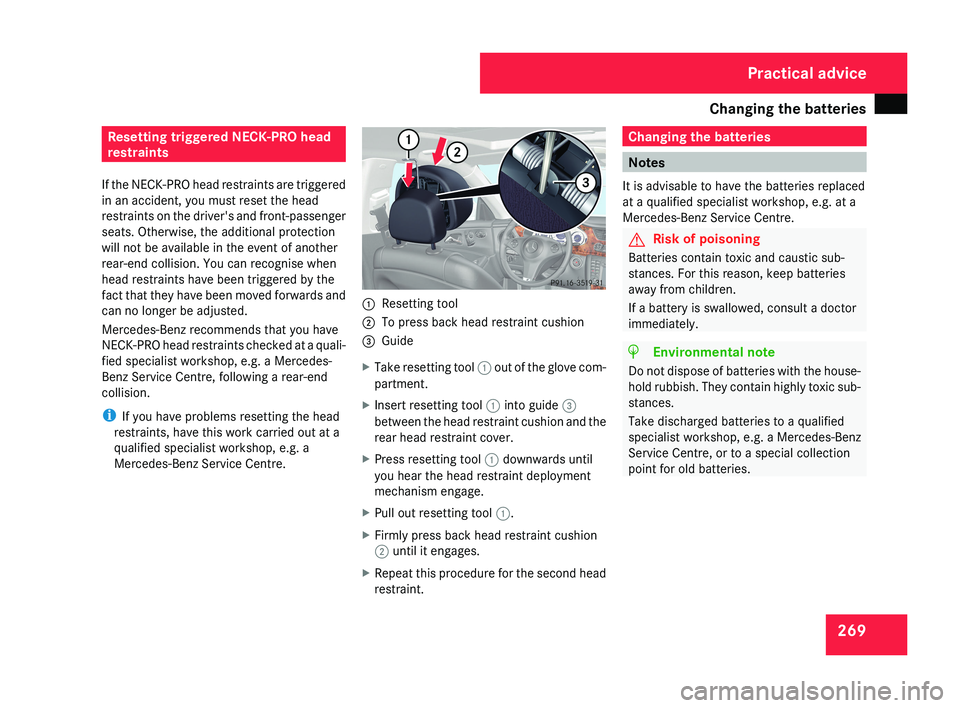
Mercedes-Benz Service Centre.1 Resetting tool
2 To press back head restraint cushion
3 Guide
X Take resetting tool 1 out of the glove com-
partment.
X Insert resetting tool 1 into guide 3
between the head restraint cushion and the
rear head restraint cover.
X Press resetting tool 1 downwards until
you hear the head restraint deployment
mechanism engage.
X Pull out resetting tool 1.
X Firmly press back head restraint cushion
2 until it engages.
X Repeat this procedure for the second head
restraint.
Changing the batteries
Notes
It is advisable to have the batteries replaced
at a qualified specialist workshop, e.g. at a
Mercedes-Benz Service Centre.
G Risk of poisoning
Batteries contain toxic and caustic sub-
stances. For this reason, keep batteries
away from children.
If a battery is swallowed, consult a doctor
immediately.
H Environmental note
Do not dispose of batteries with the house-
hold rubbish. They contain highly toxic sub-
stances.
Take discharged batteries to a qualified
specialist workshop, e.g. a Mercedes-Benz
Service Centre, or to a special collection
point for old batteries.
Practical advice
219_AKB; 2; 4, en-GB
mkalafa,
2007-11-13T09:28:36+01:00 - Seite 269
Page 294 of 329
Jump-starting
291
X
Charge the battery. Observe the notes in
the operating instructions for your battery
charger.
X Refit the charged battery.
To do this, follow the steps described in
"Removing the battery"
(Y page 290) in
reverse order.
! Do
not fit refillable batteries without elec-
trostatic protection. The electrostatic dis-
charge could otherwise cause the battery
to explode. The battery acid released could
cause damage to your vehicle.
Further information on electrostatic protec-
tion (Y page 289). G
Risk of injury
Battery acid is caustic. Avoid contact with
the skin, eyes or clothing. Reconnecting the battery
! Always reconnect the battery in the
sequence
described below. Never swap the
terminal clamps. You may otherwise dam-
age the vehicle electronics.
X Switch off all electrical consumers.
X Connect the positive terminal clamp and
secure the cover.
X Connect the negative terminal clamp.
X Connect the breather hose. Make sure that
a
cell cap is fitted between the battery and
the breather hose.
X Refit the electrostatic protection if neces-
sary ( Y page 289).
i If
the battery power supply has been inter-
rupted (e.g. if it has been reconnected), you
must carry out the following tasks:
R Set the time (Y page 125).
R Reset the sliding/tilting sunroof*
(Y page 171).
R Reset the function for folding the exterior
mirrors in/out automatically* by folding
the mirrors out once ( Y page 84). Jump-starting
If your vehicle's battery is discharged, the
engine can be jump-started from another
vehicle
or from an external battery using jump
leads.
Observe the following points:
R Jump-starting must only be performed
when the engine and catalytic converter
are cold.
R Do not start the engine if the battery has
frozen. Thaw the battery out first.
R Jump-starting may only be performed from
12V batteries.
R Only use jump leads which are protected
against polarity reversal and which have a
sufficient cross-section and insulated ter-
minal clamps.
i Jump leads which are protected against
polarity reversal and further information
about jump-starting can be obtained from
any Mercedes-Benz Service Centre.
! Avoid repeated and lengthy starting
attempts.
Never start the vehicle using a rapid battery
charger. Practical advice
* optional
219_AKB; 2; 4, en-GB
mkalafa,
2007-11-13T09:28:36+01:00 - Seite 291