2008 MERCEDES-BENZ CLS COUPE lumbar support
[x] Cancel search: lumbar supportPage 12 of 329

9
Lights
Constant headlamp mode . . . . . . . . 92
Cornering light function . . . . . . . . . . 95
Dipped-beam headlamps . . . . . . . . . 92
Front foglamps . . . . . . . . . . . . . . . . . 93
Hazard warning lamps . . . . . . . . . . . 94
Headlamp flasher . . . . . . . . . . . . . . . 94
Headlamp range . . . . . . . . . . . . . . . . 95
Light switch . . . . . . . . . . . . . . . . . . . 91
Main-beam headlamps . . . . . . . . . . . 94
Rear foglamp . . . . . . . . . . . . . . . . . . 93
Switching off (display message) . . . 235
Turn signals . . . . . . . . . . . . . . . . . . . 94
LIM indicator lamp . . . . . . . . . . . . . . 133
Load compartment load, maximum
. . . . . . . . . . . . . . . . . . . . . . . . . . . . . . . 310
Loading guidelines . . . . . . . . . . . . . . 176
Locking Automatic . . . . . . . . . . . . . . . . . . . . . 69
Emergency locking . . . . . . . . . . . . . 267
From the inside (central locking
button) . . . . . . . . . . . . . . . . . . . . . . . 70
Luggage net . . . . . . . . . . . . . . . . . . . . 176
Lumbar support . . . . . . . . . . . . . . . . . . 78
Luxury head restraint . . . . . . . . . . 76, 77 M
Main-beam headlamps Display message
. . . . . . . . . . . . . . 235
Main fuse box . . . . . . . . . . . . . . . . . . . 296
Maintenance Battery . . . . . . . . . . . . . . . . . . . . . . 288
Malfunction memory
see Message memory menu
Manual gearshift program . . . . . . . . 108
Massage function (PULSE) . . . . . . . . . 80
Maximum speed Technical data . . . . . . . . . . . . . . . . 303
Memory card
Operation (on-board computer) . . . 119
Memory function . . . . . . . . . . . . . . . . . 86
Menu
DISTRONIC . . . . . . . . . . . . . . . . . . . 139
Menu (on-board computer) . . . . . . . . 114
AMG . . . . . . . . . . . . . . . . . . . . . . . . 116
Audio . . . . . . . . . . . . . . . . . . . . . . . 118
DVD . . . . . . . . . . . . . . . . . . . . . . . . 120
Message memory . . . . . . . . . . . . . . 121
Navigation . . . . . . . . . . . . . . . . . . . 120
Resetting to factory settings . . . . . 121
Settings . . . . . . . . . . . . . . . . . . . . . 121
Standard display . . . . . . . . . . . . . . 115
Submenu overview . . . . . . . . . . . . . 122
Telephone . . . . . . . . . . . . . . . . . . . 130 Trip computer
. . . . . . . . . . . . . . . . 129
TV . . . . . . . . . . . . . . . . . . . . . . . . . . 119
Message
see Message memory menu
Minispare emergency spare wheel
Storage location . . . . . . . . . . . . . . . 218
Technical data . . . . . . . . . . . . . . . . 308
Mirror
Sun visor . . . . . . . . . . . . . . . . . . . . 180
Mobile phone . . . . . . . . . . . . . . . . . . . 183
Bracket . . . . . . . . . . . . . . . . . . . . . 183
Display message . . . . . . . . . . . . . . 240
Installation . . . . . . . . . . . . . . . . . . . 299
Own number sending . . . . . . . . . . . 184
Run-on time . . . . . . . . . . . . . . . . . . 184
Telephone menu (on-board com-
puter) . . . . . . . . . . . . . . . . . . . . . . . 130
Modifying the programming
Key . . . . . . . . . . . . . . . . . . . . . . . . . . 66
KEYLESS GO key . . . . . . . . . . . . . . . 68
MOExtended run-flat system* . 199, 287
MP3 Operation (on-board computer) . . . 119
Multi-contour seat . . . . . . . . . . . . . . . . 79
Multi-function display . . . . . . . . 110, 112
Multi-function steering wheel . . . . . 111
Overview . . . . . . . . . . . . . . . . . . . . . 30 Index
219_AKB; 2; 4, en-GB
mkalafa,
2007-11-13T09:28:36+01:00 - Seite 9
Page 81 of 329

Seats
781
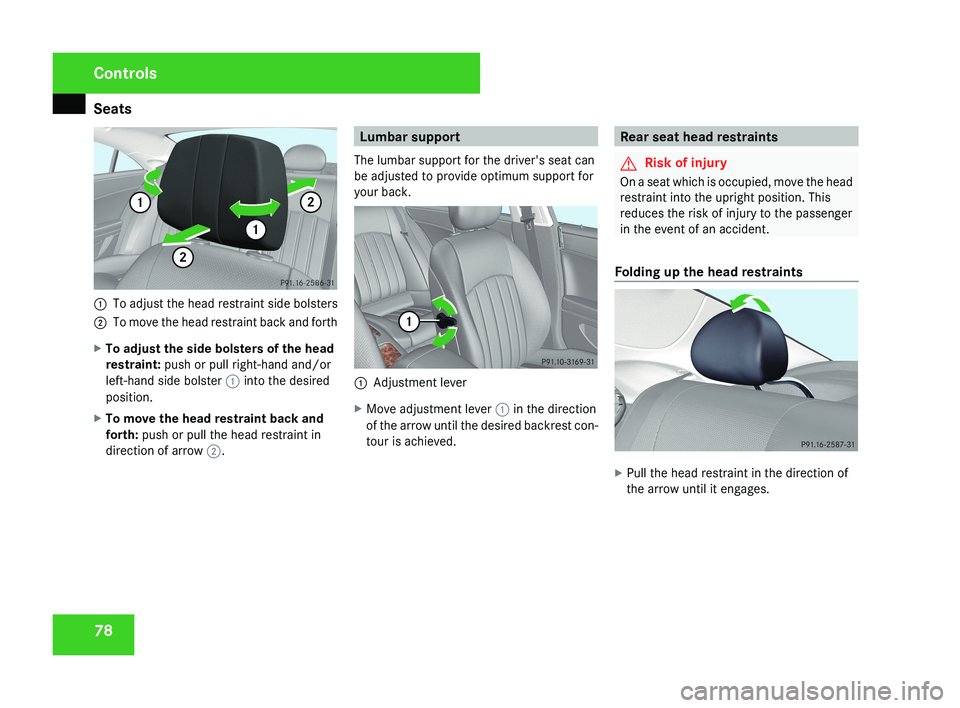
To adjust the head restraint side bolsters
2 To move the head restraint back and forth
X To adjust the side bolsters of the head
restraint: push or pull right-hand and/or
left-hand side bolster 1 into the desired
position.
X To move the head restraint back and
forth: push or pull the head restraint in
direction of arrow 2.
Lumbar support
The lumbar support for the driver's seat can
be adjusted to provide optimum support for
your back.
1 Adjustment lever
X Move adjustment lever 1 in the direction
of the arrow until the desired backrest con-
tour is achieved.
Rear seat head restraints
G Risk of injury
On a seat which is occupied, move the head
restraint into the upright position. This
reduces the risk of injury to the passenger
in the event of an accident.
Folding up the head restraints
X Pull the head restraint in the direction of
the arrow until it engages.
Controls
219_AKB; 2; 4, en-GB
mkalafa,
2007-11-13T09:28:36+01:00 - Seite 78
Page 82 of 329

Seats
79
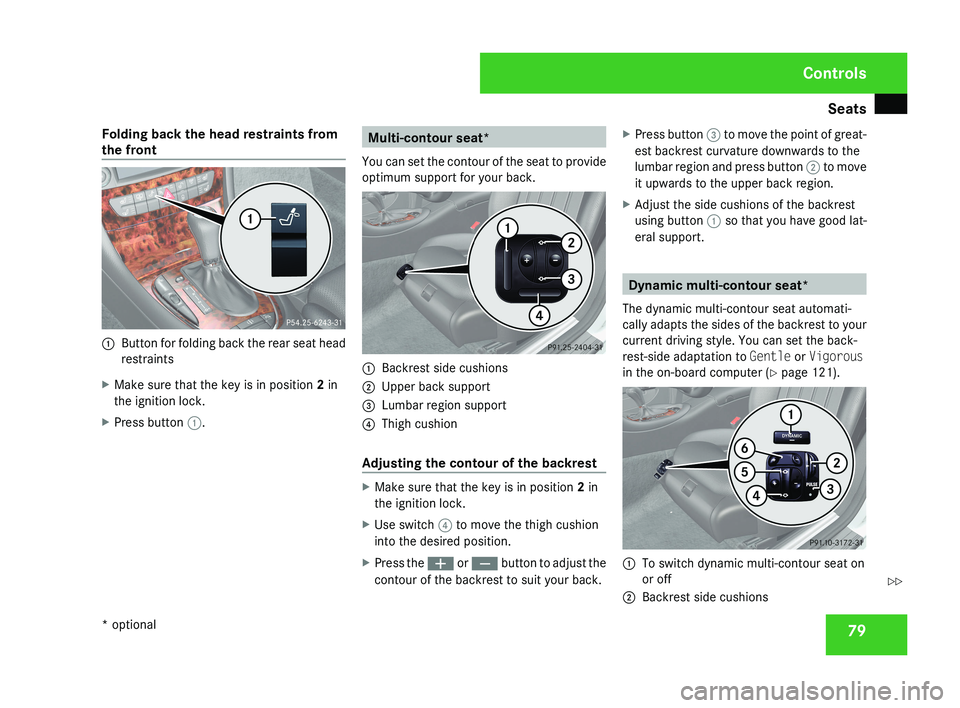
Folding back the head restraints from
the front
1
Button for folding back the rear seat head
restraints
X Make sure that the key is in position 2 in
the ignition lock.
X Press button 1. Multi-contour seat*
You can set the contour of the seat to provide
optimum support for your back. 1
Backrest side cushions
2 Upper back support
3 Lumbar region support
4 Thigh cushion
Adjusting the contour of the backrest X
Make sure that the key is in position 2 in
the ignition lock.
X Use switch 4 to move the thigh cushion
into the desired position.
X Press the æ or ç button to adjust the
contour of the backrest to suit your back. X
Press button 3 to move the point of great-
est backrest curvature downwards to the
lumbar region and press button 2 to move
it upwards to the upper back region.
X Adjust the side cushions of the backrest
using button 1 so that you have good lat-
eral support. Dynamic multi-contour seat*
The dynamic multi-contour seat automati-
cally adapts the sides of the backrest to your
current driving style. You can set the back-
rest-side adaptation to Gentle or Vigorous
in the on-board computer (Y page 121). 1
To switch dynamic multi-contour seat on
or off
2 Backrest side cushions Controls
* optional
219_AKB; 2; 4, en-GB
mkalafa,
2007-11-13T09:28:36+01:00 - Seite 79 Z
Page 83 of 329

Seats
80
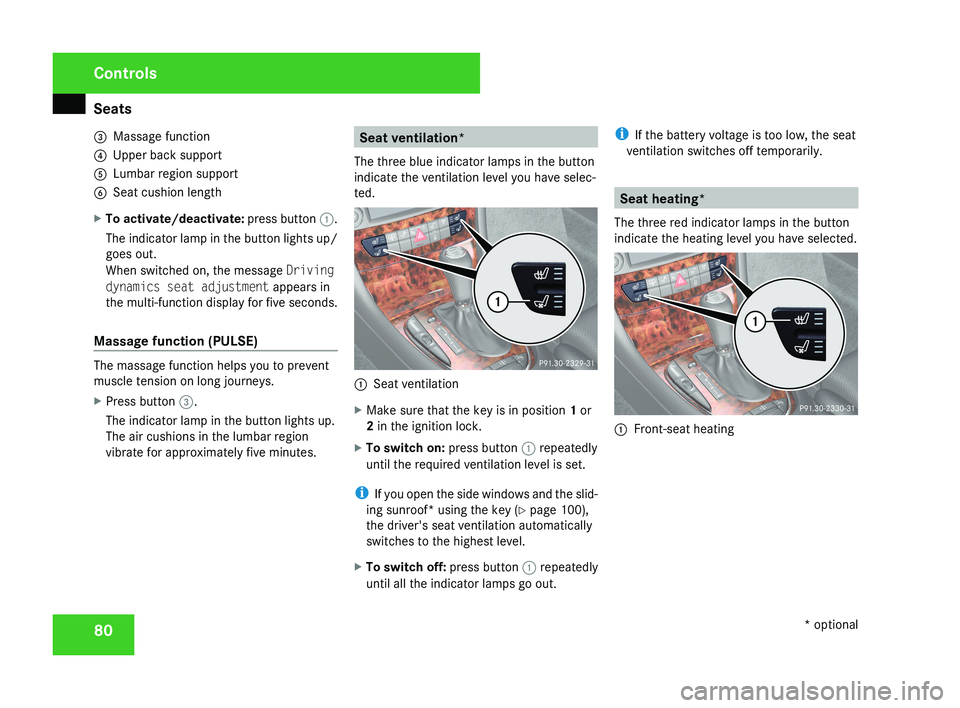
3
Massage function
4 Upper back support
5 Lumbar region support
6 Seat cushion length
X To activate/deactivate: press button 1.
The indicator lamp in the button lights up/
goes out.
When switched on, the message Driving
dynamics seat adjustment appears in
the multi-function display for five seconds.
Massage function (PULSE) The massage function helps you to prevent
muscle tension on long journeys.
X
Press button 3.
The indicator lamp in the button lights up.
The air cushions in the lumbar region
vibrate for approximately five minutes. Seat ventilation*
The three blue indicator lamps in the button
indicate the ventilation level you have selec-
ted. 1
Seat ventilation
X Make sure that the key is in position 1 or
2 in the ignition lock.
X To switch on: press button 1 repeatedly
until the required ventilation level is set.
i If you open the side windows and the slid-
ing sunroof* using the key ( Y page 100),
the driver's seat ventilation automatically
switches to the highest level.
X To switch off: press button 1 repeatedly
until all the indicator lamps go out. i
If the battery voltage is too low, the seat
ventilation switches off temporarily. Seat heating*
The three red indicator lamps in the button
indicate the heating level you have selected. 1
Front-seat heating Controls
* optional
219_AKB; 2; 4, en-GB
mkalafa,
2007-11-13T09:28:36+01:00 - Seite 80