2008 MERCEDES-BENZ CLS COUPE brake light
[x] Cancel search: brake lightPage 143 of 329
Driving systems
1401
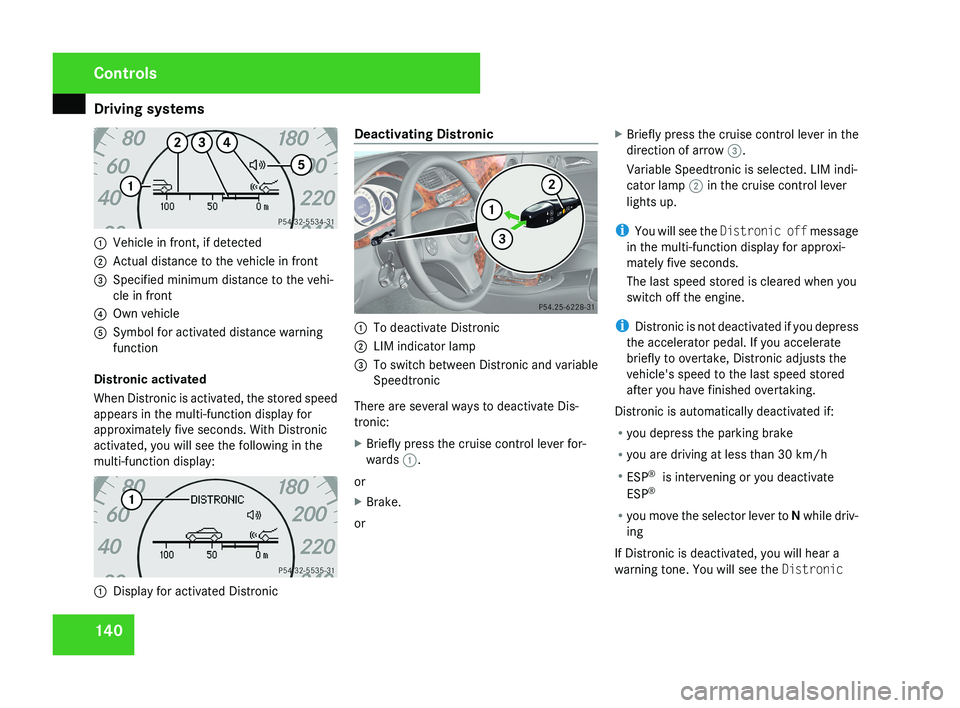
Vehicle in front, if detected
2 Actual distance to the vehicle in front
3 Specified minimum distance to the vehi-
cle in front
4 Own vehicle
5 Symbol for activated distance warning
function
Distronic activated
When Distronic is activated, the stored speed
appears in the multi-function display for
approximately five seconds. With Distronic
activated, you will see the following in the
multi-function display:
1 Display for activated Distronic Deactivating Distronic
1
To deactivate Distronic
2 LIM indicator lamp
3 To switch between Distronic and variable
Speedtronic
There are several ways to deactivate Dis-
tronic:
X Briefly press the cruise control lever for-
wards 1.
or
X Brake.
or X
Briefly press the cruise control lever in the
direction of arrow 3.
Variable Speedtronic is selected. LIM indi-
cator lamp 2 in the cruise control lever
lights up.
i You will see the Distronic off message
in the multi-function display for approxi-
mately five seconds.
The last speed stored is cleared when you
switch off the engine.
i Distronic is not deactivated if you depress
the accelerator pedal. If you accelerate
briefly to overtake, Distronic adjusts the
vehicle's speed to the last speed stored
after you have finished overtaking.
Distronic is automatically deactivated if:
R you depress the parking brake
R you are driving at less than 30 km/h
R ESP ®
is intervening or you deactivate
ESP ®
R you move the selector lever to N while driv-
ing
If Distronic is deactivated, you will hear a
warning tone. You will see the Distronic
Controls
219_AKB; 2; 4, en-GB
mkalafa,
2007-11-13T09:28:36+01:00 - Seite 140
Page 145 of 329
Driving systems
142 Speedtronic
Speedtronic brakes automatically so that you
do not exceed the set speed. On long and
steep downhill gradients, especially if the
vehicle is laden, you must select shift range
1, 2 or 3 in good time. In this way you will
make use of the braking effect of the engine,
which relieves the load on the brake system
and prevents the brakes from overheating
and wearing too quickly. If you need addi-
tional braking, depress the brake pedal
repeatedly rather than continuously. G
Risk of accident
Never depress the brake pedal continu-
ously while the vehicle is in motion, e.g.
never cause the brakes to rub by applying
constant slight pedal pressure. This causes
the brake system to overheat, increases
the braking distance and can lead to the
brakes failing completely. G
Risk of accident
Do not change down for additional engine
braking on a slippery road surface. This
could cause the drive wheels to lose their
grip and the vehicle could skid. You can set a variable or permanent limit
speed:
R
Variable for speed limits, e.g. in built-up
areas
R Permanent for long-term speed restric-
tions, e.g. for driving on winter tyres
(Y page 144) G
Risk of accident
Speedtronic is only an aid designed to
assist driving. You are responsible for the
vehicle's speed and for braking in good
time.
i The speed indicated in the speedometer
may differ slightly from the limit speed
stored.
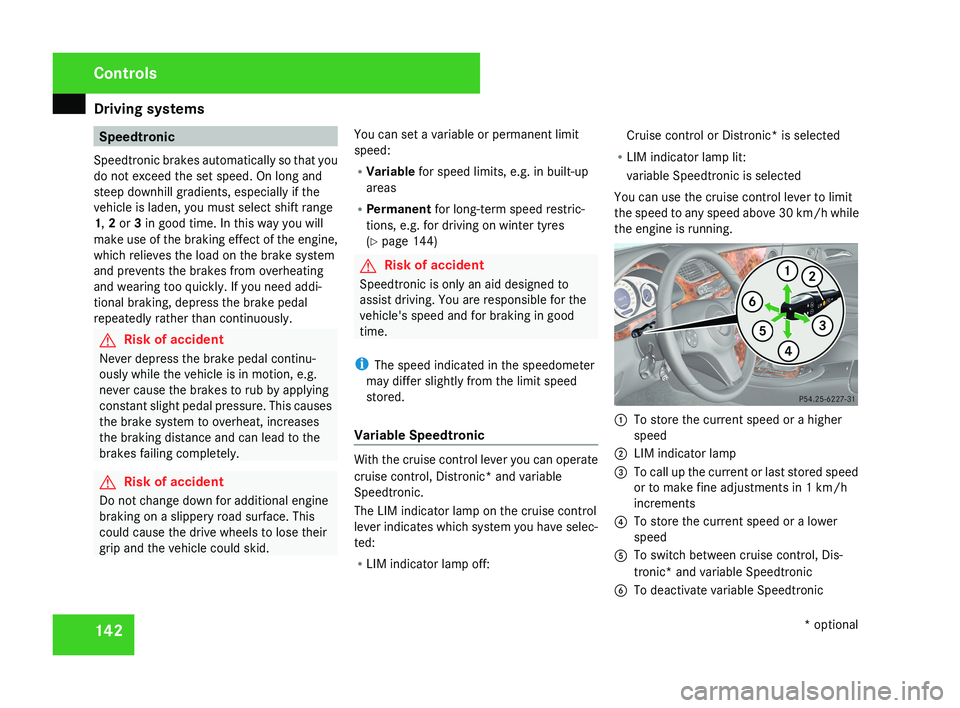
Variable Speedtronic With the cruise control lever you can operate
cruise control, Distronic* and variable
Speedtronic.
The LIM indicator lamp on the cruise control
lever indicates which system you have selec-
ted:
R
LIM indicator lamp off: Cruise control or Distronic* is selected
R LIM indicator lamp lit:
variable Speedtronic is selected
You can use the cruise control lever to limit
the speed to any speed above 30 km/h while
the engine is running. 1
To store the current speed or a higher
speed
2 LIM indicator lamp
3 To call up the current or last stored speed
or to make fine adjustments in 1 km/h
increments
4 To store the current speed or a lower
speed
5 To switch between cruise control, Dis-
tronic* and variable Speedtronic
6 To deactivate variable Speedtronic Controls
* optional
219_AKB; 2; 4, en-GB
mkalafa,
2007-11-13T09:28:36+01:00 - Seite 142
Page 149 of 329
Driving systems
146
display. Immediately depress the brake firmly
until the warning message disappears from
the multi-function display or move the selec-
tor lever to
P. This deactivates HOLD. AIRMATIC DC*
Vehicle level Your vehicle automatically adjusts its ride
height to reduce petrol consumption and
improve driving safety.
The following vehicle levels are possible:
R
Normal
R Raised
R Lowered
The "Normal" and "Raised" vehicle levels can
be set manually.
The "Lowered" vehicle level is set automati-
cally:
R at speeds above 140 km/h
R if you have selected "Sports tuning I or
II" ( Y page 147)
R if you have selected "Comfort tun-
ing" (Y page 147) and then lock the vehicle within 60 seconds of the engine being
switched off G
Risk of injury
If you have selected “Comfort tuning”, the
vehicle will be lowered if you lock it within
60 seconds of the engine being switched
off. Make sure, therefore, that nobody is in
the vicinity of the wheel housing or under
the vehicle when you lock the vehicle. Oth-
erwise, limbs could become trapped.
! If you have selected “Comfort tuning”,
the vehicle will be lowered if you lock it
within 60 seconds of the engine being
switched off. Make sure when parking that
you stop your vehicle so that it does not
make contact with the kerb as it descends.
Your vehicle could otherwise be damaged.
Setting the vehicle level manually
Select the "Normal" setting for normal road
surfaces and "Raised" for driving with snow
chains or on particularly poor road surfaces. G
Risk of injury
Make sure that nobody is in the vicinity of
the wheel housing or under the vehicle
while lowering the vehicle when it is sta- tionary. Otherwise, limbs could become
trapped.
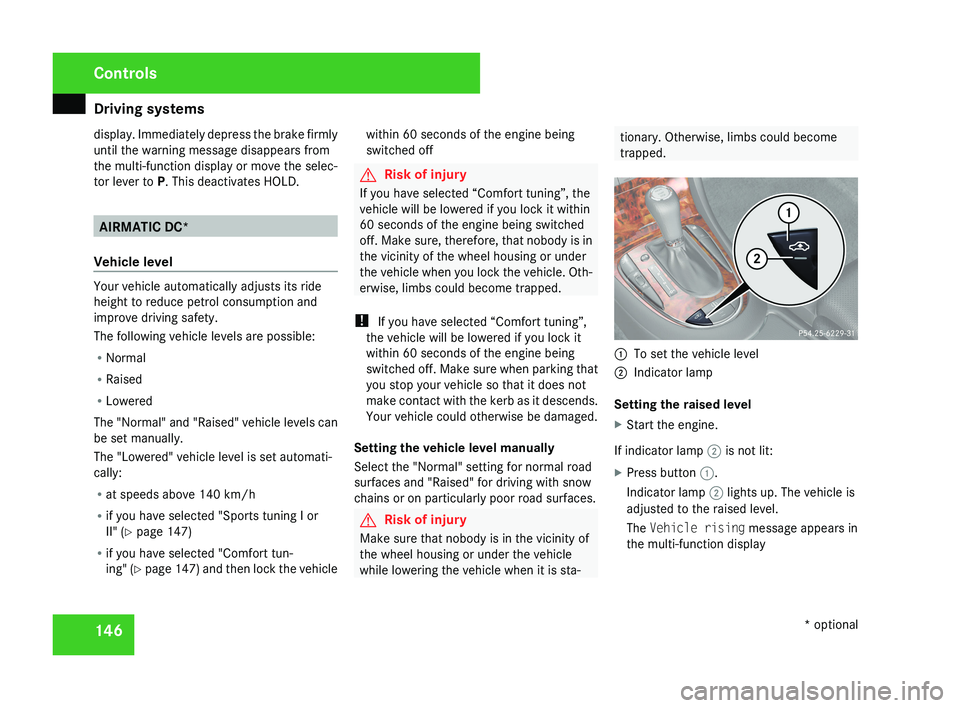
1
To set the vehicle level
2 Indicator lamp
Setting the raised level
X Start the engine.
If indicator lamp 2 is not lit:
X Press button 1.
Indicator lamp 2 lights up. The vehicle is
adjusted to the raised level.
The Vehicle rising message appears in
the multi-function display Controls
* optional
219_AKB; 2; 4, en-GB
mkalafa,
2007-11-13T09:28:36+01:00 - Seite 146
Page 152 of 329
Driving systems
149
Front sensors Centre Approximately 100 cm
Corners Approximately 60 cm
Rear sensors
Centre Approximately 120 cm
Corners Approximately 80 cm
!
Pay particular attention to objects above
or below the sensors when parking, such
as flower pots or trailer towbars. Parktronic
does not detect such objects when they are
in the immediate vicinity of the vehicle. You
could damage the vehicle or the objects.
Ultrasonic sources such as an automatic
car wash, a lorry's compressed-air brakes
or a pneumatic drill could cause Parktronic
to malfunction.
Minimum distance Centre Approximately 20 cm
Corners Approximately 15 cm If there is an obstacle within this range, all
warning displays light up and a tone sounds.
If the distance falls below the minimum clear-
ance, it may no longer be shown.
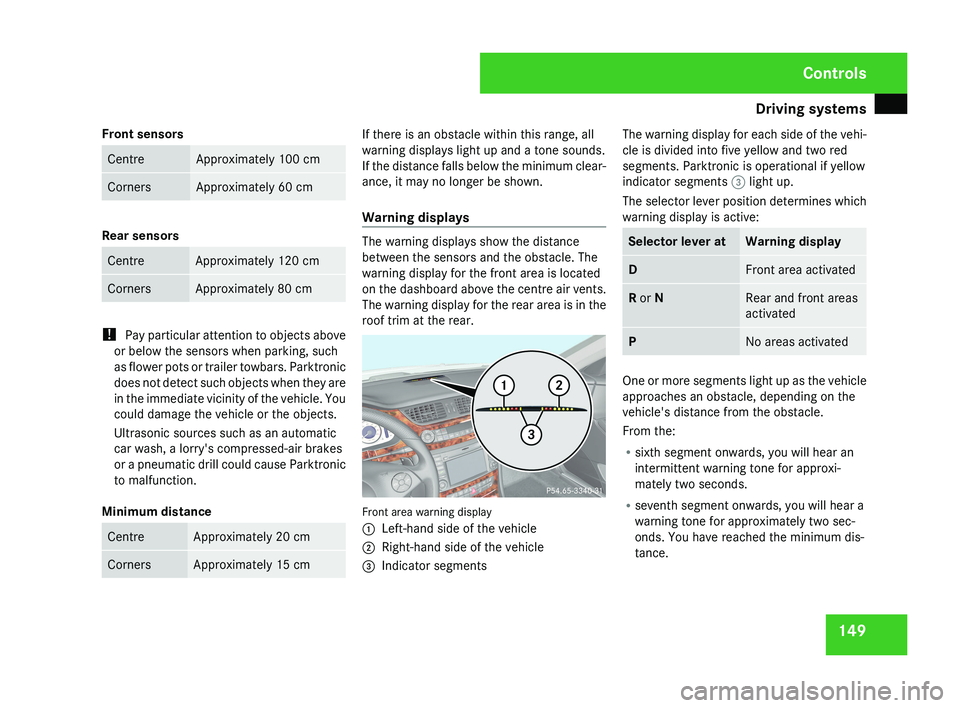
Warning displays
The warning displays show the distance
between the sensors and the obstacle. The
warning display for the front area is located
on the dashboard above the centre air vents.
The warning display for the rear area is in the
roof trim at the rear.
Front area warning display
1
Left-hand side of the vehicle
2 Right-hand side of the vehicle
3 Indicator segments The warning display for each side of the vehi-
cle is divided into five yellow and two red
segments. Parktronic is operational if yellow
indicator segments
3 light up.
The selector lever position determines which
warning display is active: Selector lever at Warning display
D Front area activated
R or N Rear and front areas
activated
P No areas activated
One or more segments light up as the vehicle
approaches an obstacle, depending on the
vehicle's distance from the obstacle.
From the:
R
sixth segment onwards, you will hear an
intermittent warning tone for approxi-
mately two seconds.
R seventh segment onwards, you will hear a
warning tone for approximately two sec-
onds. You have reached the minimum dis-
tance. Controls
219_AKB; 2; 4, en-GB
mkalafa,
2007-11-13T09:28:36+01:00 - Seite 149
Page 175 of 329
Loading and stowing
172 Loading and stowing
Cup holder
G
Risk of injury
Keep the cup holder closed while the vehi-
cle is in motion. Otherwise, vehicle occu-
pants could be injured by objects being
thrown around if you:
R brake sharply
R change direction suddenly
R are involved in an accident
Only use the cup holders for containers of
a suitable size and which have lids. Other-
wise, the drinks could spill.
Cup holders should not be used for hot
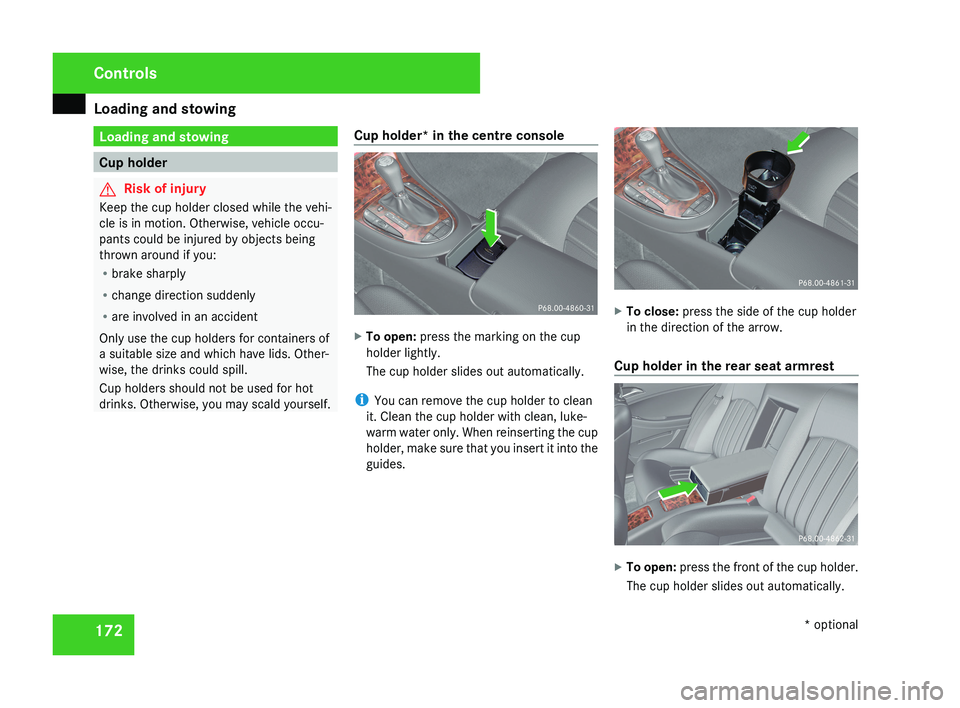
drinks. Otherwise, you may scald yourself. Cup holder* in the centre console X
To open: press the marking on the cup
holder lightly.
The cup holder slides out automatically.
i You can remove the cup holder to clean
it. Clean the cup holder with clean, luke-
warm water only. When reinserting the cup
holder, make sure that you insert it into the
guides. X
To close: press the side of the cup holder
in the direction of the arrow.
Cup holder in the rear seat armrest X
To open: press the front of the cup holder.
The cup holder slides out automatically. Controls
* optional
219_AKB; 2; 4, en-GB
mkalafa,
2007-11-13T09:28:36+01:00 - Seite 172
Page 180 of 329
Loading and stowing
177Stowage compartments
G
Risk of injury
The stowage compartments must be closed
when items are stored in them. Luggage
nets are not designed to secure heavy
items of luggage.
You or other vehicle occupants could be
injured by objects being thrown around if
you:
R brake sharply
R change direction suddenly
R have an accident
Sharp-edged and fragile objects must not
be carried in the luggage net.
Do not carry hard objects in the ruffled
pockets. Objects must not protrude over
the top of the ruffled pockets.
i You will find an overview of the stowage
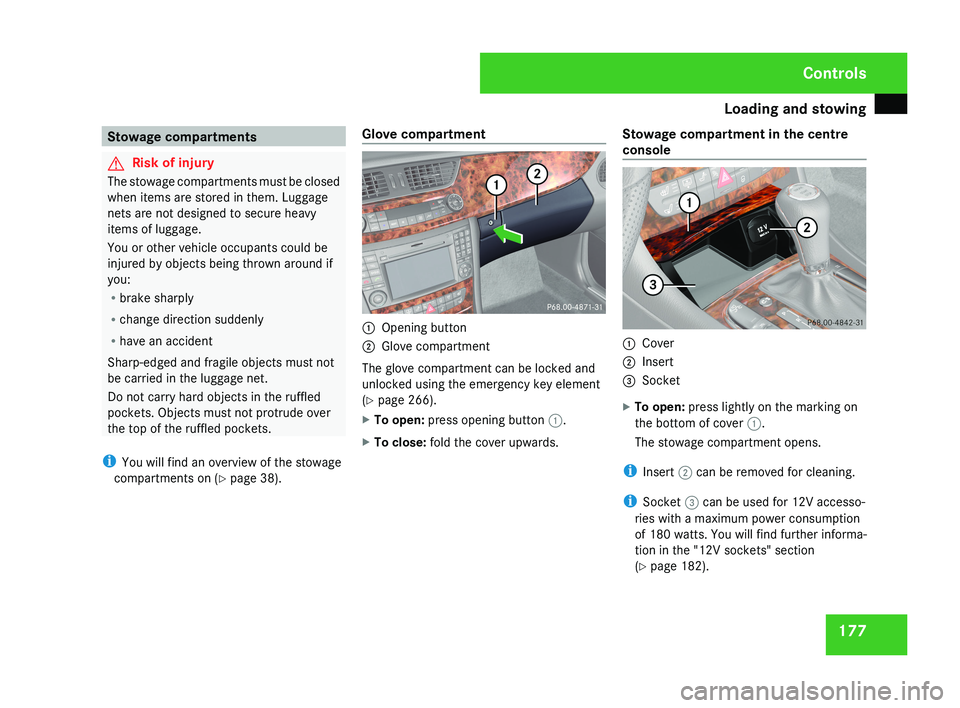
compartments on (Y page 38). Glove compartment 1
Opening button
2 Glove compartment
The glove compartment can be locked and
unlocked using the emergency key element
(Y page 266).
X To open: press opening button 1.
X To close: fold the cover upwards. Stowage compartment in the centre
console 1
Cover
2 Insert
3 Socket
X To open: press lightly on the marking on
the bottom of cover 1.
The stowage compartment opens.
i Insert 2 can be removed for cleaning.
i Socket 3 can be used for 12V accesso-
ries with a maximum power consumption
of 180 watts. You will find further informa-
tion in the "12V sockets" section
(Y page 182). Controls
219_AKB; 2; 4, en-GB
mkalafa,
2007-11-13T09:28:36+01:00 - Seite 177
Page 209 of 329
Driving tips
206 Driving tips
Rolling with the engine switched off
G
Risk of accident
Never switch the engine off while the vehi-
cle is in motion.
There
is no power assistance for the steer-
ing and the service brake when the engine
is not running.
You will require considerably more effort to
steer and brake and you could therefore
lose control of the vehicle and cause an
accident. Braking
G
Risk of accident
Do not change down for additional engine
braking on a slippery road surface. This
could cause the drive wheels to lose their
grip and the vehicle could skid. G
Risk of accident
Make sure that other road users are not
endangered by your braking. Downhill gradients On long and steep downhill gradients, espe-
cially if the vehicle is laden, you must select
shift range 1, 2 or 3 in good time.
i
This also applies if you have activated
cruise control, Speedtronic or Distronic*
.
This uses the braking effect of the engine and
you will not have to brake to such an extent
to maintain the same speed. This relieves the
load on the brake system and prevents the
brakes from overheating and wearing too
quickly. If you need additional braking,
depress the brake pedal repeatedly rather
than continuously.
Heavy and light loads If the brakes have been subjected to a heavy
load,
do not stop the vehicle immediately, but
drive on for a short while. This allows the air-
flow to cool the brakes more quickly. G
Risk of accident
Never depress the brake pedal continu-
ously while the vehicle is in motion, e.g.
never cause the brakes to rub by applying
constant
slight pedal pressure. This causes
the brake system to overheat, increases the braking distance and can lead to the
brakes failing completely.
If
the brakes have been used only moderately,
you should occasionally test their effective-
ness. To do this, brake more firmly from a
higher speed. This improves the grip of the
brakes.
Wet roads If driving in heavy rain for a prolonged period
of time without braking, there may be a
delayed
reaction from the brakes, when brak-
ing for the first time. You must brake harder.
You must therefore maintain a greater dis-
tance from the vehicle in front.
Brake firmly after driving on a wet road. This
way the brake discs will become warm, drying
more quickly, which will protect them against
corrosion.
Limited braking performance on salted
roads G
Risk of accident
The layer of salt on the brake discs and the
brake pads/linings may cause a delay in
the braking effect, resulting in a signifi- Operation
* optional
219_AKB; 2; 4, en-GB
mkalafa,
2007-11-13T09:28:36+01:00 - Seite 206
Page 210 of 329
Driving tips
207cantly longer braking distance, which could
lead to an accident.
To avoid this danger, you should:
R
occasionally
brake carefully, without put-
ting other road users at risk, when you
are driving on salted roads. This helps to
remove any salt that may have started to
build up on the brake discs and the brake
pads/linings.
R maintain a greater distance to the vehicle
ahead and drive with particular care.
R carefully apply the brakes at the end of a
trip and immediately after commencing a
new trip, so that salt residues are
removed from the brake disc.
New brake linings For safety reasons, Mercedes-Benz recom-
mends that you only have only brake pads/
linings fitted to your vehicle that have been
approved for Mercedes-Benz vehicles or
which correspond to an equivalent quality
standard.
Brake pads/linings which have not
been approved for Mercedes-Benz or which
are not of an equivalent quality could affect
your vehicle's operating safety. G
Risk of accident
New brake pads/linings only reach their
optimum braking effect after several hun-
dred
kilometres of driving. Before this opti-
mum braking effect is reached, you should
compensate for the reduced braking effect
by applying greater pressure when braking.
This also applies after the brake discs or the
brake pads/linings have been replaced.
High-performance brake system for
AMG vehicles The high-performance brake system is
designed for heavy loads. Braking can there-
fore cause noises. This will depend on:
R
Speed
R Braking force
R Environmental
conditions, such as temper-
ature and humidity
The wear of individual components of the
brake system, such as the brake pads/linings
or brake discs, depends on the individual driv-
ing style and operating conditions.
Because of this, it is impossible to state a
mileage that will be valid under all circum-
stances. An aggressive driving style will lead
to high wear. Tyre grip
G
Risk of accident
Whereas the vehicle can be fully controlled
at a certain speed on dry roads, you must
reduce your speed on wet or icy roads to
achieve the same road safety. Otherwise
you could cause an accident.
Pay particular attention to the road condi-
tions at temperatures around freezing
point.
If ice has formed on the road surface (e.g.
from
fog), a light film of water rapidly forms
on the ice when you brake, considerably
reducing tyre grip. Drive with particular
care in such weather conditions. Operation
219_AKB; 2; 4, en-GB
mkalafa,
2007-11-13T09:28:36+01:00 - Seite 207