2008 INFINITI FX35 section pg
[x] Cancel search: section pgPage 3549 of 3924
NOISE, VIBRATION AND HARSHNESS (NVH) TROUBLESHOOTINGRFD-7
< SERVICE INFORMATION >
CEF
G H
I
J
K L
M A
B
RFD
N
O P
NOISE, VIBRATION AND HARSHN ESS (NVH) TROUBLESHOOTING
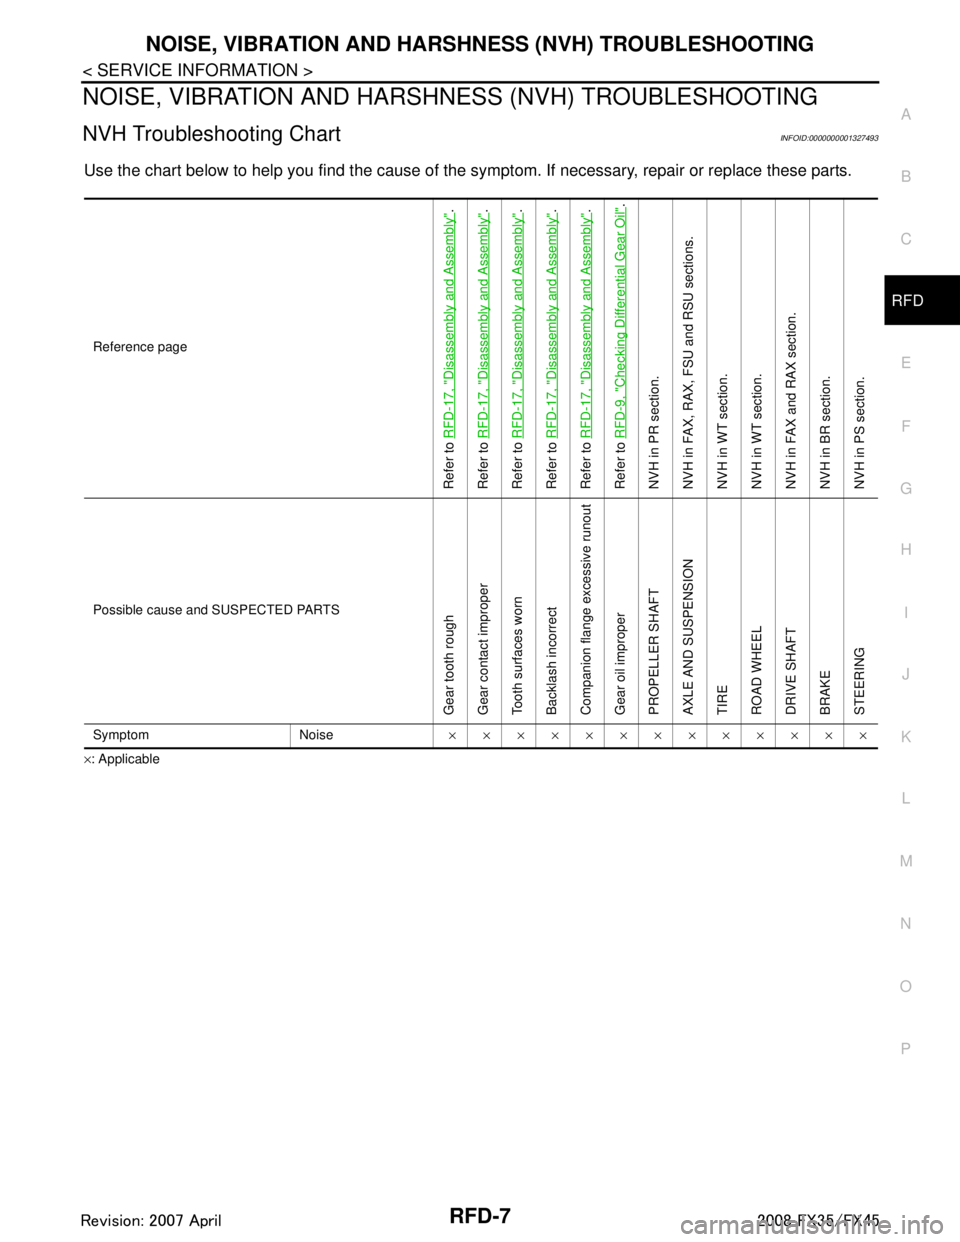
NVH Troubleshooting ChartINFOID:0000000001327493
Use the chart below to help you find t he cause of the symptom. If necessary, repair or replace these parts.
×: ApplicableReference page
Refer to
RFD-17, "
Disassembly and Assembly
".
Refer to RFD-17, "
Disassembly and Assembly
".
Refer to RFD-17, "
Disassembly and Assembly
".
Refer to RFD-17, "
Disassembly and Assembly
".
Refer to RFD-17, "
Disassembly and Assembly
".
Refer to RFD-9, "
Checking Differential Gear Oil
".
NVH in PR section.
NVH in FAX, RAX, FSU and RSU sections.
NVH in WT section.
NVH in WT section.
NVH in FAX and RAX section.
NVH in BR section.
NVH in PS section.
Possible cause and SUSPECTED PARTS
Gear tooth rough
Gear contact improper
Tooth surfaces worn
Backlash incorrect
Companion flange excessive runout
Gear oil improper
PROPELLER SHAFT
AXLE AND SUSPENSION
TIRE
ROAD WHEEL
DRIVE SHAFT
BRAKE
STEERING
Symptom Noise ×××××××××××××
3AA93ABC3ACD3AC03ACA3AC03AC63AC53A913A773A893A873A873A8E3A773A983AC73AC93AC03AC3
3A893A873A873A8F3A773A9D3AAF3A8A3A8C3A863A9D3AAF3A8B3A8C
Page 3550 of 3924
RFD-8
< SERVICE INFORMATION >
DESCRIPTION
DESCRIPTION
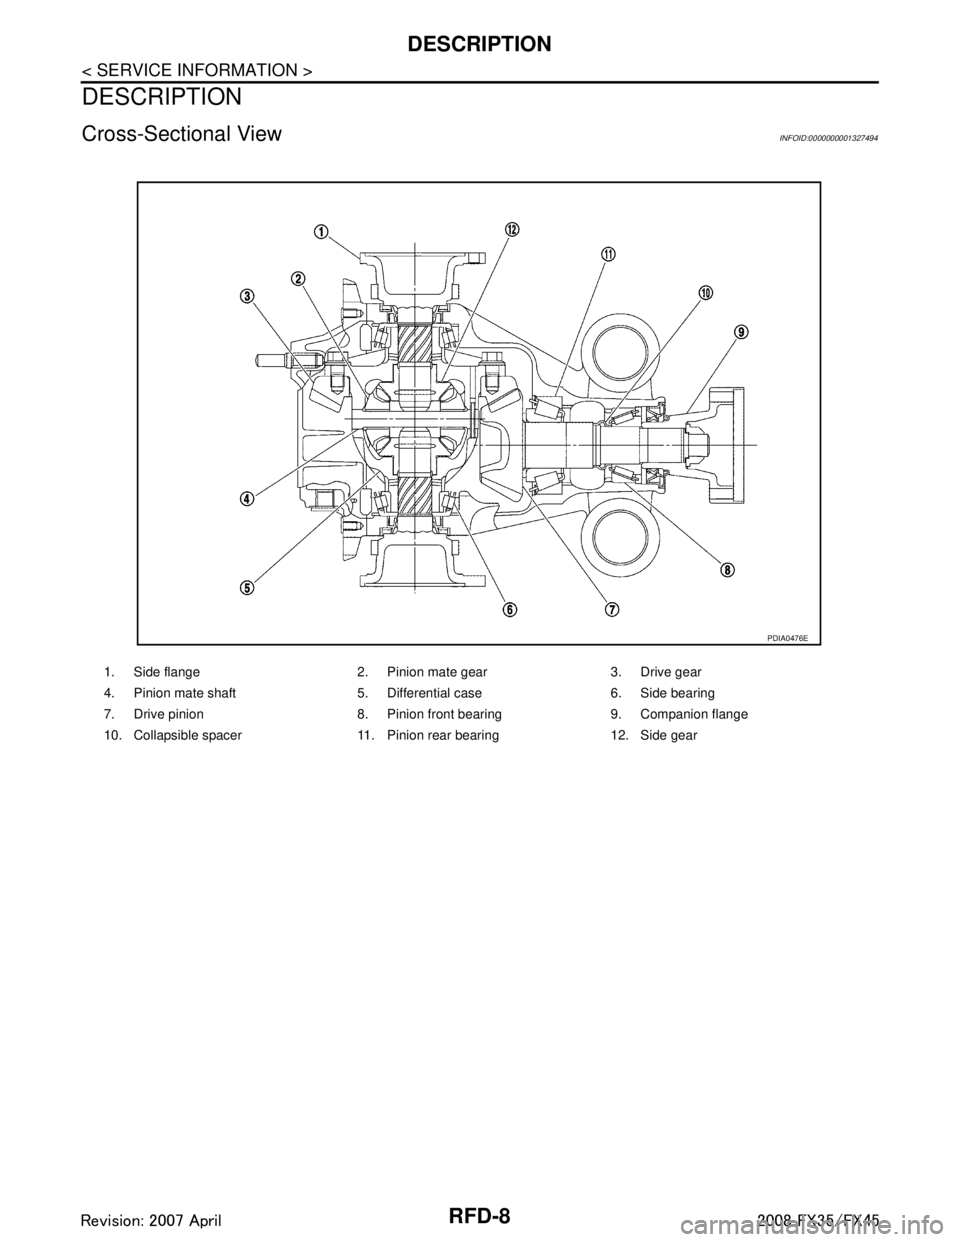
Cross-Sectional ViewINFOID:0000000001327494
1. Side flange 2. Pinion mate gear 3. Drive gear
4. Pinion mate shaft 5. Differential case 6. Side bearing
7. Drive pinion 8. Pinion front bearing 9. Companion flange
10. Collapsible spacer 11. Pinion rear bearing 12. Side gear
PDIA0476E
3AA93ABC3ACD3AC03ACA3AC03AC63AC53A913A773A893A873A873A8E3A773A983AC73AC93AC03AC3
3A893A873A873A8F3A773A9D3AAF3A8A3A8C3A863A9D3AAF3A8B3A8C
Page 3571 of 3924
REAR FINAL DRIVE ASSEMBLYRFD-29
< SERVICE INFORMATION >
CEF
G H
I
J
K L
M A
B
RFD
N
O P
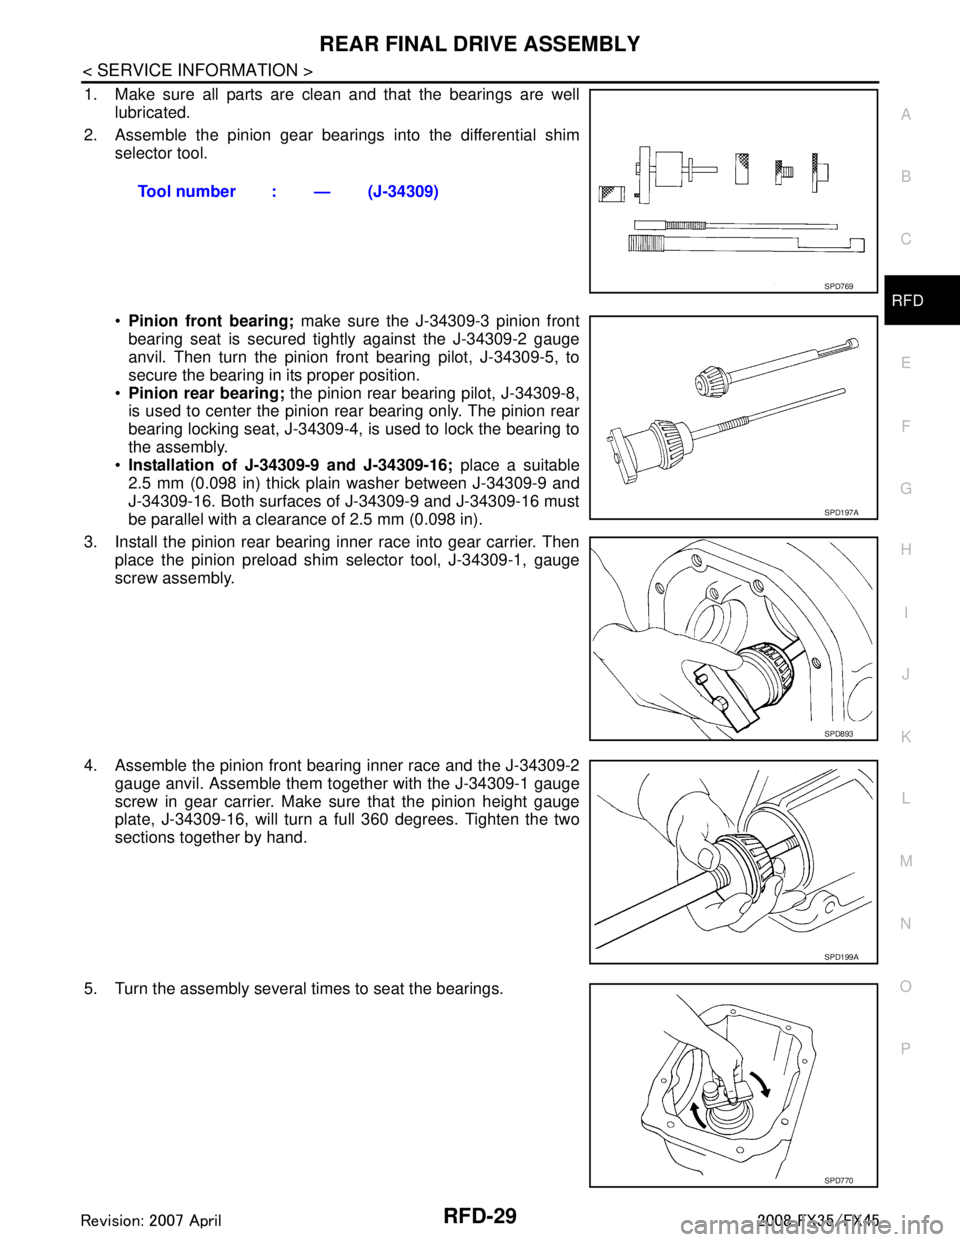
1. Make sure all parts are clean and that the bearings are well lubricated.
2. Assemble the pinion gear beari ngs into the differential shim
selector tool.
Pinion front bearing; make sure the J-34309-3 pinion front
bearing seat is secured tightly against the J-34309-2 gauge
anvil. Then turn the pinion front bearing pilot, J-34309-5, to
secure the bearing in its proper position.
Pinion rear bearing; the pinion rear bearing pilot, J-34309-8,
is used to center the pinion rear bearing only. The pinion rear
bearing locking seat, J-34309-4, is used to lock the bearing to
the assembly.
Installation of J-34309-9 and J-34309-16; place a suitable
2.5 mm (0.098 in) thick plain washer between J-34309-9 and
J-34309-16. Both surfaces of J-34309-9 and J-34309-16 must
be parallel with a clearance of 2.5 mm (0.098 in).
3. Install the pinion rear bearing inner race into gear carrier. Then place the pinion preload shim selector tool, J-34309-1, gauge
screw assembly.
4. Assemble the pinion front bearing inner race and the J-34309-2 gauge anvil. Assemble them together with the J-34309-1 gauge
screw in gear carrier. Make sure that the pinion height gauge
plate, J-34309-16, will turn a full 360 degrees. Tighten the two
sections together by hand.
5. Turn the assembly several times to seat the bearings. Tool number : — (J-34309)
SPD769
SPD197A
SPD893
SPD199A
SPD770
3AA93ABC3ACD3AC03ACA3AC03AC63AC53A913A773A893A873A873A8E3A773A983AC73AC93AC03AC3
3A893A873A873A8F3A773A9D3AAF3A8A3A8C3A863A9D3AAF3A8B3A8C
Page 3582 of 3924
RSU-1
SUSPENSION
C
DF
G H
I
J
K L
M
SECTION RSU
A
B
RSU
N
O PCONTENTS
REAR SUSPENSION
SERVICE INFORMATION .. ..........................2
PRECAUTIONS .............................................. .....2
Cautions .............................................................. ......2
PREPARATION ...................................................3
Special Service Tool ........................................... ......3
Commercial Service Tool ..........................................3
NOISE, VIBRATION AND HARSHNESS
(NVH) TROUBLESHOOTING .............................
4
NVH Troubleshooting Chart ................................ ......4
REAR SUSPENSION ASSEMBLY .....................5
On-Vehicle Inspection and Service ..................... ......5
Wheel AlignmentInspection .......................................5
Removal and Installation ...........................................6
SHOCK ABSORBER ..........................................9
Removal and Installation ..................................... ......9
Disassembly and Assembly ......................................9
SUSPENSION ARM ..........................................11
Removal and Installation ..................................... ....11
RADIUS ROD ................................... .................13
Removal and Installation ..................................... ....13
FRONT LOWER LINK .......................................14
Removal and Installation .........................................14
REAR LOWER LINK & COIL SPRING .............15
Removal and Installation .........................................15
STABILIZER BAR .............................................16
Removal and Installation .........................................16
REAR SUSPENSION MEMBER .......................17
Removal and Installation ..................................... ....17
SERVICE DATA AND SPECIFICATIONS
(SDS) .................................................................
18
Wheel Alignment (Unladen*) ...................................18
Ball Joint ..................................................................18
Wheelarch Height (Unladen*) ..................................18
3AA93ABC3ACD3AC03ACA3AC03AC63AC53A913A773A893A873A873A8E3A773A983AC73AC93AC03AC3
3A893A873A873A8F3A773A9D3AAF3A8A3A8C3A863A9D3AAF3A8B3A8C
Page 3585 of 3924
RSU-4
< SERVICE INFORMATION >
NOISE, VIBRATION AND HARSHNESS (NVH) TROUBLESHOOTING
NOISE, VIBRATION AND HARSHNESS (NVH) TROUBLESHOOTING
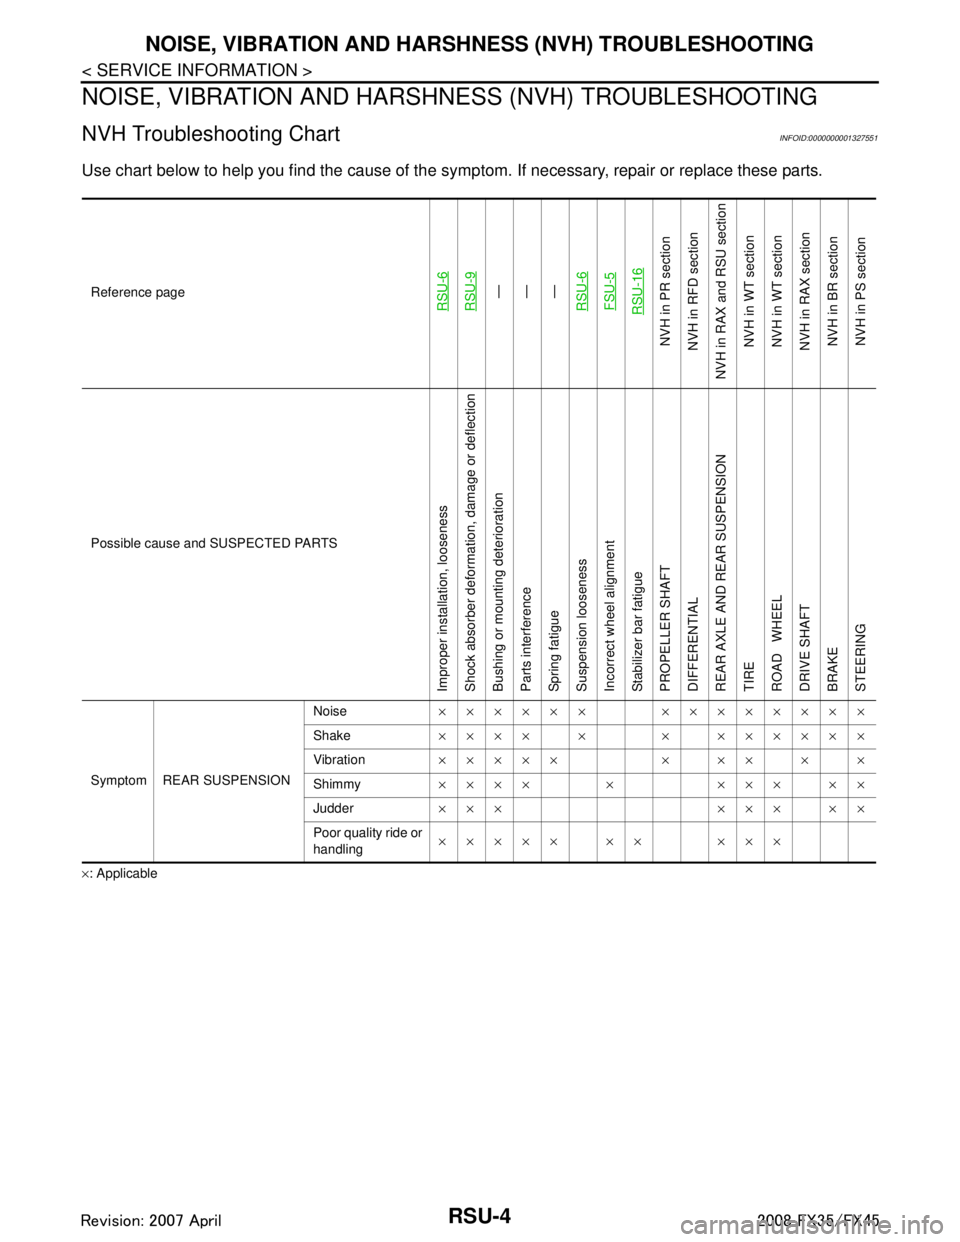
NVH Troubleshooting ChartINFOID:0000000001327551
Use chart below to help you find the cause of the symp tom. If necessary, repair or replace these parts.
×: ApplicableReference page
RSU-6RSU-9—
—
—
RSU-6FSU-5RSU-16
NVH in PR section
NVH in RFD section
NVH in RAX and RSU section
NVH in WT section
NVH in WT section
NVH in RAX section
NVH in BR sectionNVH in PS section
Possible cause and SUSPECTED PARTS
Improper installation, looseness
Shock absorber deformation, damage or deflection
Bushing or mounting deterioration
Parts interference
Spring fatigue
Suspension looseness
Incorrect wheel alignment
Stabilizer bar fatigue
PROPELLER SHAFT
DIFFERENTIAL
REAR AXLE AND REAR SUSPENSION
TIRE
ROAD WHEEL
DRIVE SHAFT
BRAKE
STEERING
Symptom REAR SUSPENSION Noise
×××××× ××××××××
Shake ×××× × × ××××××
Vibration ××××× × ×× × ×
Shimmy ×××× × ××× ××
Judder ××× ××× ××
Poor quality ride or
handling ××××× ×× ×××
3AA93ABC3ACD3AC03ACA3AC03AC63AC53A913A773A893A873A873A8E3A773A983AC73AC93AC03AC3
3A893A873A873A8F3A773A9D3AAF3A8A3A8C3A863A9D3AAF3A8B3A8C
Page 3600 of 3924
SB-1
RESTRAINTS
C
DE
F
G
I
J
K L
M
SECTION SB
A
B
SB
N
O P
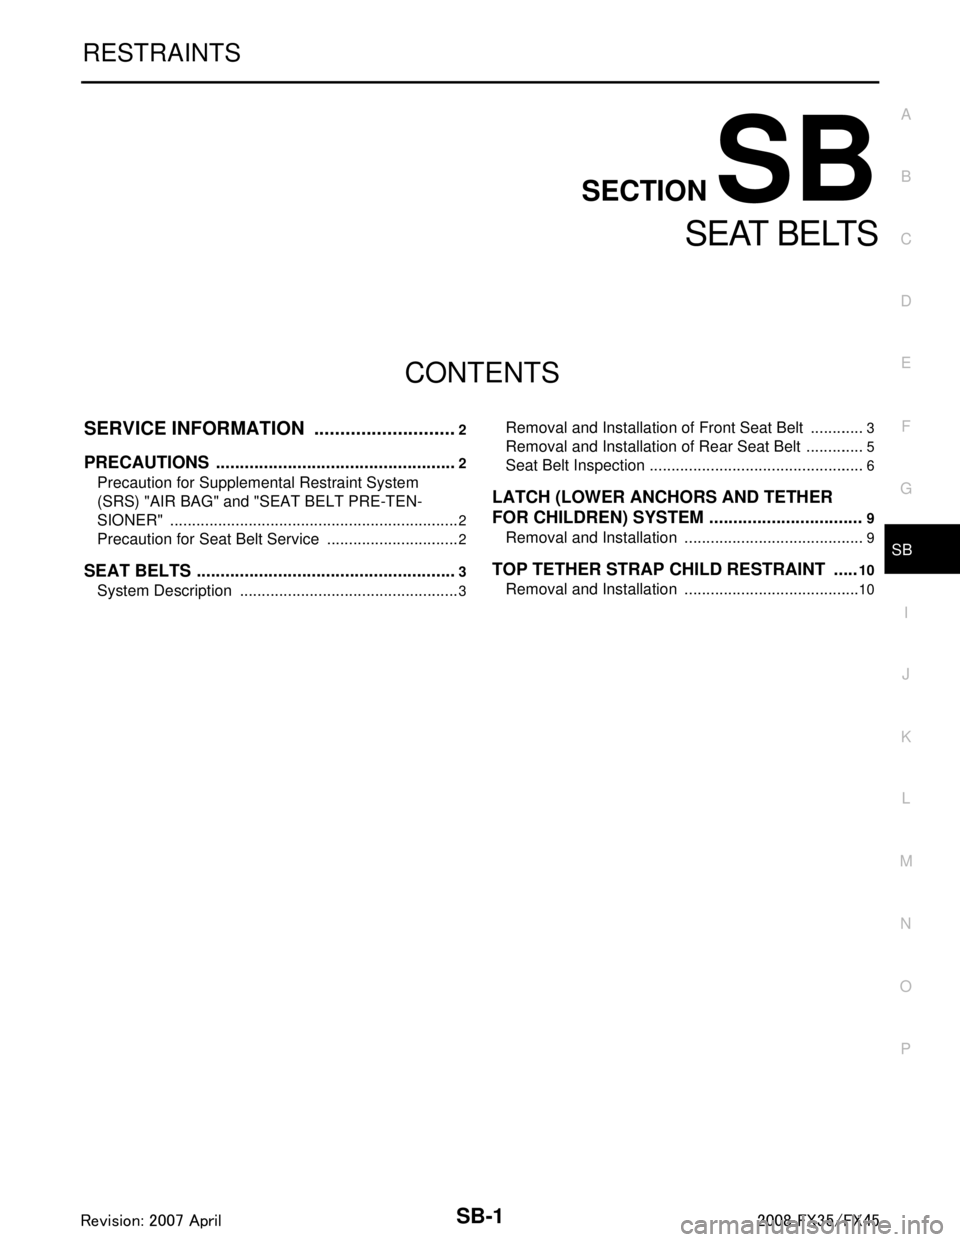
CONTENTS
SEAT BELTS
SERVICE INFORMATION .. ..........................2
PRECAUTIONS .............................................. .....2
Precaution for Supplemental Restraint System
(SRS) "AIR BAG" and "SEAT BELT PRE-TEN-
SIONER" ............................................................. ......
2
Precaution for Seat Belt Service ...............................2
SEAT BELTS .......................................................3
System Description ............................................. ......3
Removal and Installation of Front Seat Belt ........ .....3
Removal and Installation of Rear Seat Belt ..............5
Seat Belt Inspection ..................................................6
LATCH (LOWER ANCHORS AND TETHER
FOR CHILDREN) SYSTEM ................................
9
Removal and Installation ..................................... .....9
TOP TETHER STRAP CHILD RESTRAINT .....10
Removal and Installation .........................................10
3AA93ABC3ACD3AC03ACA3AC03AC63AC53A913A773A893A873A873A8E3A773A983AC73AC93AC03AC3
3A893A873A873A8F3A773A9D3AAF3A8A3A8C3A863A9D3AAF3A8B3A8C
Page 3602 of 3924
SEAT BELTSSB-3
< SERVICE INFORMATION >
C
DE
F
G
I
J
K L
M A
B
SB
N
O P
SEAT BELTS
System DescriptionINFOID:0000000001327734
SEAT BELT WARNING CHIME
With ignition switch turned ON and seat belt unfastened (seat belt switch ON), warning chime will sound for
approximately 6 seconds.
If warning chime does not sound, refer to DI-61, "
Symptom Chart" in DI section.
SEAT BELT WARNING LAMP
Fasten driver's seat belt.
The seat belt warning lamp should go out.
If the seat belt warning lamp does not go out, refer to DI-36, "
Wiring Diagram - WARN -".
Removal and Installation of Front Seat BeltINFOID:0000000001327735
CAUTION:
Before servicing SRS, turn the igni tion switch OFF, disconnect both ba ttery cables and wait at least 3
minutes.
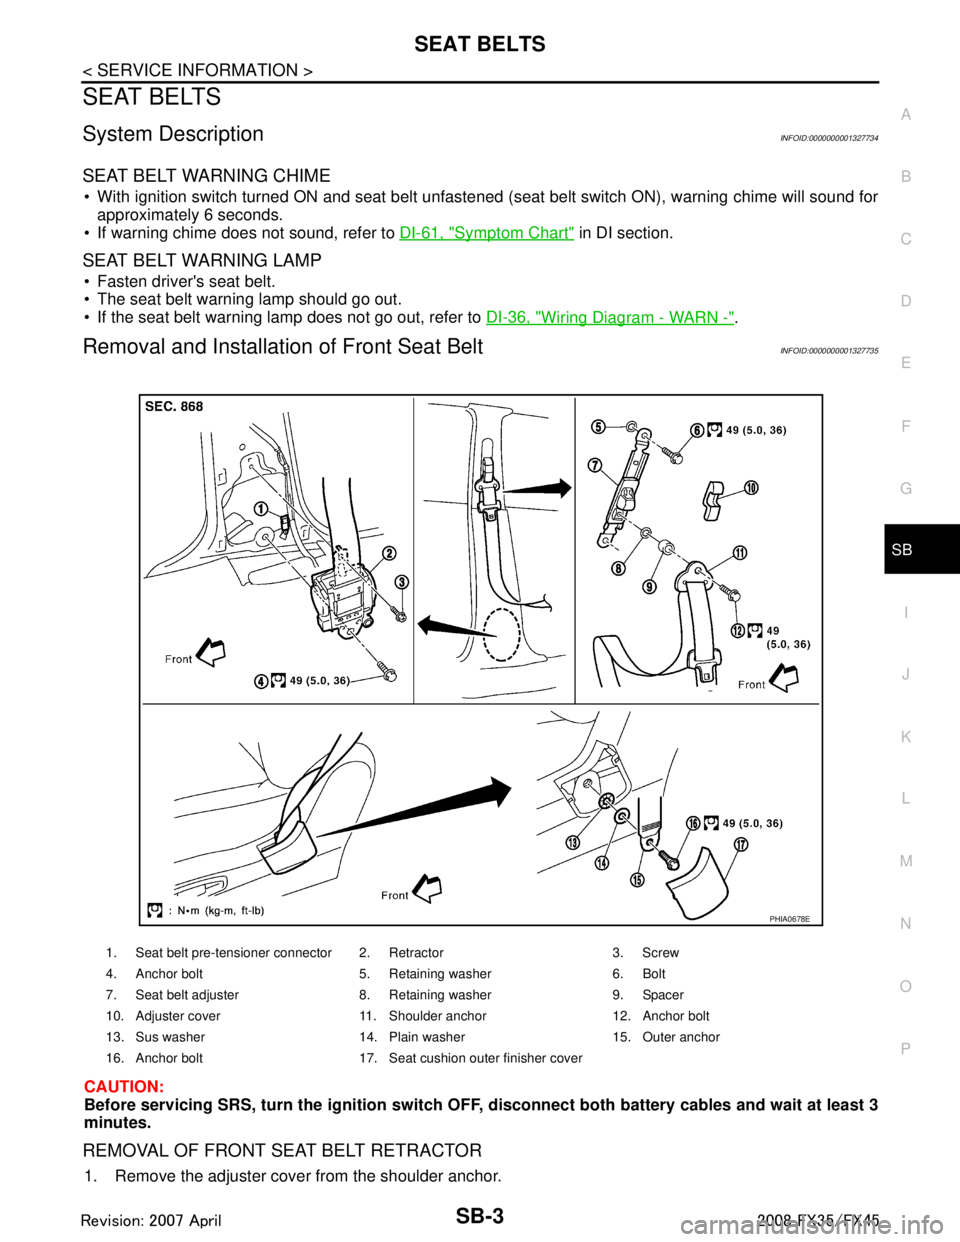
REMOVAL OF FRONT SEAT BELT RETRACTOR
1. Remove the adjuster cover from the shoulder anchor.
1. Seat belt pre-tensioner connector 2. Retractor 3. Screw
4. Anchor bolt 5. Retaining washer 6. Bolt
7. Seat belt adjuster 8. Retaining washer 9. Spacer
10. Adjuster cover 11. Shoulder anchor 12. Anchor bolt
13. Sus washer 14. Plain washer 15. Outer anchor
16. Anchor bolt 17. Seat cushion outer finisher cover
PHIA0678E
3AA93ABC3ACD3AC03ACA3AC03AC63AC53A913A773A893A873A873A8E3A773A983AC73AC93AC03AC3
3A893A873A873A8F3A773A9D3AAF3A8A3A8C3A863A9D3AAF3A8B3A8C
Page 3610 of 3924
SC-1
ELECTRICAL
C
DE
F
G H
I
J
L
M
SECTION SC
A
B
SC
N
O P
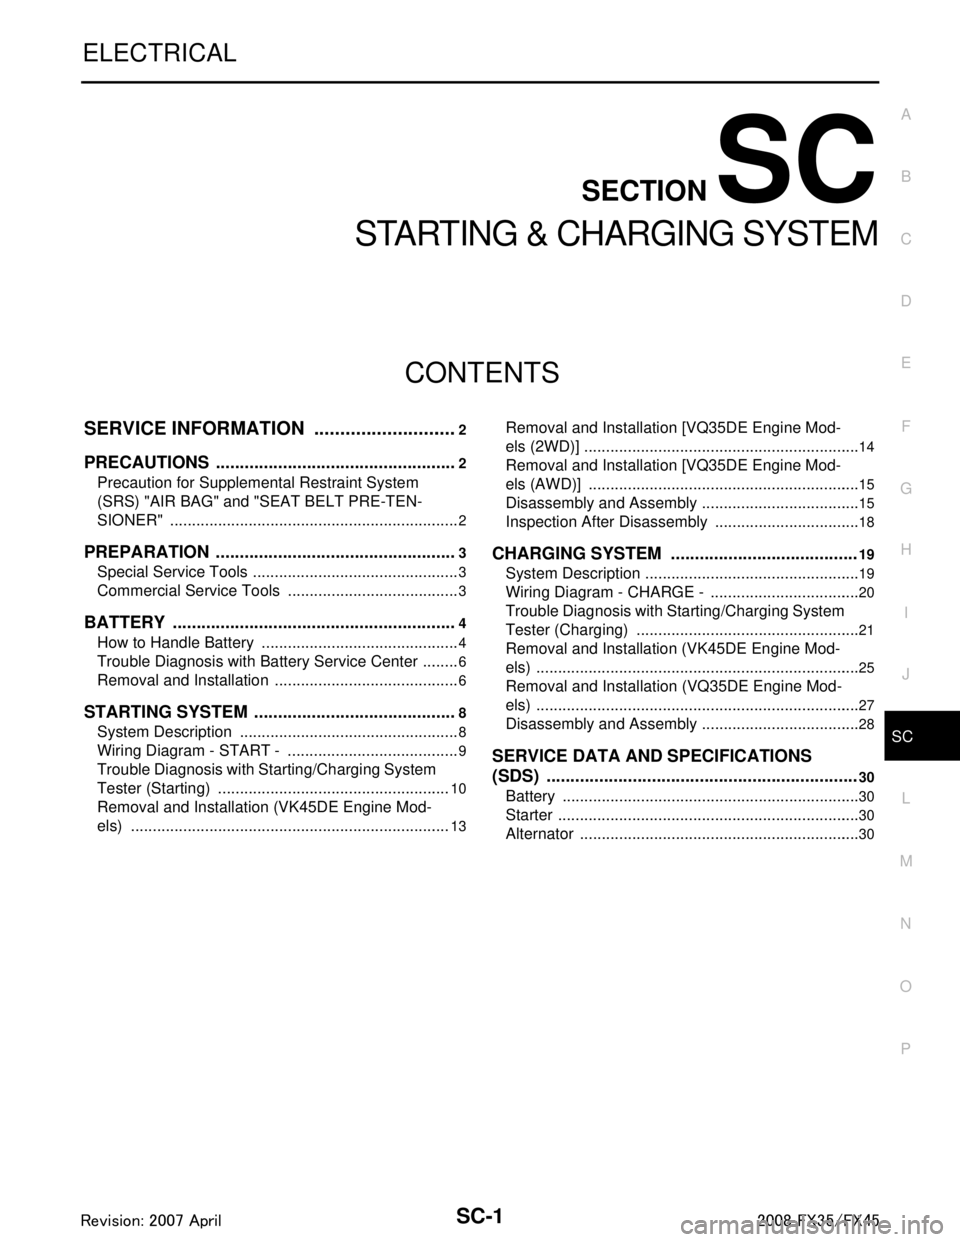
CONTENTS
STARTING & CHARGING SYSTEM
SERVICE INFORMATION .. ..........................2
PRECAUTIONS .............................................. .....2
Precaution for Supplemental Restraint System
(SRS) "AIR BAG" and "SEAT BELT PRE-TEN-
SIONER" ............................................................. ......
2
PREPARATION ...................................................3
Special Service Tools .......................................... ......3
Commercial Service Tools ........................................3
BATTERY ............................................................4
How to Handle Battery ........................................ ......4
Trouble Diagnosis with Battery Service Center .........6
Removal and Installation ...........................................6
STARTING SYSTEM ...........................................8
System Description ............................................. ......8
Wiring Diagram - START - ........................................9
Trouble Diagnosis with Starting/Charging System
Tester (Starting) ......................................................
10
Removal and Installation (VK45DE Engine Mod-
els) ..........................................................................
13
Removal and Installation [VQ35DE Engine Mod-
els (2WD)] ............................................................ ....
14
Removal and Installation [VQ35DE Engine Mod-
els (AWD)] ...............................................................
15
Disassembly and Assembly .....................................15
Inspection After Disassembly ..................................18
CHARGING SYSTEM .......................................19
System Description ..................................................19
Wiring Diagram - CHARGE - ...................................20
Trouble Diagnosis with Starting/Charging System
Tester (Charging) ....................................................
21
Removal and Installation (VK45DE Engine Mod-
els) ...........................................................................
25
Removal and Installation (VQ35DE Engine Mod-
els) ...........................................................................
27
Disassembly and Assembly .....................................28
SERVICE DATA AND SPECIFICATIONS
(SDS) .................................................................
30
Battery .....................................................................30
Starter ......................................................................30
Alternator .................................................................30
3AA93ABC3ACD3AC03ACA3AC03AC63AC53A913A773A893A873A873A8E3A773A983AC73AC93AC03AC3
3A893A873A873A8F3A773A9D3AAF3A8A3A8C3A863A9D3AAF3A8B3A8C