Page 2621 of 3000
BR–26BRAKE – FRONT BRAKE
BR
DISASSEMBLY
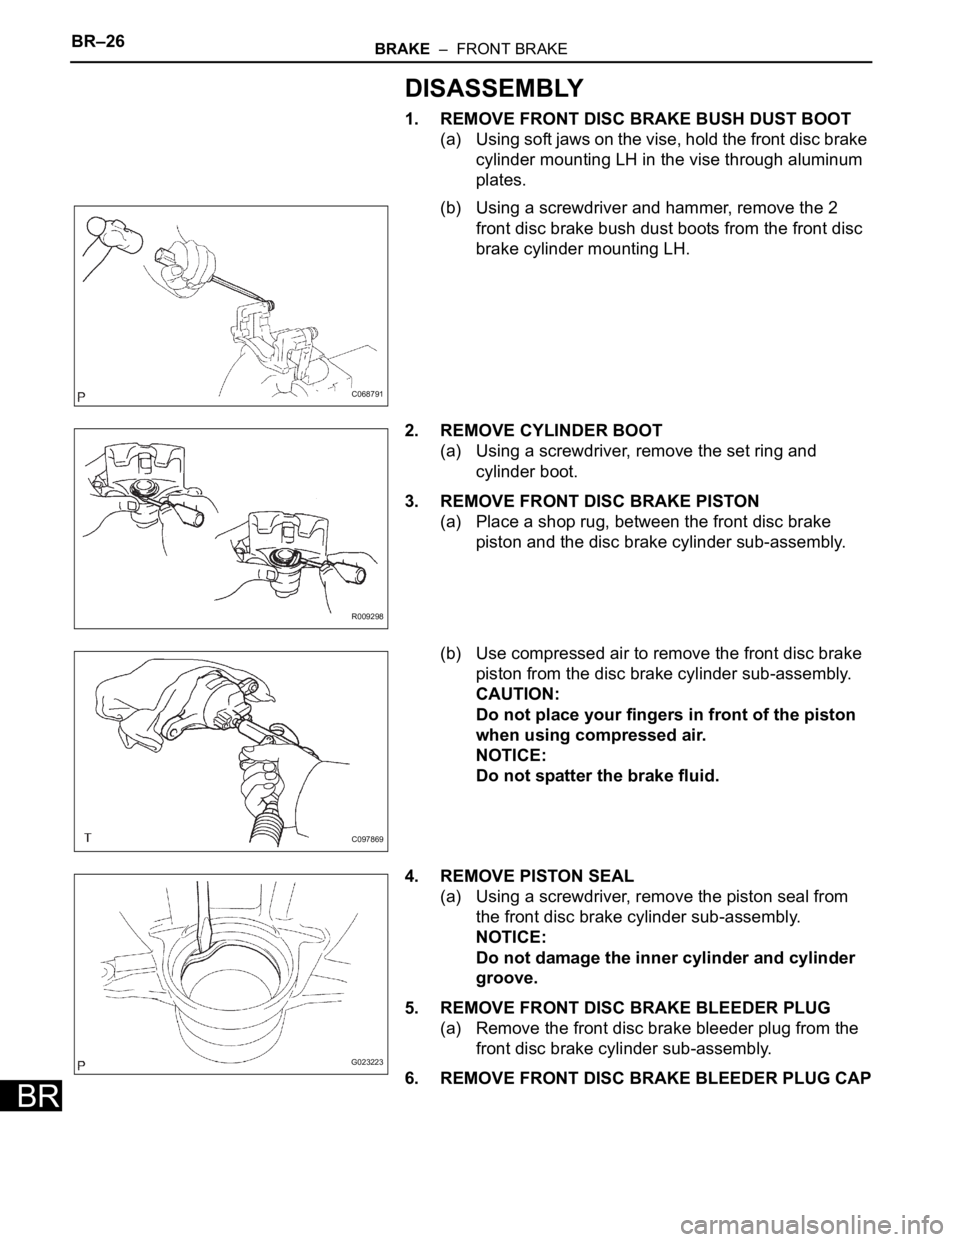
1. REMOVE FRONT DISC BRAKE BUSH DUST BOOT
(a) Using soft jaws on the vise, hold the front disc brake
cylinder mounting LH in the vise through aluminum
plates.
(b) Using a screwdriver and hammer, remove the 2
front disc brake bush dust boots from the front disc
brake cylinder mounting LH.
2. REMOVE CYLINDER BOOT
(a) Using a screwdriver, remove the set ring and
cylinder boot.
3. REMOVE FRONT DISC BRAKE PISTON
(a) Place a shop rug, between the front disc brake
piston and the disc brake cylinder sub-assembly.
(b) Use compressed air to remove the front disc brake
piston from the disc brake cylinder sub-assembly.
CAUTION:
Do not place your fingers in front of the piston
when using compressed air.
NOTICE:
Do not spatter the brake fluid.
4. REMOVE PISTON SEAL
(a) Using a screwdriver, remove the piston seal from
the front disc brake cylinder sub-assembly.
NOTICE:
Do not damage the inner cylinder and cylinder
groove.
5. REMOVE FRONT DISC BRAKE BLEEDER PLUG
(a) Remove the front disc brake bleeder plug from the
front disc brake cylinder sub-assembly.
6. REMOVE FRONT DISC BRAKE BLEEDER PLUG CAP
C068791
R009298
C097869
G023223
Page 2624 of 3000
BRAKE – FRONT BRAKEBR–29
BR
4. INSTALL FRONT DISC BRAKE BLEEDER PLUG CAP
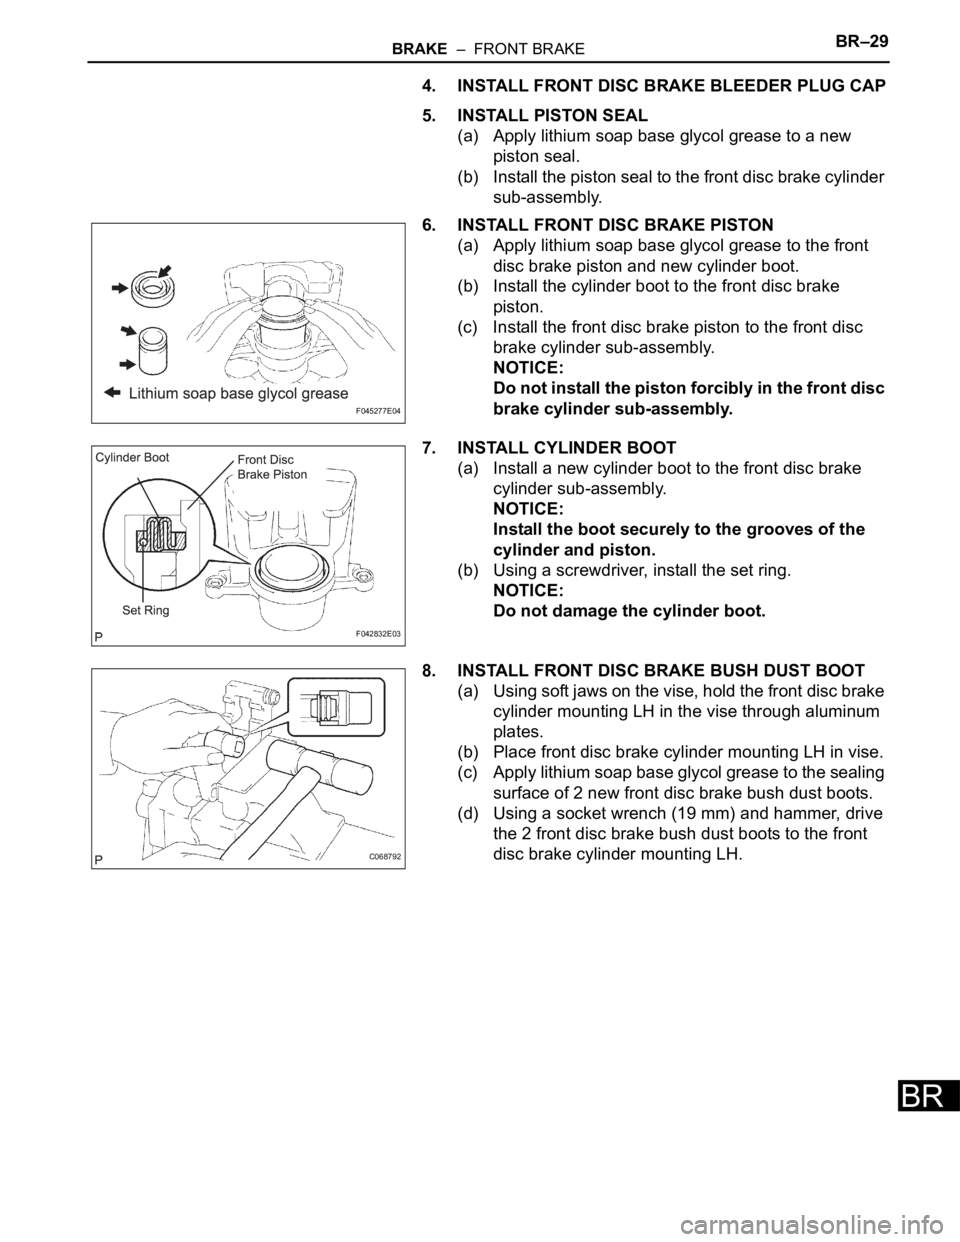
5. INSTALL PISTON SEAL
(a) Apply lithium soap base glycol grease to a new
piston seal.
(b) Install the piston seal to the front disc brake cylinder
sub-assembly.
6. INSTALL FRONT DISC BRAKE PISTON
(a) Apply lithium soap base glycol grease to the front
disc brake piston and new cylinder boot.
(b) Install the cylinder boot to the front disc brake
piston.
(c) Install the front disc brake piston to the front disc
brake cylinder sub-assembly.
NOTICE:
Do not install the piston forcibly in the front disc
brake cylinder sub-assembly.
7. INSTALL CYLINDER BOOT
(a) Install a new cylinder boot to the front disc brake
cylinder sub-assembly.
NOTICE:
Install the boot securely to the grooves of the
cylinder and piston.
(b) Using a screwdriver, install the set ring.
NOTICE:
Do not damage the cylinder boot.
8. INSTALL FRONT DISC BRAKE BUSH DUST BOOT
(a) Using soft jaws on the vise, hold the front disc brake
cylinder mounting LH in the vise through aluminum
plates.
(b) Place front disc brake cylinder mounting LH in vise.
(c) Apply lithium soap base glycol grease to the sealing
surface of 2 new front disc brake bush dust boots.
(d) Using a socket wrench (19 mm) and hammer, drive
the 2 front disc brake bush dust boots to the front
disc brake cylinder mounting LH.
F045277E04
F042832E03
C068792
Page 2626 of 3000
BR–34BRAKE – REAR DISC BRAKE
BR
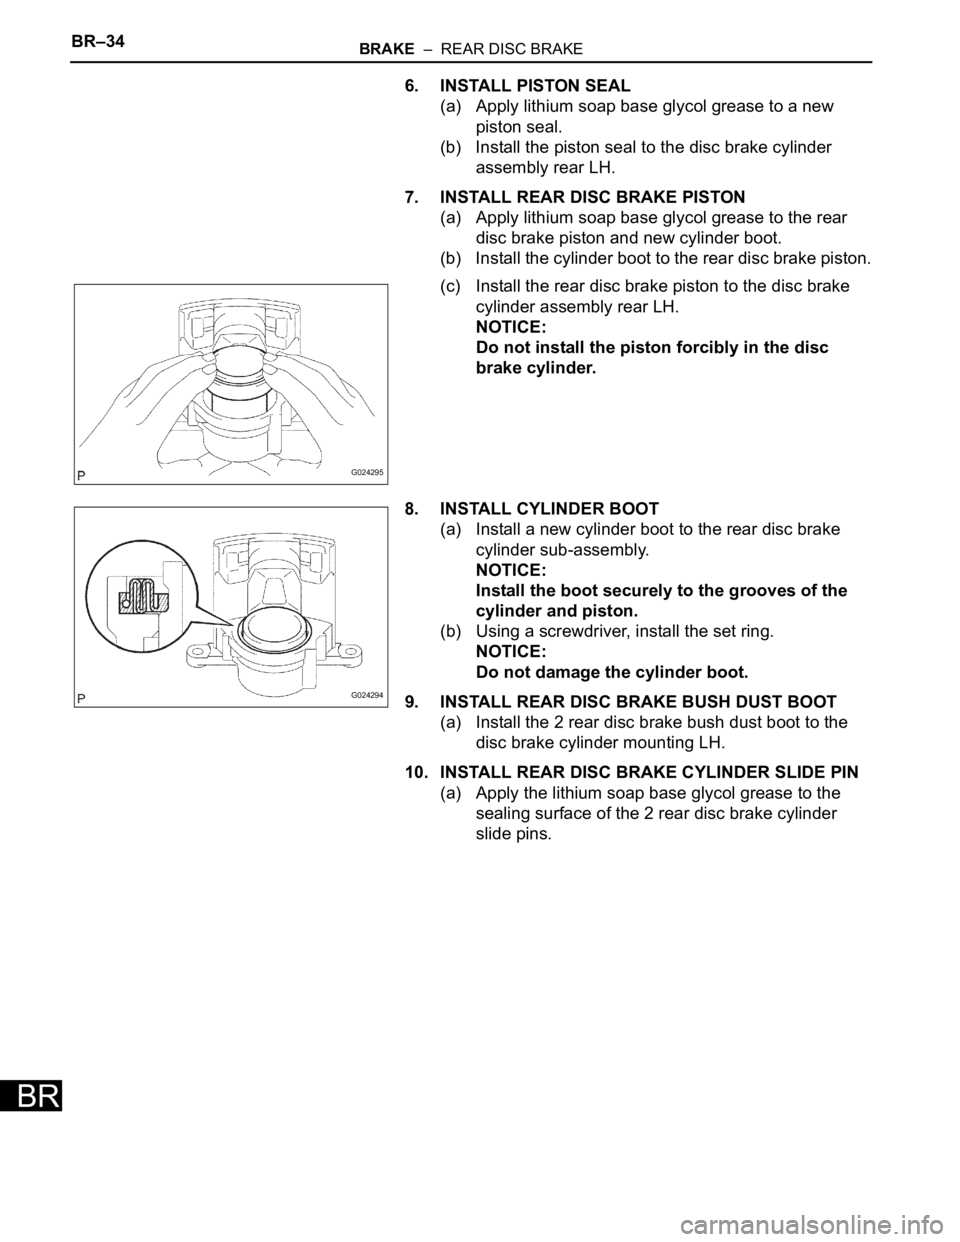
6. INSTALL PISTON SEAL
(a) Apply lithium soap base glycol grease to a new
piston seal.
(b) Install the piston seal to the disc brake cylinder
assembly rear LH.
7. INSTALL REAR DISC BRAKE PISTON
(a) Apply lithium soap base glycol grease to the rear
disc brake piston and new cylinder boot.
(b) Install the cylinder boot to the rear disc brake piston.
(c) Install the rear disc brake piston to the disc brake
cylinder assembly rear LH.
NOTICE:
Do not install the piston forcibly in the disc
brake cylinder.
8. INSTALL CYLINDER BOOT
(a) Install a new cylinder boot to the rear disc brake
cylinder sub-assembly.
NOTICE:
Install the boot securely to the grooves of the
cylinder and piston.
(b) Using a screwdriver, install the set ring.
NOTICE:
Do not damage the cylinder boot.
9. INSTALL REAR DISC BRAKE BUSH DUST BOOT
(a) Install the 2 rear disc brake bush dust boot to the
disc brake cylinder mounting LH.
10. INSTALL REAR DISC BRAKE CYLINDER SLIDE PIN
(a) Apply the lithium soap base glycol grease to the
sealing surface of the 2 rear disc brake cylinder
slide pins.
G024295
G024294
Page 2628 of 3000
BRAKE – REAR DISC BRAKEBR–31
BR
REMOVAL
HINT:
Remove the RH side by the same procedure as the LH side.
1. REMOVE REAR WHEEL
2. DRAIN BRAKE FLUID
NOTICE:
Wash the brake fluid off immediately if it attaches to
any painted surface.
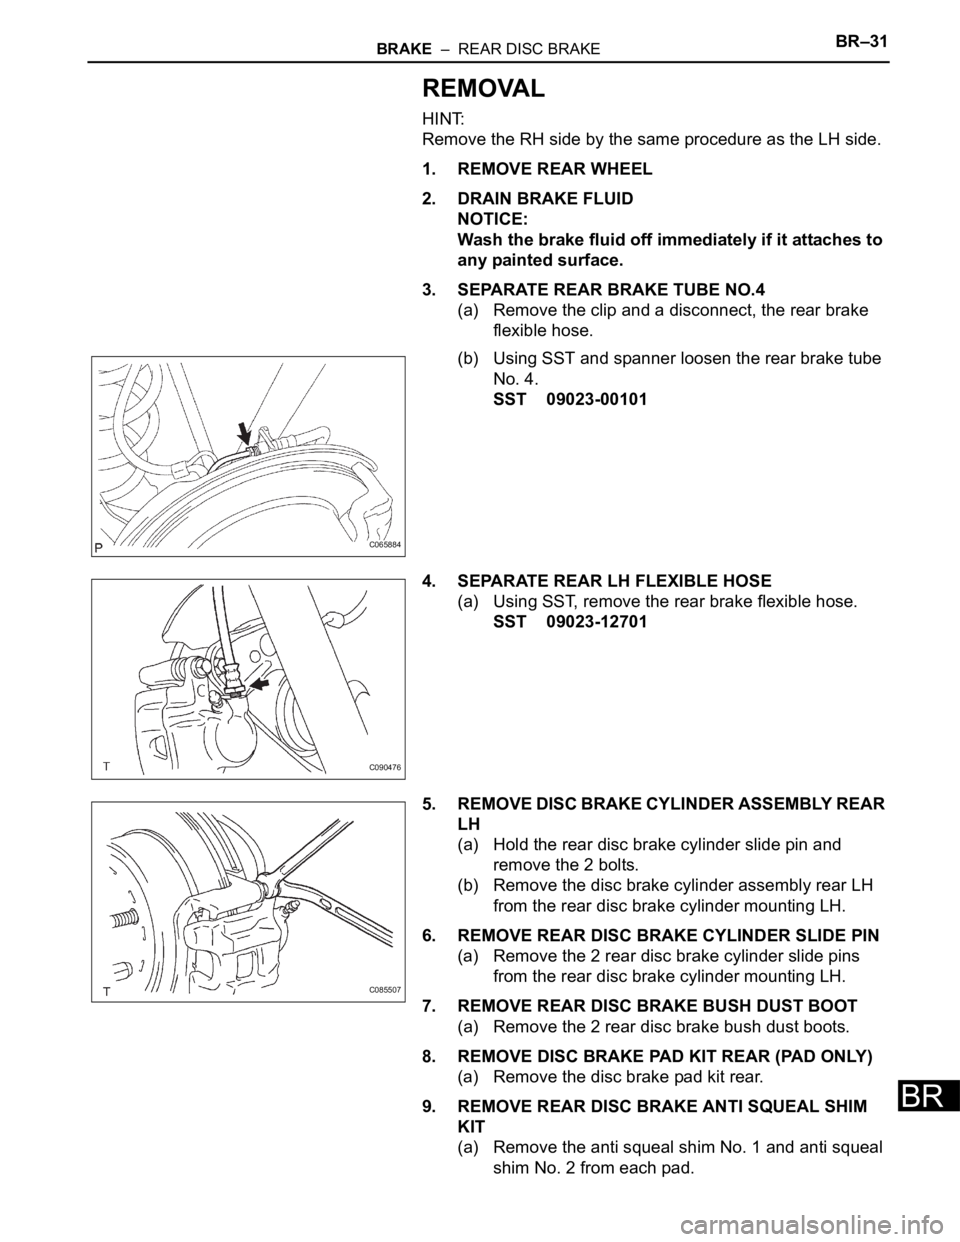
3. SEPARATE REAR BRAKE TUBE NO.4
(a) Remove the clip and a disconnect, the rear brake
flexible hose.
(b) Using SST and spanner loosen the rear brake tube
No. 4.
SST 09023-00101
4. SEPARATE REAR LH FLEXIBLE HOSE
(a) Using SST, remove the rear brake flexible hose.
SST 09023-12701
5. REMOVE DISC BRAKE CYLINDER ASSEMBLY REAR
LH
(a) Hold the rear disc brake cylinder slide pin and
remove the 2 bolts.
(b) Remove the disc brake cylinder assembly rear LH
from the rear disc brake cylinder mounting LH.
6. REMOVE REAR DISC BRAKE CYLINDER SLIDE PIN
(a) Remove the 2 rear disc brake cylinder slide pins
from the rear disc brake cylinder mounting LH.
7. REMOVE REAR DISC BRAKE BUSH DUST BOOT
(a) Remove the 2 rear disc brake bush dust boots.
8. REMOVE DISC BRAKE PAD KIT REAR (PAD ONLY)
(a) Remove the disc brake pad kit rear.
9. REMOVE REAR DISC BRAKE ANTI SQUEAL SHIM
KIT
(a) Remove the anti squeal shim No. 1 and anti squeal
shim No. 2 from each pad.
C065884
C090476
C085507
Page 2629 of 3000
BR–32BRAKE – REAR DISC BRAKE
BR
10. REMOVE REAR DISC BRAKE PAD SUPPORT PLATE
(a) Remove the rear disc brake pad support plate (No.
1) and rear disc brake pad support plate (No. 2)
from the rear disc brake cylinder mounting LH.
11. REMOVE REAR DISC BRAKE CYLINDER MOUNTING
LH
(a) Remove the bolts and rear disc brake cylinder
mounting LH.
DISASSEMBLY
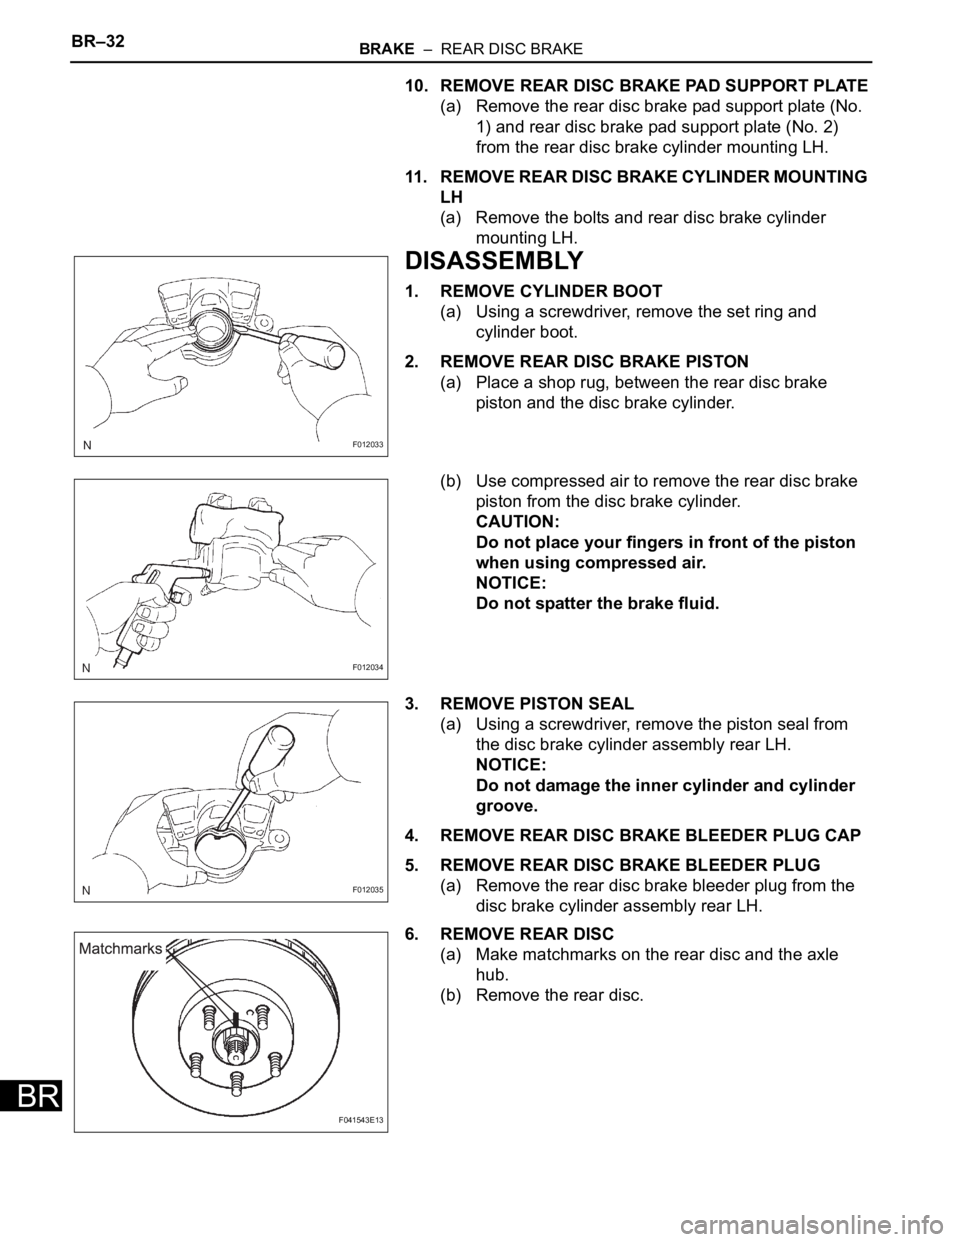
1. REMOVE CYLINDER BOOT
(a) Using a screwdriver, remove the set ring and
cylinder boot.
2. REMOVE REAR DISC BRAKE PISTON
(a) Place a shop rug, between the rear disc brake
piston and the disc brake cylinder.
(b) Use compressed air to remove the rear disc brake
piston from the disc brake cylinder.
CAUTION:
Do not place your fingers in front of the piston
when using compressed air.
NOTICE:
Do not spatter the brake fluid.
3. REMOVE PISTON SEAL
(a) Using a screwdriver, remove the piston seal from
the disc brake cylinder assembly rear LH.
NOTICE:
Do not damage the inner cylinder and cylinder
groove.
4. REMOVE REAR DISC BRAKE BLEEDER PLUG CAP
5. REMOVE REAR DISC BRAKE BLEEDER PLUG
(a) Remove the rear disc brake bleeder plug from the
disc brake cylinder assembly rear LH.
6. REMOVE REAR DISC
(a) Make matchmarks on the rear disc and the axle
hub.
(b) Remove the rear disc.
F012033
F012034
F012035
F041543E13
Page 2631 of 3000
BR–34BRAKE – REAR DISC BRAKE
BR
6. INSTALL PISTON SEAL
(a) Apply lithium soap base glycol grease to a new
piston seal.
(b) Install the piston seal to the disc brake cylinder
assembly rear LH.
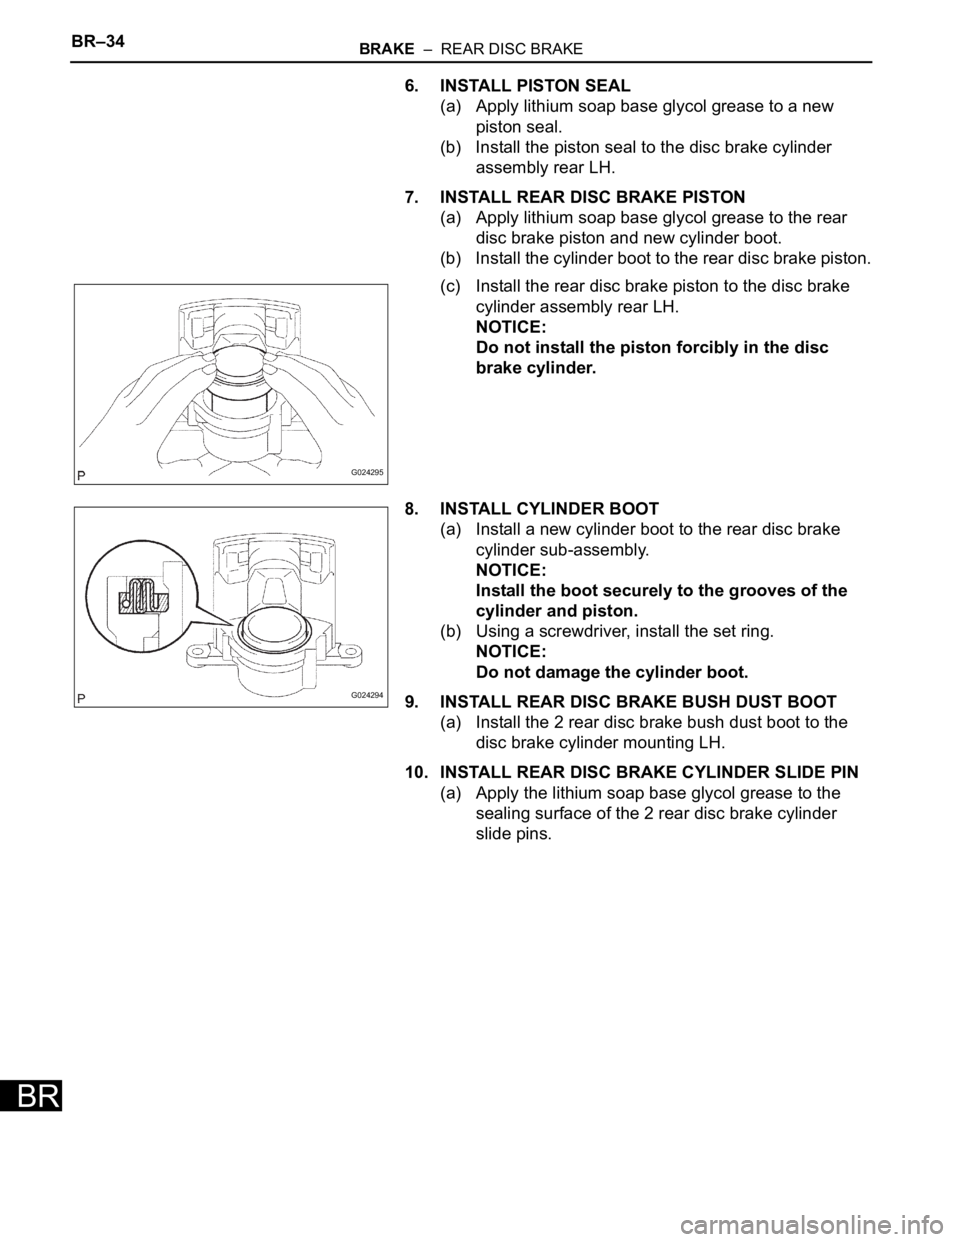
7. INSTALL REAR DISC BRAKE PISTON
(a) Apply lithium soap base glycol grease to the rear
disc brake piston and new cylinder boot.
(b) Install the cylinder boot to the rear disc brake piston.
(c) Install the rear disc brake piston to the disc brake
cylinder assembly rear LH.
NOTICE:
Do not install the piston forcibly in the disc
brake cylinder.
8. INSTALL CYLINDER BOOT
(a) Install a new cylinder boot to the rear disc brake
cylinder sub-assembly.
NOTICE:
Install the boot securely to the grooves of the
cylinder and piston.
(b) Using a screwdriver, install the set ring.
NOTICE:
Do not damage the cylinder boot.
9. INSTALL REAR DISC BRAKE BUSH DUST BOOT
(a) Install the 2 rear disc brake bush dust boot to the
disc brake cylinder mounting LH.
10. INSTALL REAR DISC BRAKE CYLINDER SLIDE PIN
(a) Apply the lithium soap base glycol grease to the
sealing surface of the 2 rear disc brake cylinder
slide pins.
G024295
G024294
Page 2638 of 3000
BR–38BRAKE – REAR DRUM BRAKE
BR
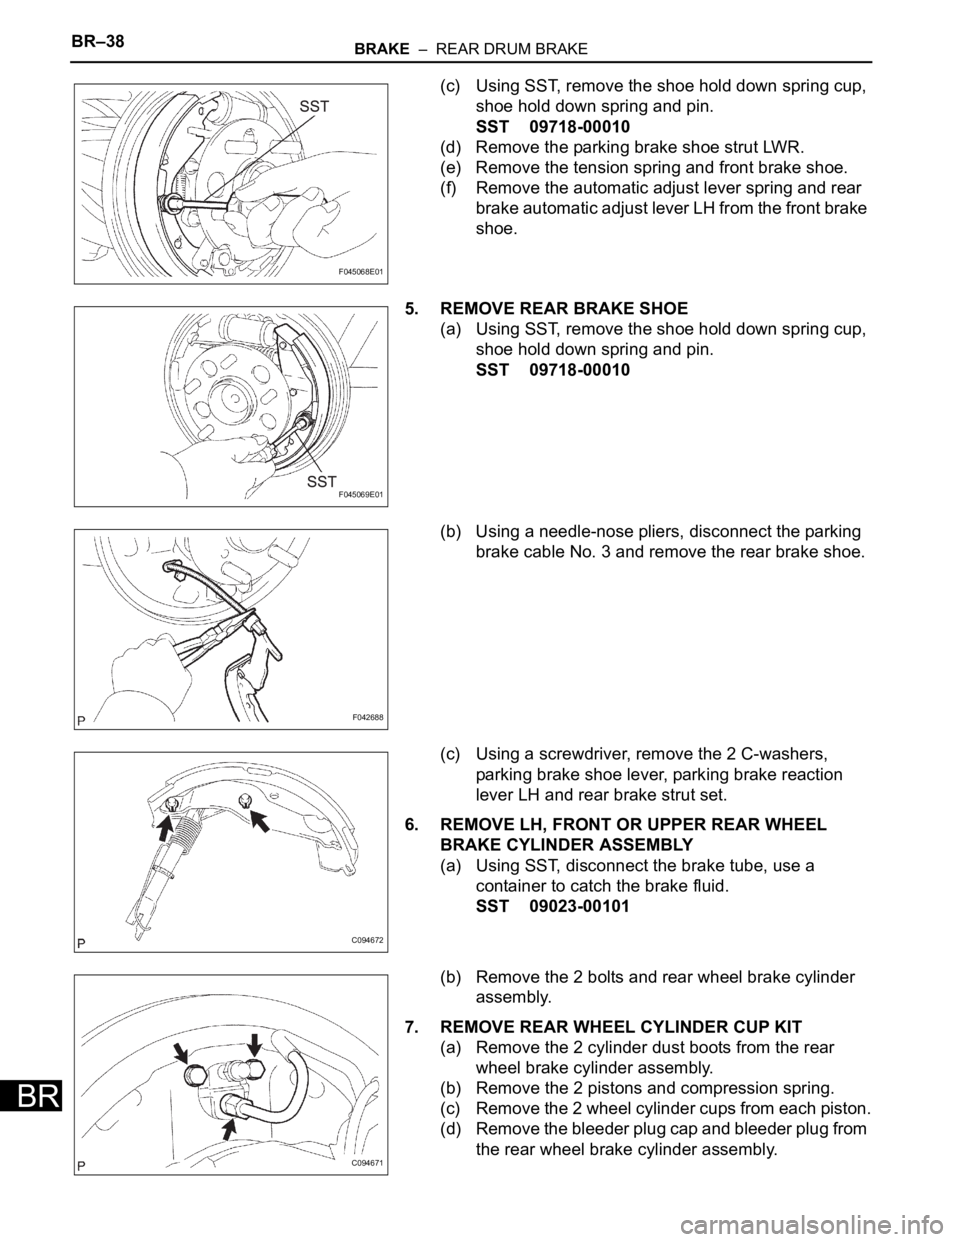
(c) Using SST, remove the shoe hold down spring cup,
shoe hold down spring and pin.
SST 09718-00010
(d) Remove the parking brake shoe strut LWR.
(e) Remove the tension spring and front brake shoe.
(f) Remove the automatic adjust lever spring and rear
brake automatic adjust lever LH from the front brake
shoe.
5. REMOVE REAR BRAKE SHOE
(a) Using SST, remove the shoe hold down spring cup,
shoe hold down spring and pin.
SST 09718-00010
(b) Using a needle-nose pliers, disconnect the parking
brake cable No. 3 and remove the rear brake shoe.
(c) Using a screwdriver, remove the 2 C-washers,
parking brake shoe lever, parking brake reaction
lever LH and rear brake strut set.
6. REMOVE LH, FRONT OR UPPER REAR WHEEL
BRAKE CYLINDER ASSEMBLY
(a) Using SST, disconnect the brake tube, use a
container to catch the brake fluid.
SST 09023-00101
(b) Remove the 2 bolts and rear wheel brake cylinder
assembly.
7. REMOVE REAR WHEEL CYLINDER CUP KIT
(a) Remove the 2 cylinder dust boots from the rear
wheel brake cylinder assembly.
(b) Remove the 2 pistons and compression spring.
(c) Remove the 2 wheel cylinder cups from each piston.
(d) Remove the bleeder plug cap and bleeder plug from
the rear wheel brake cylinder assembly.
F045068E01
F045069E01
F042688
C094672
C094671
Page 2640 of 3000
BR–40BRAKE – REAR DRUM BRAKE
BR
REASSEMBLY
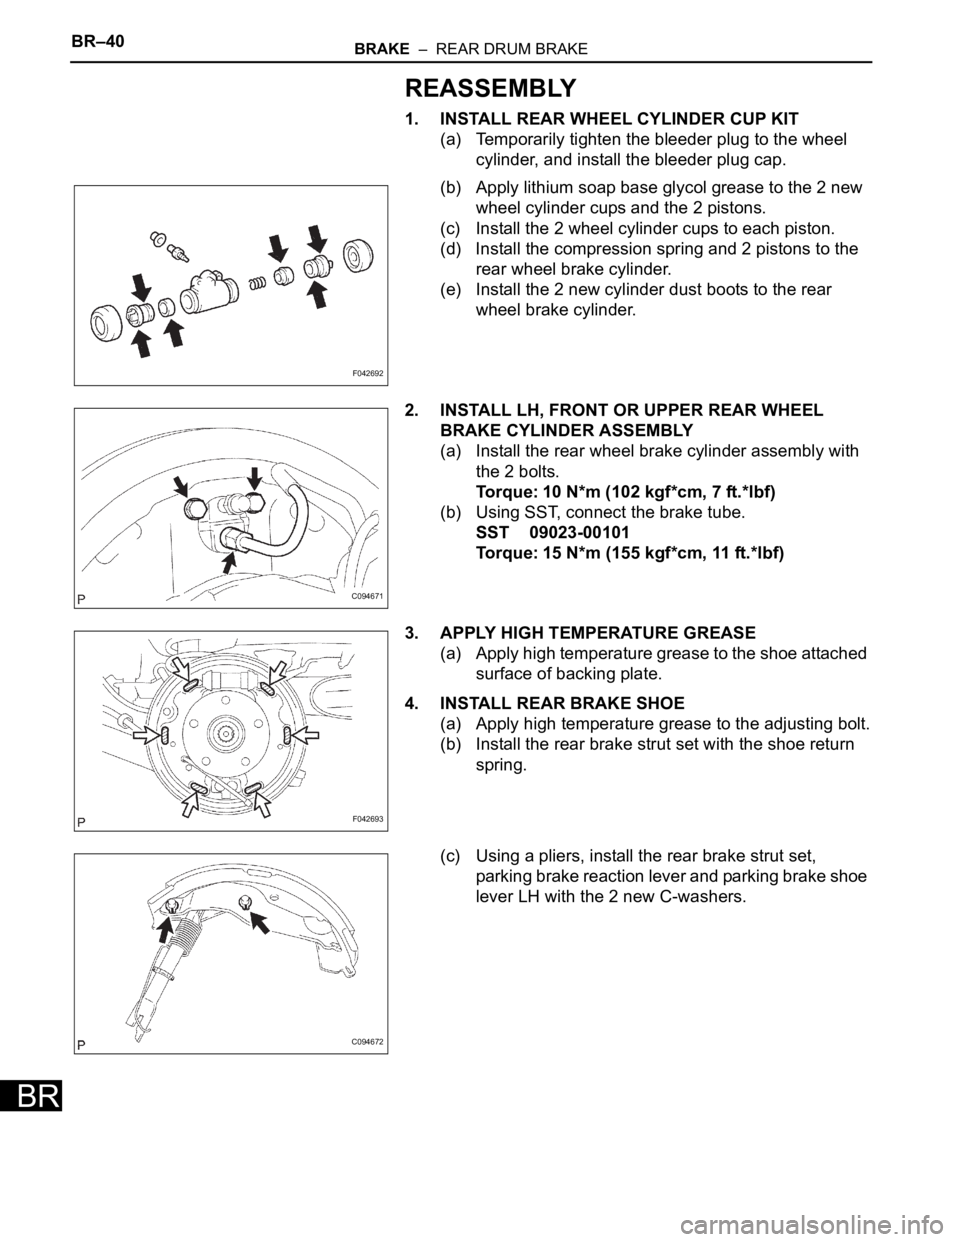
1. INSTALL REAR WHEEL CYLINDER CUP KIT
(a) Temporarily tighten the bleeder plug to the wheel
cylinder, and install the bleeder plug cap.
(b) Apply lithium soap base glycol grease to the 2 new
wheel cylinder cups and the 2 pistons.
(c) Install the 2 wheel cylinder cups to each piston.
(d) Install the compression spring and 2 pistons to the
rear wheel brake cylinder.
(e) Install the 2 new cylinder dust boots to the rear
wheel brake cylinder.
2. INSTALL LH, FRONT OR UPPER REAR WHEEL
BRAKE CYLINDER ASSEMBLY
(a) Install the rear wheel brake cylinder assembly with
the 2 bolts.
Torque: 10 N*m (102 kgf*cm, 7 ft.*lbf)
(b) Using SST, connect the brake tube.
SST 09023-00101
Torque: 15 N*m (155 kgf*cm, 11 ft.*lbf)
3. APPLY HIGH TEMPERATURE GREASE
(a) Apply high temperature grease to the shoe attached
surface of backing plate.
4. INSTALL REAR BRAKE SHOE
(a) Apply high temperature grease to the adjusting bolt.
(b) Install the rear brake strut set with the shoe return
spring.
(c) Using a pliers, install the rear brake strut set,
parking brake reaction lever and parking brake shoe
lever LH with the 2 new C-washers.
F042692
C094671
F042693
C094672