2007 TOYOTA SIENNA check engine
[x] Cancel search: check enginePage 532 of 3000
ES–2262GR-FE ENGINE CONTROL SYSTEM – SFI SYSTEM
ES
OK
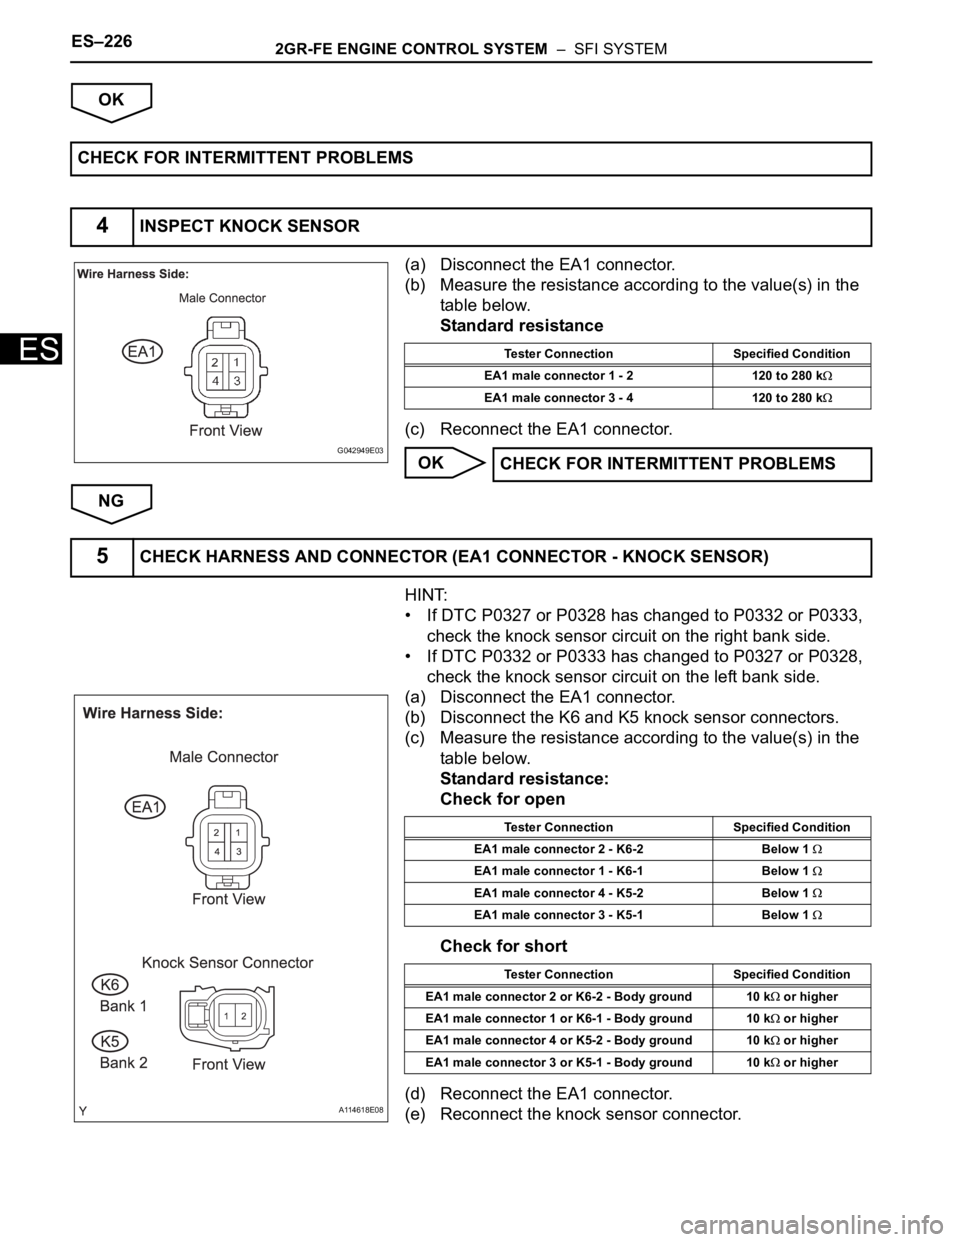
(a) Disconnect the EA1 connector.
(b) Measure the resistance according to the value(s) in the
table below.
Standard resistance
(c) Reconnect the EA1 connector.
OK
NG
HINT:
• If DTC P0327 or P0328 has changed to P0332 or P0333,
check the knock sensor circuit on the right bank side.
• If DTC P0332 or P0333 has changed to P0327 or P0328,
check the knock sensor circuit on the left bank side.
(a) Disconnect the EA1 connector.
(b) Disconnect the K6 and K5 knock sensor connectors.
(c) Measure the resistance according to the value(s) in the
table below.
Standard resistance:
Check for open
Check for short
(d) Reconnect the EA1 connector.
(e) Reconnect the knock sensor connector. CHECK FOR INTERMITTENT PROBLEMS
4INSPECT KNOCK SENSOR
G042949E03
Tester Connection Specified Condition
EA1 male connector 1 - 2 120 to 280 k
EA1 male connector 3 - 4 120 to 280 k
CHECK FOR INTERMITTENT PROBLEMS
5CHECK HARNESS AND CONNECTOR (EA1 CONNECTOR - KNOCK SENSOR)
A114618E08
Tester Connection Specified Condition
EA1 male connector 2 - K6-2 Below 1
EA1 male connector 1 - K6-1 Below 1
EA1 male connector 4 - K5-2 Below 1
EA1 male connector 3 - K5-1 Below 1
Tester Connection Specified Condition
EA1 male connector 2 or K6-2 - Body ground 10 k
or higher
EA1 male connector 1 or K6-1 - Body ground 10 k
or higher
EA1 male connector 4 or K5-2 - Body ground 10 k
or higher
EA1 male connector 3 or K5-1 - Body ground 10 k
or higher
Page 535 of 3000

2GR-FE ENGINE CONTROL SYSTEM – SFI SYSTEMES–229
ES
MONITOR DESCRIPTION
If there is no signal from the CKP sensor despite the engine revolving, the ECM interprets this as a
malfunction of the sensor.
If the malfunction is not repaired successfully, a DTC is set 10 seconds after the engine is next started.
MONITOR STRATEGY
TYPICAL ENABLING CONDITIONS
All:
Crankshaft Position Sensor Range Check during Cranking P0335:
Crankshaft Position Sensor Range Check during Engine Running P0335:
TYPICAL MALFUNCTION THRESHOLDS
Crankshaft Position Sensor Range Check during Cranking P0335:
Crankshaft Position Sensor Range Check during Engine Running P0335:
COMPONENT OPERATING RANGE
Related DTCsP0335: Crankshaft position sensor range check during cranking
P0335: Crankshaft position sensor range check during engine running
Required Sensors / Components (Main) Crankshaft Position (CKP) sensor
Required Sensors / Components (Related) -
Frequency of Operation Continuous
Duration 3 times
MIL Operation Immediate
Sequence of Operation None
The monitor will run whenever these DTCs are not
presentNone
Sta r t e r OF F
Ignition switch ON
Battery voltage 7 V or more
Minimum battery voltage while starter ON Less than 11 V
Number of VVT sensor signal pulse 6 times
CMP sensor circuit fail Not detected
Engine speed 600 rpm or more
Sta r t e r OF F
Time after starter from ON to OFF 3 seconds or more
Number of crankshaft position sensor signal pulse 132 or less, or 174 or more
CKP sensor signal No signal
CKP sensor• CKP sensor output voltage fluctuates while crankshaft is revolving
• 34 CKP sensor signals per crankshaft revolution
Page 537 of 3000
2GR-FE ENGINE CONTROL SYSTEM – SFI SYSTEMES–231
ES
INSPECTION PROCEDURE
HINT:
• If no problem is found by this diagnostic troubleshooting procedure, troubleshoot the engine
mechanical systems.
• Check the engine speed. The engine speed can be checked by using the intelligent tester. Perform the
following procedure:
(a) Connect the intelligent tester to the DLC3.
(b) Start the engine.
(c) Turn the tester on.
(d) Select the following menu items: DIAGNOSIS / ENHANCED OBD II / DATA LIST / PRIMARY /
ENGINE SPD.
The engine speed may be indicated as zero despite the engine revolving normally. This is caused
by a lack of NE signals from the Crankshaft Position (CKP) sensor. Alternatively, the engine speed
may be indicated as lower than the actual engine speed, if the CKP sensor voltage output is
insufficient.
• Read freeze frame data using the intelligent tester. The ECM records vehicle and driving condition
information as freeze frame data the moment a DTC is stored. When troubleshooting, freeze frame
data can be helpful in determining whether the vehicle was running or stopped, whether the engine
was warmed up or not, whether the air-fuel ratio was lean or rich, as well as other data recorded at the
time of a malfunction.
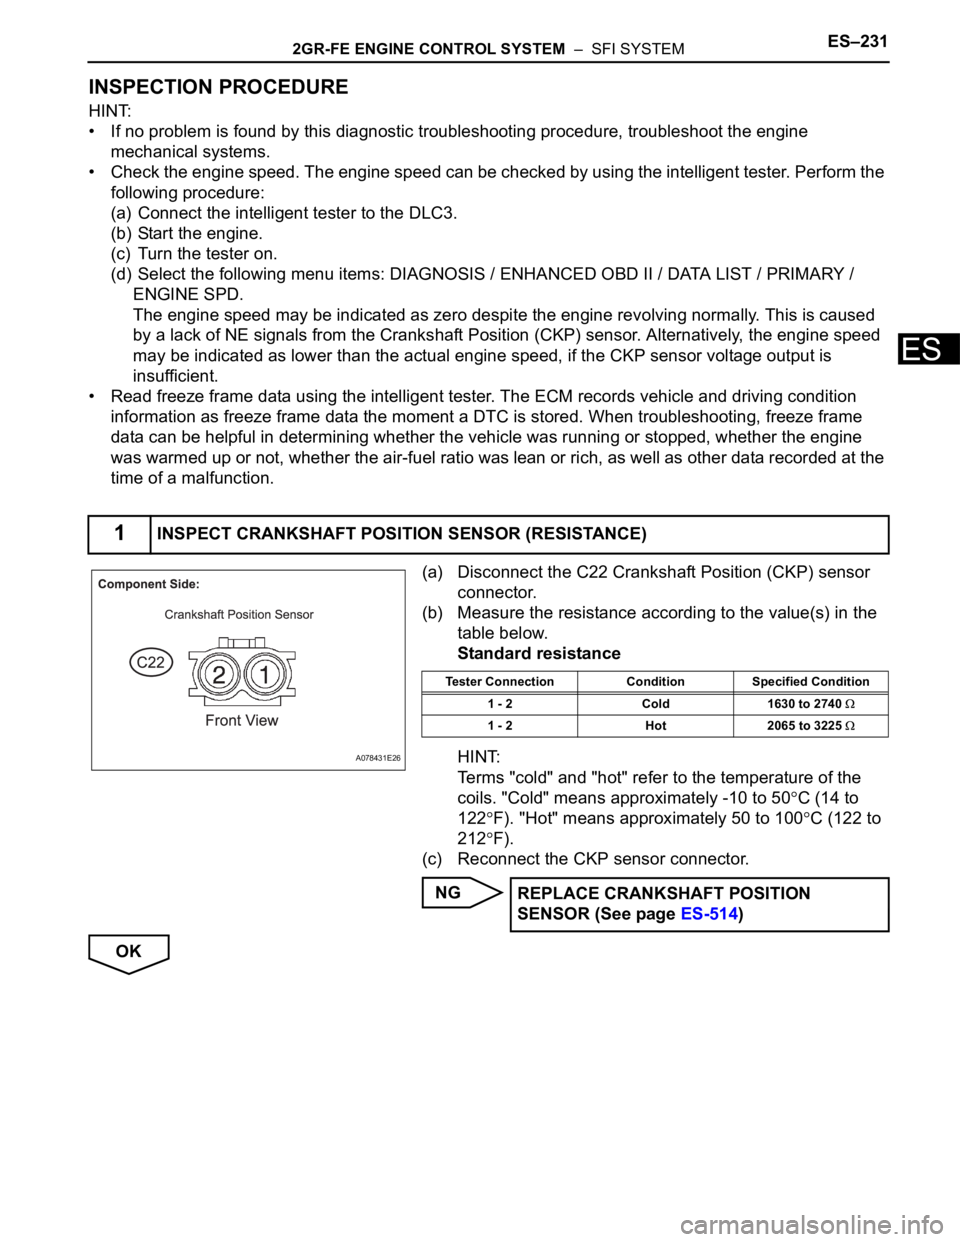
(a) Disconnect the C22 Crankshaft Position (CKP) sensor
connector.
(b) Measure the resistance according to the value(s) in the
table below.
Standard resistance
HINT:
Terms "cold" and "hot" refer to the temperature of the
coils. "Cold" means approximately -10 to 50
C (14 to
122
F). "Hot" means approximately 50 to 100C (122 to
212
F).
(c) Reconnect the CKP sensor connector.
NG
OK
1INSPECT CRANKSHAFT POSITION SENSOR (RESISTANCE)
A078431E26
Tester Connection Condition Specified Condition
1 - 2 Cold 1630 to 2740
1 - 2 Hot 2065 to 3225
REPLACE CRANKSHAFT POSITION
SENSOR (See page ES-514)
Page 538 of 3000
ES–2322GR-FE ENGINE CONTROL SYSTEM – SFI SYSTEM
ES
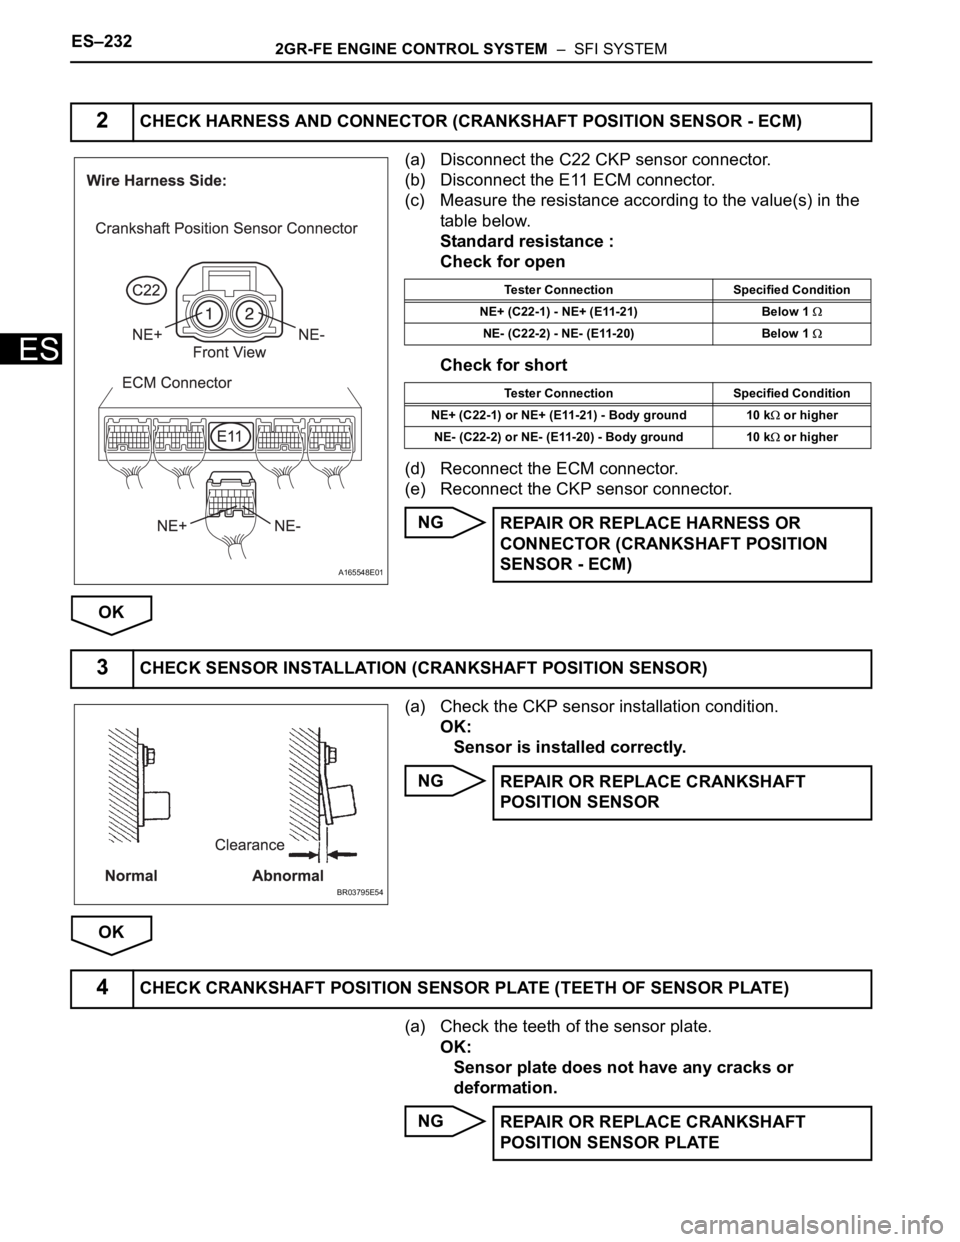
(a) Disconnect the C22 CKP sensor connector.
(b) Disconnect the E11 ECM connector.
(c) Measure the resistance according to the value(s) in the
table below.
Standard resistance :
Check for open
Check for short
(d) Reconnect the ECM connector.
(e) Reconnect the CKP sensor connector.
NG
OK
(a) Check the CKP sensor installation condition.
OK:
Sensor is installed correctly.
NG
OK
(a) Check the teeth of the sensor plate.
OK:
Sensor plate does not have any cracks or
deformation.
NG
2CHECK HARNESS AND CONNECTOR (CRANKSHAFT POSITION SENSOR - ECM)
A165548E01
Tester Connection Specified Condition
NE+ (C22-1) - NE+ (E11-21) Below 1
NE- (C22-2) - NE- (E11-20) Below 1
Tester Connection Specified Condition
NE+ (C22-1) or NE+ (E11-21) - Body ground 10 k
or higher
NE- (C22-2) or NE- (E11-20) - Body ground 10 k
or higher
REPAIR OR REPLACE HARNESS OR
CONNECTOR (CRANKSHAFT POSITION
SENSOR - ECM)
3CHECK SENSOR INSTALLATION (CRANKSHAFT POSITION SENSOR)
BR03795E54
REPAIR OR REPLACE CRANKSHAFT
POSITION SENSOR
4CHECK CRANKSHAFT POSITION SENSOR PLATE (TEETH OF SENSOR PLATE)
REPAIR OR REPLACE CRANKSHAFT
POSITION SENSOR PLATE
Page 541 of 3000
2GR-FE ENGINE CONTROL SYSTEM – SFI SYSTEMES–235
ES
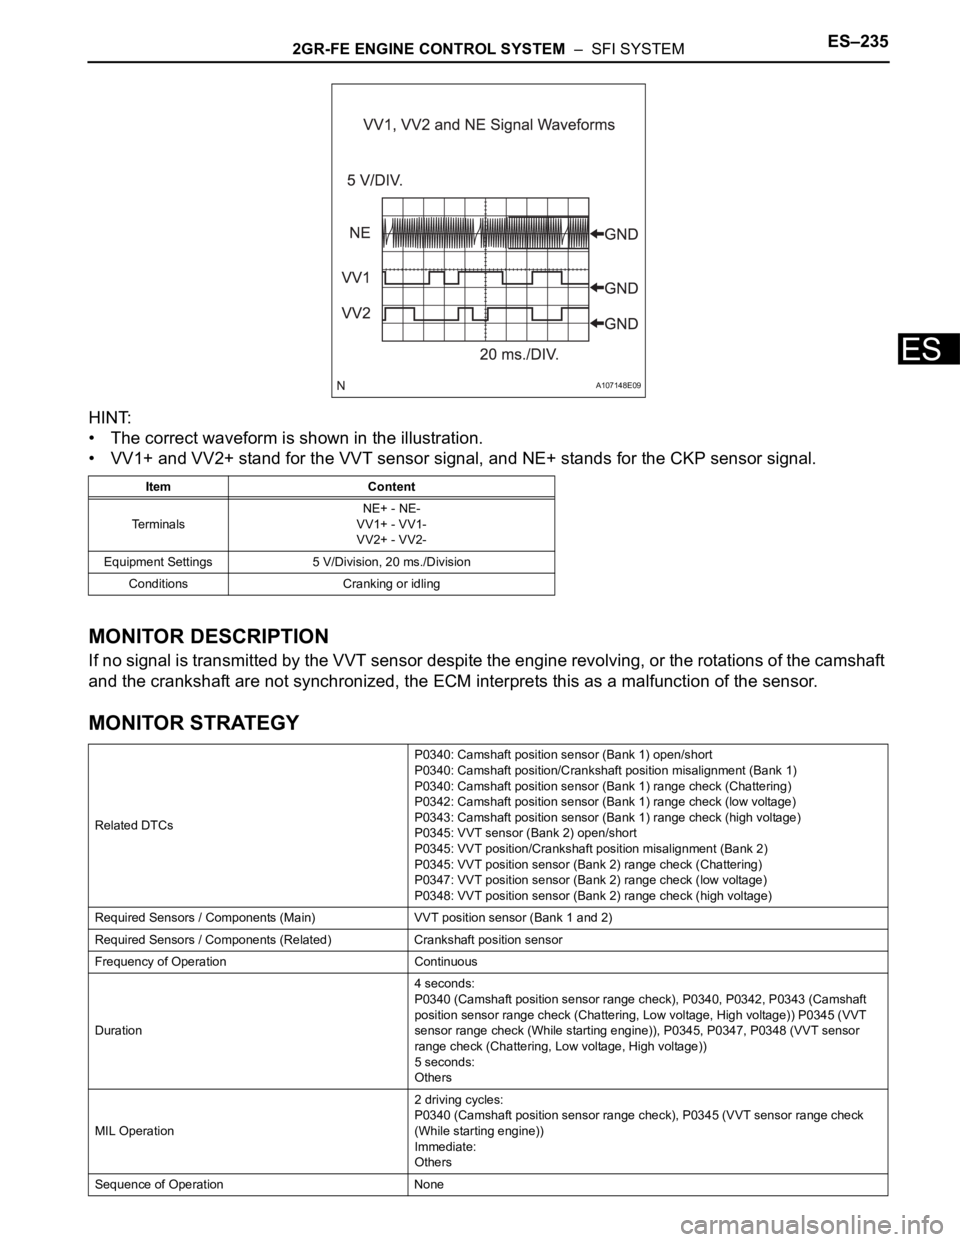
HINT:
• The correct waveform is shown in the illustration.
• VV1+ and VV2+ stand for the VVT sensor signal, and NE+ stands for the CKP sensor signal.
MONITOR DESCRIPTION
If no signal is transmitted by the VVT sensor despite the engine revolving, or the rotations of the camshaft
and the crankshaft are not synchronized, the ECM interprets this as a malfunction of the sensor.
MONITOR STRATEGY
Item Content
TerminalsNE+ - NE-
VV1+ - VV1-
VV2+ - VV2-
Equipment Settings 5 V/Division, 20 ms./Division
Conditions Cranking or idling
Related DTCsP0340: Camshaft position sensor (Bank 1) open/short
P0340: Camshaft position/Crankshaft position misalignment (Bank 1)
P0340: Camshaft position sensor (Bank 1) range check (Chattering)
P0342: Camshaft position sensor (Bank 1) range check (low voltage)
P0343: Camshaft position sensor (Bank 1) range check (high voltage)
P0345: VVT sensor (Bank 2) open/short
P0345: VVT position/Crankshaft position misalignment (Bank 2)
P0345: VVT position sensor (Bank 2) range check (Chattering)
P0347: VVT position sensor (Bank 2) range check (low voltage)
P0348: VVT position sensor (Bank 2) range check (high voltage)
Required Sensors / Components (Main) VVT position sensor (Bank 1 and 2)
Required Sensors / Components (Related) Crankshaft position sensor
Frequency of Operation Continuous
Duration4 seconds:
P0340 (Camshaft position sensor range check), P0340, P0342, P0343 (Camshaft
position sensor range check (Chattering, Low voltage, High voltage)) P0345 (VVT
sensor range check (While starting engine)), P0345, P0347, P0348 (VVT sensor
range check (Chattering, Low voltage, High voltage))
5 seconds:
Others
MIL Operation2 driving cycles:
P0340 (Camshaft position sensor range check), P0345 (VVT sensor range check
(While starting engine))
Immediate:
Others
Sequence of Operation None
A107148E09
Page 542 of 3000

ES–2362GR-FE ENGINE CONTROL SYSTEM – SFI SYSTEM
ES
TYPICAL ENABLING CONDITIONS
All:
Camshaft Position Sensor Range Check:
Camshaft Position/Crankshaft Position Misalignment:
Camshaft Position Sensor Range Check (Chattering, Low voltage, High voltage):
VVT sensor range check (While starting engine):
VVT sensor range check (After starting engine):
VVT sensor range check (Chattering, Low voltage, High voltage):
TYPICAL MALFUNCTION THRESHOLDS
Camshaft Position Sensor Range Check:
Camshaft Position/Crankshaft Position Misalignment:
Camshaft Position Sensor Range Check (Fluctuating):
Camshaft Position Sensor Range Check (Low voltage):
Camshaft Position Sensor Range Check (High voltage):
VVT sensor range check (While starting engine):
VVT sensor range check (After starting engine):
The monitor will run whenever these DTCs are not
presentNone
Starter ON and not starter ON again
Minimal battery voltage while starter ON Less than 11 V
Engine RPM 600 rpm or more
Starter OFF
Starter OFF
Ignition switch ON and time after ignition switch is OFF
to ON2 seconds or more
Starter ON
Battery voltage while starter ON once at least Less than 11 V
Engine RPM 600 rpm or more
Starter OFF
Battery voltage 8 V or more
Ignition switch ON
Starter OFF
Ignition switch ON and time after ignition switch is OFF
to ON2 seconds or more
Battery voltage 8 V or more
Camshaft position signal No signal
Camshaft position and crankshaft position phase Mis-aligned
Camshaft position voltage Less than 0.3 V, or more than 4.7 V
Camshaft position voltage Less than 0.3 V
Camshaft position voltage More than 4.7 V
VVT sensor signal No signal
VVT sensor signal No signal
Page 543 of 3000
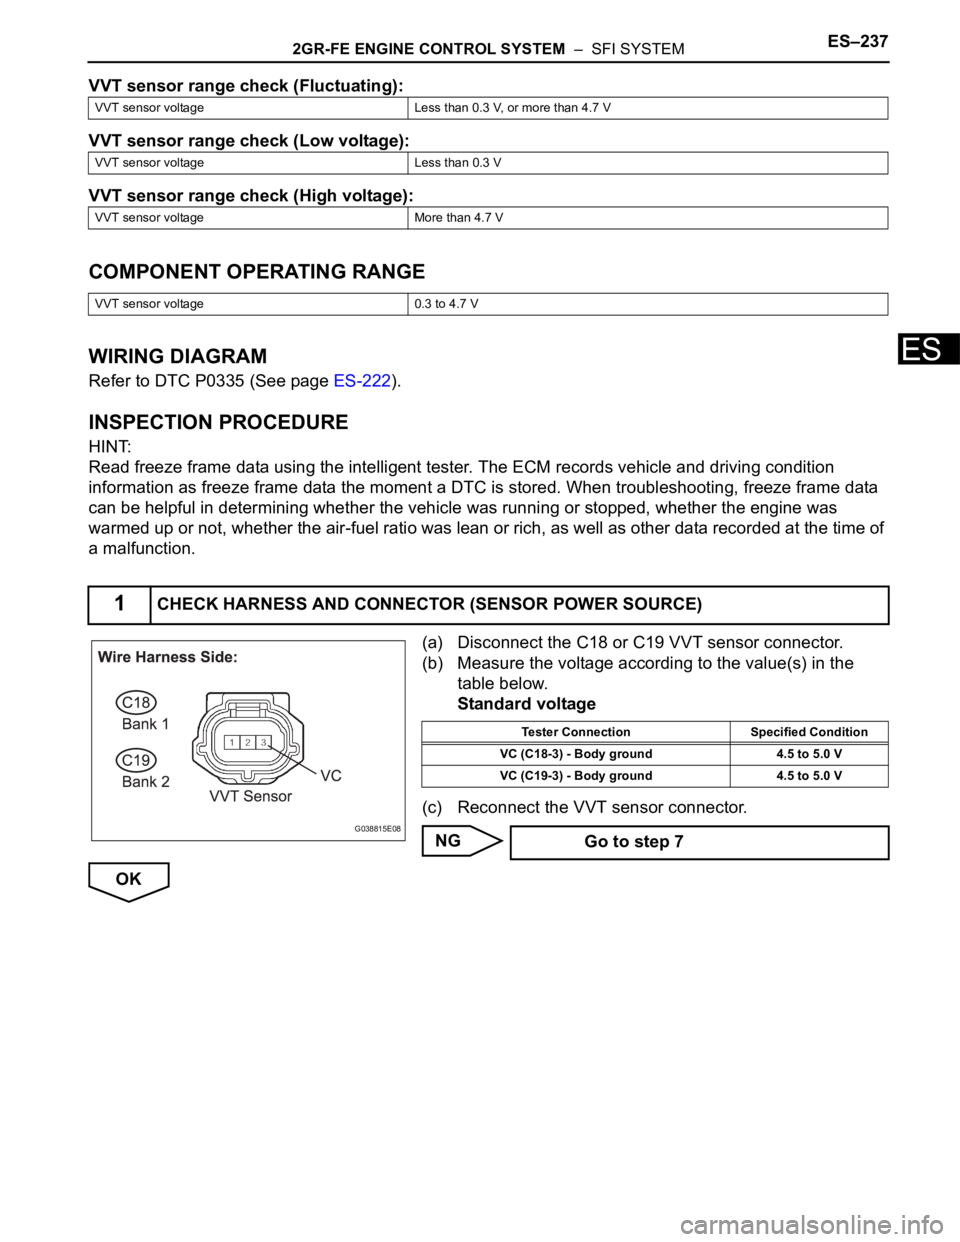
2GR-FE ENGINE CONTROL SYSTEM – SFI SYSTEMES–237
ES
VVT sensor range check (Fluctuating):
VVT sensor range check (Low voltage):
VVT sensor range check (High voltage):
COMPONENT OPERATING RANGE
WIRING DIAGRAM
Refer to DTC P0335 (See page ES-222).
INSPECTION PROCEDURE
HINT:
Read freeze frame data using the intelligent tester. The ECM records vehicle and driving condition
information as freeze frame data the moment a DTC is stored. When troubleshooting, freeze frame data
can be helpful in determining whether the vehicle was running or stopped, whether the engine was
warmed up or not, whether the air-fuel ratio was lean or rich, as well as other data recorded at the time of
a malfunction.
(a) Disconnect the C18 or C19 VVT sensor connector.
(b) Measure the voltage according to the value(s) in the
table below.
Standard voltage
(c) Reconnect the VVT sensor connector.
NG
OK
VVT sensor voltage Less than 0.3 V, or more than 4.7 V
VVT sensor voltage Less than 0.3 V
VVT sensor voltage More than 4.7 V
VVT sensor voltage 0.3 to 4.7 V
1CHECK HARNESS AND CONNECTOR (SENSOR POWER SOURCE)
G038815E08
Tester Connection Specified Condition
VC (C18-3) - Body ground 4.5 to 5.0 V
VC (C19-3) - Body ground 4.5 to 5.0 V
Go to step 7
Page 544 of 3000
ES–2382GR-FE ENGINE CONTROL SYSTEM – SFI SYSTEM
ES
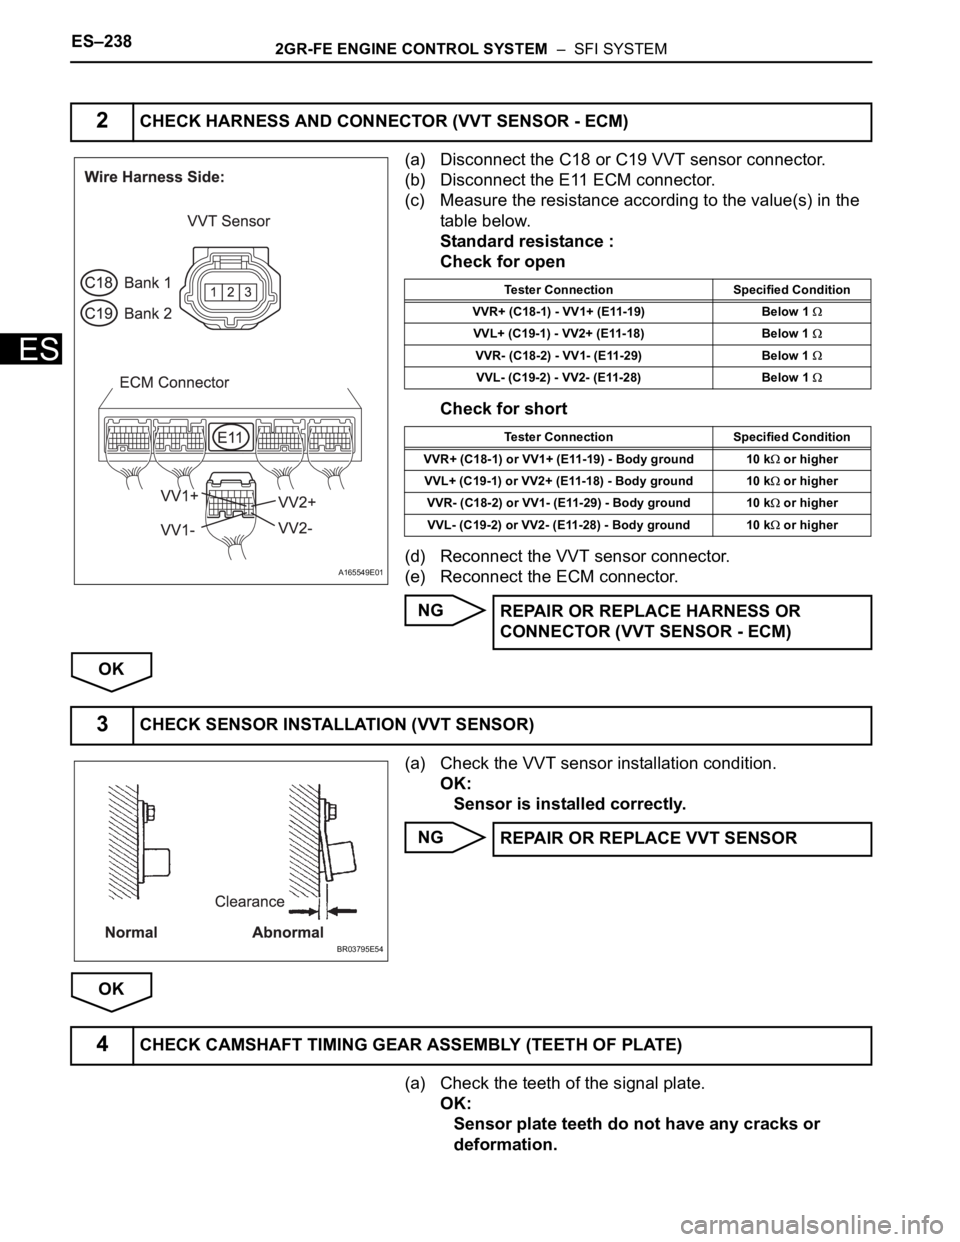
(a) Disconnect the C18 or C19 VVT sensor connector.
(b) Disconnect the E11 ECM connector.
(c) Measure the resistance according to the value(s) in the
table below.
Standard resistance :
Check for open
Check for short
(d) Reconnect the VVT sensor connector.
(e) Reconnect the ECM connector.
NG
OK
(a) Check the VVT sensor installation condition.
OK:
Sensor is installed correctly.
NG
OK
(a) Check the teeth of the signal plate.
OK:
Sensor plate teeth do not have any cracks or
deformation.
2CHECK HARNESS AND CONNECTOR (VVT SENSOR - ECM)
A165549E01
Tester Connection Specified Condition
VVR+ (C18-1) - VV1+ (E11-19) Below 1
VVL+ (C19-1) - VV2+ (E11-18) Below 1
VVR- (C18-2) - VV1- (E11-29) Below 1
VVL- (C19-2) - VV2- (E11-28) Below 1
Tester Connection Specified Condition
VVR+ (C18-1) or VV1+ (E11-19) - Body ground 10 k
or higher
VVL+ (C19-1) or VV2+ (E11-18) - Body ground 10 k
or higher
VVR- (C18-2) or VV1- (E11-29) - Body ground 10 k
or higher
VVL- (C19-2) or VV2- (E11-28) - Body ground 10 k
or higher
REPAIR OR REPLACE HARNESS OR
CONNECTOR (VVT SENSOR - ECM)
3CHECK SENSOR INSTALLATION (VVT SENSOR)
BR03795E54
REPAIR OR REPLACE VVT SENSOR
4CHECK CAMSHAFT TIMING GEAR ASSEMBLY (TEETH OF PLATE)