Page 30 of 3000
2GR-FE ENGINE MECHANICAL – ENGINE ASSEMBLYEM–31
EM
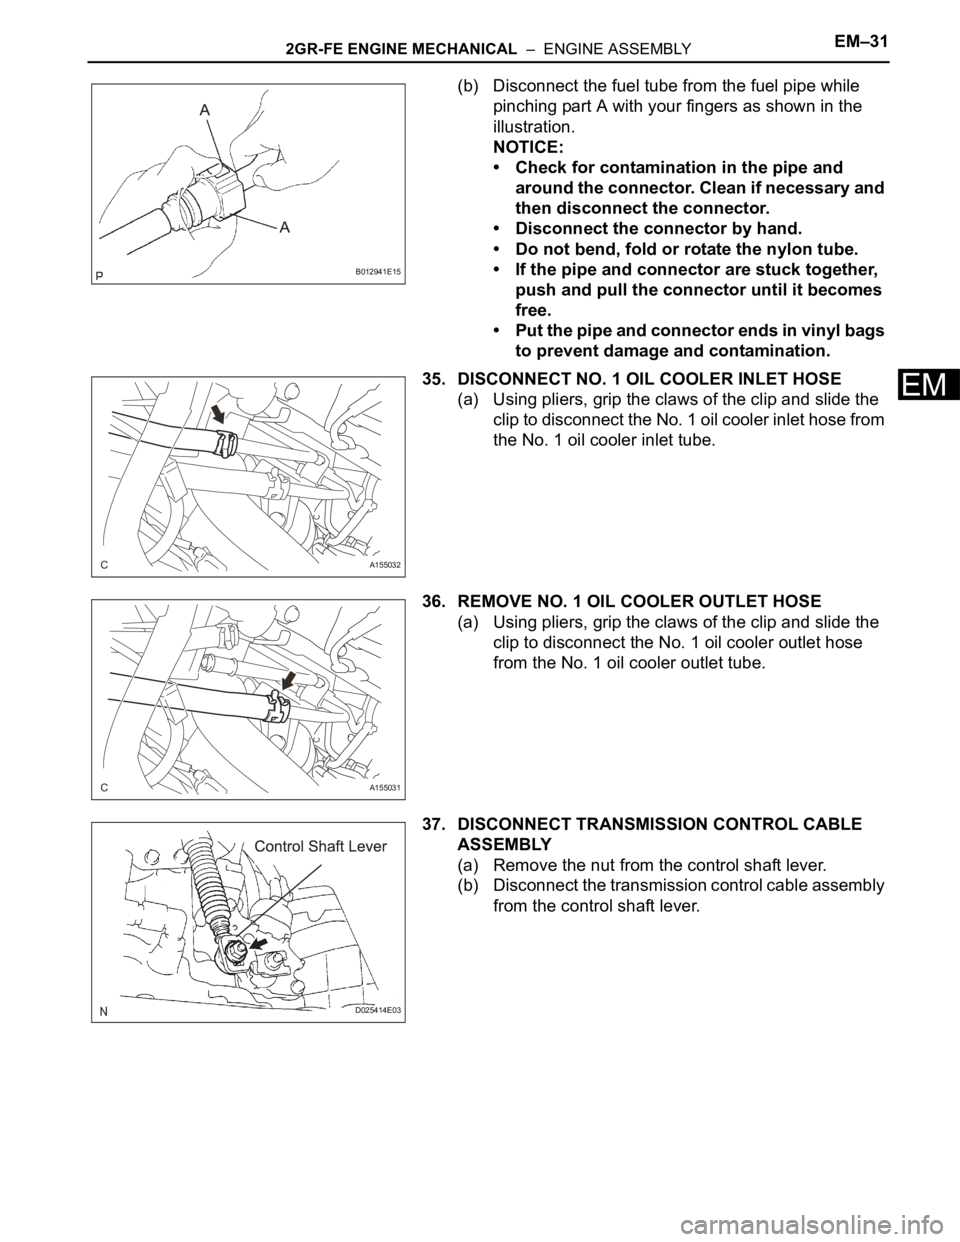
(b) Disconnect the fuel tube from the fuel pipe while
pinching part A with your fingers as shown in the
illustration.
NOTICE:
• Check for contamination in the pipe and
around the connector. Clean if necessary and
then disconnect the connector.
• Disconnect the connector by hand.
• Do not bend, fold or rotate the nylon tube.
• If the pipe and connector are stuck together,
push and pull the connector until it becomes
free.
• Put the pipe and connector ends in vinyl bags
to prevent damage and contamination.
35. DISCONNECT NO. 1 OIL COOLER INLET HOSE
(a) Using pliers, grip the claws of the clip and slide the
clip to disconnect the No. 1 oil cooler inlet hose from
the No. 1 oil cooler inlet tube.
36. REMOVE NO. 1 OIL COOLER OUTLET HOSE
(a) Using pliers, grip the claws of the clip and slide the
clip to disconnect the No. 1 oil cooler outlet hose
from the No. 1 oil cooler outlet tube.
37. DISCONNECT TRANSMISSION CONTROL CABLE
ASSEMBLY
(a) Remove the nut from the control shaft lever.
(b) Disconnect the transmission control cable assembly
from the control shaft lever.
B012941E15
A155032
A155031
D025414E03
Page 31 of 3000
EM–322GR-FE ENGINE MECHANICAL – ENGINE ASSEMBLY
EM
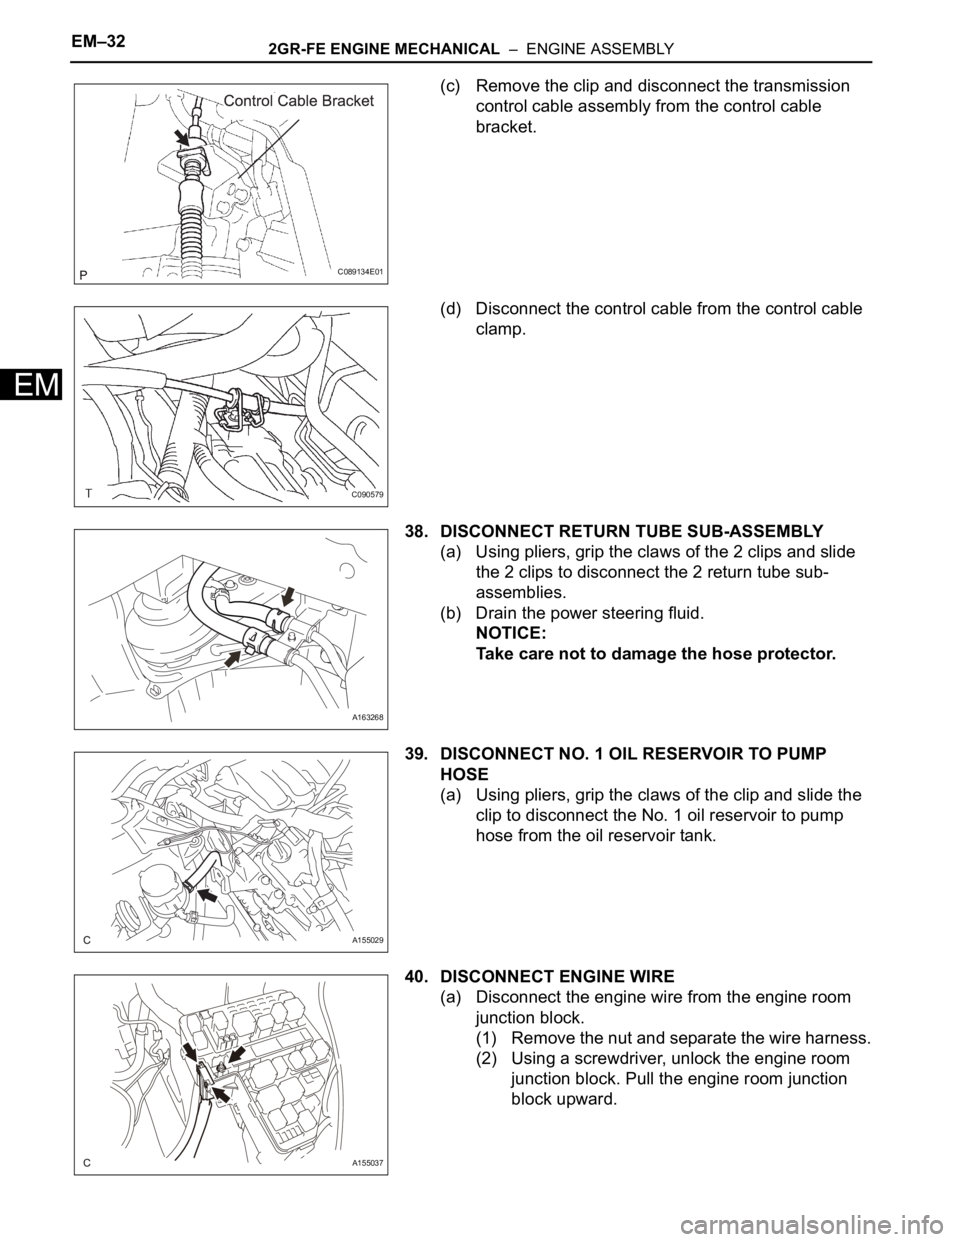
(c) Remove the clip and disconnect the transmission
control cable assembly from the control cable
bracket.
(d) Disconnect the control cable from the control cable
clamp.
38. DISCONNECT RETURN TUBE SUB-ASSEMBLY
(a) Using pliers, grip the claws of the 2 clips and slide
the 2 clips to disconnect the 2 return tube sub-
assemblies.
(b) Drain the power steering fluid.
NOTICE:
Take care not to damage the hose protector.
39. DISCONNECT NO. 1 OIL RESERVOIR TO PUMP
HOSE
(a) Using pliers, grip the claws of the clip and slide the
clip to disconnect the No. 1 oil reservoir to pump
hose from the oil reservoir tank.
40. DISCONNECT ENGINE WIRE
(a) Disconnect the engine wire from the engine room
junction block.
(1) Remove the nut and separate the wire harness.
(2) Using a screwdriver, unlock the engine room
junction block. Pull the engine room junction
block upward.
C089134E01
C090579
A163268
A155029
A155037
Page 32 of 3000
2GR-FE ENGINE MECHANICAL – ENGINE ASSEMBLYEM–33
EM
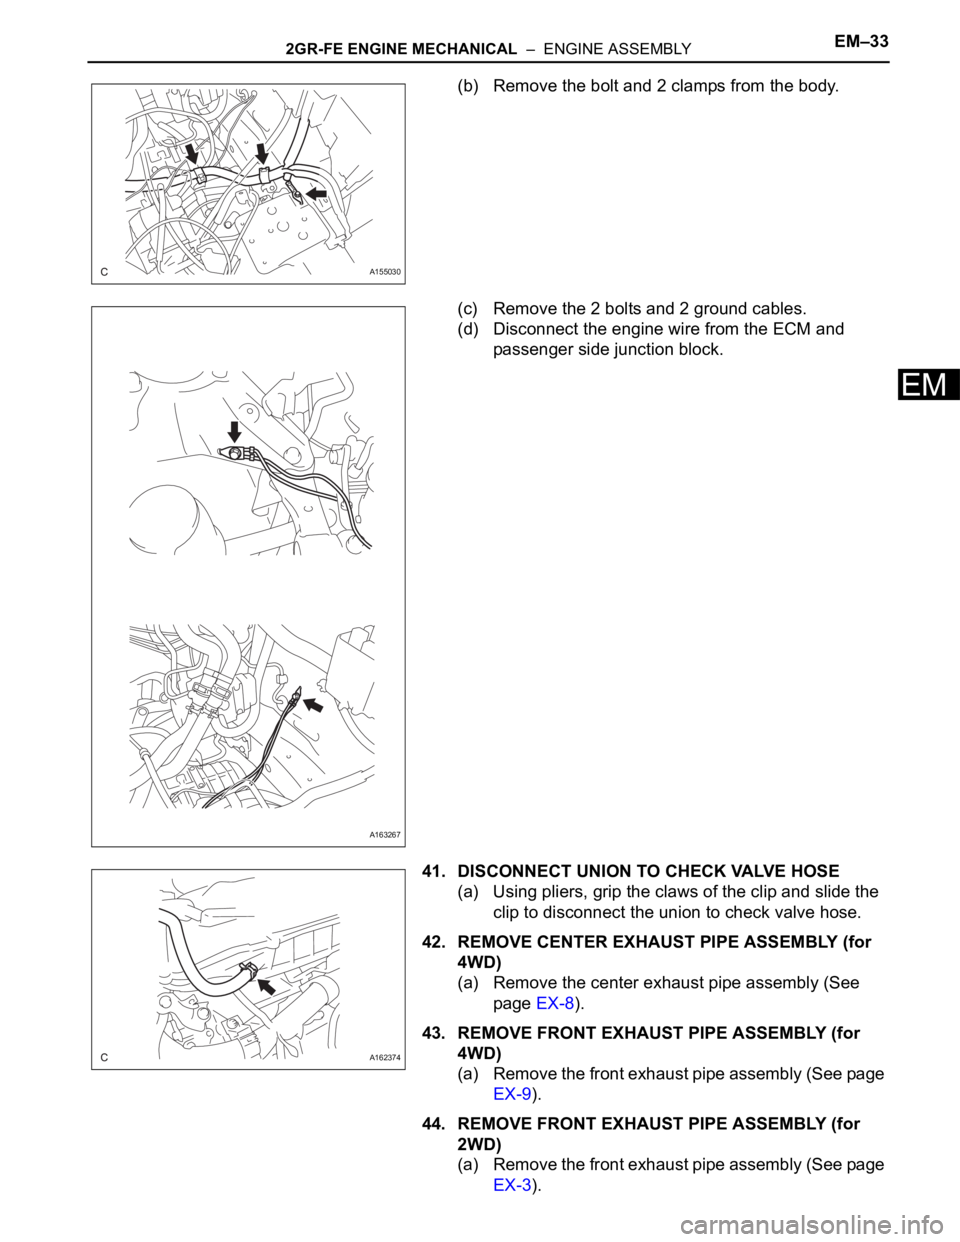
(b) Remove the bolt and 2 clamps from the body.
(c) Remove the 2 bolts and 2 ground cables.
(d) Disconnect the engine wire from the ECM and
passenger side junction block.
41. DISCONNECT UNION TO CHECK VALVE HOSE
(a) Using pliers, grip the claws of the clip and slide the
clip to disconnect the union to check valve hose.
42. REMOVE CENTER EXHAUST PIPE ASSEMBLY (for
4WD)
(a) Remove the center exhaust pipe assembly (See
page EX-8).
43. REMOVE FRONT EXHAUST PIPE ASSEMBLY (for
4WD)
(a) Remove the front exhaust pipe assembly (See page
EX-9).
44. REMOVE FRONT EXHAUST PIPE ASSEMBLY (for
2WD)
(a) Remove the front exhaust pipe assembly (See page
EX-3).
A155030
A163267
A162374
Page 33 of 3000
EM–342GR-FE ENGINE MECHANICAL – ENGINE ASSEMBLY
EM
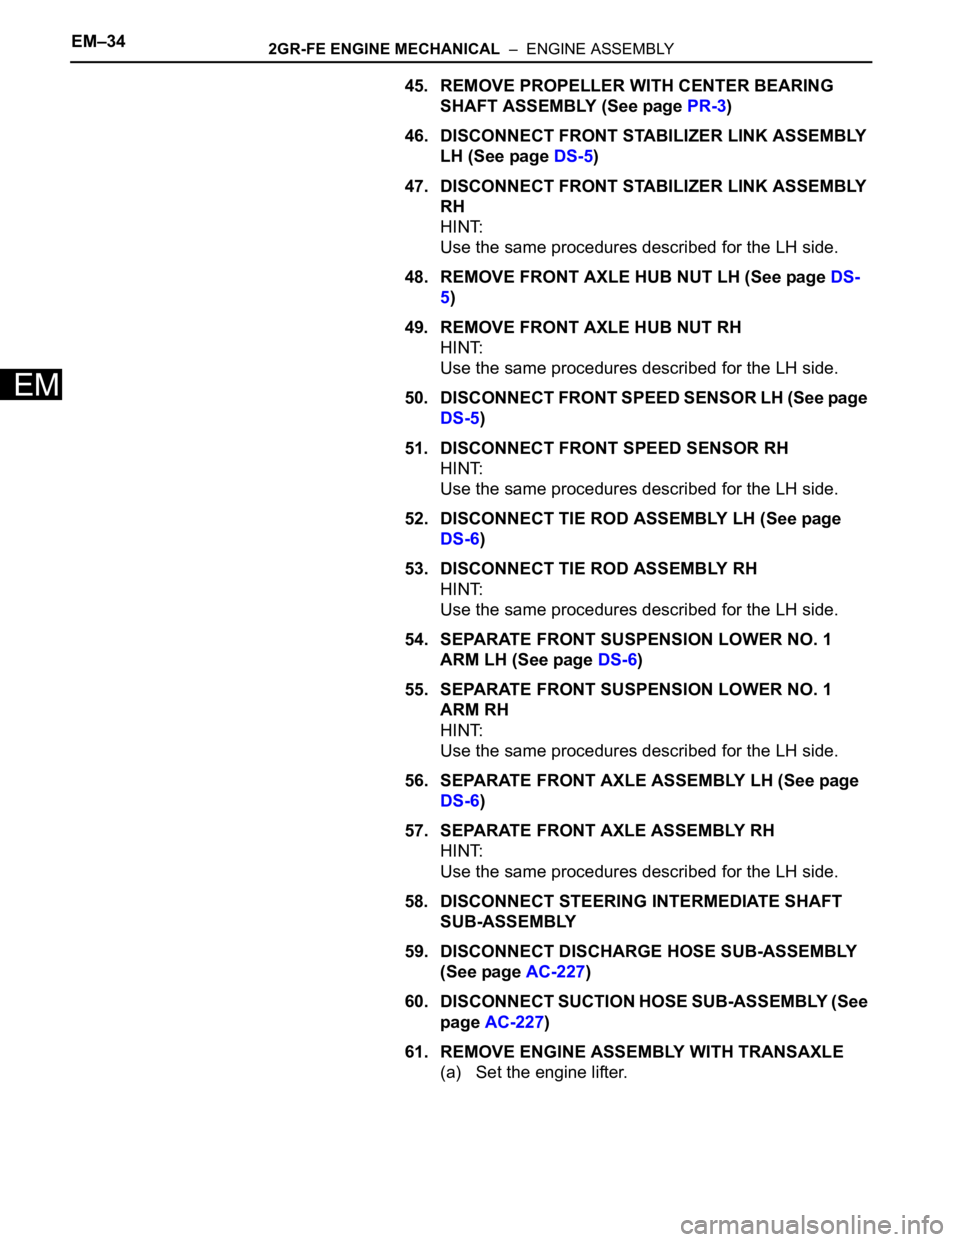
45. REMOVE PROPELLER WITH CENTER BEARING
SHAFT ASSEMBLY (See page PR-3)
46. DISCONNECT FRONT STABILIZER LINK ASSEMBLY
LH (See page DS-5)
47. DISCONNECT FRONT STABILIZER LINK ASSEMBLY
RH
HINT:
Use the same procedures described for the LH side.
48. REMOVE FRONT AXLE HUB NUT LH (See page DS-
5)
49. REMOVE FRONT AXLE HUB NUT RH
HINT:
Use the same procedures described for the LH side.
50. DISCONNECT FRONT SPEED SENSOR LH (See page
DS-5)
51. DISCONNECT FRONT SPEED SENSOR RH
HINT:
Use the same procedures described for the LH side.
52. DISCONNECT TIE ROD ASSEMBLY LH (See page
DS-6)
53. DISCONNECT TIE ROD ASSEMBLY RH
HINT:
Use the same procedures described for the LH side.
54. SEPARATE FRONT SUSPENSION LOWER NO. 1
ARM LH (See page DS-6)
55. SEPARATE FRONT SUSPENSION LOWER NO. 1
ARM RH
HINT:
Use the same procedures described for the LH side.
56. SEPARATE FRONT AXLE ASSEMBLY LH (See page
DS-6)
57. SEPARATE FRONT AXLE ASSEMBLY RH
HINT:
Use the same procedures described for the LH side.
58. DISCONNECT STEERING INTERMEDIATE SHAFT
SUB-ASSEMBLY
59. DISCONNECT DISCHARGE HOSE SUB-ASSEMBLY
(See page AC-227)
60. DISCONNECT SUCTION HOSE SUB-ASSEMBLY (See
page AC-227)
61. REMOVE ENGINE ASSEMBLY WITH TRANSAXLE
(a) Set the engine lifter.
Page 34 of 3000
2GR-FE ENGINE MECHANICAL – ENGINE ASSEMBLYEM–35
EM
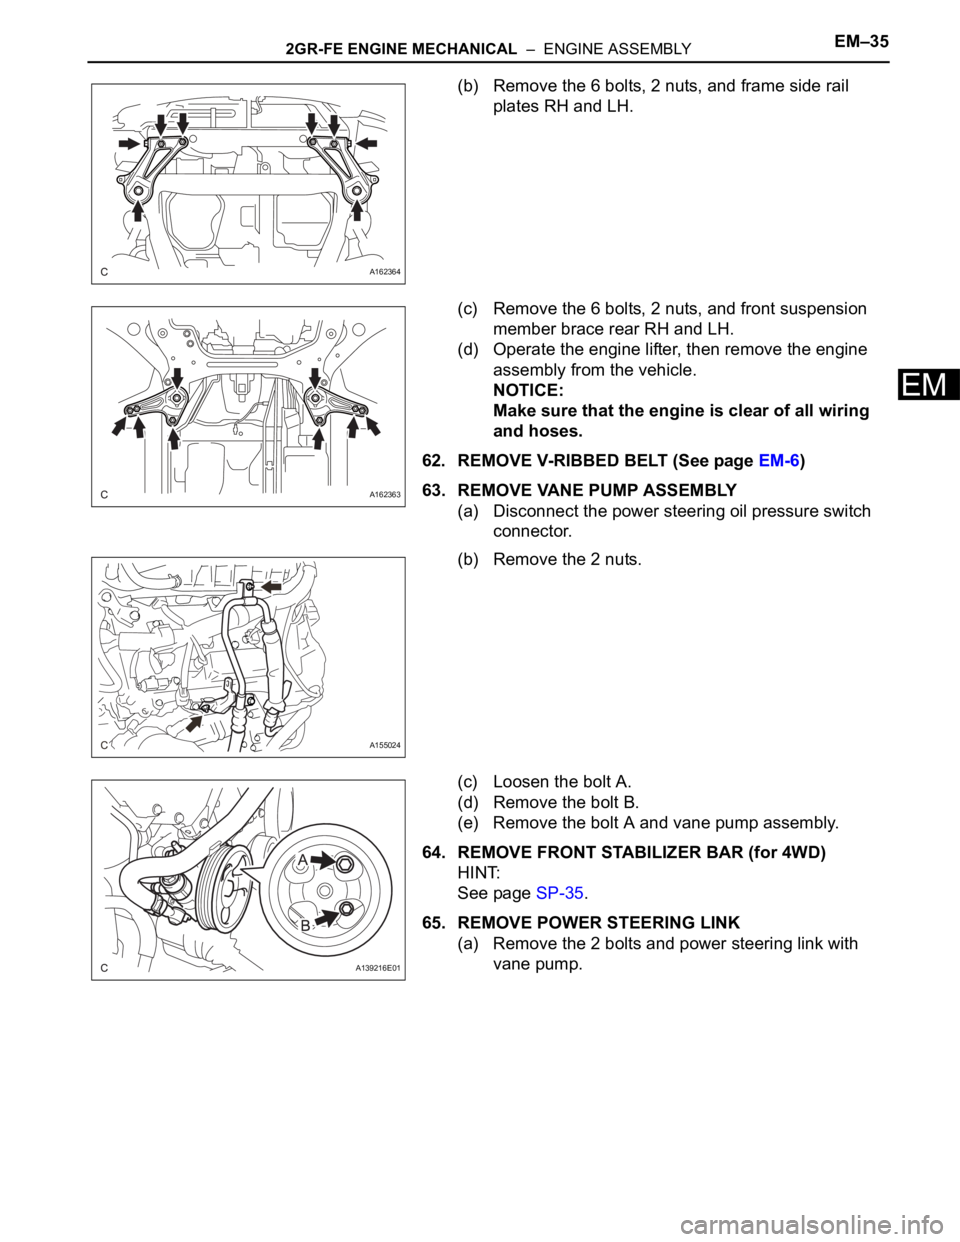
(b) Remove the 6 bolts, 2 nuts, and frame side rail
plates RH and LH.
(c) Remove the 6 bolts, 2 nuts, and front suspension
member brace rear RH and LH.
(d) Operate the engine lifter, then remove the engine
assembly from the vehicle.
NOTICE:
Make sure that the engine is clear of all wiring
and hoses.
62. REMOVE V-RIBBED BELT (See page EM-6)
63. REMOVE VANE PUMP ASSEMBLY
(a) Disconnect the power steering oil pressure switch
connector.
(b) Remove the 2 nuts.
(c) Loosen the bolt A.
(d) Remove the bolt B.
(e) Remove the bolt A and vane pump assembly.
64. REMOVE FRONT STABILIZER BAR (for 4WD)
HINT:
See page SP-35.
65. REMOVE POWER STEERING LINK
(a) Remove the 2 bolts and power steering link with
vane pump.
A162364
A162363
A155024
A139216E01
Page 35 of 3000
EM–362GR-FE ENGINE MECHANICAL – ENGINE ASSEMBLY
EM
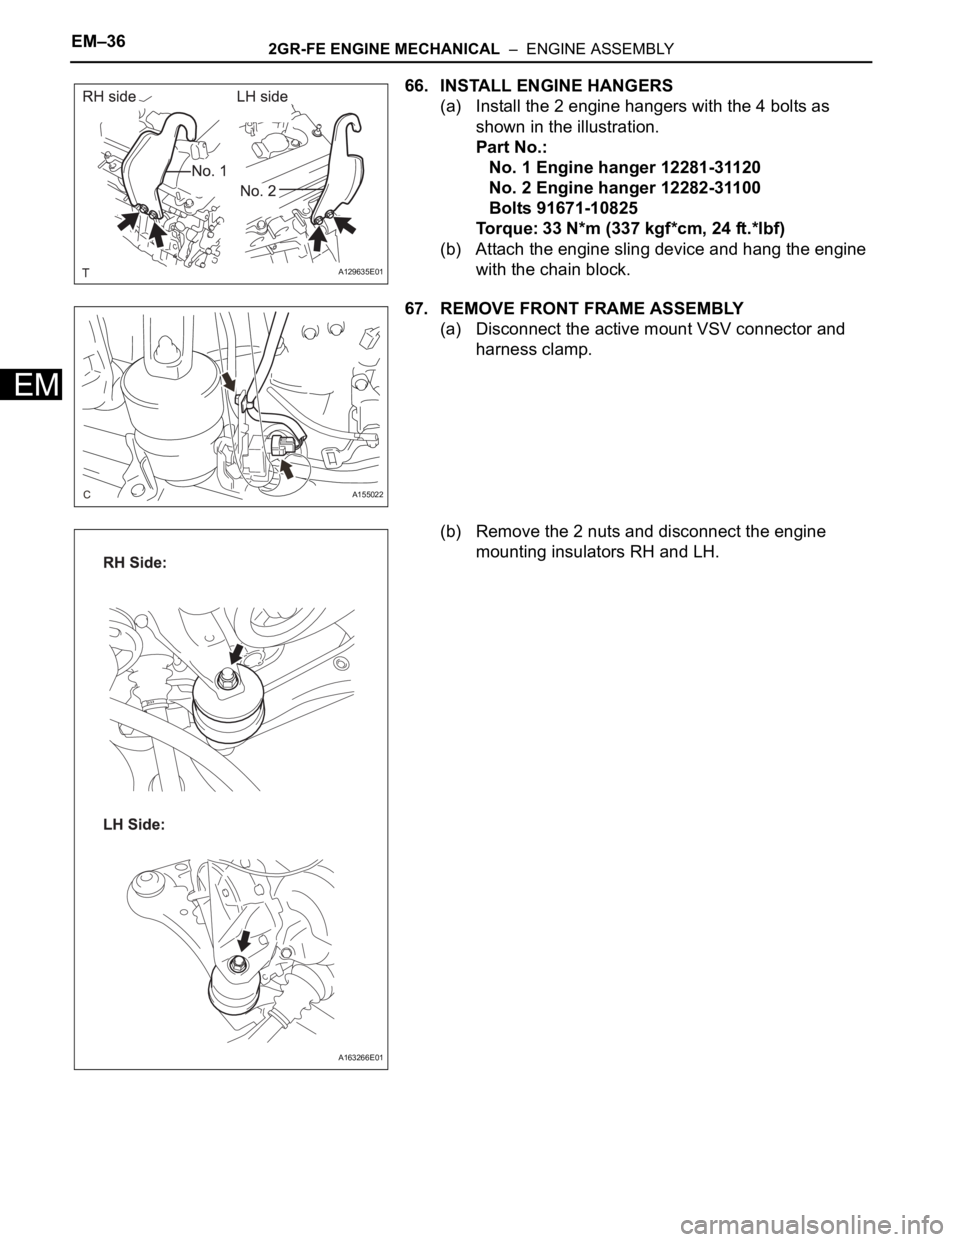
66. INSTALL ENGINE HANGERS
(a) Install the 2 engine hangers with the 4 bolts as
shown in the illustration.
Part No.:
No. 1 Engine hanger 12281-31120
No. 2 Engine hanger 12282-31100
Bolts 91671-10825
Torque: 33 N*m (337 kgf*cm, 24 ft.*lbf)
(b) Attach the engine sling device and hang the engine
with the chain block.
67. REMOVE FRONT FRAME ASSEMBLY
(a) Disconnect the active mount VSV connector and
harness clamp.
(b) Remove the 2 nuts and disconnect the engine
mounting insulators RH and LH.
A129635E01
A155022
A163266E01
Page 36 of 3000
2GR-FE ENGINE MECHANICAL – ENGINE ASSEMBLYEM–37
EM
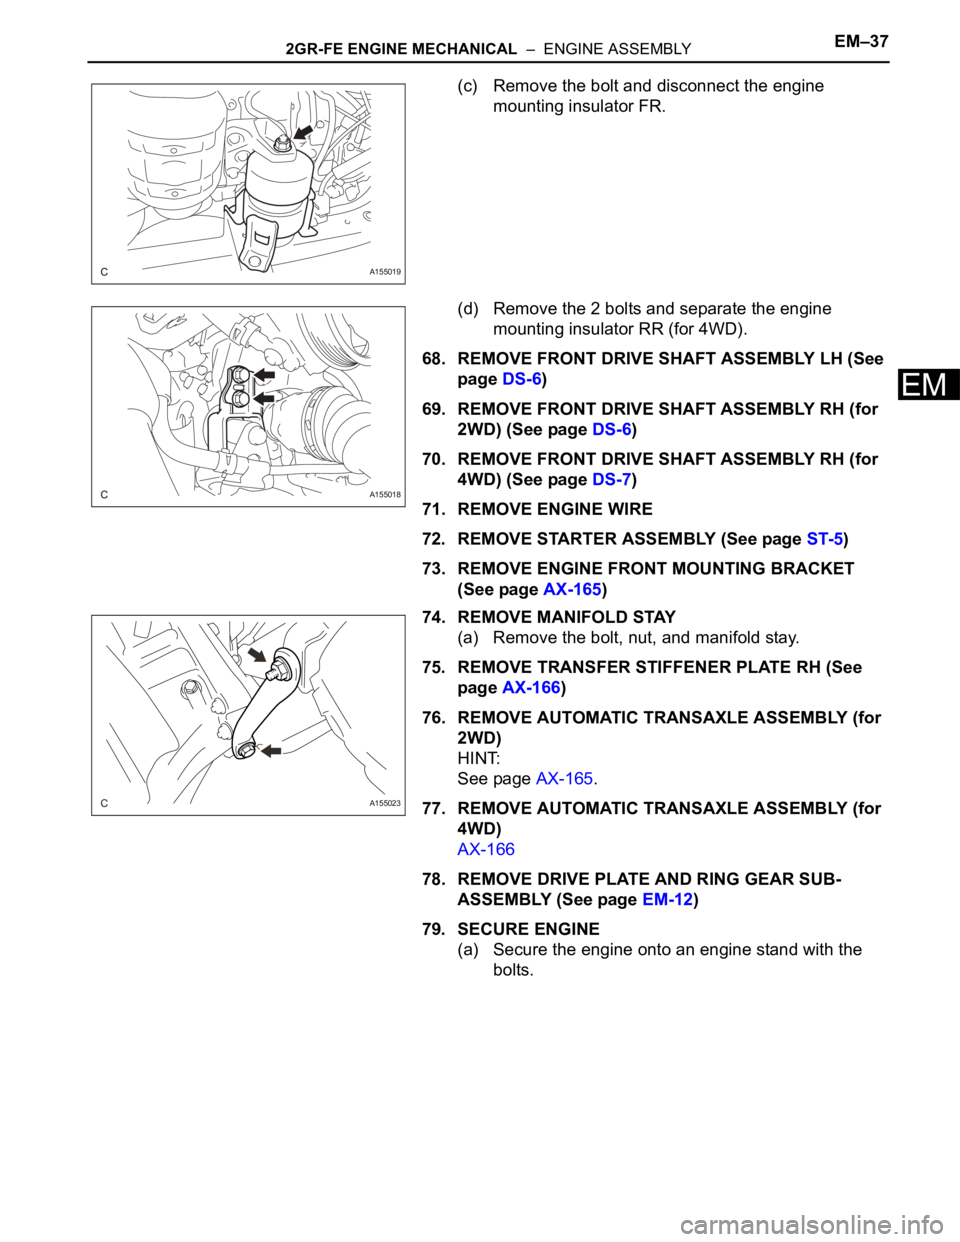
(c) Remove the bolt and disconnect the engine
mounting insulator FR.
(d) Remove the 2 bolts and separate the engine
mounting insulator RR (for 4WD).
68. REMOVE FRONT DRIVE SHAFT ASSEMBLY LH (See
page DS-6)
69. REMOVE FRONT DRIVE SHAFT ASSEMBLY RH (for
2WD) (See page DS-6)
70. REMOVE FRONT DRIVE SHAFT ASSEMBLY RH (for
4WD) (See page DS-7)
71. REMOVE ENGINE WIRE
72. REMOVE STARTER ASSEMBLY (See page ST-5)
73. REMOVE ENGINE FRONT MOUNTING BRACKET
(See page AX-165)
74. REMOVE MANIFOLD STAY
(a) Remove the bolt, nut, and manifold stay.
75. REMOVE TRANSFER STIFFENER PLATE RH (See
page AX-166)
76. REMOVE AUTOMATIC TRANSAXLE ASSEMBLY (for
2WD)
HINT:
See page AX-165.
77. REMOVE AUTOMATIC TRANSAXLE ASSEMBLY (for
4WD)
AX-166
78. REMOVE DRIVE PLATE AND RING GEAR SUB-
ASSEMBLY (See page EM-12)
79. SECURE ENGINE
(a) Secure the engine onto an engine stand with the
bolts.
A155019
A155018
A155023
Page 37 of 3000
EM–382GR-FE ENGINE MECHANICAL – ENGINE ASSEMBLY
EM
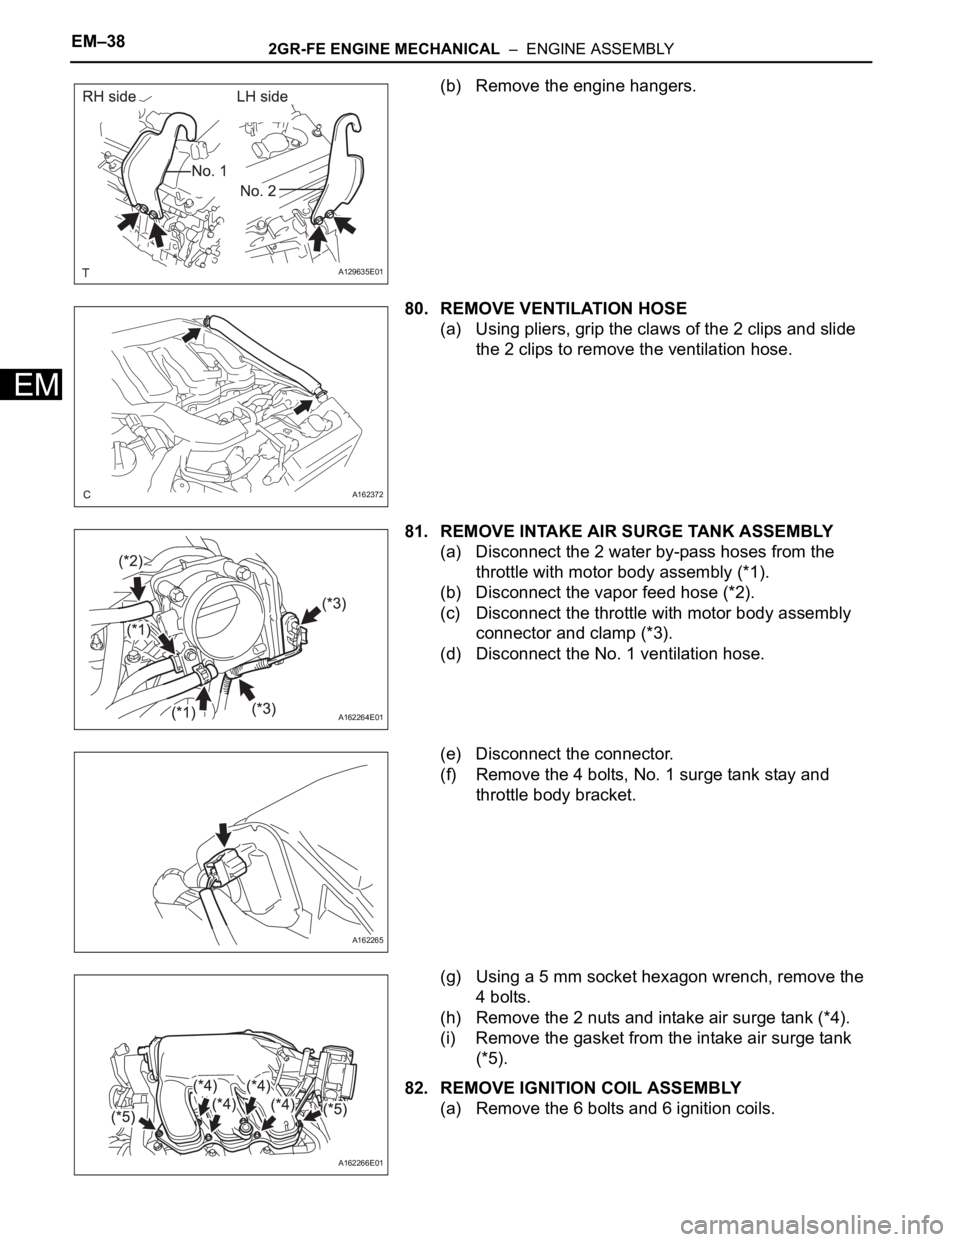
(b) Remove the engine hangers.
80. REMOVE VENTILATION HOSE
(a) Using pliers, grip the claws of the 2 clips and slide
the 2 clips to remove the ventilation hose.
81. REMOVE INTAKE AIR SURGE TANK ASSEMBLY
(a) Disconnect the 2 water by-pass hoses from the
throttle with motor body assembly (*1).
(b) Disconnect the vapor feed hose (*2).
(c) Disconnect the throttle with motor body assembly
connector and clamp (*3).
(d) Disconnect the No. 1 ventilation hose.
(e) Disconnect the connector.
(f) Remove the 4 bolts, No. 1 surge tank stay and
throttle body bracket.
(g) Using a 5 mm socket hexagon wrench, remove the
4 bolts.
(h) Remove the 2 nuts and intake air surge tank (*4).
(i) Remove the gasket from the intake air surge tank
(*5).
82. REMOVE IGNITION COIL ASSEMBLY
(a) Remove the 6 bolts and 6 ignition coils.
A129635E01
A162372
A162264E01
A162265
A162266E01